Bohemia Interactive is known for its post-apocalyptic world survival gaming experience like DayZ which is a multiplayer-only survival video game, inspired by the ARMA lineup. As DayZ is a standalone title based on the same ARMA 2 mod, players will have to fight and survive the zombie-affected people. Though the developers have done really well in terms of optimizations and overall gameplay, it seems that recently several players are going through the DayZ High Ping and High Latency Issue on the PC.
Multiple reports are claiming that whenever players escape after getting attacked by zombies or poisonous gas or picking up supplies before other players, the high latency or ping delay issue appears in DayZ. It’s frustrating a lot because it eventually troubles players to smoothly run the game and causes death by zombies in crucial situations. It includes packet data loss, high ping response, and high latency which basically indicates there is an issue with the game server or your internet connection.
Also Read
Page Contents
- Fix: DayZ High Ping and High Latency Issue
- 1. Run Steam as an Administrator
- 2. Update DayZ
- 3. Verify the Integrity of the Game Files
- 4. Power Cycle the Wi-Fi Router
- 5. Check the Internet Connection
- 6. Update the Network Driver
- 7. Check for Windows Updates
- 8. Clear Server Filters of DayZ
- 9. Optimize Network Settings
- 10. Flush the DNS Cache
- 11. Change DNS Servers
- 12. Scan for Adware or Malware
- 13. Disable Windows Firewall
- 14. Turn Off Antivirus Protection
- 15. Try Changing Windows Update Delivery Settings
- 16. Adjust the DayZ Graphics Settings
- 17. Close Unnecessary Background Processes
- 18. Perform a Clean Boot
- 19. Disable Overlay Apps
- 20. Disable CPU or GPU Overclocking
- 21. Check the DayZ Server Status
Fix: DayZ High Ping and High Latency Issue
Well, there are a couple of potential reasons applicable behind such an issue that includes poor internet connectivity, server issues, an outdated game patch version, corrupted or missing game files, inadequate storage space, low system resources like CPU or RAM, CPU or GPU overclocking, third-party overlay app conflicts, background running tasks, unnecessary startup programs, networking driver issues, outdated Windows build, firewall blocking issues, and so on.
It’s better to follow all the troubleshooting methods below until the problem has been fixed. So, without further ado, let’s get into it.
1. Run Steam as an Administrator
Make sure to run the Steam launcher as an administrator to avoid user account control regarding privilege issues. To do this:
- Right-click on the Steam client on your PC.
- Now, select Properties > Click on the Compatibility tab.

- Next, click on the Run this program as an administrator checkbox to select it.
- Click on Apply and select OK to save changes.
2. Update DayZ
It’s also recommended to update the DayZ game on your PC by following the steps below to ensure there is no conflict with the outdated game patch version. Sometimes an outdated game version basically includes bugs and optimization issues that reflect on the game launching or server connectivity. To do so:
- Open the Steam client > Go to Library.
- Right-click on DayZ from the list > Click on Manage.
- Select Properties > Click on the Updates tab.
- Click on Automatic Updates.
- After enabling, whenever there is a new update available, the Steam client will notify you.
- Click on the Update button and wait for it to install.
3. Verify the Integrity of the Game Files
You should also verify and repair the game files on your Windows computer to ensure there is no corrupted or missing game file troubling you to get into the game server. To do that:
- Launch Steam > Click on Library.
- Right-click on DayZ from the list of installed games.
- Now, click on Properties > Go to Local Files.

- Click on Verify Integrity of Game Files.
- You’ll have to wait for the process until it gets completed.
- Once done, just restart your computer to apply changes.
4. Power Cycle the Wi-Fi Router
It’s also recommended to try performing a power cycle method on your Wi-Fi router because temporary glitches can also cause issues with the network connectivity whatsoever. To do so:
- Power Off the Wi-Fi Router > Unplug the power adapter from the power source.
- Wait for around 30 seconds then plug back the power cable in.
- Turn On the Wi-Fi router to check for the issue.
5. Check the Internet Connection
You should always cross-check your internet connection because a poor or unstable network can eventually trigger plenty of issues while connecting to the game servers online. Make sure to disconnect other devices from the same network which are unnecessary to avoid slow internet speed. If in case, your internet network isn’t stable or fast enough then make sure to contact your service provider for further technical assistance.
6. Update the Network Driver
You should try updating the network adapter driver on the PC to ensure there is no conflict happening with the networking connectivity. Sometimes your internet connection might have a good signal or speed but the network adapter may trouble you due to driver-related issues. To fix it:
- Right-click on the Start Menu to open the Quick Link Menu.
- Click on Device Manager from the list.
- Now, double-click on the Network adapters category to expand the list.
- Then right-click on the specific network device.
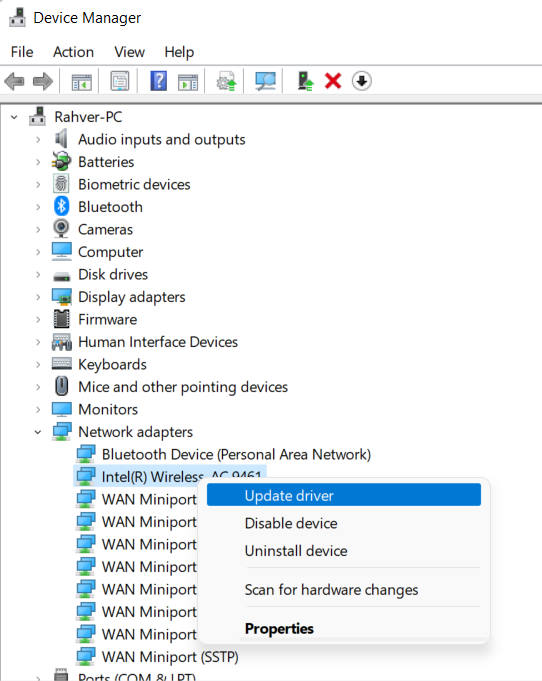
- Select Update driver > Choose Search automatically for drivers.
- If there is an update available, it’ll automatically download and install the latest version.
- Once done, make sure to reboot your computer to change the effects.
7. Check for Windows Updates
In most cases, it’s also possible that your specific device software version becomes outdated for a while. Obviously, an outdated system version or build can cause multiple issues with the program running in some cases. To do this:
- Press the Win+I keys to open the Windows Settings menu.
- Next, click on Update & Security.
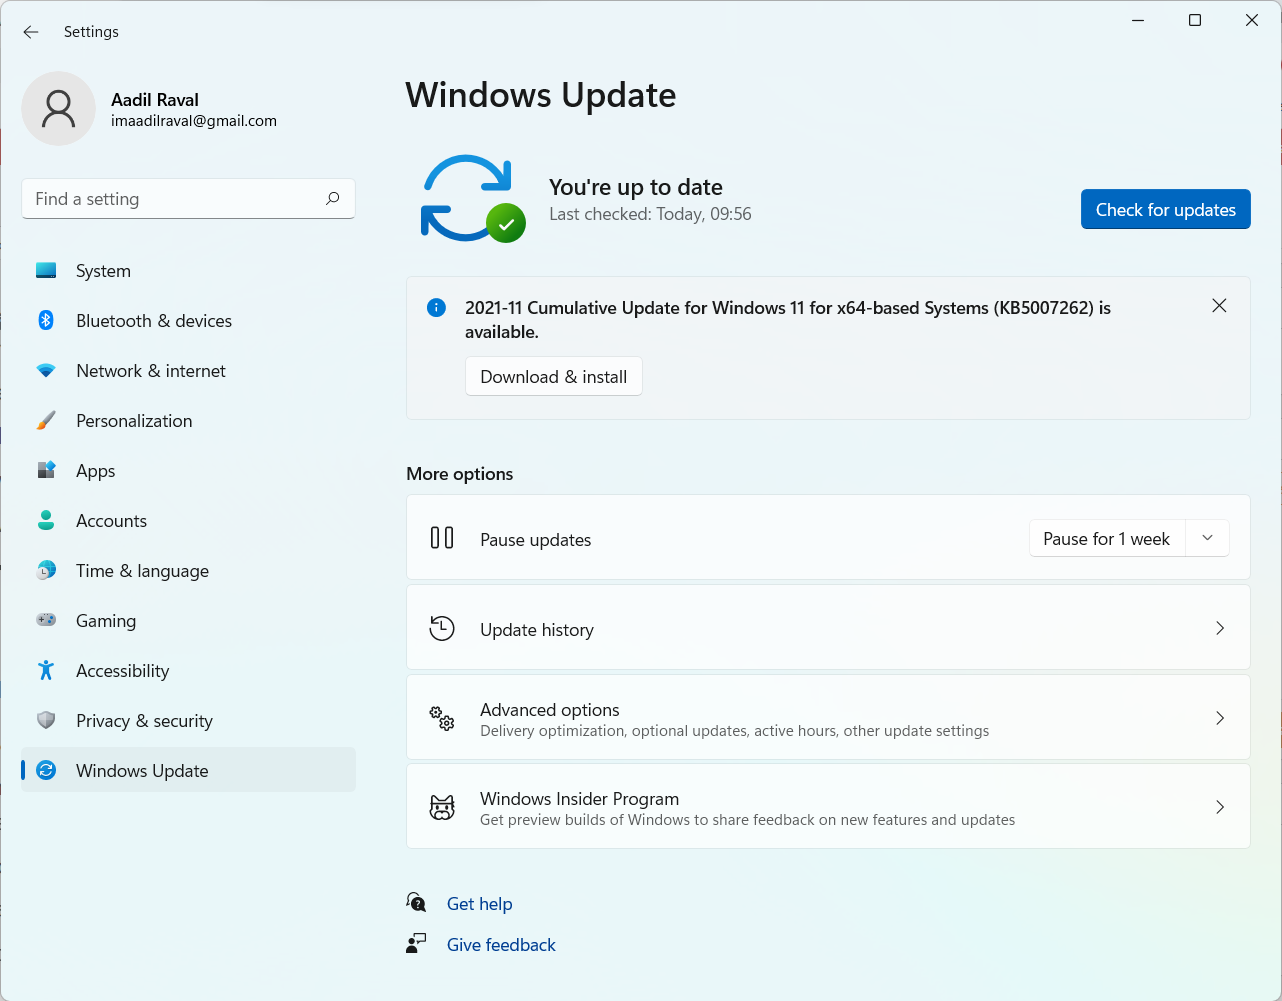
- Select Check for updates under the Windows Update section.
- If there is a feature update available, select Download and Install.
- It may take a while to complete the update.
- Once done, restart your computer to install the update.
8. Clear Server Filters of DayZ
It seems that some of the game servers are not showing at your end because the filter is hiding them. In that case, you should clear the game server filters from the DayZ game. To do that:
- Launch the DayZ game > Head over to the Server selection list.
- Now, click on Clear Filters > Click on Apply Filters to save changes.
- Once done, make sure to reboot the game to check for the issue.
- Finally, your servers should show up, and this might fix the problem.
9. Optimize Network Settings
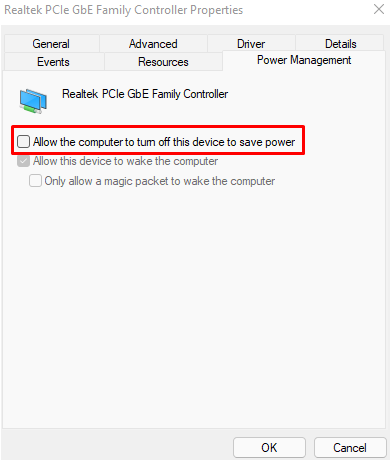
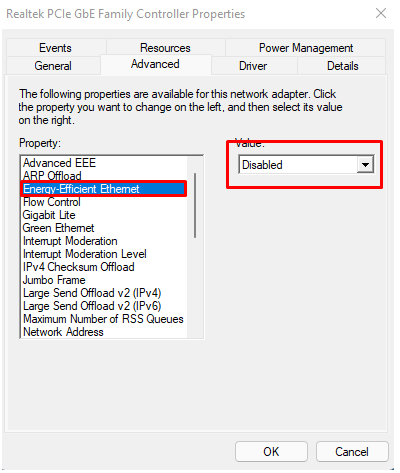
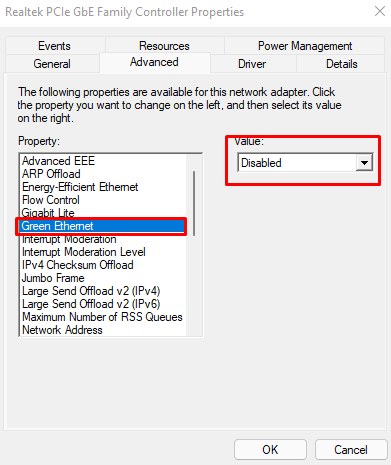
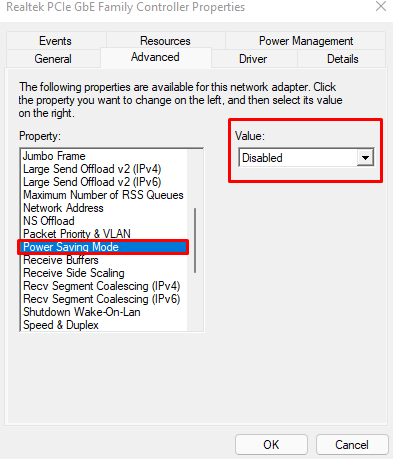
The chances are high that somehow the network settings conflict on the system is troubling a lot with the stable ping reply to the game servers. It’s better to optimize the network settings manually at your end to check if the problem has been fixed or not. It includes turning off multiple options like energy-efficient ethernet, green ethernet, power-saving mode, etc.
- Open the Start Menu and search for Device Manager.
- Open it and right-click on the Network adapter.
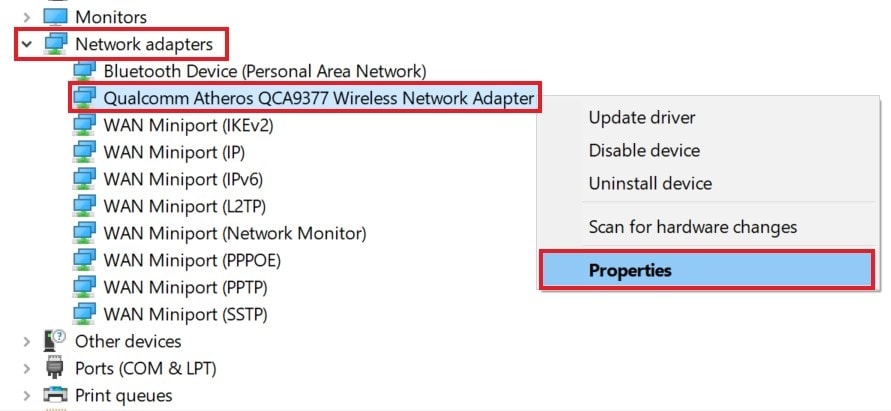
- Choose Properties > Navigate to the Power Management tab.
- Then uncheck the option: “Allow the computer to turn off this device to save power“.
- Head over to the Advanced tab, and disable the following power-saving feature such as:
- Energy-Efficient Ethernet
-
- Green Ethernet
-
- Power saving mode
- Once done, make sure to reboot the system to check for the issue again.
10. Flush the DNS Cache
It’s also possible that your Windows system has gathered plenty of DNS cache data related to the internet configuration. You can follow the steps below to easily connect with the game servers after removing the DNS resolver cache data from the system.
- Open the Start Menu.
- Type Command Prompt and search for it.
- Now, right-click on Command Prompt > Select Run as administrator.
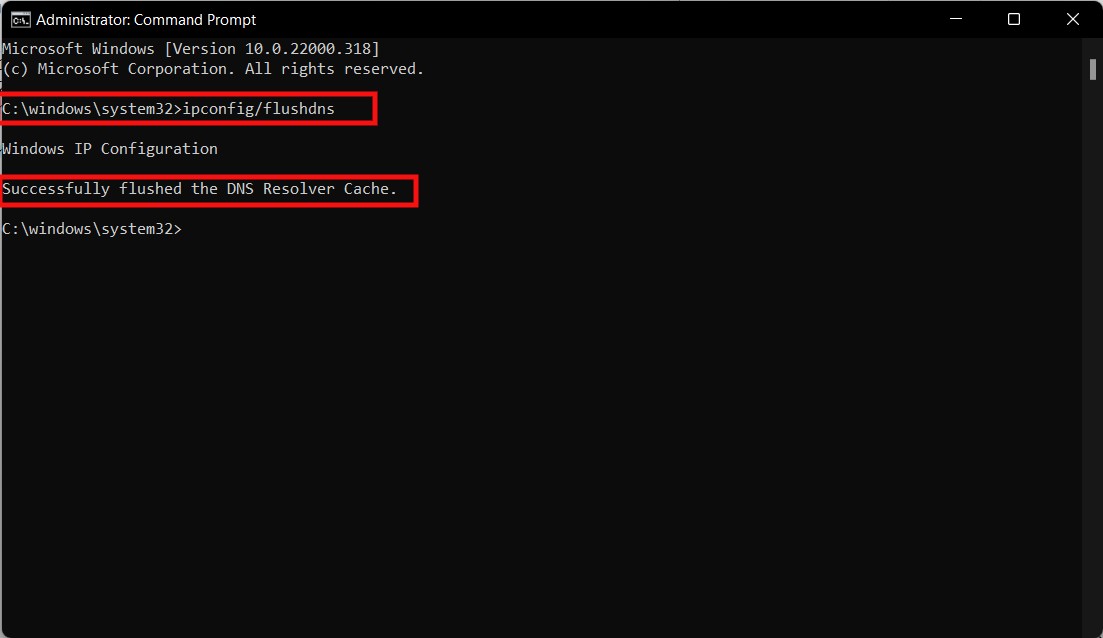
- Click on Yes to run with the admin access > Once the command prompt window opens, type the following command and hit Enter:
ipconfig /flushdns
- A successful message will appear that says, ‘Successfully flushed the DNS Resolver Cache.’
- Restart the computer and check for the issue again.
11. Change DNS Servers
Make sure to change the DNS address properly on the PC manually to ensure there are no issues with the DNS server connectivity or ping delay. If in case, your specific ISP has some issues with the DNS address then make sure to use the Google Public DNS address by following the steps below to fix the game server connectivity.
- Press the Win+R keys to open the Run dialogue box.
- Now, search and open Control Panel.
- Click on Network and Internet > Select Network and Sharing Center.
- Go to your Connections to select Ethernet, Wi-Fi, or others depending on what you’re using.
- Next, click on Properties > Double-click on Internet Protocol Version 4 (TCP /IPv4) to open a new window.
- Click on Use the following DNS server addresses and input 8.8.8.8 as a Preferred DNS server.
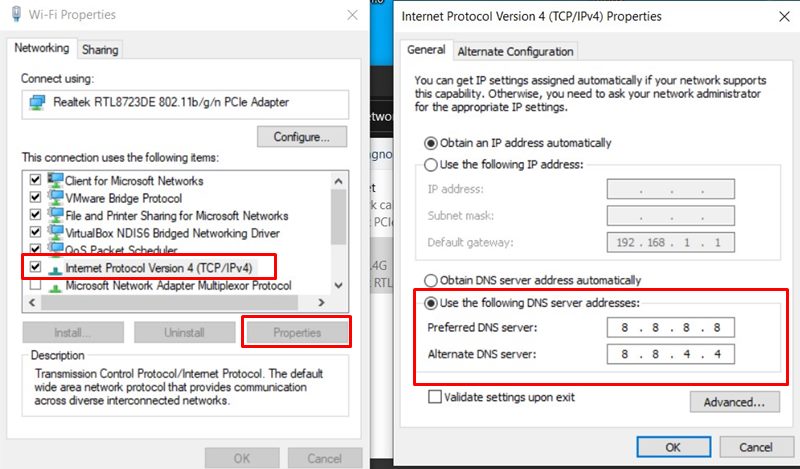
- Enter 8.8.4.4 as the Alternate DNS server.
- Click OK to confirm the changes.
- Once done, reboot the PC to change effects immediately.
12. Scan for Adware or Malware
It’s also better to scan for potential adware or malware viruses on your computer to make sure there are no harmful files available on your system. Such virus files will affect the system files to run properly and eventually block ongoing connections from the system which will lead to server connectivity issues. Whatever security software you’re using, just make sure to perform a deep scan to check for the issue. Otherwise, you can use Windows Defender by default.
13. Disable Windows Firewall
You should also try disabling the Windows Firewall protection on your PC temporarily to check if the ping delay issue appears again or not. Sometimes the Firewall program can block the ongoing connectivity of the machine to the game servers which can trigger such issues.
- Click on the Start Menu > Type Firewall.
- Select Windows Defender Firewall from the search result.
- Now, click on Turn Windows Defender Firewall on or off from the left pane.
- Select the Turn off Windows Defender Firewall (not recommended) option for both the Private & Public Network Settings.
- Once selected, click on OK to save changes.
14. Turn Off Antivirus Protection
You can also try turning off the Windows Defender Antivirus protection on your PC to ensure there is no antivirus software blocking the game files to run properly. In case, you’re using any third-party antivirus program on your PC then just turn off the real-time protection or scanning feature temporarily.
- Press the Win+I hotkeys to open the Windows Settings menu.
- Click on Update & Security > Click on Windows Security from the left pane.
- Now, click on the Open Windows Security button.
- Go to Virus & threat protection > Click on Manage Settings.
- Next, you’ll need to turn off the Real-time protection toggle.
- If prompted, click on Yes to proceed further.
15. Try Changing Windows Update Delivery Settings
Another thing you can do is simply set a limitation on your bandwidth usage for downloading Windows updates on the machine manually by following the steps below. It’ll ensure the overuse of the data bandwidth while running other programs or slow down the data consumption for Windows updates.
- Open the Start menu > Search for Windows Update delivery settings.
- Click on Advanced options.
- Select the Percentage of measured bandwidth.
- Then set the Limit how much bandwidth is used for downloading updates in the background.
- Slide the bar to the left to make it Low as 10% or less.
- Once done, restart the PC to apply changes.
16. Adjust the DayZ Graphics Settings
It’s highly recommended to adjust some of the graphics settings in DayZ manually by following the steps below to reduce ping delay issues.
- Just open Steam > Click on Library.
- Click on DayZ > Click on the Play button.
- Now, head over to the in-game Graphics Settings menu.
- Then adjust the following options one by one:
- Vsync – Disabled
- Terrain – Very Low
- Shadows – Disabled
- Clouds – Disabled
- Video memory – Auto
- Texture detail – Low
- Texture filtering – Low
- Antialiasing – Disabled
- Alpha to coverage – Disabled
- Edgesmoothing – FXAA Low
- Postprocess quality – Disabled
17. Close Unnecessary Background Processes
Unnecessary background running tasks or programs can consume a lot of system resources like CPU or Memory usage that literally reduces system performance. Hence, the startup crashing, lagging, and not loading issues appear quite often. Simply, close all the unnecessary background running tasks completely. To do this:
- Press the Ctrl+Shift+Esc keys to open the Task Manager.
- Now, click on the Processes tab.
- Click to select tasks one by one that are unnecessarily running in the background.
- Then click on End Task to close the task one by one.
- Once done, restart your system.
18. Perform a Clean Boot
Some of the apps and their services may start automatically while booting the system right away. In that case, those apps or services will definitely gonna use a lot of internet connection as well as system resources. If you’re also feeling the same, make sure to perform a clean boot on your computer to check for the issue. To do that:
- Press the Win+R keys to open the Run dialogue box.
- Now, type msconfig and hit Enter to open System Configuration.
- Go to the Services tab > Enable the Hide all Microsoft services checkbox.
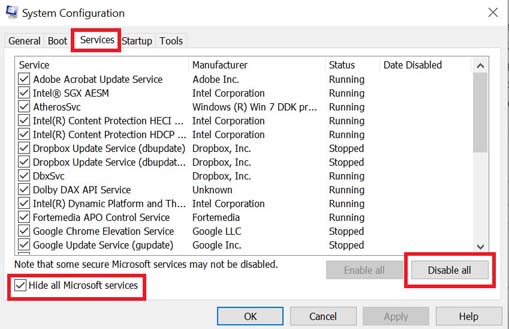
- Click on Disable all > Click on Apply and then OK to save changes.
- Now, go to the Startup tab > Click on Open Task Manager.
- The Task Manager interface will open. Here go to the Startup tab.
- Then click on the particular task which has a higher startup impact.
- Once selected, click on Disable to turn them off from the startup process.
- Do the same steps for each program that has a higher startup impact.
- Once done, make sure to restart your computer to apply changes.
19. Disable Overlay Apps
It seems that a couple of popular apps do have their own overlay program that can eventually run in the background and cause issues with the game launching or lagging issues. You should turn them off to fix the issue by following the steps below:
Disable Discord Overlay:
- Launch the Discord app > Click on the gear icon at the bottom.
- Click on Overlay under App Settings > Turn on the Enable in-game overlay.
- Now, click on the Games tab > Select DayZ.
- Finally, turn off the Enable in-game overlay toggle.
- Make sure to reboot your PC to apply changes.
Disable Xbox Game Bar:
- Press the Win+I keys to open Windows Settings.
- Click on Gaming > Go to Game Bar.
- Turn Off the Record game clips, screenshots, and broadcast using Game bar option.
Disable Windows Game Mode:
- Press the Win+I keys to open Windows Settings.
- Click on Gaming > Click on Game Mode.
- Make sure to Turn Off the toggle.
Disable Nvidia GeForce Experience Overlay:
- Launch the Nvidia GeForce Experience app > Head over to Settings.
- Click on the General tab > Disable the In-Game Overlay option.
- Finally, restart the PC to apply changes, and launch the game again.
Also do keep in mind that you should disable some other overlay apps like MSI Afterburner, Rivatuner, RGB software, or any other third-party overlay apps that run in the background always.
20. Disable CPU or GPU Overclocking
It’s also worth mentioning not to enable CPU/GPU overclocking on your PC if your game is crashing or stuttering a lot. We can understand that overclocking CPU/GPU can make a huge impact in improving gameplay but sometimes it may also cause issues with the bottleneck or compatibility too. Just set the frequency to default for optimal performance.
21. Check the DayZ Server Status
Last but not least, if the above methods didn’t help then ensure to check the DayZ server status by visiting the @DayZ Twitter handle for real-time updates and info regarding the server downtime or upcoming patch updates. You can also visit the third-party DownDetector DayZ status webpage to get all the real-time reports including the last 24 hours’ details, user reports, live map outage, and more.
We can see that at the time of writing this article, plenty of DayZ players are having server connectivity issues. Especially, there is a huge spike in downtime in the last 24 hours. If that’s also what you’re facing, make sure to wait for a couple of hours, and then try again.
That’s it, guys. We assume this guide was helpful to you. For further queries, you can comment below.
