Discord has become one of the popular instant messaging and VoIP social platforms across the globe that allows users to communicate with friends & others via voice calls, video calls, text messaging, and media files. For the sake of the community or groups, Discord also brings private chats and virtual communities known as ‘Discord Servers’. But it’s quite unfortunate that several users are getting the Discord “RTC Connecting” and “No Route” Errors on Windows whenever they try joining a voice channel.
As per multiple reports recently, a lot of users have expressed their experience with the Discord no route error message which eventually leads to failing in connecting to a voice server. So, in case you’re also experiencing the same issue for a while then don’t worry. Well, if we talk about the potential reasons, the chances are high that conflicts with the antivirus protection, network administrator blocking, Discord voice channel incompatibility, and other bugs can be applicable.

Page Contents
- How to Fix Discord “RTC Connecting” and “No Route” Errors on Windows
- 1. Force Close and Relaunch Discord
- 2. Restart Your Computer
- 3. Run Discord as an Administrator
- 4. Check Your Internet Connection
- 5. Power Cycle the Wi-Fi Router
- 6. Disable the VPN Service
- 7. Update Discord on Windows
- 8. Turn Off Quality of Service High Packet Priority
- 9. Disable Antivirus
- 10. Turn Off Windows Firewall
- 11. Flush Your DNS Cache
- 12. Change the Voice Region of Your Server on Discord
- 13. Renew Your IP Address
- 14. Try Changing DNS Settings
- 15. Use the WebRTC Troubleshooter
- 16. Disable QoS from Voice & Video Settings
How to Fix Discord “RTC Connecting” and “No Route” Errors on Windows
Luckily, here we’ve shared with you some of the workarounds that should come in handy. Make sure to follow all troubleshooting methods until the problem has been fixed. So, without wasting any more time, let’s jump into it.
1. Force Close and Relaunch Discord
You should force close and relaunch Discord to refresh any kind of potential issues with the application cache. To do so:
- Close and Exit Discord.
- Open Task Manager by pressing the Ctrl+Shift+Esc keys.
- Go to Processes > Select Discord.
- Click on End Task.
- Then relaunch the Discord app.
- Press the Ctrl+R keys to get a blank screen while Discord restarts.
- If there is an update available, Discord will start updating.
- Once done, close Discord, and run it again.
2. Restart Your Computer
It seems that any kind of temporary system glitch is causing the Discord app to run properly. You should always reboot the PC manually to check if the problem has been fixed or not. To do so:
- Go to the Start menu > Click on the Power icon.
- Click on Restart > Once rebooted, run the app again.
3. Run Discord as an Administrator
It’s also recommended to run the Discord program as an administrator on the PC by following the steps below to ensure there is no issue with the system permission while running the particular program.
- Open the Start menu > Type and search for Discord.
- Right-click on the Discord app from the search result.
- Click on Properties > Click on the Compatibility tab.

- Enable the Run this program as an administrator box.
- Click on Apply and then OK to save changes.
4. Check Your Internet Connection
You should also try checking out the internet connection at your end to ensure there is no issue with a poor or unstable network. If the internet connection isn’t working well then ensure to switch the wired network to wireless or vice versa. Otherwise, you can try performing the power cycle method on a Wi-Fi router to refresh the temporary networking glitches in most scenarios.
5. Power Cycle the Wi-Fi Router
We’ll also recommend you perform a power cycle to your Wi-Fi router by following the steps below to easily clear networking glitches or temporary cache issues. Any kind of temporary networking glitches on the router might trouble you a lot.
- Power Off the Wi-Fi Router at your end.
- After the LED indicator stops blinking, disconnect the power adapter from the router.
- Wait for around a couple of minutes and then reconnect the power adapter.
- Once done, Power On the Wi-Fi Router to check for the issue again.
6. Disable the VPN Service
Virtual Private Network (VPN) is getting quite popular these days due to its wide range of accessibility such as streaming geo-restricted content or playing video games using a different region server. Generally, VPN services are useful enough to surf the internet safely while using a public connection to prevent getting exposed to data privacy issues.
But sometimes using the VPN service can also trouble you a lot when it comes to the Discord server joining. You should temporarily turn off the VPN access to check for the Discord RTC connecting or no-route issue at your end.
7. Update Discord on Windows
You might need to update Discord to ensure there is no issue with the outdated app version. Make sure to follow the steps below to do so:
- Open the Start menu > Type and search for Discord.
- Open Discord and it’ll check for available updates.
- If available, the Discord app will start downloading updates.
- Once the update process is done, Discord will close and restart.
- Wait for it and the update should be installed successfully.
8. Turn Off Quality of Service High Packet Priority
Some users have reported that disabling the ‘Enable Quality of Service High Packet Priority’ option manually on Discord did fix the no-route error quite easily. You should follow the steps below to turn it off at your end.
- Launch Discord on your PC.
- Click on Settings (gear icon) on the bottom left side.
- Scroll down to App Settings > Click on Voice & Video.
- Under the Quality of Service option, Turn Off the Enable Quality of Service High Packet Priority toggle.
- Then relaunch the Discord app to check if the No Route error persists or not.
9. Disable Antivirus
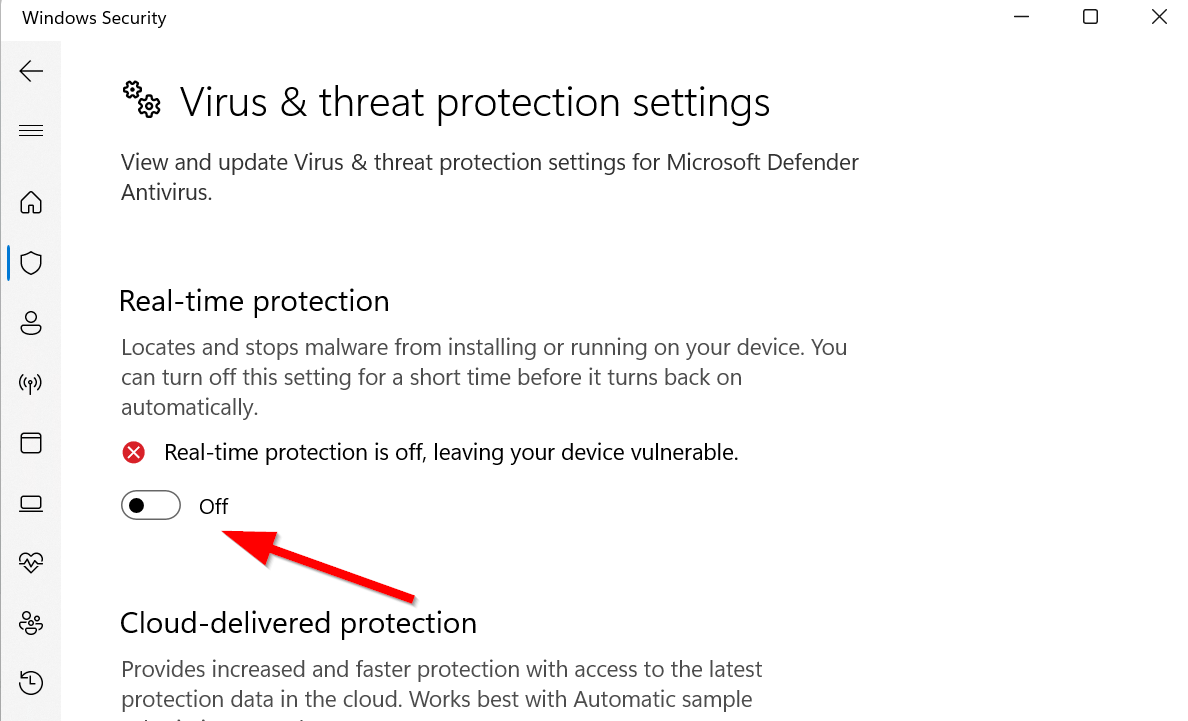
Additionally, you can also try disabling the antivirus protection on your Windows computer manually to prevent the Discord application from getting blocked by the aggressive real-time protection scanning in the background. If you’re using the default Windows antivirus that comes pre-installed then check the following steps to turn it off.
- Press the Win+I keys to open Windows Settings.
- Click on Update & Security > Go to Windows Security.
- Head over to Open Windows Security > Click on Virus & Threat Protection.

- Select Manage Settings > Go to Real-time protection.
- Turn it Off > If prompted, click on Yes to continue.
Please Note: If you’re using any other third-party antivirus program on your PC then turn off the real-time protection feature via the program settings menu.
10. Turn Off Windows Firewall
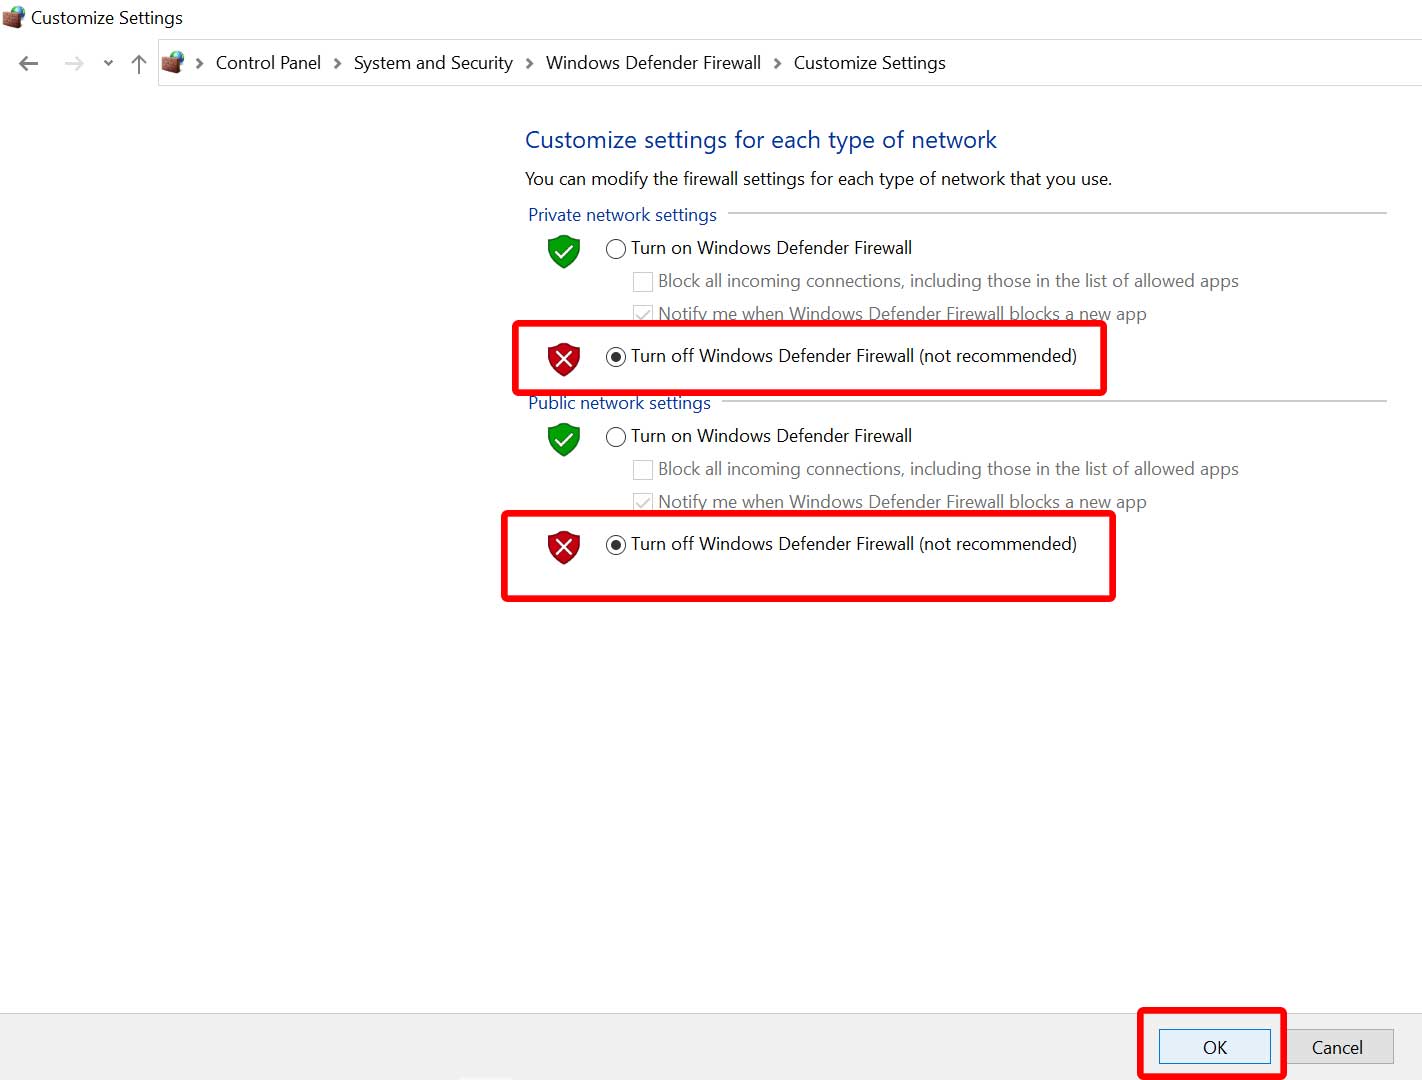
You can also try disabling Windows Firewall manually to check if the security software is preventing the Discord servers from connecting properly. Make sure to follow the steps below to do so:
- Open the Start Menu > Search and open Windows Defender Firewall.
- Click on Turn Windows Defender Firewall ON or OFF.
- Select the Turn off Windows Defender Firewall (not recommended) option.

- Click on OK to save changes.
- Once done, reboot the PC to apply changes.
11. Flush Your DNS Cache
The Domain Name System (DNS) indicates domain names in the IP addresses on your computer that can easily interact with each other. The web browser and the system itself store the DNS cache for the visited sites to speed up the loading process whenever you re-visit those sites shortly. But it gets clogged and corrupted over some time. So, it’s always a better idea to flush your DNS cache by following the steps below.
- Open the Start menu and search for cmd.
- Right-click on Command Prompt > Click on Run as administrator.
- If prompted, click on Yes to proceed.
- Now, type the following command line in cmd and press Enter.
ipconfig /flushdns
- Once the confirmation message appears, run Discord again.
12. Change the Voice Region of Your Server on Discord
Discord works well with the regional servers to connect people across the global database. In general, users want to connect to a voice server nearest to their geographical location so that the process and connection go smoothly. The closer you are connected to the regional server, the lower your ping delay will be. So, you should try changing the voice region of your Discord server manually by following the steps below.
- Open Discord > Head over to the problematic voice channel.
- Click on Settings (cogwheel icon).
- From the Overview tab, select the Region Override menu.
- Select the nearest region.
- You’re good to go.
13. Renew Your IP Address
Most of the Windows PCs are set up to dynamically assign an IP address once you connect to a network. But sometimes any expired IP address or networking glitch can trouble you a lot. You should try releasing and renewing your IP address by following the steps below. Several Discord users have found this method useful.
- Open the Start menu > Search for cmd.
- Open Command Prompt > If prompted by UAC, click on Yes.
- Type the following command and hit Enter:
ipconfig /release
- Once done, you’ll need to get a new IP address.
- Now, type the following command & hit Enter:
ipconfig /renew
- Finally, restart your computer to apply changes.
14. Try Changing DNS Settings
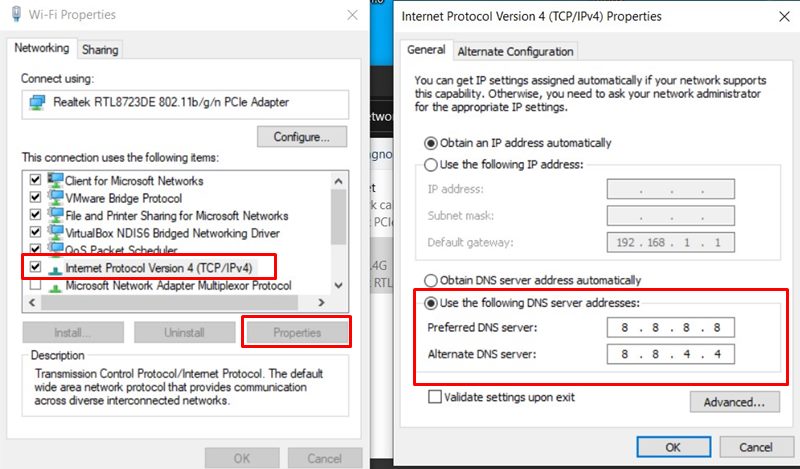
You can use the Google DNS address manually on the gaming device to fix server connectivity or matchmaking issues with your active internet properties. You can try following the steps below to check for the issue again.
- Open the Start menu > Search and open the Control Panel.
- Click on Network and Internet.
- Select Network and Sharing Center.
- Now, go to your Connections to select the active network.
- Select Properties > Double-click on Internet Protocol Version 4 (TCP/IPv4).
- Click on Use the following DNS server addresses.
- Use 8.8.8.8 as a Preferred DNS server address.

- Enter 8.8.4.4 as the Alternate DNS server.
- Click OK to confirm the changes.
- Once done, reboot the PC to change effects immediately.
15. Use the WebRTC Troubleshooter
In case, you’re still encountering issues with the RTC Connecting or No Router error on Discord then make sure to troubleshoot WebRTC to check the real-time connection between your web browser or program with the Discord server. Sometimes any kind of incompatibility issues with the WebRTC might trigger conflicts at your end. You can check out the WebRTC Leak Test (troubleshooter) to examine every aspect of how well your Windows machine is connecting with Discord.
16. Disable QoS from Voice & Video Settings
Quality of Service (QoS) is a protocol feature that is usually designed to block packet data loss and reduce the ping delay with the network. It eventually prioritizes the data sent or received on a specific network to allocate resources efficiently. However, it might get worse with your networking devices like Wi-Fi Routers to cause RTC connection issues on Discord servers. You should manually turn off this option by following the steps below.
- Launch Discord > Click on Settings (cogwheel icon) at the bottom left corner.
- Click on Voice and Video from the left side.
- Scroll down to the QoS section.
- Make sure to Disable QoS.
- Once done, force close & relaunch the Discord app.
That’s it, guys. We assume this guide was helpful to you. For additional queries, you can comment below.
