Alright, so you are following a guide, maybe to root your Android Device, or maybe to flash a Custom ROM on an Android Device having Snapdragon chip inside. Whatever the case might be, the thing is that you have come across a sentence which says, Install Qualcomm QDL Driver for your Snapdragon Device or maybe, You need to have Qualcomm QDL Driver installed on your PC for your Snapdragon Device. Anyways, you don’t know what is Qualcomm QDL Driver and how to install it.
That’s the reason you searched for it and landed here on this page. The GetDroidTips as always won’t disappoint you. Today, in this post, we would be covering on Download and Install Qualcomm QDL Driver for supported device. We would clear all your doubts about the Qualcomm QDL Driver with this post. So without any further, we do, let’s jump straight into it.
Page Contents
Download and Install Qualcomm QDL Driver [QDLoader HS-USB]
There are 2 methods to Download and Install Qualcomm QDL Driver for your Device on your Windows PC. The first one is quite easy and is Direct Installation which does not need any commands at all. And the second one is Manual Installation for those of you who like to do everything manually.
These methods would work on all versions of Windows Operating System. So it does not really matter if you have a Windows XP, Vista, 7 or 10 installed on your PC. These are universal methods and has been tested.
Now once that’s clear, let us take a look at our first method to Download and Install Qualcomm QDL Driver, should we?
Method 1: Direct Installation [Easy]
Now, in order to Download and Install Qualcomm QDL Driver for the supported device using this method, you need to follow these steps carefully:
- First of all, you need to download the Qualcomm QDL Driver.7z file. You can do so by clicking on the download link below:
- Once the download has been completed, extract the contents of the above package in a new folder. You can do this easily using any Compression Utility Software like WinRAR, 7ZIP etc.
- Now, run the setup file of Qualcomm QDL Driver according to your Windows Architecture (32 bit or 64 bit).
- Here, select the Free Bld option and click on Next.
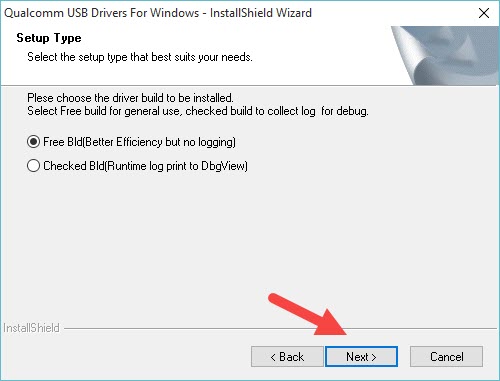
- The Installation Wizard would begin now, click on Next.
- You need to accept the terms of the license agreement in order to continue. So accept the terms of the license agreement.
- Now, click on the Install button to begin the installation.
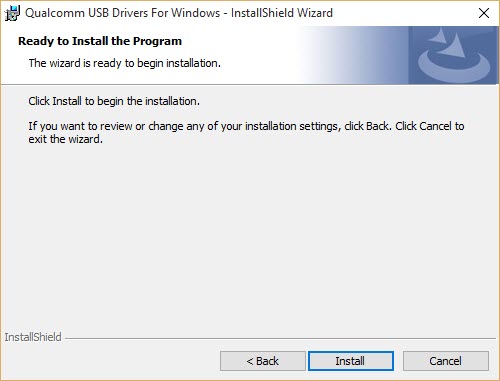
- Wait till the setup copies the driver files and complete the installation.
- Once the installation has been completed, Click on Finish button to exit the setup.
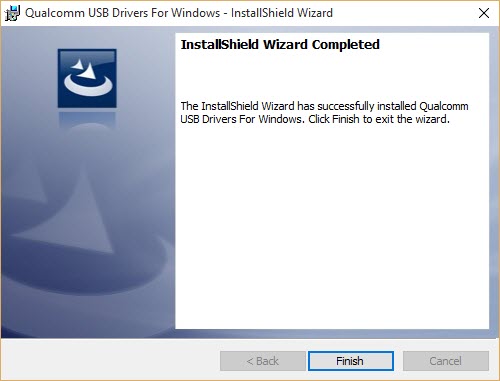
- Restart your Windows PC.
That’s it, you have successfully installed the Qualcomm QDL Drivers on your Windows PC. Pretty Easy, No?
Well, now let us take a look at our next method to Download and Install Qualcomm QDL Driver, should we?
Method 2: Manual Installation
Now, in order to Download and Install Qualcomm QDL Driver for the supported device using this method, you need to follow these steps carefully:
- First of all, you need to download the Download Qualcomm QDLoader Driver Package. You can do so by clicking on the download link below:
- Once the download has been completed, extract the contents of the above package in a new folder. You can do this easily using any Compression Utility Software like WinRAR, 7ZIP etc.
- Now, on your Android Device, enable the USB Debugging. You can enable it by simply going to the Settings >> About Phone >> here, tap on the Build Number 7 times. Now go back and tap on Developer Options and enable USB Debugging.
- Connect your Android Device to your Windows C via USB Cabe now.
- Now, open a Command Window on your PC by pressing Win + R key and entering cmd into the run window.
Note:
You need to have ADB Fastboot Installed on your Device, you can follow our guide on How to Install ADB and Fastboot on Windows.
- Now, enter the following command on your Command Prompt Window and press Enter.
adb devices
- You should now see a serial number of your device.
- Now, enter the command below to boot your Device into the EDL or Download Mode.
adb reboot edl
- It’s time to install the Qualcomm QDL Driver for your device. To do this go to the Control Panel on your Windows PC.
- Now, click on Device Manager.
- Here, you must see a new device under Other Devices with an exclamation mark labeled as QHSUSB_BULK as shown in the image below.
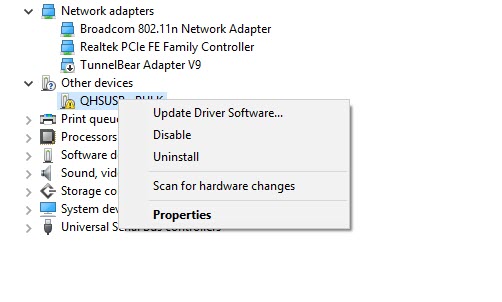
- Right-Click on the QHSUSB_BULK and select Update Driver Software from the context menu.
- On the next Window, select Browse my computer for driver software option.
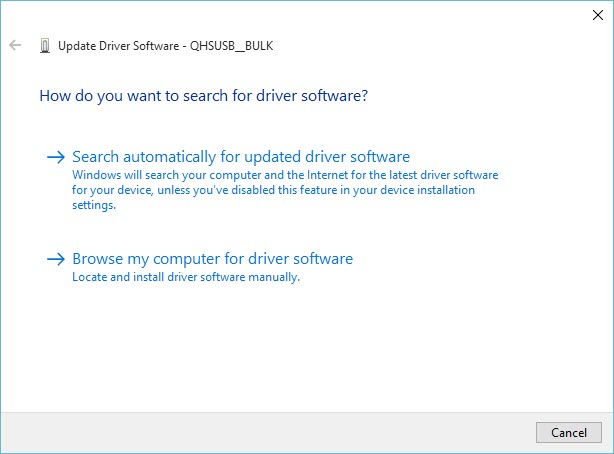
- Click on the Browse button and navigate to the folder which contains the contents of Qualcomm QDLoader Driver Package you downloaded earlier.
- Select the Drivers Folder and click on OK.
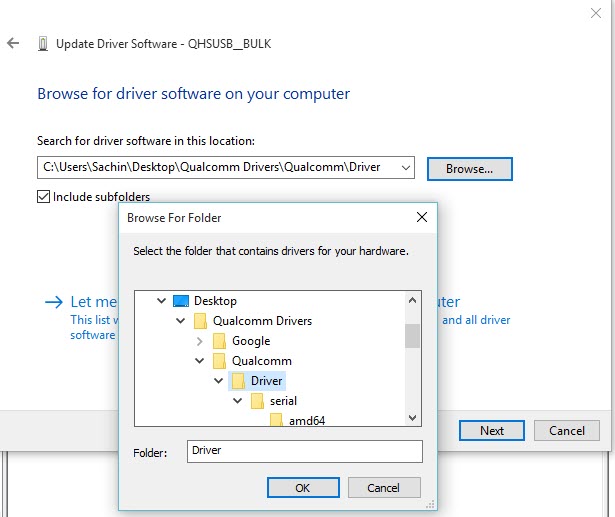
- Click on Next.
- Now, your Windows may ask you for the permissions to install the Drivers, just click on Install this driver software anyway (Don’t worry it’s safe).
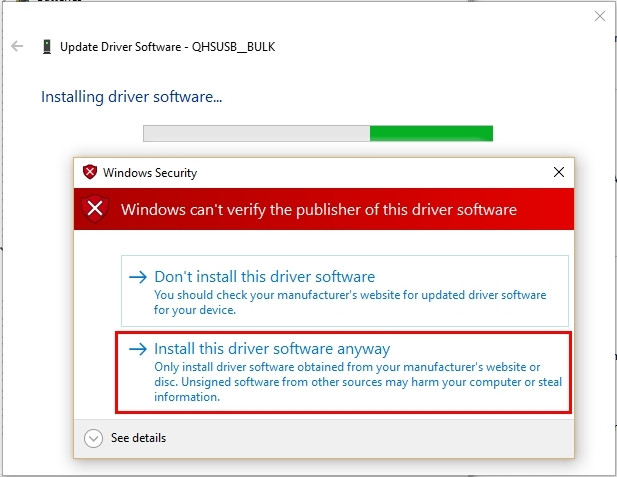
- Wait till the system copies the driver files and complete the installation.
- Once the installation has been completed, you would see a Success Message as shown below in the image.
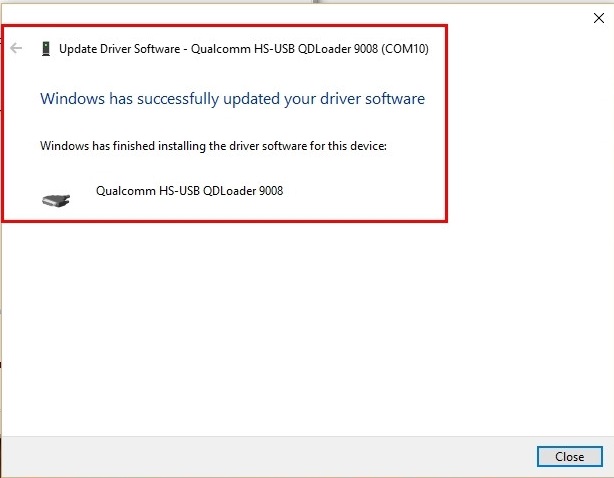
This means that you have successfully installed the Qualcomm QDL Drivers on your Windows PC. Pretty Easy, Right?
So that’s it guys, this was our take on Download and Install Qualcomm QDL Driver for supported device. We hope that you found this post helpful. Just in case, if you have stuck somewhere between the guide or have any questions related to the topic, then feel free to leave them in the comments section down below.
