Android is a great operating system that allows users to tweak their devices how they want. Although there are certain precautions that you need to take care of before tweaking your smartphone, when done correctly, it opens the world of new features and enhancements. We have seen a lot of mods and modules that enhance the device’s productivity. But, there is a hidden or rather secret menu under the Settings option called ‘Developer Options’, which allows the user a lot of hardcore settings and tweaks that provide additional features for the device.
However, as the name suggests, it is meant for users who are well aware of what they are dealing with, as one wrong toggle could cause harm to their Android device. This post will guide you on enabling and disabling developer options on your Android device. Not all the settings in the Developer Options are meant for the developers. Instead, there are quite a few settings like turning off animations to speed up your device, faking your GPS location, or turning on USB debugging, etc., that are meant for the average user, too. With that being said, let us jump straight into the article to learn more about this hidden option:
Also Read

Page Contents
Developer Options: Benefits
Before we go ahead with the procedure to disable or enable the Developer Options on your Android devices, let us first understand a few basic things like the benefits of this hidden option for the average user as well as developer. So, according to the official Google website, below are the list of main options and their benefits that you will get, under the Developer Options menu.
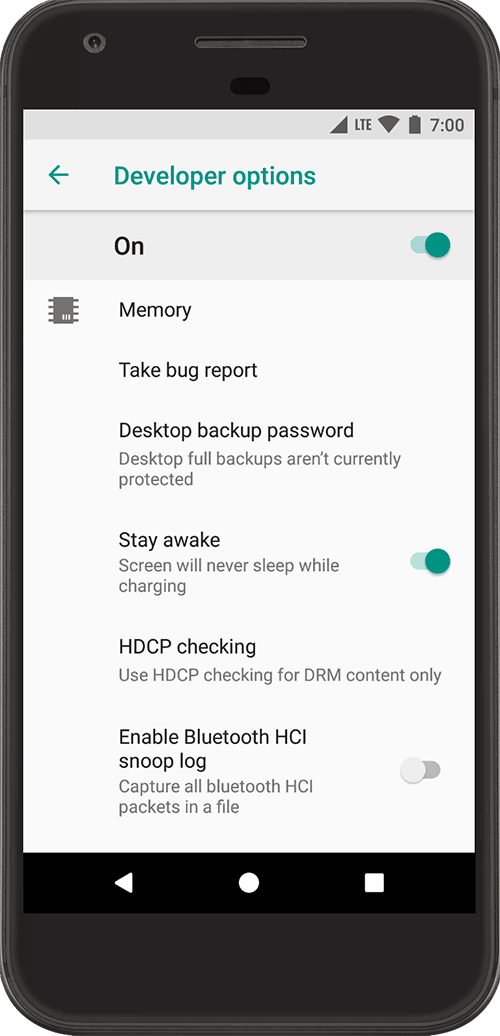
- Memory: (On Android 8.0 and higher) Display memory stats, such as average memory usage, memory performance, total memory available, average memory used, how much free memory is available, and how much memory is being used by apps.
- System UI demo mode: Makes it easier to take clean screenshots by displaying a generic, preset notification bar that does not show notifications or low battery warnings. Enable Demo Mode allows you to change the appearance of the status bar using ADB demo mode commands. Or you can use Show Demo Mode to hide notifications and display a preset status bar.
- Desktop backup password: Sets a backup password so you can use ADB commands to back up and restore device apps and data under password protection.
- Stay awake: Sets your screen to stay on every time you plug it in.

- USB Debugging: Debugging options provide ways to configure on-device debugging, and to establish communication between the device and your development computer.
- Select the mock location app: Use this option to fake the GPS location of the device to test whether your app behaves the same in other locations. To use this option, download and install a GPS mock location app.
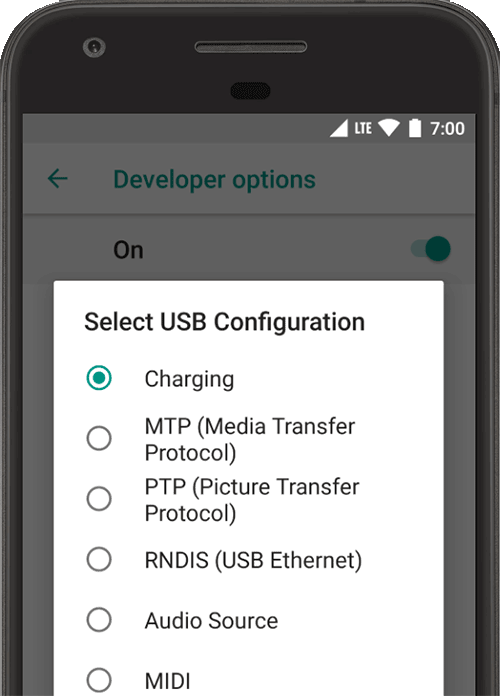
- Select USB Configuration: To specify how you want the computer to identify the device. You can configure devices for charging only, to transfer files (MTP), to transfer pictures (PTP), to use your mobile internet on the PC (RNDIS), or to transfer audio or MIDI files.
- Bluetooth AVRCP version: Select the profile version you want to use to control all of the Bluetooth A/V equipment to which your device has access. Additionally, to fine-tune the audio playback on the device, tap and set the following options:

- Bluetooth Audio Codec: Adjust the sound quality (codec) of your devices by selecting one of the following codecs:
- SBC: Transfer data to Bluetooth audio output devices such as headphones and speakers.
- AAC: Better sound quality from wired devices than MP3 at similar bit rates.
- aptX: A pure wireless sound in high-quality smartphones, speakers, soundbars, headphones, and tablets.
- aptX HD: High-resolution streaming to Bluetooth devices.
- LDAC: Provide high-quality music listening over wireless connections.
- Enable Optional Codecs and Disable Optional Codecs: If you have additional codec implementations installed, use these options to enable and disable them.
- Bluetooth Audio Codec: Adjust the sound quality (codec) of your devices by selecting one of the following codecs:
- Bluetooth Audio Sample Range: Adjust the number of audio samples per second by selecting an audio codec sample rate. Higher sample rates use more resources.
- Bluetooth Audio Bits Per sample: Set the number of bits of information in each audio sample. With a higher bit rate, the sound is better but the sample file is larger.
- Bluetooth Audio Channel Mode: Select mono or stereo.
- Bluetooth Audio LDAC Codec: Optimize the sound to increase audio quality, balance audio and connection quality, increase connection quality, or use an adaptive bitrate to balance audio and connection quality.
- Aggressive Wi-Fi to cellular handover: When the signal is low, it makes Wi-Fi more efficient in handing over the data connection to a cellular network.
- Show taps: Display taps when you touch the screen. A circle appears under your finger or stylus and follows you as you move around the screen.
- Pointer Location: To show the pointer (tap) location on the device with cross-hairs.
- Window animation scale: Sets the window animation playback speed so you can check its performance at different speeds. A lower scale results in a faster speed.
- Transition animation scale: Sets the transition animation playback speed so you can check its performance at different speeds. A lower scale results in a faster speed.
- Simulate secondary displays: Creates a secondary display as an overlay on the device. This is useful when supporting additional displays with the presentation.
- Force 4x MSAA: Enables multisample anti-aliasing (MSAA) in Open GL ES 2.0 to speed up high-end games and applications.
- Disable HW overlays: Using the hardware overlay enables each app that displays something on the screen to use less processing power. Without the overlay, an app shares the video memory and has to constantly check for collision and clipping to render a proper image. The checking uses a lot of processing power.
- Disable USB audio routing: To disable automatic routing to external audio devices connected to a computer through a USB port.
- Monitoring: Monitoring options provide visual information about app performance, such as long thread and GPU operations.
- Background process limit to set the number of processes that can run in the background at one time.
- Force allow apps on external: This option lets you make any application eligible for installing in the external storage if you run out of space in your internal memory.
- Force activities to be resizable: This allows forces the application to run in split mode.
How To Enable and Disable Developer Options On Your Android Device
Enable Developer Options
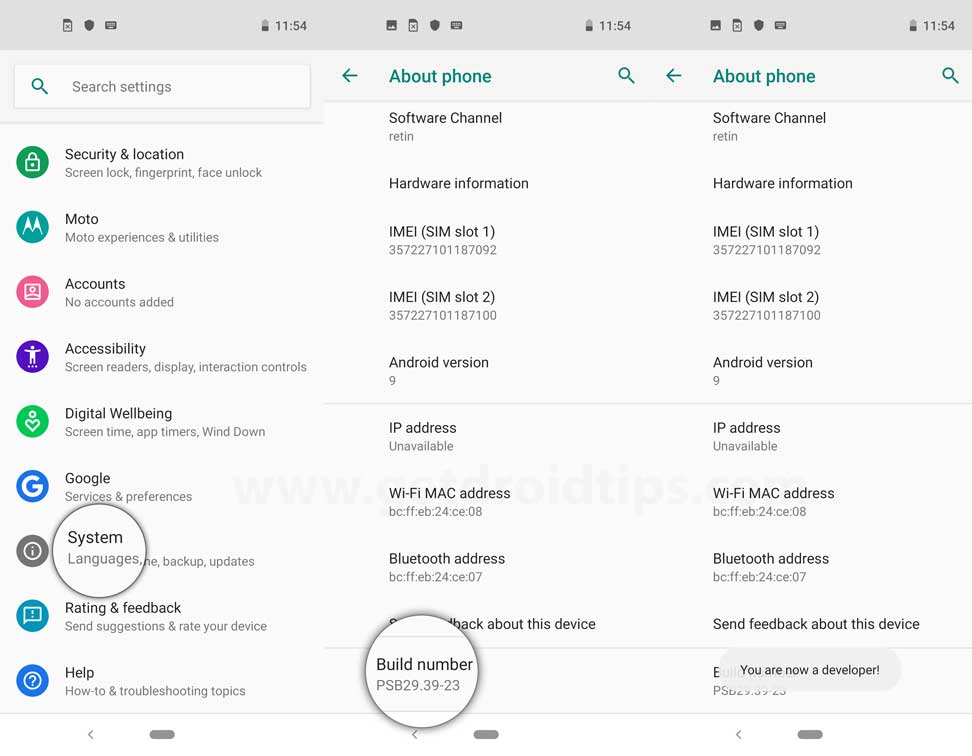
To Enable the Developer Option on your device follow the below steps:
- Go to the Settings menu of your Android device.
- Then scroll down and go to About.
- Now you need to head to Software Information>> More.
- Here tap on the Build Number 7-8 Times until you see a message “You are now a developer”.

You can watch the video below on enabling Developer Options on any Android device. (Note we have used the Galaxy S10 for this purpose, but it is applicable to any Android device.)
Disable Developer Options
To Disable the Developer Option on your device follow the below steps:
Method 1:
- Go to the Settings menu of your Android device.
- Then scroll down and go to Developer Options.
- Toggle the slider button to Off at the top of the right pane.
Method 2:
- Head to Settings.
- Go to Apps.
- Then scroll down and find System.
- Go to Storage.
- Press Clear Data. (Note that all the system settings accounts, etc will be deleted if you perform this step)
So, there you have it from my side in this post. I hope you guys liked this post and were able to understand the importance as well as how to enable and disable the Developer Options menu from Settings on any Android smartphone. Let us know in the comments below if you come across any issues file following the above-mentioned commands. Until the next post…Cheers!

How do I relock bootloaer on Mate 9?
Hi,
Can you give me advice on how can I activate “dual SIM card management settings” on Huawei PRA-LX1 (Prague_L31_VN1)?
The phone was sold by Vodafone Hungary and has a dumbed down firmware, which takes out that option and locks the 2nd card slot into SD Card only mode.
I’ve been at this for days now and can’t really get it to work, even tried to update firmware (with zero experience), but most failed. The few that worked made no difference.
Thank you
Thanks for info. Kind regards.
I need root for my device Asus Zenfone 3s max please because I lost lot of my important and memoriable pictures can you please send me how to get Root for my device
I am trying GB to root my samsung galaxy j3 Android 7.1.1. Need help nothing it working…says I don’t have root access and developer options will not come up no mater what!!