2004’s World of Warcraft is a massively multiplayer online role-playing video game by Blizzard Entertainment that offers micro-transactions in the game to ensure improved cosmetics and quality of life. It also prevents a pay-2-win scenario with the help of a subscription. But as an MMO title, there are plenty of problems appearing to the players from server connectivity to game launching to in-game bugs. Meanwhile, several players are experiencing an error WoW51900319 on World of Warcraft.
Now, if you’re also facing this specific error then don’t worry. Here we’ve shared with you a couple of possible workarounds that should come in handy. As per multiple reports, plenty of WoW players are experiencing the specific error message that says “You have been disconnected from the server. Error Code: WOW51900319”. This error message appears whenever your WoW game loses its connection with the World of Warcraft servers online. It mostly occurs while playing the game or logging into it.

Page Contents
- How to Fix This Error WoW51900319 on World of Warcraft
- 1. Restart the Device
- 2. Check the Internet Connection
- 3. Update World of Warcraft
- 4. Verify and Repair the Game Files
- 5. Update the Networking Driver
- 6. Change DNS
- 7. Reset Network Settings
- 8. Run Internet Connection Troubleshooter
- 9. Change the Display Mode
- 10. Optimize Network Settings in WoW
- 11. Lower the Maximum Background FPS
- 12. Check the WoW Server Status
- 13. Flush DNS Cache
- 14. Reset Winsock
- 15. Reset the User Interface
- 16. Contact Blizzard Support
How to Fix This Error WoW51900319 on World of Warcraft
The chances are high that there are a couple of reasons behind such an error which include network problems, game server connectivity glitches, incorrect settings to the game, problematic networking driver, and more. You can check out this full guide to fix the WoW51900319 error code in WoW. Now, without wasting any more time, let’s jump into it.
1. Restart the Device
Before doing anything, make sure to restart the computer manually to ensure there is no issue with the temporary system glitch or cache data whatsoever. In some cases, a glitch might cause several issues with the system which might trigger WoW51900319. So, just reboot the PC to apply changes to check for the issue.
2. Check the Internet Connection
The chances are high that your internet connection somehow has an issue like slow speed or unstable. It’s always a better idea to run a speed test of the internet connection that you’re using and try other online multiplayer games. In case, there is an issue with the internet connection then make sure to use another Wi-Fi connection or connect to an ethernet network (wired) to check for the issue. Another thing you should do is contact your internet service provider (ISP) to get technical assistance.
3. Update World of Warcraft
According to Blizzard Support, corrupted or damaged game files can cause a wide variety of problems and errors with game launching or gameplay. You can check the following steps to do so:
- Open the Battle.net desktop app on your PC.
- Now, click on the World of Warcraft icon.
- Click on the cogwheel icon (settings) next to the Play button.
- Select Check for Updates and wait for the process to be completed.
- If there is an update already available, make sure to download and install the game update.
4. Verify and Repair the Game Files
By scanning and repairing the installed WoW game on your computer, you’ll be easily able to fix corrupted or missing game files properly. To do that:
- Launch the Battle.net client on the PC.
- Go to All Games > Click on Installed.
- Click on the World of Warcraft game from the list.
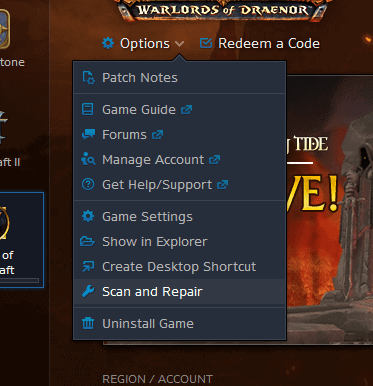
- Go to Options (Gear icon) > Select Scan and Repair.
- Click on Begin Scan and wait for it to complete.
- Once done, restart your computer to apply changes.
5. Update the Networking Driver
The chances are high that somehow the temporary networking glitch on your PC is conflicting with the server connection issue. Make sure to follow the steps below to update the networking driver.
- Press the Win+X keys to open the Quick Link Menu.
- Now, click on Device Manager > Double-click on Network adapters.
- Right-click on the networking device and select Update driver.
- Click on Search automatically for drivers to check for the update.
- If an update is available, it’ll automatically download & install the update properly.
- Let the process be completed, and then reboot your computer to apply changes.
6. Change DNS
You can use a Google DNS address (public DNS) to ensure there is no server connectivity issue with the problematic game. Sometimes issues with your blocked DNS address that have been provided by the ISP may have some issues. To do this, you can follow the steps below.
- Press the Win+R keys to open up the Run dialogue box.
- Type ncpa.cpl and click on OK to open the Network Connections page.
- Now, right-click on your active network adapter > Click on Properties.
- Select Internet Protocol Version 4 (TCP/IPv4) > Click on Properties.
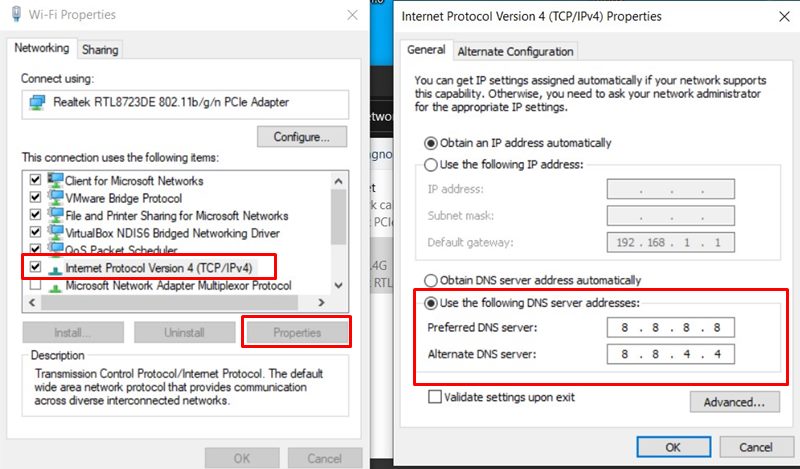
- Click to select Use the following DNS server addresses.
- Now, enter 8.8.8.8 for the Preferred DNS server and 8.8.4.4 for the Alternate DNS server.
- Once done, click on OK to save changes.
- Make sure to restart your PC to apply changes.
7. Reset Network Settings
However, if none of the methods worked for you, try performing the factory reset of your network settings on the Windows computer to set the factory defaults. In most cases, this method should work for everyone. Please keep in mind that you’ll need to set or connect to the respective network again after the factory reset. To do so:
- Press the Win+I keys to open Windows Settings.
- Go to Network & Internet > Scroll down the Status page to the bottom.
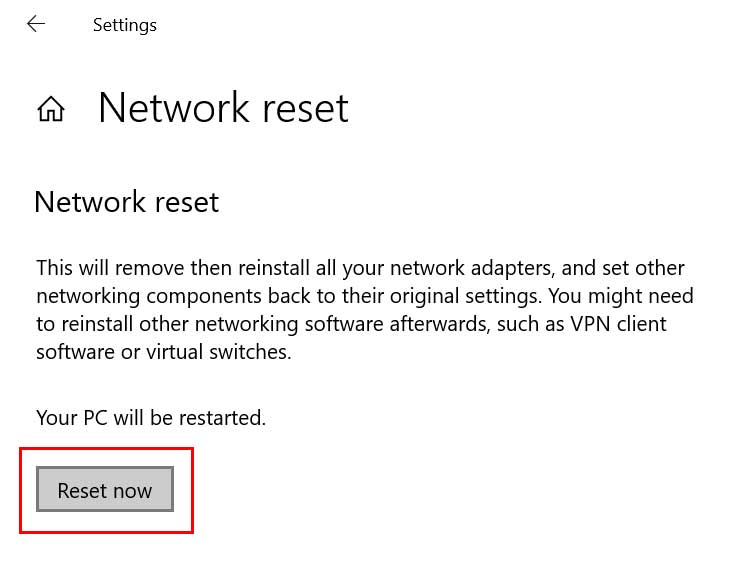
- Click on Network reset > Click on the Reset now button.
- Wait for the process to complete. Once done, your PC will reboot automatically.
8. Run Internet Connection Troubleshooter
If you’re sure that there are no possible issues with your internet connection because you’re able to browse online and do other internet-related work on other computers or mobile devices then you should run the internet connection troubleshooter on your PC to check for it. Windows default troubleshooters can try fixing the issues automatically in most cases.
- Press the Win+I keys to open Windows Settings.
- Now, click on Update & Security > Click on Troubleshoot from the left pane.
- Click on Additional Troubleshooter from the right pane window.
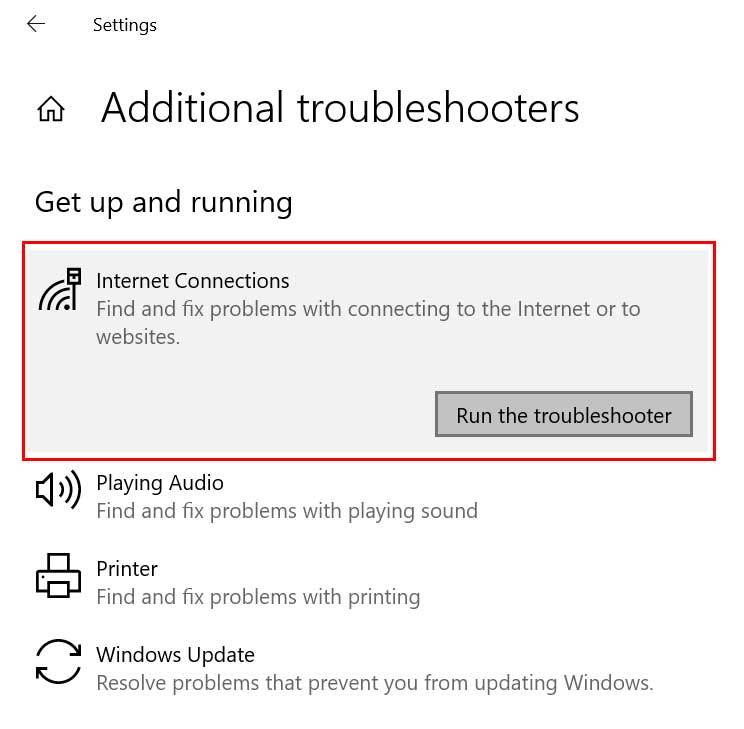
- Next, click on Internet Connections.
- Select Run the troubleshooter and wait for the process to complete.
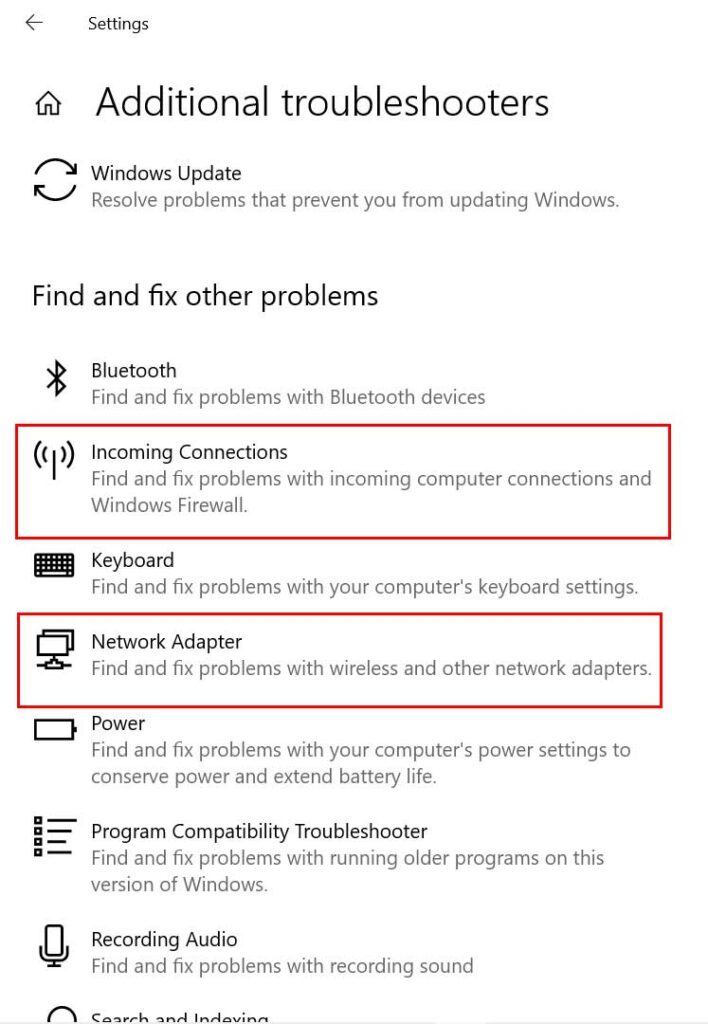
- Make sure to do the same steps for Incoming Connections and Network Adapters too.
- Once done, make sure to restart your computer to apply changes.
9. Change the Display Mode
You should also try changing the display mode in World of Warcraft to check if the problem has been fixed or not. Some reports claim that changing the display mode did come in handy.
- Launch the World of Warcraft game.
- Go to Menu > Click on System.
- Navigate to the Graphics tab.
- Set the Display Mode to Windowed or Fullscreen. (vice versa)
- Make sure to save it and relaunch the game.
10. Optimize Network Settings in WoW
Another thing you should do is optimize network settings in World of Warcraft by following the steps below to ensure the game can connect to the servers easily.
- Open the Battle.net client.
- Go to All Games > Click on Installed.
- Click on the World of Warcraft game from the list.
- Go to System in WoW > Go to the Network tab.
- Tickmark the Optimize network for Speed to enable it.
- Save it and relaunch the game to check for the issue.
11. Lower the Maximum Background FPS
Ensure to lower or reduce the maximum background FPS option by following the steps below to set it to 30 FPS to check for the issue again.
- Open the Battle.net client.
- Go to All Games > Click on Installed.
- Click on the World of Warcraft game from the list.
- Head over to the in-game graphics settings.
- Scroll down to Max FPS > Set it to 30 FPS.
- Once done, relaunch WoW to check for the issue.
12. Check the WoW Server Status
You should always check the WoW server status Realm Status page to ensure there is no issue with the server connectivity. Sometimes any kind of technical fault or glitch can trouble you a lot with the game. If the server status is inactive then make sure to wait for a couple of hours and then try again.
13. Flush DNS Cache
By flushing the DNS cache on your Windows computer, you can easily clear all older or invalid cache entries and the system fetches new combinations & store them in the local cache again. To do that:
- Press the Win+R keys to open the Run dialogue box.
- Type cmd and hit Enter to open the Command Prompt. [If prompted by UAC, click on Yes to allow the permission]
- Now, input the following command and hit Enter to remove the current IP address:
ipconfig /release
- Next, type the following command and press Enter again to request a new IP address from DHCP:
ipconfig /renew
- Once done, execute the following command to refresh IP entries on your computer:
ipconfig /flushdns
- You’re done. Close the command prompt and reboot your PC.
14. Reset Winsock
Netsh is a command-line utility tool that helps users to restore network connectivity on Windows machines. While ‘Winsock’ is known as “Windows Sockets”. Winsock is a set of files that allow Windows programs to connect to the Internet and other computers easily. If you are also receiving the “ERR_CONNECTION_RESET” error on Chrome or Microsoft Edge browser, this method should fix the issue.
You can also say that Winsock is an ‘Application Programming Interface (API)’ that can be used by developers to make their programs network-enabled. It’s also worth mentioning that 16-bit applications use WINSOCK files. To reset it:
- Press the Win+R keys to open the Run dialogue box.
- Type cmd and hit Enter to open the Command Prompt.
- If prompted by UAC, click on Yes to allow permission.
- Next, input the following command, and hit Enter to reset the full network settings on your PC:
netsh winsock reset
- Once done, close the command prompt window.
- Finally, restart your computer to apply changes.
15. Reset the User Interface
According to Blizzard Entertainment, resetting the user interface of the World of Warcraft game might help you to resolve such an issue. To do so:
- First, close the WoW game on your PC.
- Now, go to uninstall add-on managers.
- Open the Battle.net client > Click on the World of Warcraft game.
- Click on Options > Select Show in Explorer.
- This will open the folder in the File Explorer where you’ve installed the WoW game.
- Open the WoW game folder > Find out Cache, WTF, and Interface folders.
- Right-click on the following folders > Select Rename individually.
- Ensure to rename these folders to the following:
Cache to CacheOld

Interface to InterfaceOld

WTF to WTFOld
- Once done, make sure to reboot your PC, and relaunch the WoW game.
- This method will automatically rebuild the deleted folders once you open the game normally.
16. Contact Blizzard Support
Last but not least, you can visit the BlizzardCS Twitter handle for additional support. We’ll recommend you create a support ticket for the same to get it fixed asap. Developers will try investigating this issue with the help of a ticket.
That’s it, guys. We assume this guide was helpful to you. For further queries, feel free to comment below.
