Online multiplayer tactical first-person video games can be frustrating at times when players can’t be able to join the matchmaking process or get into the gameplay sessions. Well, the Escape from Tarkov is no exception here as plenty of players are experiencing multiple issues with loading into the game. Recently, some players are having the Escape from Tarkov Error 1000 which prevents players from joining the game from the backend. If you’re also facing the same error, you should follow this guide.
Whenever this error code appears, it indicates that affected players cannot connect to the game servers with their friends in Escape from Tarkov. If you’re also encountering the same error that means there are a couple of potential reasons applicable which need to be addressed. This error may occur due to a game’s launcher, corrupted game files, an outdated game patch version, network connectivity issues, outdated system software, conflicts with the game server, etc reasons.

Page Contents
- How to Fix Escape from Tarkov Error 1000?
- 1. Restart the PC
- 2. Close and Relaunch the Game
- 3. Update Escape from Tarkov
- 4. Run the Integrity Check for the Game
- 6. Check for Your Internet Connection
- 7. Run the Game as an Administrator
- 8. Update the Network Driver
- 9. Turn Off Antivirus
- 10. Disable Windows Firewall
- 11. Check for the Server Status
- 12. Deleting the CefCache Folder
- 13. Change Server Location
- 14. Use a Public DNS Address
- 15. Reinstall Escape from Tarkov
- 16. Contact Support
How to Fix Escape from Tarkov Error 1000?
Fortunately, here we’ve shared with you some workarounds that should come in handy. Make sure to follow all troubleshooting guides to resolve this error code. So, without wasting any more time, let’s jump into it.
1. Restart the PC
We’re recommending you manually restart your computer at times which might fix in clearing the temporary system glitches or cache data issues. Several users have found this trick helpful. So, you can try it out.
- Open the Start menu > Click on the Power icon.
- Click on Restart.
2. Close and Relaunch the Game
Another thing you should try closing and relaunching the game from the specific launcher to ensure there is no issue with the game cache. Sometimes conflicts with the game launching and temporary glitches might trouble you a lot. To do so, follow the steps below.
- Exit the Escape from Tarkov game from the client.
- Press the Ctrl+Shift+Esc keys to open Task Manager.
- Go to Processes > Click on the EscapefromTarkov.exe task.
- Select End Task > Then reboot the PC.
- Finally, launch the game to check for the issue.
3. Update Escape from Tarkov
It’s also recommended to manually update the Escape from Tarkov game on the computer by following the steps below which will allow you to clear potential glitches with the outdated game patch version.
- Open the Battlestate Games Launcher.
- Go to the Escape from Tarkov page.
- Now, click on the arrow icon under your profile.
- Click on Check for updates.
- If an update is available, download and install it.
- Once done, close the launcher, and run the game again.
4. Run the Integrity Check for the Game
You might also need to verify the game files on the PC by following the steps below. Verifying the game files might help in fixing multiple conflicts with server connection and even game launching up to some extent.
- Open the Battlestate Games Launcher.
- Go to the Escape from Tarkov page.
- Now, click on the arrow icon under your profile.
- Select Integrity Check > Wait for the repair to complete.
- Once done, close & relaunch the game.
6. Check for Your Internet Connection
It’s also possible that your internet connection is having issues with the game servers. Either the network is slow or unstable. So, make sure to cross-check your network connection that whether the connection is poor or not. If that’s the reason then we’ll recommend you choose a higher package so that you’ll get higher internet speed. Also, keep in mind that if you’re using a Wi-Fi network then try switching it to a wired network and try again. Sometimes wireless connectivity can also cause several glitches or congestion during peak hours.
7. Run the Game as an Administrator
You should run the game application as an administrator to allow the system user account control permission. It’ll fix several issues with the game client while running video games. To do this:
- Right-click on the Escape from Tarkov app on your PC.
- Select Properties > Click on the Compatibility tab.

- Turn On the Run this program as an administrator option.
- Click on Apply and select OK to save changes.
- Once done, run the game.
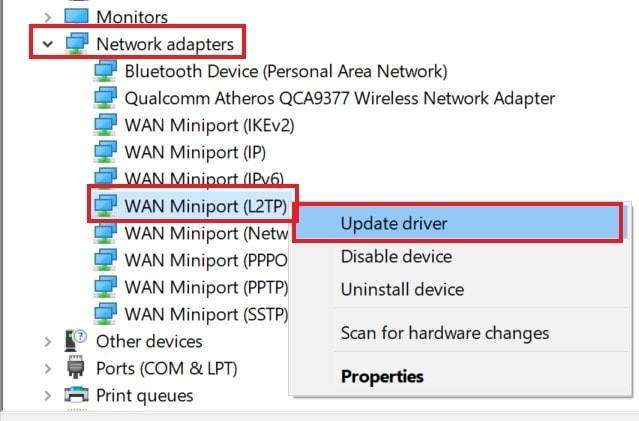
8. Update the Network Driver
An outdated or corrupted networking driver on the Windows computer can also cause issues with online gaming or connecting to the servers. So, it’s better to check for updates by following the steps below:
- Press the Win+X keys to open the Quick Link Menu.
- Now, click on Device Manager from the list.
- Double-click on Network adapters.

- Right-click on the active networking device.
- Select Update driver > Choose to Search automatically for drivers.
- If an update is available, it’ll automatically download & install the latest version.
- Once done, restart the PC to change the effects.
9. Turn Off Antivirus
If you’re using the default Windows Defender Antivirus security program to scan potential malware or viruses then the chances are high that your antivirus program is forcefully blocking the game program. It’s recommended to turn off the antivirus scanning by following the steps below:
- Press the Win+I keys to open Windows Settings.
- Click on Update & Security.
- Go to Windows Security from the left pane.
- Now, click on Virus & Threat Protection.
- Click on Manage Settings.
- Turn Off the Real-time Protection feature.
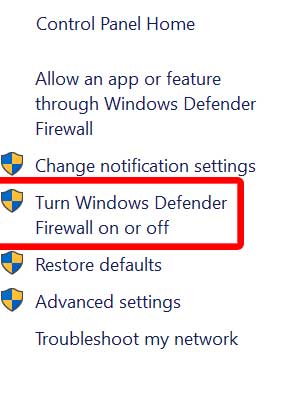
10. Disable Windows Firewall
You should also disable the Windows Firewall program by following the steps below to ensure there are no blocking issues with the game application. The chances are high that your Firewall security is troubling you to run the game properly.
- Open the Start menu > Search for Control Panel and open it.
- Now, search for firewall > Open Windows Firewall from the search result.

- Click on Turn Windows Firewall on or off from the left pane.
- Turn Off the Windows Firewall option for all domains.
- Finally, restart your system to apply changes.
11. Check for the Server Status
If you’re still experiencing the server connectivity error then you should check for the Escape from Tarkov service status to ensure there is no issue with the downtime or outage. You might also need to follow the official @tarkov Twitter account to check if the multiple reports coming out regarding the same issue. It’s also worth mentioning to visit the third-party DownDetector Escape from Tarkov Status webpage to check whether the server reports coming out or not.
It seems that plenty of players have reported in the last 24 hours at the time of writing this article. In case, you’re also experiencing the same issue then make sure to wait for a couple of hours and then check for the issue further.
12. Deleting the CefCache Folder
Several reports also claim that delete the CefCache folder from the main Battlestate Games directory and as well as deleting the Temp folder in the UserAppDataLocalBattleState Games. You should check out the following steps to ensure there is no issue whatsoever.
- Navigate to the main BattleState Game folder (directory).
- Locate and open the BSGLauncher folder.
- Search and Delete the CefCache folder.
- Then go to UserAppDataLocalBattleState Games path.
- Delete the Temp folder.
- Once done, launch the client, and verify the game files.
- Then reboot the PC to apply changes.
13. Change Server Location
Some users have reported that even changing the server location in the Escape from Tarkov game settings from Auto to a specific region. This particular method might help you in fixing the backend error 1000. To do so:
- Launch Escape From Tarkov.
- Search for the Server Settings > Select a specific region (nearest one).
- Once done, save and apply the changes.
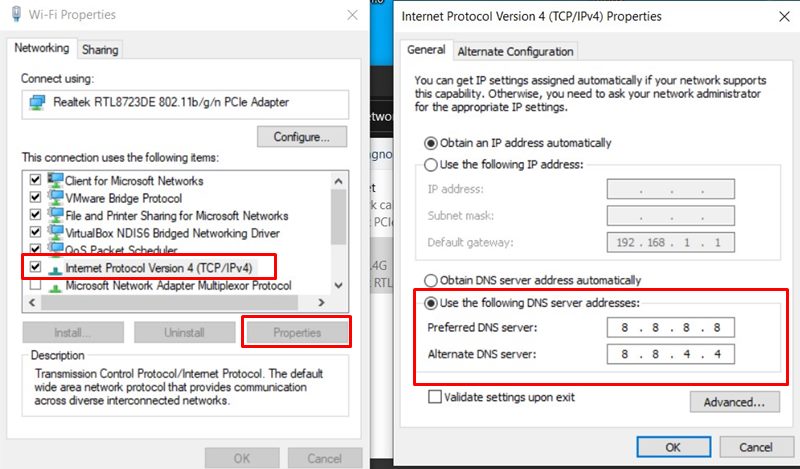
14. Use a Public DNS Address
Well, changing the Google DNS server addresses instead of a private DNS address can quickly resolve issues with the game server connectivity that may occur on your Windows PC. To do this:
- Open the Start Menu > Search and open Control Panel.
- Click on Network and Internet > Select Network and Sharing Center.
- Go to Change adapter settings > Select the active network.
- Right-click on the Wi-Fi/Ethernet connection details.
- Select Properties > If prompted by UAC, click on Yes to allow the admin privilege.
- Head over to the Networking tab.
- Double-click on Internet Protocol Version 4 (TCP/IPv4).
- Click on Use the following DNS server addresses.
- If any DNS addresses are listed there, write them down for future reference, and remove them.

- Input 8.8.8.8 for Primary DNS and 8.8.4.4 for Secondary DNS.
- Once done, click on OK to save changes.
- Finally, reboot your PC to apply changes immediately.
15. Reinstall Escape from Tarkov
If none of the workarounds did come in handy then make sure to uninstall and reinstall the Escape from Tarkov game on your computer by following the steps below. You’ll be able to resolve multiple conflicts if any kind of game installation conflicts trouble you.
- Open Battlestate Games Launcher.
- Go to the Escape from Tarkov page.
- Head over to Settings > Go to Game Directory.
- Double-click on the uninstall.exe file.
- Click on the Uninstall button to start deleting Escape from Tarkov.
- Follow the on-screen instructions to complete it.
- Once done, restart the PC to apply changes.
- Finally, run the launcher, and reinstall the game. (Try installing on another drive)
16. Contact Support
Last but not least, you should have to contact Escape from Tarkov Support to get better assistance on it. You can also submit a support ticket for the same issue so that the developers can investigate it further.
That’s it, guys. We hope this guide was useful to you. For further queries, you can comment below.
