Sleep Mode is a useful feature that helps your Windows computer to temporarily turn off the system in order to save power energy until users move the mouse cursor or unlock the screen. It seems that after installing the latest Windows builds, some of the users are receiving multiple issues like the Black Screen After Sleep in Windows 10. If you’re also facing the same, check out this guide to fix it.
So, the Windows computer doesn’t wake after putting it into sleep mode for a while. Talking about the reasons behind such an issue, there may be a couple of factors and possible workarounds that we’ve mentioned below. Off the Hibernate mode, changing power options, checking networking settings, updating graphics driver, uninstalling unnecessary programs, updating BIOS, disabling default GPU, etc.
Also Read
Page Contents
How to Fix Black Screen After Sleep in Windows 10
So, without wasting any more time, let’s jump into the guide below.
1. Force Restart the System
If in case, your Windows computer doesn’t wake up after using the sleep mode for a while by moving or clicking the mouse or even pressing the keyboard keys then you should try forcefully restarting the system. It may also indicate that your system is using too many background runnings tasks that are consuming higher system resources. To do so:
- Just make sure to press and hold the Power button of your laptop or desktop CPU until the computer gets turned off completely.
- Once done, wait for around a couple of seconds and then quick-press the Power button again to turn on your Windows computer.
This method should fix the Black Screen After Sleep in Windows 10 easily. However, if this doesn’t help you, make sure to follow the next method.
2. Disable Hibernate
Hibernation is one kind of power down the system just like the sleep mode. While the hibernation mode starts, your computer basically saves the contents of its RAM (Random Access Memory) to a hard disk or other non-volatile storage. So, this can be another reason behind such an issue. In that scenario, you should try turning off the Hibernate mode. To do that:
- Click on the Start Menu > Type cmd.
- Right-click on Command Prompt from the search result.
- Now, select Run as administrator > If prompted by UAC, click on Yes to proceed.
- Once the command prompt window appears, you’ll need to execute the following command:
powercfg /h off
- This will basically turn off the Hibernate Mode on your computer. [Keep in mind that it may not show you any successful message]
- Just close the command prompt window and restart your computer to apply changes.
3. Tweak Power Options
Well, changing power options on your Windows computer can also fix the sleep mode or black screen-related issues very easily. To do this:
- Click on the Start Menu > Type Power Options and click on it from the search result.
- Now, click on Choose what the power button does on the left pane.
- Click on Change settings that are currently unavailable.
- Next, scroll down and you’ll find the Turn on Fast Startup option.
- Just click on the checkbox to uncheck or disable it. [If already turned on]
- Make sure to save the changes and restart your computer two times. [Important to reboot twice]
This should fix the Black Screen After Sleep in Windows 10. However, if the problem still persists, you can follow another method.
4. Check Your Network Settings
- Click on the Wi-Fi or Network icon from the Taskbar.
- Select Network & Internet settings > Click on Change adapter options.
- Now, right-click on the active networking adapter.

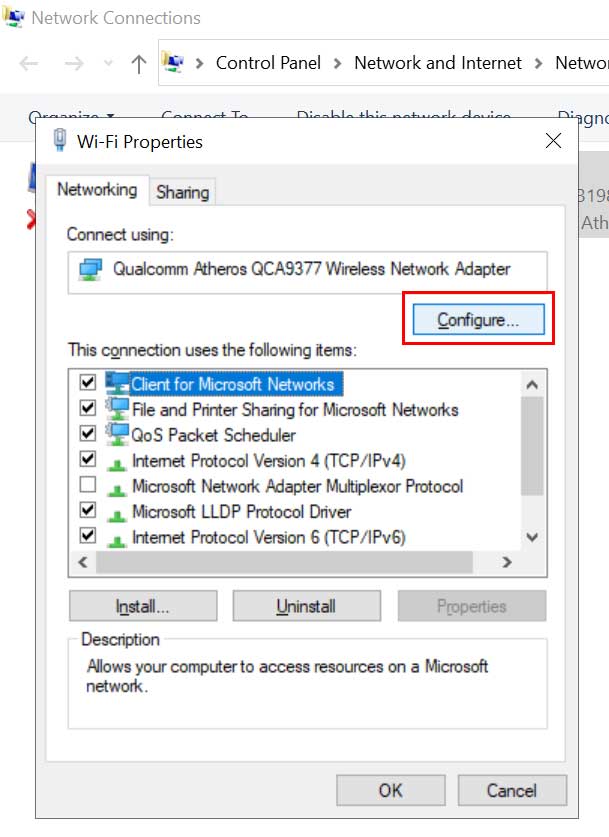
- Select Properties > Click on Configure from the small window.
- If prompted, click on Yes to proceed.
- Next, click on the Advanced tab > Here you’ll find Wake on Magic Packet.
- Set it to Disabled > You can also Disable the Wake on Pattern Match.
- Once done, click on OK to save changes.
- Finally, make sure to restart your computer twice in order to fix the issue.
5. Use a Keyboard Shortcut
If the black screen issue doesn’t get removed after using the sleep mode on your Windows 10 computer then you can also try using a keyboard shortcut. Sometimes using a keyboard shortcut can also restart the graphics driver and maybe your screen should turn on again.
Just press the Windows + Ctrl + Shift + B keys to try waking up the sleep mode or black screen. Although some of the HP users got benefitted from this method, it may not work for all. Still, you can try it.
6. Uninstall Problematic Programs
Sometimes it can be useful to uninstall some of the unnecessary or problematic programs on your Windows computer to fix such issues. To do this:
- Click on the Start Menu > Type Control Panel and click on it from the search result.
- Click on Uninstall a program > Here you’ll need to locate and click on the problematic programs from the list.
- Select Uninstall and try deleting the problematic apps one by one.
- Once done all, make sure to reboot your computer.
7. Update BIOS
It may also possible that the Sleep mode issue is occurring due to the outdated BIOS firmware. Yes! Just like the app updates and software updates, BIOS updates can also fix a lot of system-related and booting-related issues. So, it’s better to update the BIOS (UEFI) firmware.
You can simply head over to your computer manufacturer’s website and check for the latest updates according to your model number. If there is an update available for the motherboard BIOS then you can download and install the update properly.
Keep in mind that while installing and applying the BIOS update, don’t turn off the computer and don’t remove the AC power adapter until the computer starts again.
8. Disable Onboard Graphics Driver
Make sure to disable the onboard graphics driver on your Windows computer in order to quickly resolve the graphics-related glitches or cache data issue. To do so:
- Press Windows + X keys to open the Quick Start Menu.
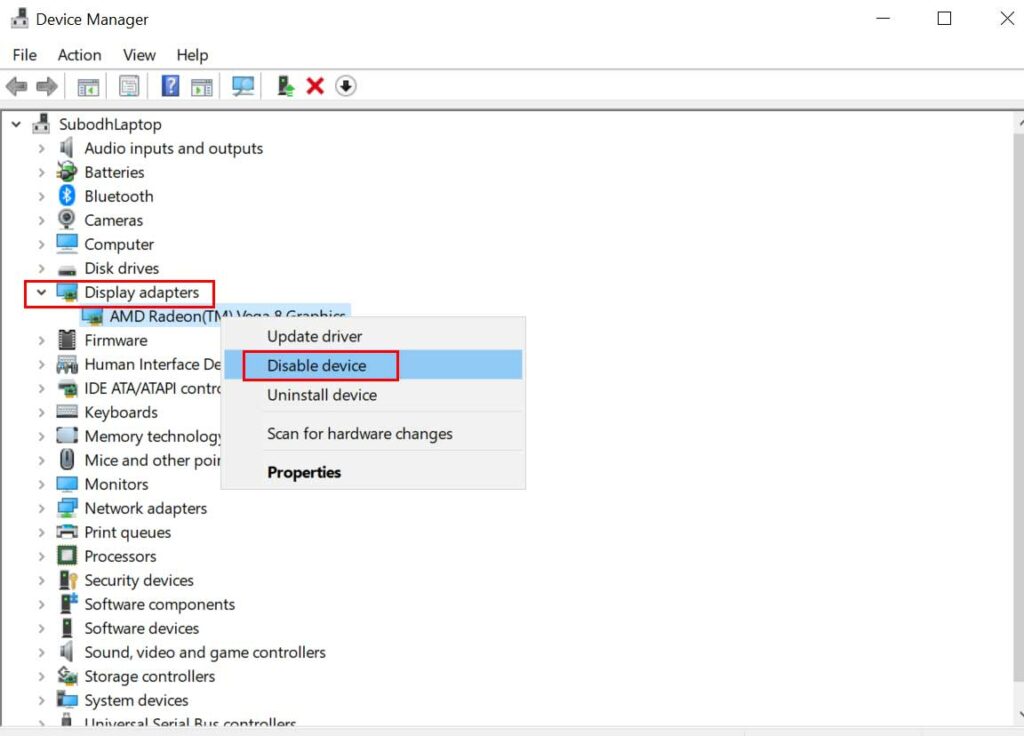
- Now, select Device Manager > Double-click on Display adapters.

- Then Right-click on the onboard GPU > Click on Disable device.
- If prompted by UAC, make sure to click on Yes to proceed.
- Finally, you should restart your computer to apply changes.
This method should fix the Black Screen After Sleep in Windows 10 computer.
9. Disable Sleep Mode
If you’re unable to resolve the black screen issue after having the sleep mode for a while, then make sure to disable the Sleep Mode from your computer. To do that:
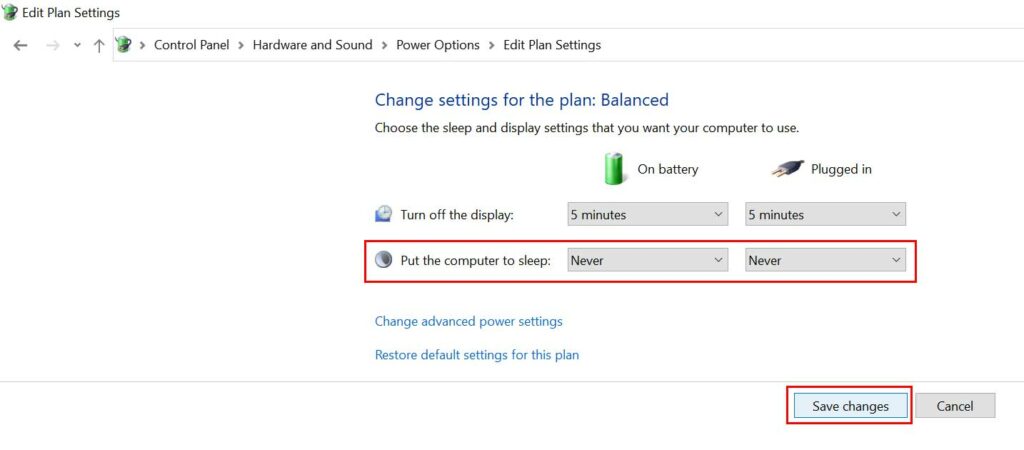
- Click on the Start Menu > Type Power and click on Edit Power Plan from the search result.
- Select Never for the Put the computer to sleep option for both the On battery and Plugged in categories.

- Once done, click on Save changes.
- You can restart your computer to apply changes.
10. Update Windows OS Build
If none of the above methods don’t work for you, make sure to check for Windows updates by following the steps below:
- Press Windows + I keys to open Settings.
- Click on Update & Security > Click on Check for updates.
- If there is an update available, you can click on Download and Install it.
- Let the system install and restart your computer to apply the update.
11. Update Graphics Driver
- Press Windows + X keys to open the Quick Access Menu.
- Now, select Device Manager > Double-click on Display adapters to expand it.
- Right-click on the active device > Select Update driver.
- Choose Search automatically for drivers > If there is an update available, it’ll automatically download and install the update.
- So, let the process to complete. Once done, restart your system.
12. Run SFC
System File Checker (SFC) is a utility tool in Microsoft Windows that allows users to scan for corrupted Windows system files and restore them automatically. This method should fix the error completely.
- Click on the Start Menu and type cmd.
- Now, right-click on Command Prompt from the search result.
- Select Run as administrator > If prompted, click on Yes to give admin privileges.
- Once the command prompt window opens, type the following command and hit Enter to execute it:
SFC /scannow
- Now, wait for the process to complete.
- Make sure to restart your computer to apply changes.
That’s it, guys. We assume this guide was helpful to you. For further queries, you can comment below.
