Fortnite has become one of the popular online battle royale video games that have been appreciated by millions of active players. It’s been a couple of years since the game releases but the in-game bugs or errors can be a headache. However, it seems that the online connectivity error is troubling a lot of players that we can’t deny. Recently, multiple players have encountered the Fortnite Matchmaking Error 1 while trying to connect to the multiplayer mode online.
This specific matchmaking error appears quite often and needs to be fixed by the developers ASAP. However, you should try performing some workarounds until the error has been fixed. The chances are high that temporary system glitches, an outdated game patch version, missing game files, internet connection issues, VPN connectivity issues, DNS address conflicts, issues with the server region, party joining errors, antivirus or firewall blocking issues, and more. But there is nothing to worry about it.

Page Contents
- How to Fix Fortnite Matchmaking Error 1
- 1. Reboot the PC
- 2. Check Your Internet Connection
- 3. Check for Epic Games Status
- 4. Run Fortnite as an Administrator
- 5. Update Fortnite
- 6. Scan and Repair Game Files
- 7. Disable Antivirus
- 8. Whitelist Fortnite in Windows Firewall
- 9. Disable VPN or Proxy Servers
- 10. Change the DNS Address
- 11. Switch the Matchmaking Region
- 12. Join a Party and Leave It
- 13. Ensure Windows Date and Time is Correct
- 14. Contact Epic Games Support
How to Fix Fortnite Matchmaking Error 1
Fortunately, here we’ve shared with you some workarounds that should come in handy. Make sure to follow all troubleshooting methods until the problem has been fixed. So, without wasting any more time, let’s jump into it.
1. Reboot the PC
Before performing other workarounds, it’s recommended to reboot the system manually. By doing so, you’ll be able to clear temporary system glitches or cache data issues whatsoever. Go to the Start menu > Click the Power icon > Select Restart.
2. Check Your Internet Connection
It seems that your internet connection is getting slow or unstable which might trigger game connectivity errors in the matchmaking. You should check the internet connection properly and then connect the wired (ethernet) connection to a wireless network or vice versa. You can also run a speed test of the connected internet via the online platforms to ensure there is no issue with the active network that you’re using. You can also contact your internet service provider (ISP) to get technical assistance.
3. Check for Epic Games Status
You should check the Epic Games Server Status at your end to ensure there is no issue with the server downtime or outage. Sometimes technical faults or server downtime can trigger a Fortnite matchmaking error #1 for the players. If the server outage is happening, just wait for a couple of hours before trying again.
4. Run Fortnite as an Administrator
Make sure to run the game exe file as an administrator to avoid user account control regarding privilege issues. You should also run the game client as an administrator on your PC. To do this:
- Right-click on the Fortnite.exe app file on your PC.
- Now, select Properties > Click on the Compatibility tab.

- Enable the Run this program as an administrator checkbox.
- Click on Apply and select OK to save changes.
5. Update Fortnite
Another thing you should do is update your Fortnite game on the PC by following the steps below to ensure there is no outdated patch version troubling you. Sometimes an outdated game patch version can cause several issues with the multiplayer connectivity errors.
- Open the Epic Games Launcher > Click on Settings.
- Scroll down to the Manage Games section.
- Select the Allow Auto-Updates checkbox.
- Expand the menu for Fortnite.
- Make sure the game is set to Auto-update.
- Exit the launcher and open it again to refresh the system.
6. Scan and Repair Game Files
Sometimes corrupted or missing game files might trouble you a lot with the game logging or matchmaking errors. It’s recommended to verify and repair the game files by following the steps below to fix it.
- Open the Epic Games Launcher > Go to your Library.
- Click on the three-dot icon next to Fortnite.
- Click on Verify > Wait for the repair process to be completed.
- Once done, reboot the PC to apply changes.
7. Disable Antivirus
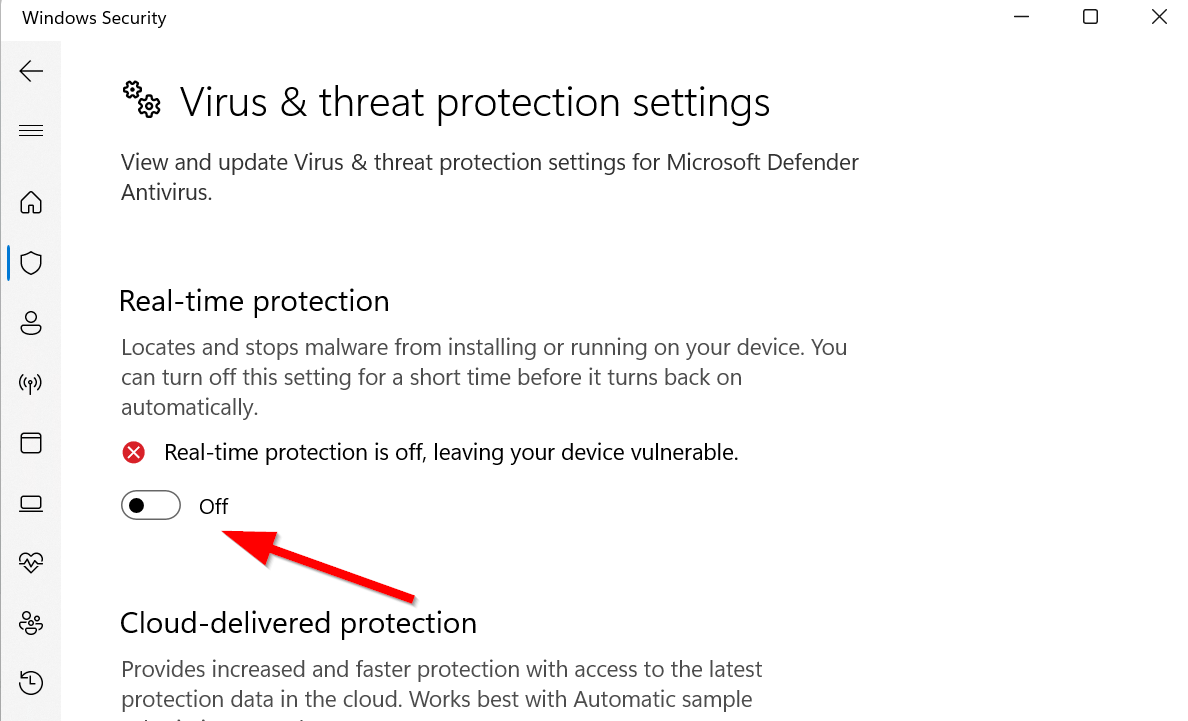
Another thing you can do is to disable the anti-virus protection on your Windows computer manually to prevent game application blocking by the aggressive real-time protection scanning in the background. If you’re using the default Windows antivirus that comes pre-installed then check the following steps to turn it off.
- Press the Win+I keys to open Windows Settings.
- Click on Update & Security > Go to Windows Security.
- Now, click on Open Windows Security > Select Virus & Threat Protection.

- Select Manage Settings > Go to Real-time protection and Turn it Off.
- If prompted, click on Yes to continue.
- Now, you can run the game again to check for the issue.
Please Note: If you’re using any other third-party antivirus program on your PC then turn off the real-time protection feature via the program settings menu.
8. Whitelist Fortnite in Windows Firewall
Well, you can try whitelisting the Fortnite program in the Windows Firewall protection by following the steps below to avoid game connectivity errors in most cases.
- Open the Start menu > Search and open Control Panel.
- Go to Systems and Security > Open Windows Firewall.
- Select Allow an app or feature through Windows Firewall.
- Now, click on Change settings > Select Allow another app.
- Select Browse > Click to select Fortnite.
- Click on Add > Save changes and proceed.
9. Disable VPN or Proxy Servers
We suggest you not use any kind of VPN (Virtual Private Network) or proxy servers at your end to avoid server connectivity issues. The chances are high that using a VPN is probably causing ping delay issues which eventually increases server connectivity errors. So, make sure to temporarily disable the VPN service and then run the server connectivity issue again.
10. Change the DNS Address
You can use the Google DNS address manually on the PC to fix server connectivity or matchmaking issues with your active internet properties. You can try following the steps below to check for the issue again.
- Press the Win+R keys to open the Run dialogue box.
- Now, search and open the Control Panel.
- Click on Network and Internet > Select Network and Sharing Center.
- Go to your Connections to select Ethernet, Wi-Fi, etc what you’re using.
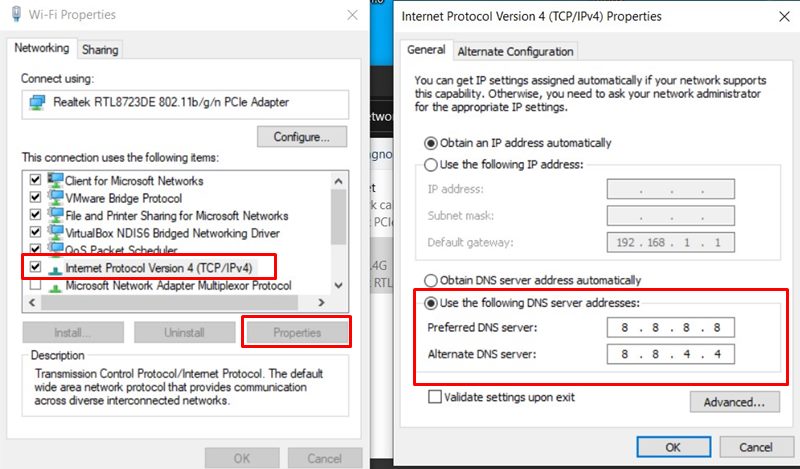
- Next, click on Properties > Double-click on Internet Protocol Version 4 (TCP /IPv4) to open a new window.
- Click on Use the following DNS server addresses.
- Set the 8.8.8.8 value as a Preferred DNS server address.

- Enter 8.8.4.4 as the Alternate DNS server.
- Click OK to confirm the changes.
- Once done, reboot the PC to change effects immediately.
11. Switch the Matchmaking Region
Try switching the matchmaking region server from the Fortnite game settings manually to check if the server connectivity issue has been fixed or not. By selecting the region to auto, you’ll be able to use the best possible server for your nearest location which basically helps in improving matchmaking processes. Several players have found this method useful enough and you can also check for the same.
- Launch Fortnite > Go to the Settings menu.
- Click on the Game Settings menu (gear icon).
- Scroll down to the Matchmaking Region section.
- Click on Auto to select it.
- Save your changes and relaunch the game to check for the Fortnite Matchmaking Error #1.
12. Join a Party and Leave It
Another thing you can try is joining a party and then leaving the party manually to check if the Fortnite Matchmaking Error #1 still bothers you or not. It’s better to go back from the ready mode in the party to avoid the matchmaking connectivity loop that you’re experiencing at the moment.
- Launch Fortnite > When you’re ready, join a party with your friends.
- Now, wait for the matchmaking error to happen again.
- Go to the Party menu.
- Ensure to select the Leave Party option.
- Then select the Solo mode > Start the matchmaking process further.
13. Ensure Windows Date and Time is Correct
You might also set the correct date and time on your Windows computer manually by following the steps below. Sometimes an incorrect date & time on the system might also trigger several issues with the game launching or server connectivity errors. It’s also important to set the correct timezone depending on your region. To do so:
- Press the Win+I keys to open Windows Settings.
- Click on Time & Language > Click on Date & Time.
- Make sure that the Set time automatically should be turned off.
- Next, select the correct Time zone as per your country/city.
- Then Turn On the Set time automatically option again.
- Click on Sync now to check if the date and time show correctly.
- Otherwise, click on Additional Clocks.
- Click on the Date and Time tab.
- Now, click on Change date and time > Go to Calendar settings.
- Set the date and time format > Click on Apply and then OK.
- Click on OK again and reboot the PC.
14. Contact Epic Games Support
If none of the methods worked for you then make sure to contact Epic Games Fortnite Support for further assistance. You can create a support ticket for the same. With the help of a ticket, Epic Games will investigate the issue and try resolving it from the server side.
That’s it, guys. We assume this guide was helpful to you. For further queries, you can comment below.
