If you messed around with audio and sound settings on your computer (even if for just a little bit) in the heydays of Windows 7, then chances are that you are conversant with Realtek HD Audio Manager. Characterized by a chocolate-coloured speaker icon in the hidden icons list on the Windows taskbar, Realtek Audio Manager is most probably the oldest sound management application and driver currently in existence in the Windows ecosystem, and the reality is that it’s still very much in use, even in Windows 10.
Also Read
![]()
We’ve seen reports all over the internet of Windows 10 users complaining about Realtek HD Audio Manager not opening or working on their computers, and to this end, I’ve put together this article on how to fix it.
I mentioned up there that Realtek HD Audio Manager is still very much in use even in Windows 10. While you might not see the chocolatey speaker icon in your taskbar or use the vintage-looking Audio Manager interface that characterized the driver’s application GUI, many modern Sound/Audio Manager applications on Windows 7, Windows 8 and Windows 10 use Realtek Audio Manager. I’ll explain.
My HP laptop comes with Beats Audio, and I’ve used the application to enhance audio from different sources on my laptop many times. So imagine my surprise when, during the course of writing this article and ensuring I’m putting down correct info, I attempted to launch the Realtek HD Audio Manager GUI application (by opening the corresponding .exe file in Program Files), and my Beats Audio app was launched instead.
So in essence, you probably still need the Realtek High Definition Audio driver and its corresponding applications on your laptop, even if you use other audio managers like Beats Audio. If you’ve attempted to launch the app and it wasn’t opening, or you even managed to get it to launch and your applied settings aren’t working, the methods discussed below will help you fix the issue.
Page Contents
- Methods to Fix Realtek HD Audio Manager Not Opening/Working in Windows 10
- 1. Confirm Existence of Realtek HD Audio Manager Folder in Program Files
- 2. Enable Realtek HD Audio Manager in Windows Startup Settings
- 3. Update your Windows OS
- 4. Run the Audio Playback Troubleshooter
- 5. Refresh Installed Audio Drivers in Device Manager
- 6. Automatically Update Audio Drivers in Device Manager
- 7. Rollback Audio Drivers in Device Manager
- 8. Uninstall Audio Drivers in Device Manager
- 9. Download and Manually Install Realtek Audio Drivers
Methods to Fix Realtek HD Audio Manager Not Opening/Working in Windows 10

As with almost any issue in the Windows operating system, there are multiple ways to solve this issue causing the Realtek High Definition Audio Manager app to stop opening or working on Windows 10.
Below are the methods that have been tested and confirmed to work in different scenarios, so try each one of them and you’re sure to find a fix in one for your specific case.
1. Confirm Existence of Realtek HD Audio Manager Folder in Program Files
Before we come around to fixing the issue, we should first confirm if the Realtek High Definition Audio Manager driver and the application still exist on the computer, and the best way to do that is to check the Program Files directory on the primary disk for your Windows installation.
To do this, simply open your File Explorer and navigate to This PC > Windows (C:) > Program Files and scan for a folder named Realtek. There are several courses of action based on whether the folder exists in that directory or not.
Scenario 1: The Realtek folder exists in Program Files
If the folder exists there, open it and further navigate to Audio > HDA and confirm that the folder structure is similar to that in the image below and that at least the four files listed below exist in the folder:
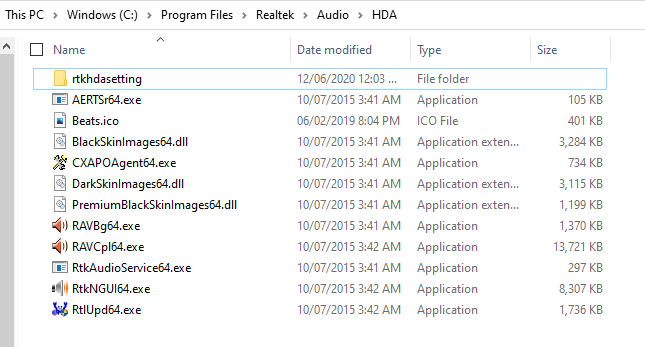
- RAVBg64.exe
- RAVCpl64.exe
- RtkAudioService64.exe
- RtkNGUI64.exe
If your Realtek/Audio/HDA folder structure is similar to mine or those four files listed above exist in the folder, and the program is still not opening or working on your Windows 10, you can then proceed to try methods 2-7 below.
Scenario 2: The Realtek folder does not exist in Program Files
If the Realtek folder does not exist in the Program Files directory on your computer, then that means that Realtek HD Audio Manager is not even installed on the system in the first place. Try out methods 3 and 5-8 discussed below if this scenario applies to you.
2. Enable Realtek HD Audio Manager in Windows Startup Settings
Realtek HD Audio Manager still not opening or working in Windows 10 for you? It might just be that the application is disabled in your Windows Startup Settings, which will prevent the necessary background services from running when the computer starts up.
First, confirm if the app is really disabled by opening the Task Manager on your computer, navigating to the “Startup” tab and checking the “Status” tab for the “Realtek HD Audio Manager” listing.
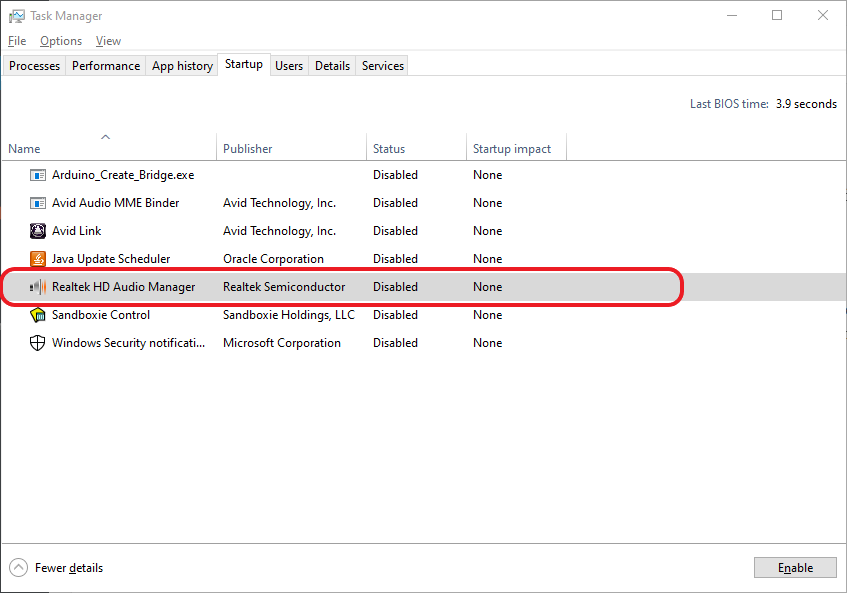
If it shows “Disabled”, simply right-click on the listing and select “Enable”.
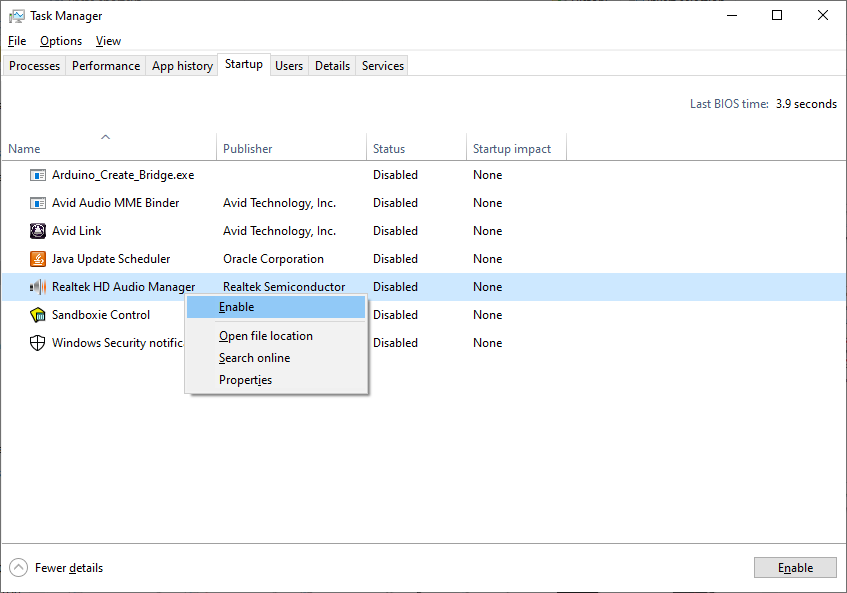
Then restart your computer and you should see the icon for Realtek Audio Manager in the taskbar, and the application should now open up and work. If it doesn’t, proceed to alternative solutions below.
3. Update your Windows OS
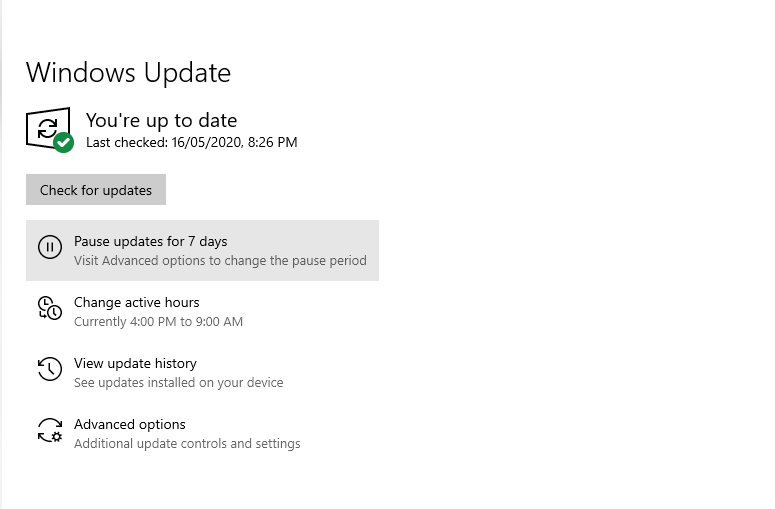
It’s become a thing of legend that almost any issue that occurs on Windows can be fixed by running the Windows Update program, and it’s no different in this case.
This works because, during a Windows Update, the system checks for all outdated files and installs the latest updates, and in addition downloads and installs missing files and programs that are deemed important for the proper functioning of the OS. Realtek HD Audio Manager is considered one of those programs.
So go ahead, open up the Settings app, check for updates and download/install any available updates, restart your computer and check if the issue has been fixed.
4. Run the Audio Playback Troubleshooter
The Windows Troubleshooter is another useful tool included in Windows for helping out with issues like this. There are different types of troubleshooters in Windows 10, so for this particular issue treated in this article, we’ll be using the Audio Playback troubleshooter.
Here are the steps to run the troubleshooter in hopes of fixing the Realtek Audio Manager issue:
- Open Control Panel on your computer.
- Search for “Troubleshooting” and click on the first item in the search results list to open the Troubleshooting window.
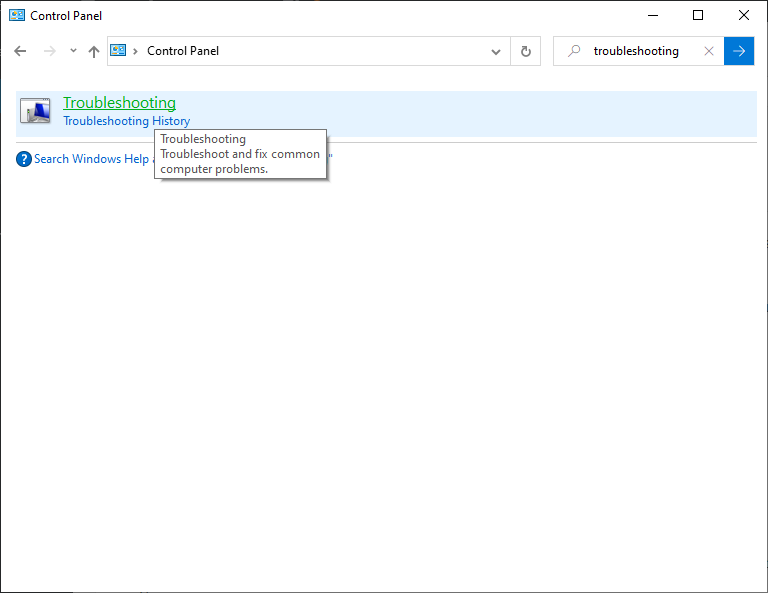
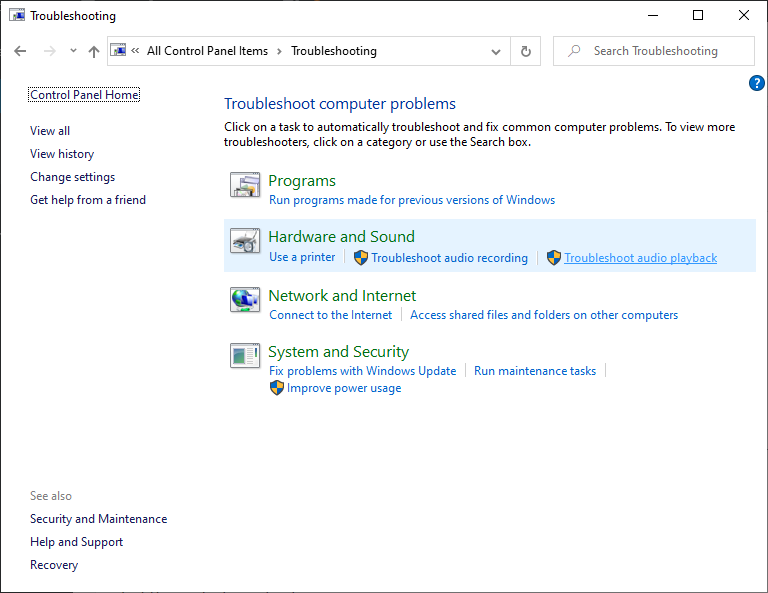
- Under the Hardware and Sound entry, click on “Troubleshoot audio playback”.
- In the window that pops up, click on the “Next” button to start the troubleshooter.
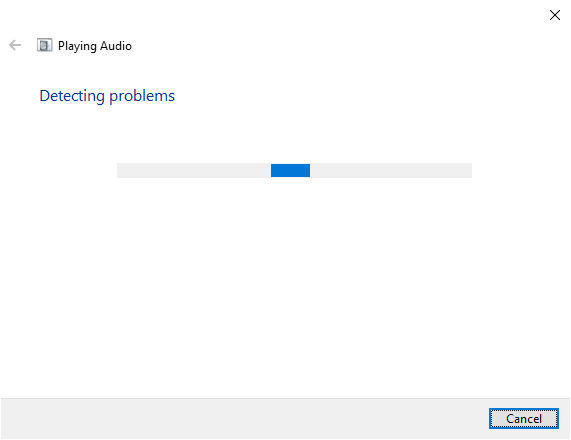
- Follow the prompts given by the troubleshooter to fix whatever issues were found. You might need to restart your PC several times to finalize the changes made, and it’s advisable to run the troubleshooter again and again until no issues are found.
Hopefully, one of the issues that will be found by the troubleshooter is that affecting the Realtek Audio Manager program, and it will be fixed. If, however, it doesn’t still get fixed, try other methods below.
5. Refresh Installed Audio Drivers in Device Manager
Sometimes, the installed program might just need a jolt to bring it back alive, and a perfect way to do that is to refresh the drivers for Realtek Audio via the ever-useful Device Manager application on Windows 10. Here are the steps for doing that:
- Search for “Device Manager” in the Start Menu or press Windows+R on your keyboard, type in “devmgmt.msc” and press Enter.
- Click on the “>” icon to the left of “Sound, video and game controllers” to expand it.
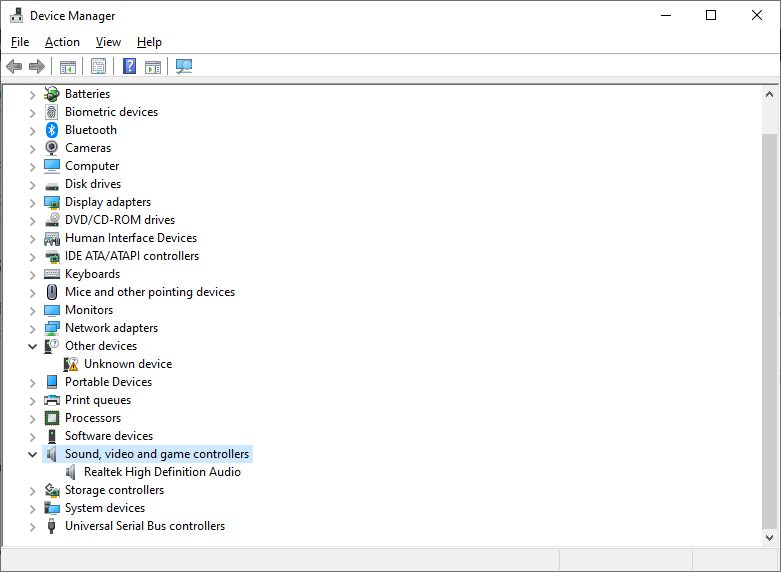
- Right-click on “Realtek High Definition Audio” and select “Update Driver”.
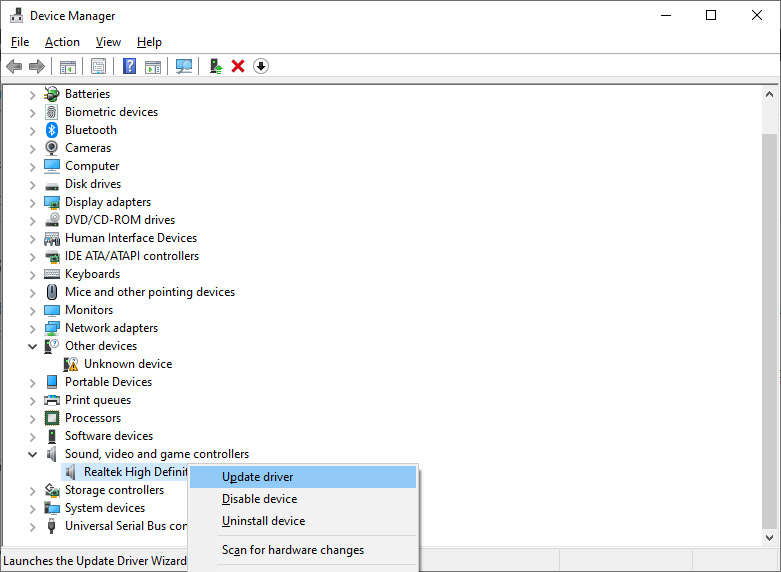
- Select the second option, “Browse my computer for driver software”.
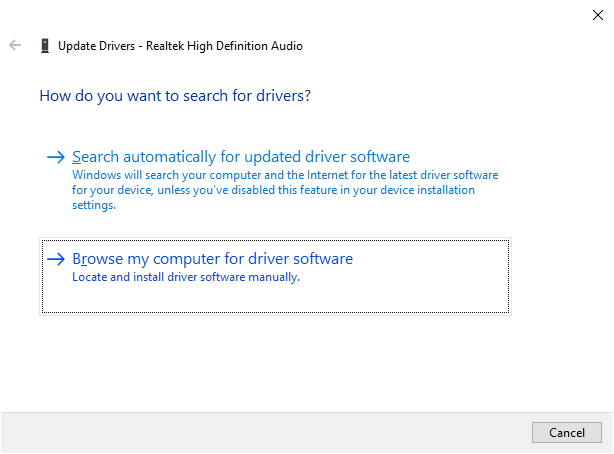
- On the next screen, select “Let me pick from a list of available drivers on my computer”.
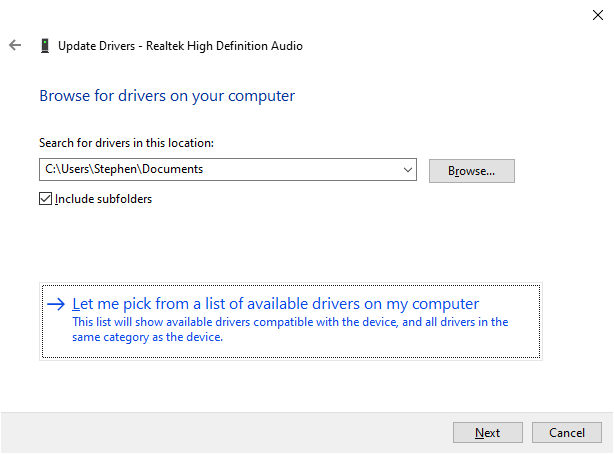
- Two driver options should appear on the next screen. Select “Realtek High Definition Audio” and click on Next.
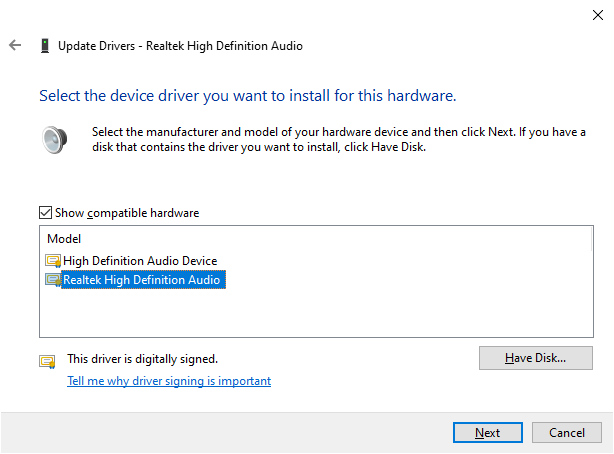
- The system will start refreshing the audio driver. Wait for the process to finish.
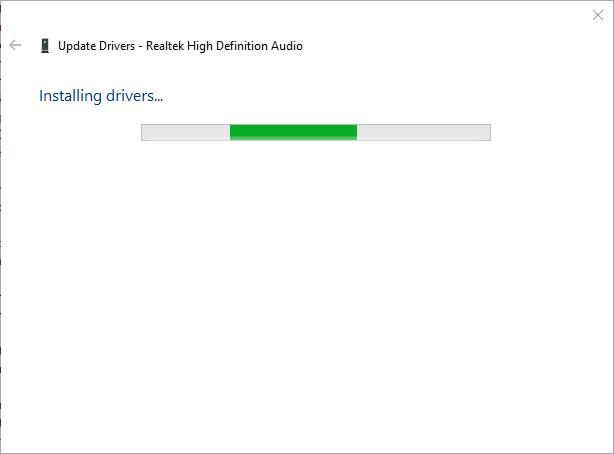
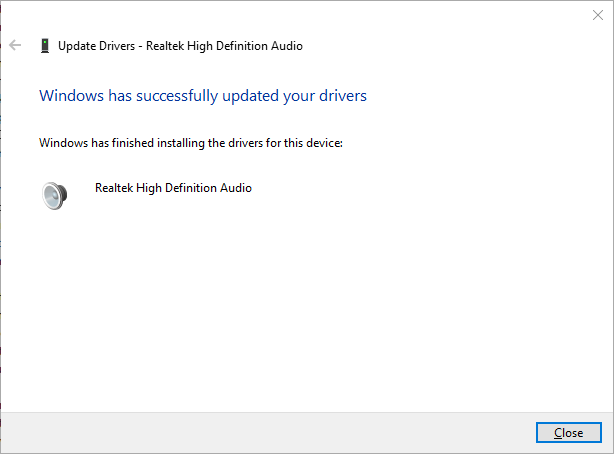
- When the refresh is complete, close all windows and restart your PC.
6. Automatically Update Audio Drivers in Device Manager
If Windows Update somehow doesn’t manage to automatically update the Realtek HD Audio driver on your computer, you can trigger the update yourself in the Device Manager application.
- Open the Device Manager app as previously described.
- Expand the “Sound, video and game controllers” section.
- Right-click on “Realtek High Definition Audio” and select “Update Driver”.
- Select the first option, “Search automatically for updated driver software”. Make sure you’re connected to the internet before doing this.
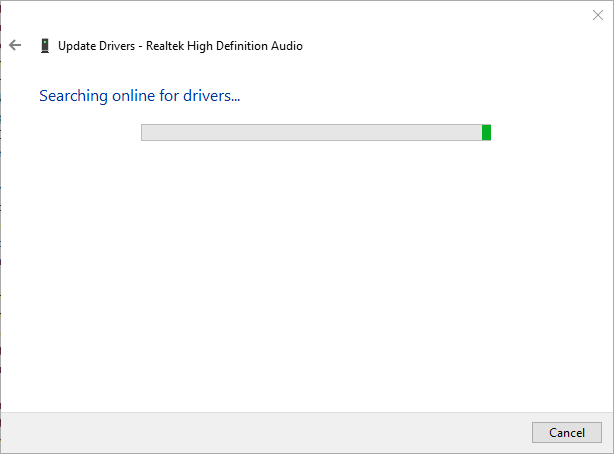
- If updates are found for the driver, follow the prompts to download and install them.
After installing whatever updates are found for the Realtek High Definition Audio driver, restart your PC and the issue should be fixed.
7. Rollback Audio Drivers in Device Manager
If the methods 5 and 6 above do not work, then it might be that you need to roll back to an old version of the audio driver, instead of updating it to a new version or refreshing the installed version. Here are the steps to do that via Device Manager:
- Open the Device Manager app as previously described.
- Expand the “Sound, video and game controllers” section.
- Right-click on “Realtek High Definition Audio” and select “Properties”.
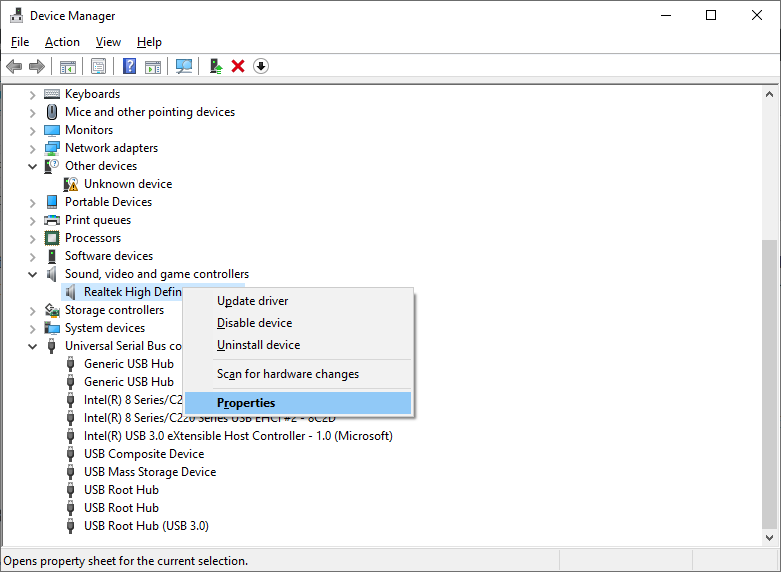
- Navigate to the Driver tab on the Properties windows and click on “Roll Back” driver.
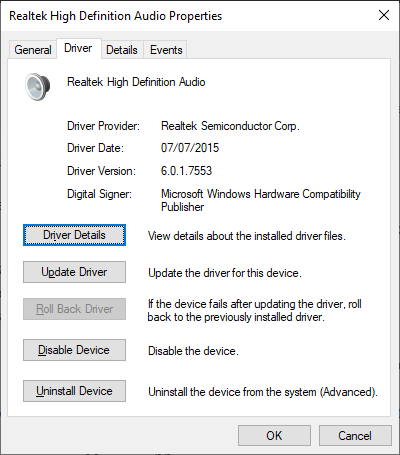
The option would be enabled only if you’ve previously updated the driver - Follow the prompts to finish the rollback, and restart your PC.
8. Uninstall Audio Drivers in Device Manager
This is usually the last trick in the book, and it’s a method well-known to those that have had to deal with several driver issues on Windows, right from the days of Windows 7.
Whenever you uninstall a driver on Windows and restart your PC, the operating system automatically reinstalls that driver when the PC is started up again, and this can help fix any issues you might have with the driver.
It might also fix the Realtek HD Audio Manager Not Opening Working Windows 10 issue. Here are the steps:
- Open the Device Manager app as previously described.
- Expand the “Sound, video and game controllers” section.
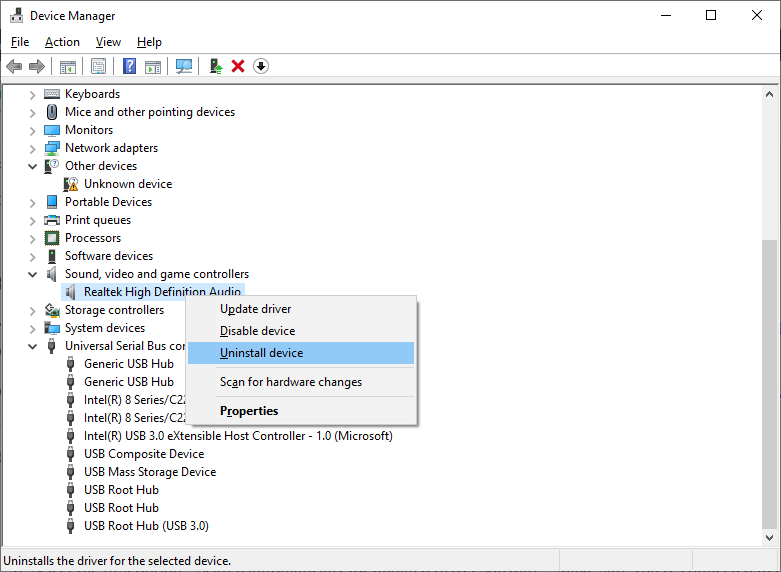
- Right-click on “Realtek High Definition Audio” and select “Uninstall device”.
- IMPORTANT: On the window that pops up to confirm your decision to uninstall the device, make sure the checkbox next to the “Delete the driver software for this device” is unticked. The OS will not be able to automatically reinstall the driver if the driver software is deleted.
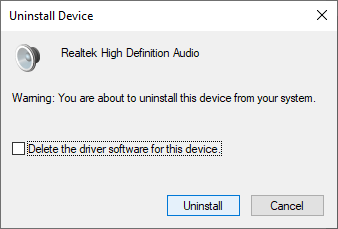
- Finally, click on “Uninstall”.
- After the uninstall is complete, restart your PC.
9. Download and Manually Install Realtek Audio Drivers
Did I say last trick in the book? Oh, I was wrong! All the methods discussed so far have been ways to get the Windows 10 operating system to do the hard work for you, and if they have all failed, it’s time for you to handle it yourself. Manually.
You can fix issues causing the Realtek HD Audio Manager to not open or work in Windows 10 by downloading and manually installing the audio drivers for Realtek.
Fortunately, we’ve made a list of download links for the Realtek Audio drivers for different types of PC. Alternatively, you can download the Realtek HD Audio Manager driver for Windows directly from the Realtek website.
Download the driver file for your PC from the list, and follow the below steps to install the driver via the .inf file downloaded:
- Open the Device Manager app and expand the “Sound, video and game controllers” section.
- Right-click on “Realtek High Definition Audio” and select “Update Driver”.
- Select the second option, “Browse my computer for driver software”.
- On the next screen, select “Let me pick from a list of available drivers on my computer”.
- On the next screen, select “Have Disk” at the bottom right of the list of drivers.
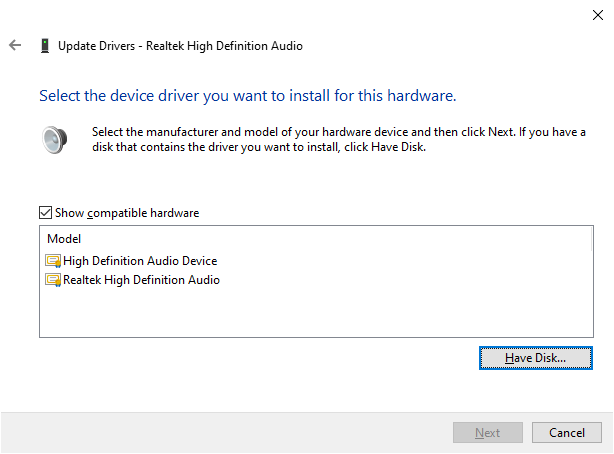
- There will be a new window prompt for you to select the driver installation file from your PC, so click “Browse”.
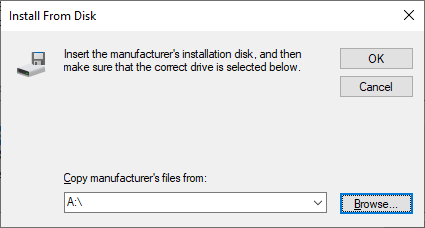
- Navigate to the directory on your PC where you have the extracted folder, and locate the “.inf” file for the driver and select it. The file might be nested in several folders.
- Click on the “open” button and select OK on the “install from disk” prompt that comes up next. Wait for the installation process to finish.
- When the process is complete, close all windows and restart your PC.
I made a lot of research while writing this guide, and the above all are the methods I found for fixing this issue of Realtek HD Audio Manager not opening or working on Windows 10. Let us know in the comments section if any of them worked for you, or if you were able to resolve the issue on your PC via different methods.
