Using High CPU or other system resources in the background on a Windows machine can be frustrating enough that we can’t deny it. The Finals is the newly released free-to-play first-person shooter title that consumes higher resources on the system to run the program smoothly enough. Even if you have a powerful configuration, sometimes the high CPU usage issue can be problematic. Meanwhile, some players report about The Finals High CPU Usage while running the PC.
In this combat-centered virtual arena game, players must use teammates to get into the gaming experience, where teams can alter and exploit surroundings. However, it seems that several players are unfortunate enough to go through higher usage of the system resources. This affects the overall gameplay and reduces performance. Additionally, some other issues might occur at times, like stability issues with the system, hardware overheating, and more.

Page Contents
- How to Fix The Finals High CPU Usage
- 1. Reboot the PC
- 2. Check the System Requirements
- 3. Run The Finals as an Administrator
- 4. Update The Finals
- 5. Verify the Integrity of the Game Files
- 6. Update the CPU Driver
- 7. Check for Graphics Driver Updates
- 8. Close Background Tasks
- 9. Adjust The Finals Graphics Settings
- 10. Set a High Priority
- 11. Shut Down Your PC to Cool Down
- 12. Perform a Clean Boot
- 13. Try Upgrading RAM
How to Fix The Finals High CPU Usage
If we talk about High CPU usage, it may arise due to some potential reasons such as outdated graphics drivers, an outdated game version, corrupted game files, incompatible specifications, third-party background processes, poor internet connection, and more. Thankfully, we’ve shared a couple of workarounds that should be useful. Make sure to follow all troubleshooting methods until the problem has been fixed. So, without further ado, let’s jump into it.
1. Reboot the PC
First, you can try rebooting the desktop or laptop to ensure no issue with the temporary system glitch or cache data. Sometimes, a normal restart of the system can resolve multiple issues with the system’s performance. Rebooting the PC doesn’t take too long, so you can try it out.
2. Check the System Requirements
It’s highly recommended to cross-check the system requirements of the Rust game to ensure there is no compatibility issue with the PC specification. Sometimes, not running the game with the required specs might trouble you with the smoother gaming experience. Both the minimum and recommended system requirements are mentioned below for your ease. If your PC specs don’t meet the requirements, upgrade the specific hardware or software respectively.
MINIMUM:
- OS: Windows 10 or later 64-bit (latest update)
- Processor: Intel Core i5-6600K or AMD Ryzen R5 1600 processor
- Memory: 12 GB RAM
- Graphics: NVIDIA GeForce GTX 1050 Ti or AMD Radeon RX 580
- DirectX: Version 12
RECOMMENDED:
- OS: Windows 10 or later 64-bit (latest update)
- Processor: Intel Core i5-9600K or AMD Ryzen 5 3600 processor
- Memory: 16 GB RAM
- Graphics: NVIDIA GeForce RTX 2070 or AMD Radeon RX 5700 XT
- DirectX: Version 12
3. Run The Finals as an Administrator
It’s also recommended to run The Finals as an administrator on the PC by following the steps below to allow the User Account Control (UAC) permission. It eventually allows the system to run the game client and game application properly without any permission conflicts.
- Right-click on TheFinals.exe application on your PC.
- Select Properties > Click on the Compatibility tab.

- Click on the Run this program as an administrator checkbox to enable it.
- Once done, click on Apply > Select OK to save changes.
4. Update The Finals
Mostly an outdated game patch version might trouble you a lot with the errors. You can check for the game updates to the latest version to ensure there is no issue with downloading or installing the game patch. Make sure to follow the steps below to do so:
- Open the Steam client > Go to Library.
- Click on The Finals from the left pane.
- Now, Steam will automatically search for the available update.
- If there is an update available, click on Update.
- Wait for a couple of minutes to complete the update.
- Once done, close Steam, and reboot your PC to apply changes.
5. Verify the Integrity of the Game Files
Sometimes there might be an issue with the installed game files like corrupted or missing game files on the PC. It eventually causes game performance issues.
- Launch the Steam client > Click on Library.
- Right-click on The Finals from the list of installed games.
- Click on Properties > Go to the Local Files files.

- Click on Verify Integrity of Game Files.
- You’ll have to wait for the process until it gets completed.
- Once done, restart your computer.
6. Update the CPU Driver
You should always check and update the processor driver to the latest version to avoid potential bugs, glitches, and incompatibility issues. An outdated CPU driver might cause high CPU usage while running games which can trigger performance drops.
- Press the Win+X keys to open the Quick Link Menu.
- Click on Device Manager from the list.
- Double-click on Processors.
- Right-click on the specific chipset > Click on Update Driver.
- Click on Search automatically for drivers.
- If an update is available, the system will automatically install the update.
- Once done, reboot the PC to apply changes.
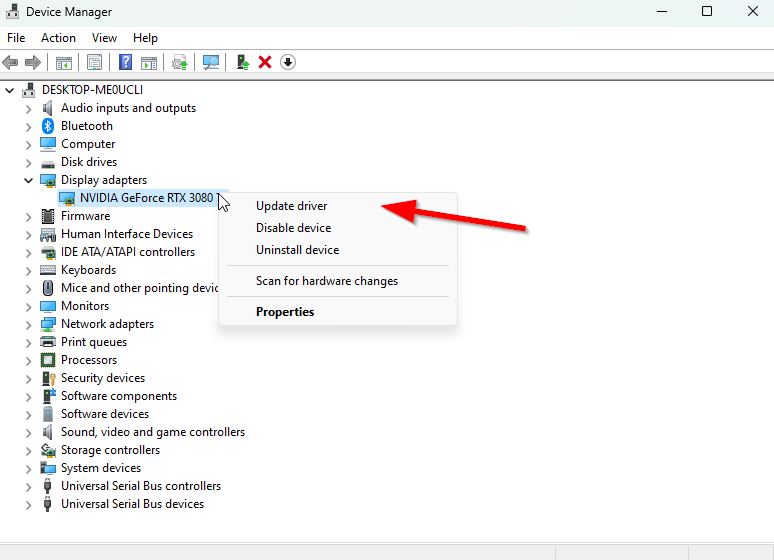
7. Check for Graphics Driver Updates
An outdated or corrupted graphics card driver can trigger multiple game or system performance issues while running programs. It’s highly recommended to check the graphics driver update. To do so:
- Press the Win+X keys to open the Quick Link Menu.
- Click on Device Manager from the list > Double-click on Display adapters.
- Right-click on the dedicated graphics card that you’re using.

- Click on Update driver > Choose Search automatically for drivers.
- If the latest update is available, it’ll automatically download & install the latest version.
- Once done, restart the computer to apply changes immediately.
Alternatively, you can manually download the latest graphics driver version and install it on the PC via the official website. Download the graphics driver file respective to your graphics card model and manufacturer from the links below.
8. Close Background Tasks
Sometimes closing the background tasks that are not necessary for you to run always might help in boosting the system performance or specific app performance. Otherwise, third-party tasks can consume a lot of system resources in the background without notifying you.
- Press the Ctrl+Shift+Esc keys to open the Task Manager.
- Click on the Processes tab > Click on a particular task consuming higher resources.
- Now, click on End Task to close the same.
- Do the same steps for each unnecessary task individually.
- Once done, restart your PC to apply changes.
9. Adjust The Finals Graphics Settings
It looks like the in-game graphical settings can also trouble you a lot when the system resources are higher for the video games. Some of the adjustments or tweaks can easily reduce the impact on the system resources quite efficiently. In that case, the specific program will run smoothly without increasing the usage of the CPU. You can check the following steps to do so:
- Launch The Finals > Head over to the Settings menu.
- Set Graphics Quality to Medium / Low.
- Disable – Anti-Aliasing > Disable – Post-Processing effects.
- Reduce – Render Distance > Reduce – Environment Details.
- Set the Frame Rate limit to your monitor’s native refresh rate.
10. Set a High Priority
Make sure your program is not taking too many system resources in the background which can conflict with the system performance for other programs or games whatsoever. It’s recommended to set a lower priority from the Task Manager settings to run the Steam client or The Finals at the optimum level. To do this:
- Right-click on the Start Menu > Select Task Manager.
- Click on the Processes tab > Right-click on the Steam or The Finals task.
- Select Set Priority to High > Close Task Manager.
- Finally, run the program to check for the issue.
11. Shut Down Your PC to Cool Down
You can try shutting down the computer for a few minutes or more to easily cool it down because too much overheating to the hardware might trouble you a lot. It’ll also be a better option to shut down the system to avoid any further damage to the hardware due to overheating.
12. Perform a Clean Boot
Multiple users claimed that performing a clean boot on the PC fixed the system boot-up issue because some apps or tasks start initially. These tasks run all the time and consume a lot of system resources. You should follow the steps below to do so:
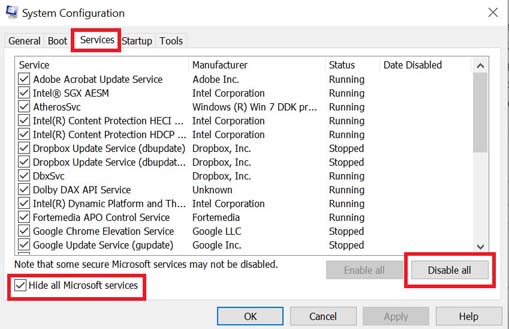
- Press the Win+R keys to open the Run dialogue box.
- Type msconfig and hit Enter to open System Configuration.
- Go to Services > Click on Hide all Microsoft services to select it.

- Now, click on Disable all so that the rest of the services are turned off.
- Click on Apply and then OK to save changes.
- Next, go to Startup > Click on Open Task Manager.
- Click on the Startup tab > Ensure to select the specific task with a higher startup impact.
- Now, click on Disable to turn it off.
- Finally, make sure to restart your computer to apply changes.
13. Try Upgrading RAM
Last but not least, even if you’re using the recommended 16GB of RAM, we suggest you increase or upgrade the RAM option to play the game much smoother than expected. In case, you’re using less than 16GB of RAM then it’s always recommended to increase the RAM. To do so:
- Shut down your PC and unplug the power supply.
- Open the case panel > Check for the motherboard’s RAM slots.
- Remove the RAM stick(s) gently.
- Now, insert the upgraded RAM stick(s) into the slots properly.
- Then close the case panel > Connect to the power supply.
- Finally, power on the computer to check again.
That’s it, guys. We hope this guide was helpful to you. For additional queries, you can comment below.
Also Read
