Iron Gate Studio and Coffee Stain Studios did release Valheim as an open-world survival craft and sandbox-type video game in 2021 which is available for all platforms. It’s a brutal exploration and survival title that allows up to 10 players inspired by Viking culture to battle, build, and conquer. However, plenty of players are facing the Valheim Crashing issue on World Load on the PC.
Now, if you’re also one of the victims of such an issue, follow this troubleshooting guide to fix it. Valheim starts crashing whenever some players try to get into a new world. Unfortunately, affected players cannot join a new world or friend’s world, which is very frustrating. This specific issue may occur due to the outdated or corrupted in-game mods that trigger launching crashes.

Page Contents
How to Fix Valheim Crashing on World Load
In some cases, issues with the outdated game version, not running the game as admin, corrupted or missing game files, an outdated Windows system version, unnecessary background running tasks, issues with the security programs, launching the game in fullscreen display mode, and more can be a major reason. So, without wasting any more time, let’s jump into it.
1. Run the Game as an Administrator
First of all, you should run the game executable application file on your PC as an administrator to allow the User Account Control (UAC) access to the system. Sometimes your system requires the UAC access permission to run a program which is quite important. By following the steps below you’ll have to allow the admin access for once and it won’t ask you for the same again. To do so:
- Go to the installed Valheim game directory.
- Right-click on the application file on your PC.
- Click on Properties > Click on the Compatibility tab.

- Click on the Run this program as an administrator checkbox to enable it.
- Once done, click on Apply and then OK to save changes.
- Finally, just double-click on the game app file to launch it.
If in case, you’re running the game via the Steam launcher then perform the same steps for the respective game client too.
2. Check for Game Updates
It’s recommended to check for the game update manually on the Steam client to make sure there is no issue with the outdated game version on the PC. An outdated game patch version can cause several potential issues or game launching issues or lags, etc. To do so:
- Open Steam and go to Library.
- Click on Valheim from the left pane.
- Steam will automatically search for the available update.
- If there is an update available, click on Update.
- Make sure to wait for some time until the update completes.
- Once done, ensure to reboot the PC to apply changes.
3. Verify and Repair Game Files
The chances are high that somehow the installed game files on the PC become corrupted or missing for an unexpected reason. It can cause issues with the game launching, lagging, stuttering, etc which can be fixed by repairing the game files.
- Launch the Steam client > Click on Library.
- Right-click on Valheim from the list.
- Click on Properties > Go to the Local Files tab.

- Click on Verify Integrity of Game Files.
- This process may take some time to get completed. So, have some patience.
- Once done, make sure to reboot the PC to apply changes.
4. Update GPU Drivers
You should also check for the graphics driver update on the PC by following the steps below to avoid graphical glitches. An outdated graphics driver version can trouble you a lot when it comes to launching PC games or running games properly.
- Press the Win+X keys to open the Quick Access Menu.
- Click on Device Manager from the list.
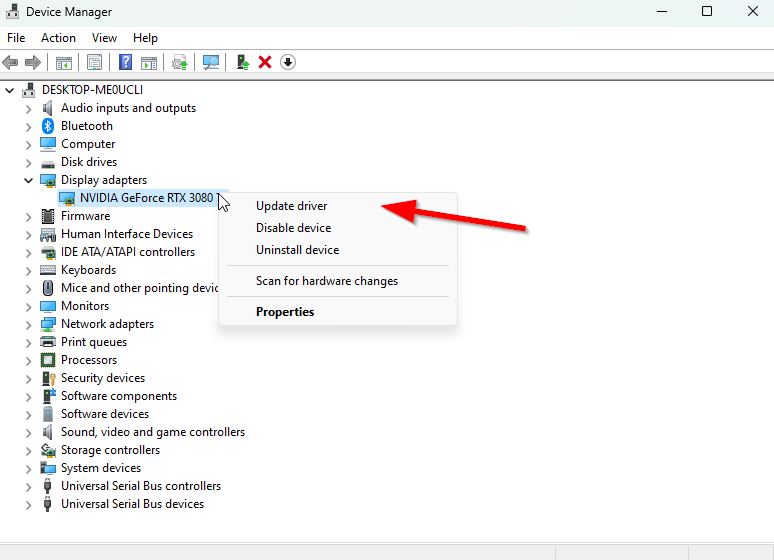
- Double-click on Display adapters to expand it.

- Right-click on the dedicated graphics card that’s active or you’re using.
- Now, click on Update driver > Click on Search automatically for drivers.
- It’ll now automatically check for the available update then download and install the latest version.
- Just wait for the same and reboot the PC to apply changes.
If there is no update available for your GPU then you can go to the official graphics card website from the links below and search for the model of your graphics manually. Make sure to download and install the latest GPU driver for your model number as per the manufacturer.
5. Check for Windows Updates
If you’re running an outdated Windows version or build number for a while then make sure to follow the steps below to check for the same. Always try to install the latest update of the system so that you can get the latest security patch, improved performance, bug fixes, additional features, and more.
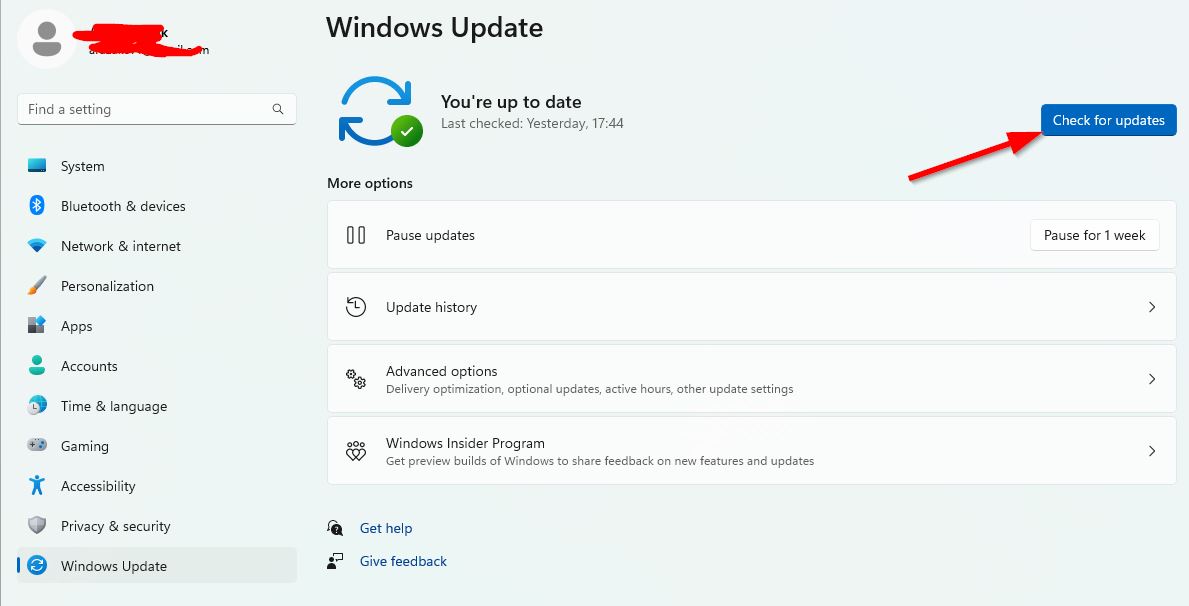
- Press the Win+I keys to open Settings.
- Click on Windows Update > Click on Check for updates.

- If there is an update available, click on Download and Install.
- Wait for the update process to be completed.
- Once done, reboot your PC to apply changes.
6. Set Priority to High
You can try setting the priority of the Valheim task to High so that the system resources can run the game smoothly by allocating more CPU/RAM. To do this:
- Press the CTRL+Shift+Esc shortcut keys to launch the Task Manager.
- Now, go to the Details tab where you’ll see a list of all applications.
- Right-click on Valheim > Click on the Set priority option.
- Select the High option to set Valheim to high priority.
- Once done, reboot the PC to apply changes.
- Finally, you can run the Valheim game to check for the issue.
7. Choose the Windowed Display Mode
You can also select the windowed display mode on your Valheim game which might help a lot.
- Just go to the Steam client.
- Launch Valheim > Go to the in-game Settings menu.
- Choose to set the game in Windowed Mode.
You can also try following another method to force-run the Valheim game in windowed mode. To do so, you can follow the steps below:
- Launch the Steam client > Click on Library.
- Locate and right-click on Valheim > Select Properties.
- Go to the General tab > Click on the Set Launch options.
- Now, type -windowed -noborder in the field.
- Click on OK and reboot the client to check for the issue.
8. Uninstall Valheim Mods
Some of the affected players have reported that uninstalling the Valheim mod files from the PC might help in fixing the new world crashing or launching issues. Outdated game mods can also cause multiple issues with the game. To uninstall mods:
- Go to the C:\Program Files (x86)\Steam\steamapps\common\Valheim directory on the PC. [If you’ve installed the game on another location, navigate there]
- Make sure to Delete Mod files/folders carefully.
- Once done, reboot the PC, and play the game.
9. Disable Windows Firewall and Anti-Virus Program
The chances are high that you’re using the default Windows Firewall protection on your PC but sometimes disabling it temporarily before launching any game might reduce startup crashing issues a lot. To do this:
- Click on the Start Menu > Type Windows Defender Firewall and open it.
- Next, click on Turn Windows Defender Firewall on or off from the left pane.
- Select the Turn off Windows Defender Firewall (not recommended) option for all domains.
- Once done, click on OK to save changes > Reboot your PC to apply changes.
Additionally, make sure to turn off the Windows Defender antivirus program on your PC to ensure there is no antivirus software blocking the game files. To do so:
- Press the Win+I keys to open Settings.
- Click on Update & Security > Click on Windows Security.
- Click on Open Windows Security > Go to Virus & threat protection.
- Now, click on Manage settings > Just turn off the Real-time protection toggle.
- If prompted, click on Yes to proceed further.
That’s it, guys. We hope this guide was helpful to you. For further queries, you can comment below.
Also Read
