The Xbox app is an application for Windows OS, Android, and iOS platforms that allow users to access Xbox video game consoles, Xbox Live community features, remote control feature, a second-screen functionality with selected games, apps, & content. However, some unfortunate users are reporting that Xbox App Not Downloading or Installing on Windows 10.
If you’re also one of the victims, make sure to follow this troubleshooting guide to resolve such an issue. The Xbox app allows users to play games from the Microsoft Store with other Xbox players, create scoreboards, sharing social content, etc very easily. But due to the specific problem, users are unable to play with their Xbox friends. So, what to do if this problem troubling you a lot.
Also Read
Page Contents
Fix: Xbox App Not Downloading or Installing on Windows 10
Well, without wasting any more time, let’s jump into the steps below.

1. Reboot Your Windows
If in case, your Xbox app isn’t downloading or installing on your computer then make sure to simply reboot your system first. This method is quite common yet powerful in most cases. Restarting your Windows system can clear the possible temporary glitches or cache issues with the Xbox app.
- Click on the Windows icon to open up the Start Menu.
- Now, click on the Power icon > Select Restart.
However, if this method doesn’t work for you, try following another one below.
2. Reset Xbox App Package
Second, you should try resetting the Xbox app package on your Windows computer to fix this issue. To do so:
- Press the Windows key to open up the Start Menu.
- Now, type PowerShell and click on it from the search result.
- Enter the following command and hit Enter to execute it:
Get-AppXPackage -AllUsers | Foreach {Add-AppxPackage -DisableDevelopmentMode -Register "$($_.InstallLocation)\AppXManifest.xml"}
- Wait for the process to complete.
- Once done, try running the Xbox app on your Windows 10 again.
However, if you’re still seeing that Xbox App Not Downloading or Installing on Windows 10 then follow the next method.
3. Run License Service Script
- First of all, click on the Windows icon to open up the Start Menu.
- Next, type Notepad and click on Open to launch it from the search result.
- Copy and paste the following text into the Notepad:
echo offnet stop clipsvcif “%1″==”” ( echo ==== BACKING UP LOCAL LICENSES move %windir%serviceprofileslocalserviceappdatalocalmicrosoftclipsvctokens.dat %windir%serviceprofileslocalserviceappdatalocalmicrosoftclipsvctokens.bak )if “%1″==”recover” ( echo ==== RECOVERING LICENSES FROM BACKUP copy %windir%serviceprofileslocalserviceappdatalocalmicrosoftclipsvctokens.bak %windir%serviceprofileslocalserviceappdatalocalmicrosoftclipsvctokens.dat )net start clipsvc
- Click on File > Go to Save as.
- Choose File Name as license.bat > Open the Start Menu again.
- Type cmd and right-click on the Command Prompt.
- Select Run as administrator and click on Yes when prompted by UAC.
- Now, Execute the license.bat script properly into the command prompt.
- This method will uninstall the Xbox app from Windows 10.
- Once done, reboot your computer, and reinstall the Xbox app from the Microsoft Store directly.
- Finally, you’re good to go.
4. Clear Microsoft Store Cache
If none of the methods worked for you, try clearing the Microsoft Store Cache properly on your computer by following the steps below. The chances are high that your Microsoft Store cache requires a fresh start as it gathers temporary glitches.
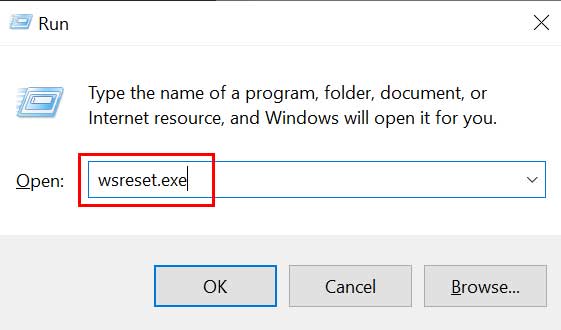
- Press Windows + R keys to open up the Run dialog box.

- Type wsreset.exe into the field and hit Enter to execute it.
- Let the process finish and it’ll automatically clear the MS Store Cache.
- Once done, make sure to reboot your computer.
- Finally, you should be able to fix the Xbox App Not Downloading or Installing Windows 10 issue.
That’s it, guys. We assume this guide was helpful to you. For further queries, let us know in the comment below.
