Google Meet is one of the better and more reliable video communication services from Google itself that can be used via the web browser or the mobile application. After the pandemic breakout globally, there are several video conferencing services emerged in the market for people to contact each other from distance. But it seems that some of the Google Meet users have reported the camera failed error while using the service or during video calls.
Now, if you’re also one of the victims to encounter such an issue then don’t worry. Here we’ve shared a couple of possible workarounds for you that should come in handy. It’s worth mentioning that Google Meet is a web-based service that’s also available as a mobile application. But if you’ve newly installed Google Meet on your computer or mobile device and skipped the required permissions to grant then you might face issues with running Google Meet.
Page Contents
- Fix: Google Meet Camera Failed Error
- 1. Grant Camera Permission from the Google Meet Page
- 2. Ensure the Webcam is Connected Properly
- 3. Turn On the Camera before joining Google Meet
- 4. Check no other Apps currently using your Camera
- 5. Reboot Browser and Check for Updates
- 6. Set the Active Camera for Google Meet (If Multiple Cameras are Installed)
- 7. Set the Default Google Meet Camera
- 8. Check for Webcam Driver Rollback
- 9. Disable MediaFoundation Video Capture in Chrome
- 10. Update the Google Meet app
- 11. Clear Google Meet Cache Data and Storage Data
- 12. Disable Antivirus Protection
- 13. Check for the Webcam Driver Update
- 14. Clear Chrome Cache and Data
- 15. Check Chrome Extensions
- 16. Reinstall Google Chrome
Fix: Google Meet Camera Failed Error
Apart from the microphone issue, Google Meet users can also experience the camera failed error due to several possible reasons that we’ve mentioned below. So, before jumping into the workarounds, make sure to take a quick look at the common reasons. Now, without wasting any more time, let’s get in.
- It seems that the insufficient permission to grant the camera access for the webcam or mobile camera can be a possible reason behind the camera failed error.
- Any kind of temporary browser or app glitch can conflict with the service.
- Missing or outdated webcam drivers on the computer can also trouble you a lot.
- If the webcam is in use by other apps then you may face such issues.
- Sometimes an incorrectly configured video setting can cause a camera failed error.
- Outdated browser or application.
- Issues with the Antivirus software blocking.
- Unnecessary background running third-party apps.
Luckily, you can perform the workarounds to fix such an issue by properly configuring the camera, connecting the webcam to the PC, granting required permissions to Google Meet, updating the application to the latest version, rebooting and updating the browser, upgrading the webcam driver, etc. Additionally, closing the third-party applications running in the background, disabling the antivirus program blocking, and more can be a solution.
1. Grant Camera Permission from the Google Meet Page
Google Meet requires camera permission to use your camera as well as microphone permission so that other people can hear your voice in the web browser. When you open the Google Meet page and start the video call, you’ll be asked to allow access for the first time. To do so:
- From the Google Meet page, click on the Camera or Microphone icon.
- Select Always allow Google Meet to access your camera.
- Click on Done > Click on the Video/Camera icon on the Google Meet screen to turn it on.
- Finally, click on the camera icon in the address bar > Here select the Always allow option.
If in case, you haven’t allowed the required permissions then you will have to manually grant the permission as follows.
- From the Google Chrome browser interface, click on the three dots icon on right.
- Click on Settings > Open the Privacy and Security tab from the left pane.
- Open Site Settings > Scroll down and click on Camera.
- Now, click on Google Meet URL > Click on the drop-down button for Camera.
- Select Allow.
You’ve now successfully allowed the camera access for Google Meet on your browser.
2. Ensure the Webcam is Connected Properly
It’s highly recommended to connect the webcam properly on the computer to ensure there is no issue with the connectivity. Sometimes the loose connection may affect the camera signal.
3. Turn On the Camera before joining Google Meet
You should enable the camera if it’s turned off or locked before joining Google Meet. Some users may not understand this issue and start blaming Google Meet.
4. Check no other Apps currently using your Camera
Make sure to check no other applications currently using the camera to cause issues with Google Meet. Try closing foreground applications before running Google Meet. Additionally, you can try following the steps below to close unnecessary tasks via Task Manager.
- Press the Ctrl+Shift+Esc keys to open Task Manager.
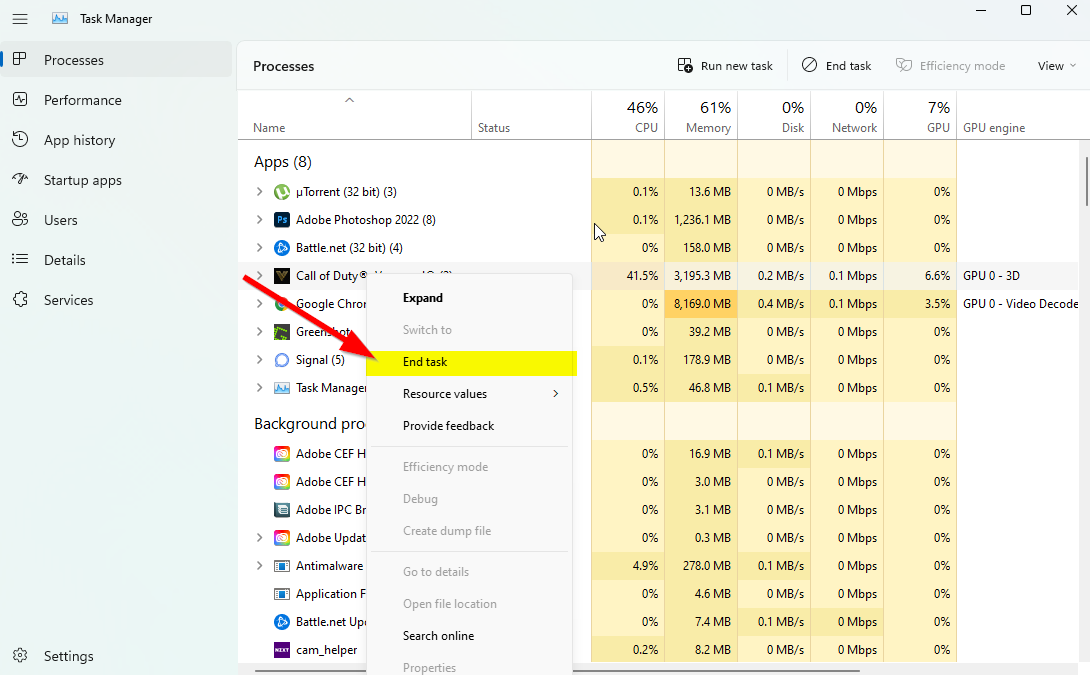
- Click on Processes and check which task is consuming higher resources.
- Just click on the particular process and select End Task to close it forcefully.
- Make sure to do the same steps for each third-party app process that is consuming higher resources.
- Once done, close Task Manager, and restart your PC.
5. Reboot Browser and Check for Updates
You should reboot Google Chrome and then make sure to check for updates. An outdated Chrome version can trouble in running applications.
- Launch Google Chrome > Click on the Menu (three vertical dots icon) from the top-right corner.
- Click on Settings > Select About Chrome from the left pane.
- The Chrome system will automatically check for available updates. If there is an update available, it will automatically download and install the update.
- Once done, simply restart your Chrome browser.
6. Set the Active Camera for Google Meet (If Multiple Cameras are Installed)
If you’re using multiple cameras on your computer then make sure to select a specific active camera for Google Meet to turn on and use it. This will reduce confusion for sure.
7. Set the Default Google Meet Camera
Google Meet uses the system’s integrated camera app (by default). If you’re using a third-party camera app or your phone as a webcam then you will have to configure Google Meet manually. To set the default camera:
- Open Google Meet on the web browser.
- Click on the Gear icon (top-right corner) to open Settings.
- Open the Video tab > Click on the default camera option.
- Make sure to select your preferred camera option.
8. Check for Webcam Driver Rollback
The recently updated camera driver on the PC may not be stable enough and include some bugs that can eventually trouble the Google Meet running. You can follow the steps below to check for the webcam driver rollback.
- Press Windows + X keys to open the Quick Access Menu.
- Now, select Device Manager > Double-click on Cameras to expand it.
- Right-click on the active camera > Select Properties.
- Click on the Driver tab > Click on Roll Back Driver (if available).
- Follow the on-screen prompts to complete the process.
- Once done, make sure to restart your computer to apply changes.
If the Google Meet Camera Failed Error is still bothering you then make sure to head over to the next method.
9. Disable MediaFoundation Video Capture in Chrome
Chrome flags are quite useful for experimental features so that developers and advanced users can play with them. Well, the MediaFoundation Video Capture is one of the Chrome flags and a multimedia framework that has been developed by Microsoft. Several reports are coming out that after disabling this particular Chrome flag, users can be able to fix the camera error. To do so:
- Copy/paste the following line in the address bar one by one on Chrome or Microsoft Edge (Chromium) browser and hit Enter.
edge://flags/#enable-media-foundation-video-capture

chrome://flags/#enable-media-foundation-video-capture
- Select Disabled from the drop-down for MediaFoundation Video Capture.
- Restart your web browser to apply changes.
10. Update the Google Meet app
If you’re still running the outdated Google Meet app on your mobile device then it may cause compatibility issues. To simply update the app:
For Android:
- Open the Google Play Store app > Tap on the hamburger menu icon.
- Next, tap on My Apps & games > Make sure to check whether the Google Meet update is showing on the list of available updates or not.
- If so, just tap on the Update button next to the app and wait for it to install.
- Once done, make sure to open the Google Meet app, and check for the issue.
For iOS (iPhone):
- Open the Apple App Store application on the iPhone.
- Now, tap on the Profile Picture icon from the top-right corner.
- Scroll down a bit to see which apps are available for update.
- Check whether the Google Meet app update is on the list or not.
- If the app is there, then make sure to tap on the Update button.
- Wait for the installation process to complete.
11. Clear Google Meet Cache Data and Storage Data
If in case, you’re trying to play Google Meet on your Android device then try clearing the app cache data and the storage data from the settings menu of the application to refresh glitches. Sometimes outdated or corrupted app cache data can also cause several issues whatsoever.
Note: There is no option to do this on iPhone. Only a simple restart will do the job.
- Go to the device Settings menu > Head over to Apps & Notifications.
- Now, tap on See All Apps > Head over to Google Meet under the App info section.
- Tap on Google Meet to open the app info page > Tap on Storage & Cache.
- Next, tap on Clear Cache > Once done, tap on Storage & Cache.
- Tap on Clear Storage.
- Finally, launch the Google Meet app, and check for the issue again.
12. Disable Antivirus Protection
Make sure to turn off the Windows Defender antivirus program on your PC to ensure there is no antivirus software blocking the Google Meet application or service. To do so:
- Press the Win+I keys to open Settings.
- Click on Update & Security > Click on Windows Security.
- Click on Open Windows Security > Go to Virus & threat protection.
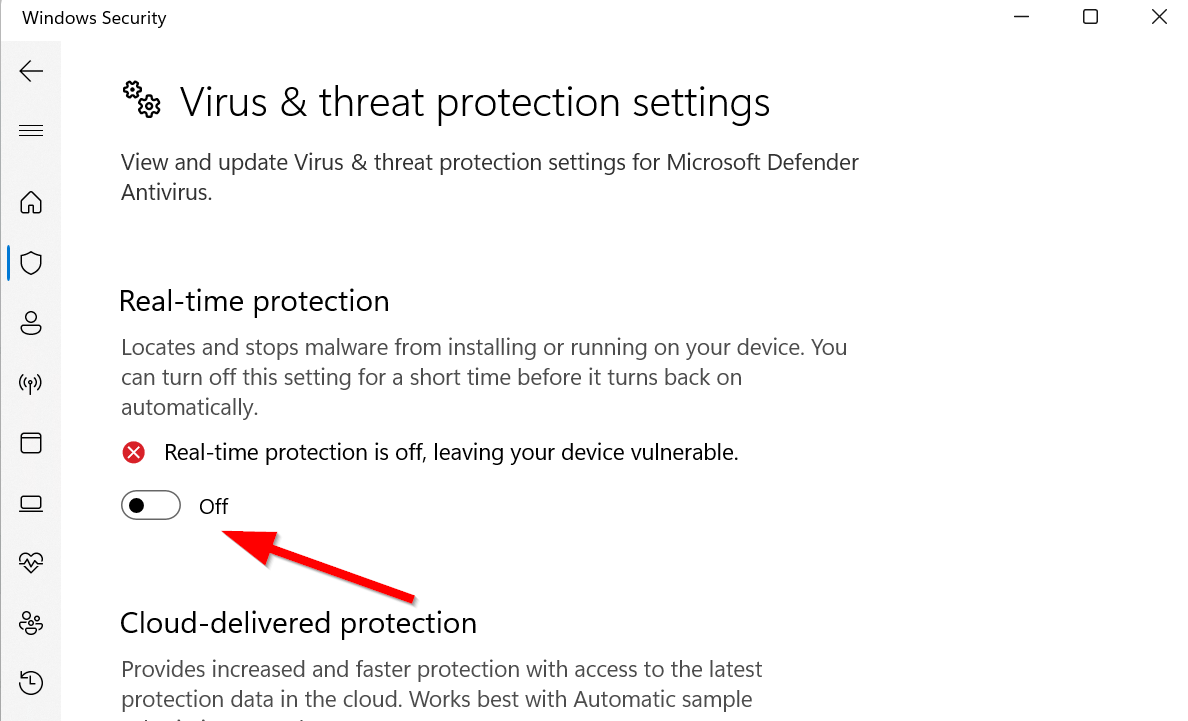
- Now, click on Manage settings > Just turn off the Real-time protection toggle.
- If prompted, click on Yes to proceed further.
13. Check for the Webcam Driver Update
If the above methods didn’t come in handy for you then make sure to check for the webcam driver update on the PC by following the steps below.
- Press the Win+X keys to open the Quick Access Menu.
- Click on Device Manager from the list.
- Double-click on Display adapters to expand it.
- Right-click on the dedicated graphics card that’s active or you’re using.
- Now, click on Update driver > Click on Search automatically for drivers.
- It’ll now automatically check for the available update then download and install the latest version.
- Just wait for the same and reboot the PC to apply changes.
14. Clear Chrome Cache and Data
Web browser cache and data can cause several issues with the webpage loading or redirect errors. So, clearing the saved cache and data can fix webpage loading issues. To do so:
- Open Chrome browser > Click on the Menu (three vertical dots icon) from the upper right side of the browser interface.
- Now, hover over the More tools field to expand the drop-down list.
- Click on Clear browsing data.
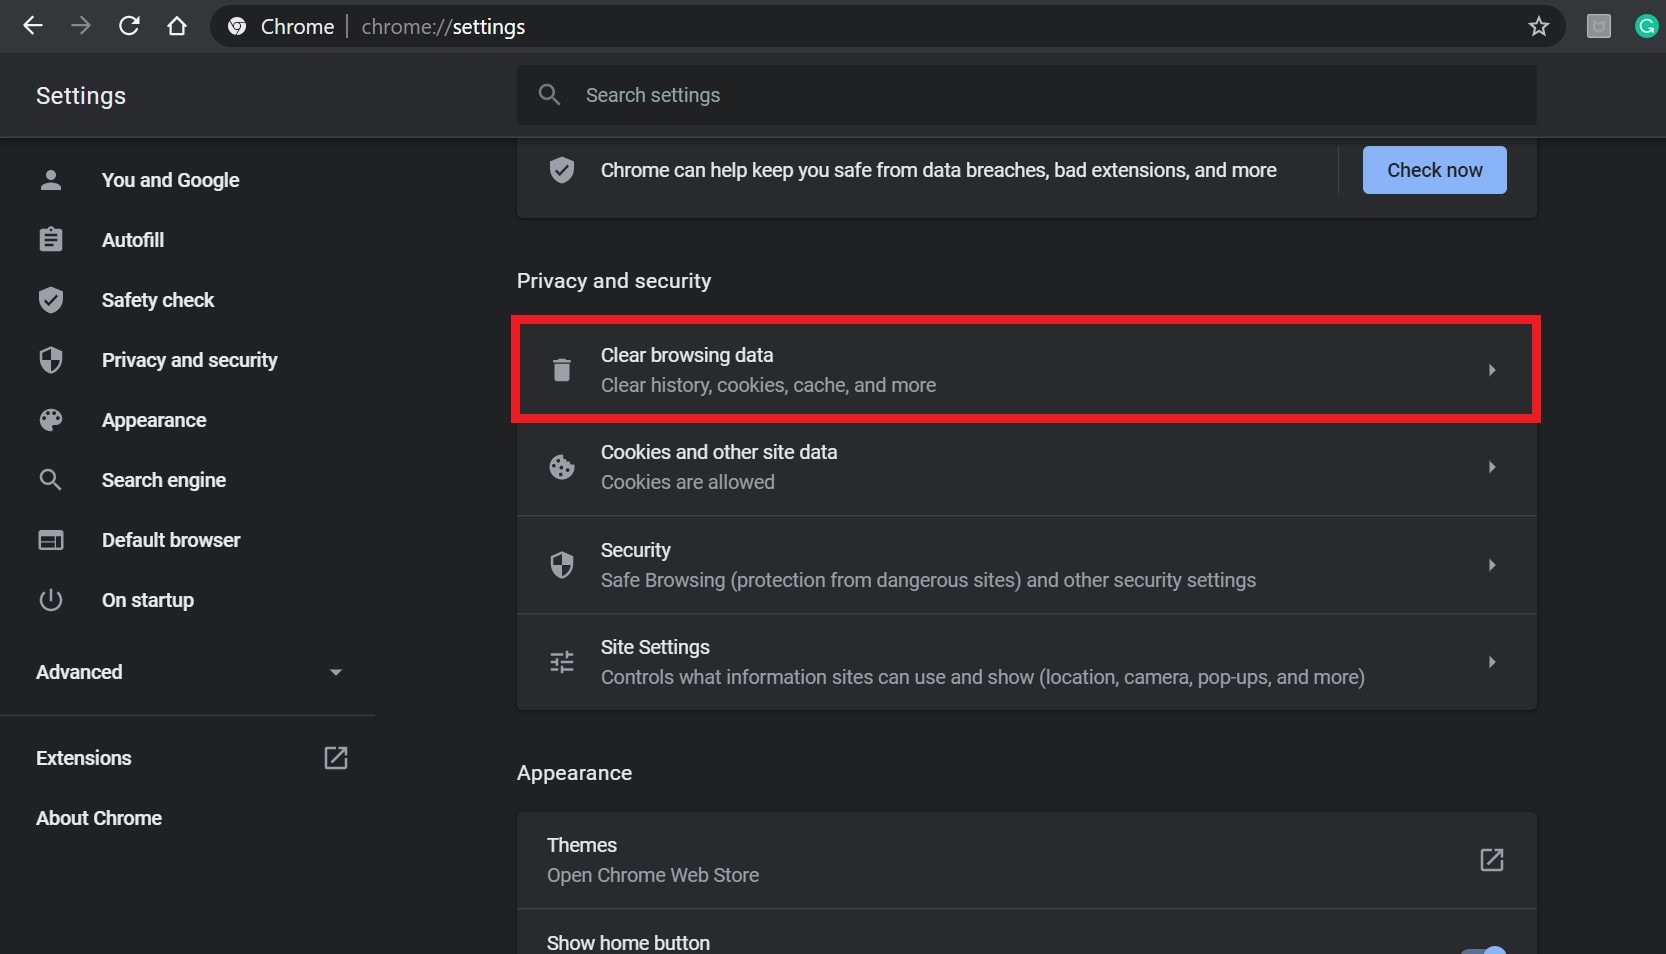
- Next, under the Basic tab, select the Time range according to your preference.
- Then click on the checkbox of Browsing history, Cookies and other site data, Cached images and files to select them.
- Finally, click on Clear data.
- Once done, restart your Chrome browser, and check whether the problem has been fixed or not.
15. Check Chrome Extensions
Google Chrome Redirected Too Many Times Error can happen due to the wrong extension. So, you should always check for the browser extension and try disabling them all to cross-check whether the problem is still appearing to you or not. To do that:
- Open Chrome browser > Click on the Menu (three vertical dots icon) from the upper right side of the browser interface.
- Now, hover over the More tools field to expand the drop-down list.

- Click on Extensions > Disable all the extensions one by one (Turn off toggle).
- Once done, exit the browser > Relaunch it.
16. Reinstall Google Chrome
Well, it seems that after following all the possible methods above, the problem still persists. So, we’ll recommend you uninstall and reinstall the Google Chrome browser completely to fix it.
- Click on Start > Type Control Panel and select it from the search result.
- Now, click on Uninstall a program > Look for Chrome browser from the list of installed programs.
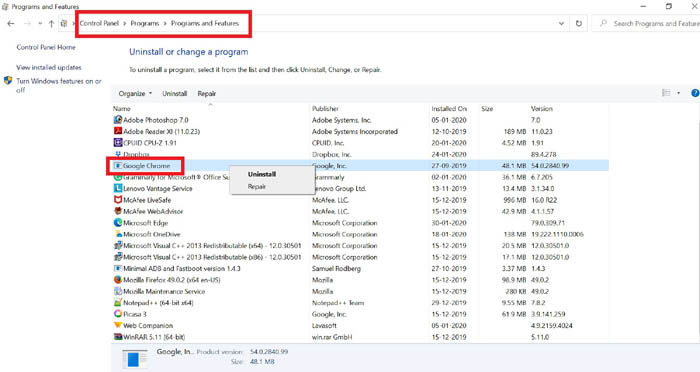
- Right-click on Google Chrome > Select Uninstall.
- Follow the on-screen prompts and proceed to the uninstallation process.
- Once the removal process is done, simply restart the PC.
- Next, launch another browser and go to the official Google Chrome page to download and install it on your computer.
- Finally, you can try loading the specific webpage that previously causing issues.
That’s it, guys. We assume this guide was helpful to you. For further queries, you can comment below.
