“Gray Zone Warfare” is a popular first-person shooter game on Steam. It allows you to join a Private Military Company and explore a vast open world featuring both PvEvP and PvE modes. You will need to use your strategic skills to survive against human operators and AI enemies while uncovering the mystery of Lamang Island.
However, several players have reported facing issues with multiplayer connectivity and lobby joining when playing the game with their friends. Whenever some players try to join the lobby, they receive an “An error occurred” notice. If you’re also facing the Gray Zone Warfare Multiplayer Not Working issue or Not Able to Join Friends, you can check out this guide.
Despite the game’s good server connectivity and in-game improvements, there’s a likelihood that some bugs or issues may still be present, which require more time to be addressed. Players seem to be getting affected by internet connectivity issues, outdated game patch versions, corrupted game files, server outages, crossplay feature issues, conflicts with the networking driver & devices, VPN-related issues, conflicts with the created party, and more, which can be the possible reasons for such issues.

Page Contents
- Fix Gray Zone Warfare Multiplayer Not Working or Not Able to Join Friends
- 1. Force Close and Relaunch the Game
- 2. Reboot the PC
- 3. Run Gray Zone Warfare as an Administrator
- 4. Check the Internet Connection
- 5. Update Gray Zone Warfare
- 6. Scan and Repair the Game Files
- 7. Update the Network Driver
- 8. Create a New Lobby with your Friends
- 9. Whitelist the Program on Windows Firewall
- 10. Add an Exclusion of the Game to Antivirus
- 11. Turn Off the VPN Service
- 12. Reinstall Gray Zone Warfare
Fix Gray Zone Warfare Multiplayer Not Working or Not Able to Join Friends
Luckily, there are a couple of workarounds mentioned below that should come in handy. We recommend our readers follow all methods until the party joining error has been fixed. So, without further ado, let’s jump into it.
1. Force Close and Relaunch the Game
Before doing any other workarounds, try force closing and relaunching the game on your PC to ensure there is no temporary cache data issue on the system. Forcefully closing the game can also prevent background-running game tasks from interrupting other tasks.
- Close the game and exit Steam.
- Press the Ctrl+Shift+Esc keys to open Task Manager.
- Click on Processes > Select Gray Zone Warfare or Steam task.
- Click on End Task > Once done, relaunch the game.
2. Reboot the PC
It’s highly recommended to reboot the PC manually before following other troubleshooting methods until the problem has been fixed. Sometimes a normal system reboot can fix multiple issues with the glitches or program data caches. To do that:
- Open the Start menu.
- Click on the Power icon > Click on Restart.
- Once the system reboots, check for the issue again.
3. Run Gray Zone Warfare as an Administrator
Run the game executable application as an administrator to avoid user account control regarding privilege issues. The chances are high that your game application is getting blocked by the system admin permissions. To do this:
- Right-click on the LethalCompany.exe app on your PC.
- Now, select Properties > Click on the Compatibility tab.

- Enable the Run this program as an administrator checkbox.
- Click on Apply and select OK to save changes.
4. Check the Internet Connection
It’s suggested you check your internet connection at your end to ensure there is no network issue. A slow or unstable internet connection can cause multiple issues whatsoever. If you’re using a wired (ethernet) connection, try using a wireless (Wi-Fi) connection or vice versa to check for the issue. You can also try using a different network to cross-check it. Additionally, you can try power cycling the Wi-Fi router to check whether the networking glitches have been fixed.
5. Update Gray Zone Warfare
Sometimes, an outdated game patch version can cause problems with multiplayer sessions or party joining. It’s recommended that you check for game updates manually by following the steps below.
- Open Steam > Go to Library.
- Right-click on Gray Zone Warfare.
- Select Properties > Click on Updates.
- Go to Automatic Updates.
- Select Only Update this game when I launch it.
- It’ll automatically install updates whenever available.
6. Scan and Repair the Game Files
Sometimes, corrupted or missing game files on the PC might also trouble you when you start the game. It’s always better to verify and repair the game files by following the steps below on your PC to avoid errors.
- Open the Steam client > Go to Library.
- Right-click on Gray Zone Warfare.
- Go to Manage > Select Properties.
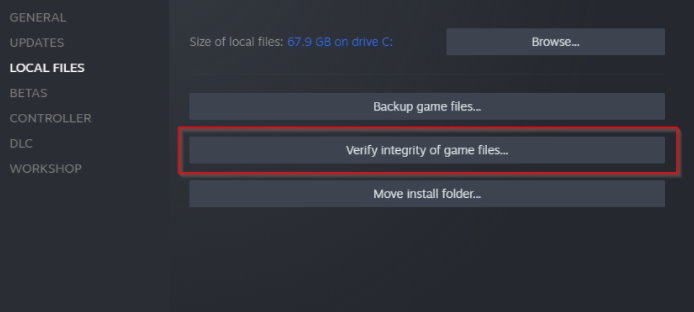
- Click on Local Files > Select Verify integrity of game files.

- Wait for the process to complete.
- Once done, reboot the system to apply changes.
7. Update the Network Driver
You should try updating the network adapter driver on the PC to ensure no conflict is happening with the networking connectivity. Sometimes, your internet connection might have a good signal or speed, but the network adapter may trouble you due to driver-related issues. To fix it:
- Search for Device Manager from the Start menu and open it.
- Double-click on the Network adapters.
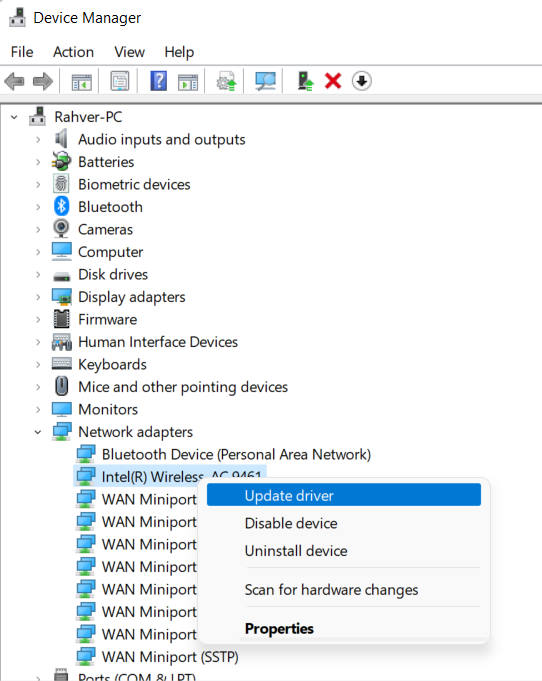
- Right-click on the network device.

- Click on Update driver > Choose Search automatically for drivers.
- If an update is available, it’ll automatically be installed.
- Once done, reboot your computer to change the effects.
8. Create a New Lobby with your Friends
The game servers can easily be filled up, and the rest of the players must wait in the queue. In that case, the server overload may end up with party joining errors & more. So, you should retry joining the lobby multiple times and create a new lobby with your friends that would be useful.
9. Whitelist the Program on Windows Firewall
Another thing you might need to do is whitelist the Gray Zone Warfare program on the Windows Firewall protection to reduce potential issues. It usually allows the game program to run smoothly without any further issues. To do so:
- Open the Start menu > Search and open Control Panel.
- Click on Systems and Security > Go to Windows Firewall.
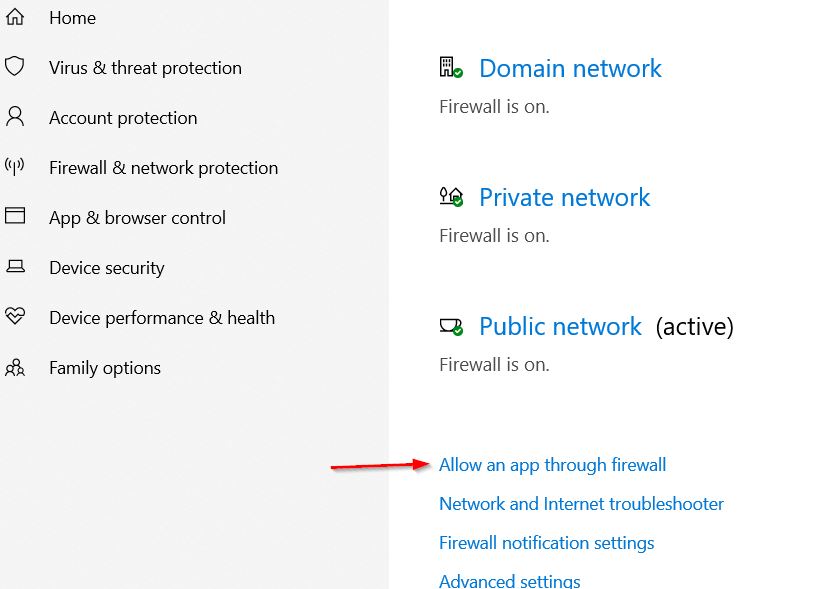
- Choose Allow an app through Windows Firewall.

- Then select Change Settings > Choose Allow another app.
- Click on Browse > Choose Gray Zone Warfare.
- Now, click Add > Save changes to check for the issue again.
10. Add an Exclusion of the Game to Antivirus
It’s also recommended to add the Gray Zone Warfare program as an exception to the antivirus software. This method will help in fixing potential issues with the multiplayer sessions. To do so:
- Press the Win+I keys to open Settings.
- Click on Privacy & Security.
- Now, click on Windows Security.
- Select Virus & Threat Protection.
- Click on Manage Ransomware Protection.
- Turn ON the Controlled Folder Access toggle.
- If prompted, click on Yes.
- Click on Allow an app through controlled folder access.
- If prompted, click on Yes.
- Next, click on Add an allowed app.
- Navigate to the installed game directory.
- Browse and select the LethalCompany.exe app.
- Click on Open to add it.
- Reboot the PC to apply changes.
11. Turn Off the VPN Service
Using any kind of VPN (Virtual Private Network) might be useful enough in most cases, but not always. The chances are high that VPN service can also cause server connectivity issues in the games. Not only does it cause ping delay issues, but it also has higher latency. Therefore, we’ll need to disable VPN services manually.
12. Reinstall Gray Zone Warfare
If none of the workarounds come in handy, make sure to uninstall and reinstall the Gray Zone Warfare game on your gaming device. Sometimes, issues with the game installation directory may cause multiple conflicts. You should uninstall and reinstall the game by following the steps below.
- Open the Steam client on your PC.
- Go to Library > Right-click on Gray Zone Warfare.
- Select Uninstall > Click on Delete to confirm.
- Wait for the uninstallation process to complete.
- Exit the Steam client > Open File Explorer.
- Copy & paste C:\Program Files (x86)\Steam\steamapps\common on the address bar.
- Press Enter to search for the location.
- Go to the game folder > Delete the folder completely.
- Reboot the PC to apply changes.
- Then open Steam and reinstall the Gray Zone Warfare game on a different drive.
That’s it, guys. We assume this guide was helpful to you. If you have any further queries, please comment below.
