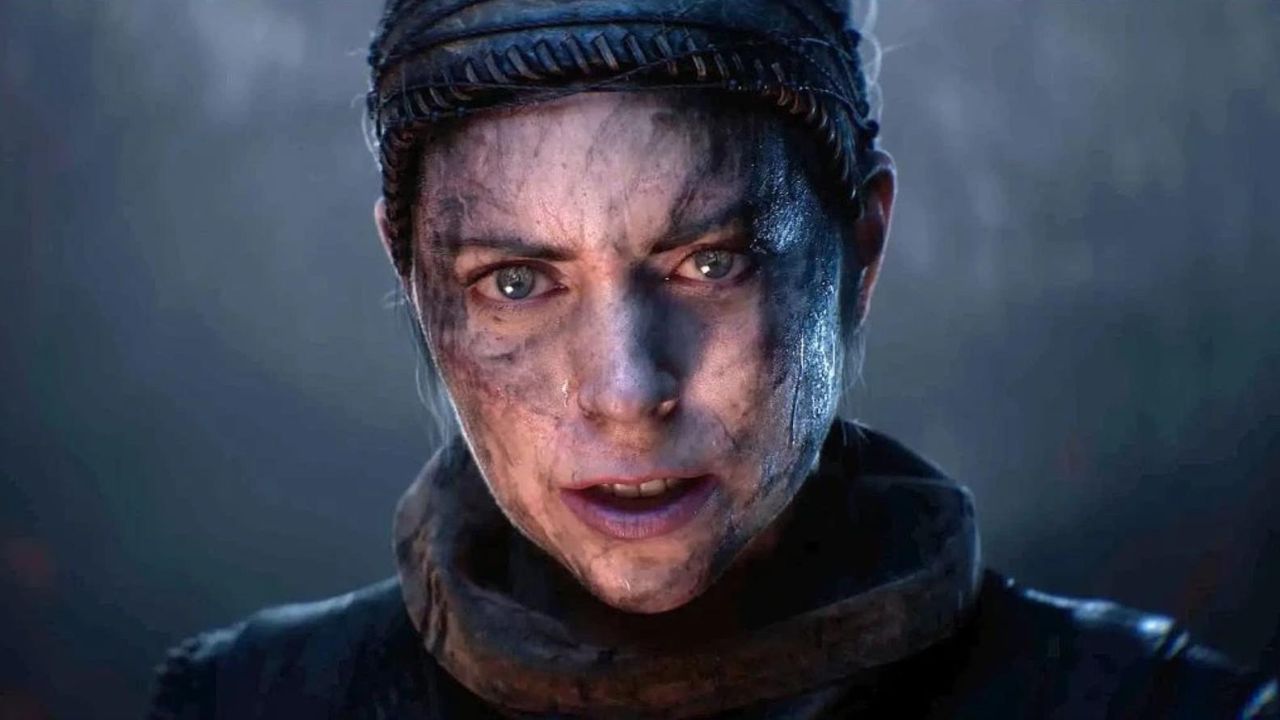
Senua’s Saga: Hellblade II is an action-adventure game developed by Ninja Theory and published by Xbox Game Studios. Released in 2024, the game is a sequel to Hellblade: Senua’s Sacrifice and is set in 9th-century Iceland, drawing inspiration from Norse mythology and culture. It is now available for PC and Xbox Series X/S users. However, some players have reported issues with the game getting stuck on the loading screen on the PC. This can be a frustrating problem that prevents players from entering the game. Given that the game is new to the market, we can expect several in-game bugs and glitches until patches are released to fix them.
Page Contents
- Reasons Behind the Infinite Loading Screen Issue of Hellblade 2?
- Steps to Fix Senua’s Saga Hellblade 2 Stuck on Loading Screen on PC
- 1. Restart the System
- 2. Run Senua’s Saga Hellblade 2 as an Administrator
- 3. Check for Senua’s Saga Hellblade 2 Updates
- 4. Verify and Repair the Game Files
- 5. Turn Off Google Drive/OneDrive or Other Cloud Services
- 6. Use Windows Compatibility for Senua’s Saga Hellblade 2
- 7. Adjust In-Game V-Sync Settings
- 8. Update Graphics Card Drivers
- 9. Change the FPS Limit
- 10. Use the Dynamic Resolution Mode
- 11. Adjust In-Game Graphics Settings
- 12. Disable Antivirus
- 13. Turn Off Overlay Apps
- 14. Perform a Clean Boot
- 15. Try Switching the Window Mode
- 16. Do a Clean Installation of the Graphics Driver
Reasons Behind the Infinite Loading Screen Issue of Hellblade 2?
If you encounter the frustrating issue of being stuck on an infinite loading screen when trying to launch Senua’s Saga: Hellblade 2 on your PC, there are several potential causes. The most common reason for this issue is an unstable game. However, other factors such as temporary system glitches, conflicts with administrative privileges, outdated game versions, corrupted game files, conflicts with vertical sync or frame rate limit, display resolution conflicts, background cloud syncing issues, in-game graphical glitches, issues with antivirus software, Windows compatibility issues with the game, and more can also lead to the problem of being stuck on the loading screen. Reports indicate that most of these issues stem from conflicts on the PC end and can be resolved relatively easily. I will outline the workarounds to address these issues below.
Steps to Fix Senua’s Saga Hellblade 2 Stuck on Loading Screen on PC
If you’re also one of the victims who encounter the loading screen stuck on the PC while launching Senua’s Saga Hellblade 2, then don’t worry. Luckily, we’ve provided some troubleshooting methods below that should be useful enough to resolve such an issue. So, without further ado, let’s get into it.
1. Restart the System
If you’re using a desktop or laptop, temporary system glitches can be a real problem no matter your PC configuration. If you’ve recently installed a Windows update or a video game, it’s important to reboot your computer to see the changes take effect immediately. Otherwise, you might experience issues with cache data or temporary system glitches, which can cause problems with launching games and result in being stuck on the loading screen. To avoid these issues, go to the Start menu, bring up the Power menu, and choose Restart.
2. Run Senua’s Saga Hellblade 2 as an Administrator
Affected players have already claimed that running the Senua’s Saga Hellblade 2 game application on the PC as an administrator might help fix temporary issues with the admin privileges.
- Go to the Senua’s Saga Hellblade 2 installation directory on your PC.
- Right-click on the Senua’s Saga Hellblade 2.exe application.
- Click on Properties > Click on the Compatibility tab.

- Enable the Run this program as an administrator option.
- Click on Apply and select OK to apply changes.
- Then run the game directly from the directory to check for the issue.
3. Check for Senua’s Saga Hellblade 2 Updates
It looks like an outdated game version is more problematic to cause stuck on the loading screen issue. An outdated game patch version can also trigger game crashes, display glitches, in-game bugs, performance conflicts, and more that we can’t deny. You can check the steps below to update the game with the available version.
- Open the Steam client > Go to Library.
- Click on Senua’s Saga Hellblade 2.
- Click on the Update button if available.
- It may take some time to install the update.
- Once done, restart the system to apply changes.
4. Verify and Repair the Game Files
Any missing or corrupted game files on the PC might trigger game running issues, such as being stuck on the loading screen. To avoid multiple glitches, it’s recommended to follow the steps below to verify and repair the installed game files.
- Open the Steam launcher > Go to Library.
- Right-click on the Senua’s Saga Hellblade 2 game.
- Go to Settings > Select Properties.

- Click on Local Files > Select Verify integrity of game files.
- Wait for a while to complete it and then close the client.
- Once done, restart the PC.
5. Turn Off Google Drive/OneDrive or Other Cloud Services
In some cases, turn off Google Drive, Microsoft OneDrive cloud sync, Dropbox, Adobe Cloud services, etc. from running in the background. Sometimes these cloud services not only consume system resources but also higher data bandwidth, which eventually causes multiple conflicts. Turn them off manually or disable those services to avoid game-running issues. Go to Task Manager and close unnecessary cloud syncing tasks.
6. Use Windows Compatibility for Senua’s Saga Hellblade 2
You should also check for the Windows compatibility specific to the Senua’s Saga Hellblade 2 game to ensure whether your system is capable of running the game or not. In case, you’re using Windows 10/11 then make sure to follow the steps below.
- Head over to the installed game directory.
- Right-click on the Senua’s Saga Hellblade 2.exe application.
- Click on Properties > Go to the Compatibility tab.
- Enable the Run this program in compatibility mode for: option.
- Now, select Windows 7/8 from the drop-down menu.
- Click on Apply and then OK to save changes.
7. Adjust In-Game V-Sync Settings
We’ll also recommend you manually turn off the in-game vertical sync feature to avoid any kind of graphical glitches. Turning off the V-Sync option from the game might help in fixing the stuck-on-loading screen issue in some cases. Check out the steps below to do so:
- Open the Steam client > Go to Library.
- Click on Senua’s Saga Hellblade 2 > Hit Play.
- Go to the in-game Settings menu.
- Head over to Display > Navigate to V-Sync.
- Turn Off – V-Sync.
8. Update Graphics Card Drivers
Sometimes, an outdated graphics card driver or corrupted driver on the PC might trouble you a lot with gaming experiences. Several PC gamers have found this workaround useful enough, and it will also help fix graphical glitches.
Recommended Method:
- Open the Start menu > Search and open Device Manager.
- Double-click on Display Adapters to open it.
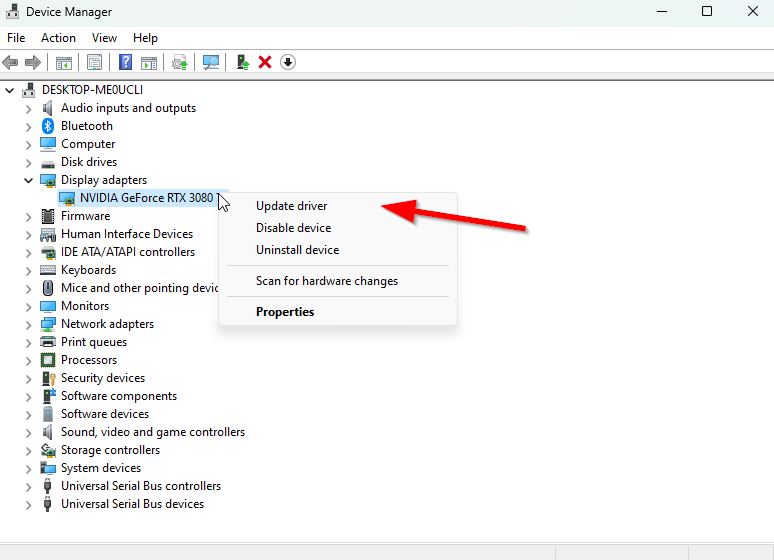
- Right-click on the dedicated graphics card.
- Now, choose Update driver > Click on Search automatically for drivers.
- The latest version will be downloaded and installed automatically if an update is available.
- Once done, restart your PC to apply the changes.
Manual Method:
You should try manually downloading and installing the latest graphics driver depending on your graphics card generation and model number. Sometimes, you won’t be able to find any updates for the graphics driver from the system, so you should visit the official website of the graphics card manufacturer that you’re using. Then, search for the latest driver for your graphics card model and grab it.
9. Change the FPS Limit
If you’re still experiencing any graphical glitches, such as being stuck on the loading screen on the PC, make sure to change the FPS limit from the game settings menu.
- Launch Senua’s Saga Hellblade 2 on your PC.
- Open the game’s Settings menu.
- Navigate to the Graphics options.
- Check for the Max FPS or Frame Rate Limit option.
- Make sure to adjust the fps limit to 60 maximum so that your game can run smoothly.
10. Use the Dynamic Resolution Mode
The Dynamic Resolution Mode usually reduces the pressure on the graphics processing unit (GPU) and maintains a stable target frame rate. So, if you’re using a graphics card that supports ‘Dynamic Resolution Mode’ (FRS/DLSS), you can try using the same feature from the game settings menu to avoid further glitches.
- Launch Senua’s Saga Hellblade 2 > Go to the in-game Settings menu.
- Head over to the Graphics settings > Enable – Dynamic Resolution Mode.
- You can try experimenting with some other display settings according to your preference.
- It’ll allow you to check better performances and visual fidelity.
11. Adjust In-Game Graphics Settings
It’s also recommended that some in-game graphics settings on the PC be adjusted by following the steps below. This method will help avoid loading screen issues while launching the Senua’s Saga Hellblade 2 game. You should also try lowering the resolution or texture quality of the game to check for the issue again.
- Launch Senua’s Saga Hellblade 2 > Go to in-game Settings.
- Go to Graphics > Set Resolution to native display resolution of the monitor.
- Set Texture Quality to Low.
12. Disable Antivirus
Try turning off the antivirus protection on your computer by following the steps below to ensure there is no issue with the game application blocking. Aggressive antivirus blocking issues have existed for over a decade, and initially, PC users feel safe about it. But things have changed a lot over a few years, and somehow, it seems that most antivirus software assumes game applications or launchers are suspicious ones to remove them easily. Removing the game launcher directly from the installed game file might be a deal breaker for most users. Whereas preventing the game from launching properly is one of them. So, it’s better to temporarily disable antivirus protection on your Windows system and check for the issue again.
- Press the Win+I keys to open Settings.
- Click on Update & Security > Click on Windows Security from the left pane.
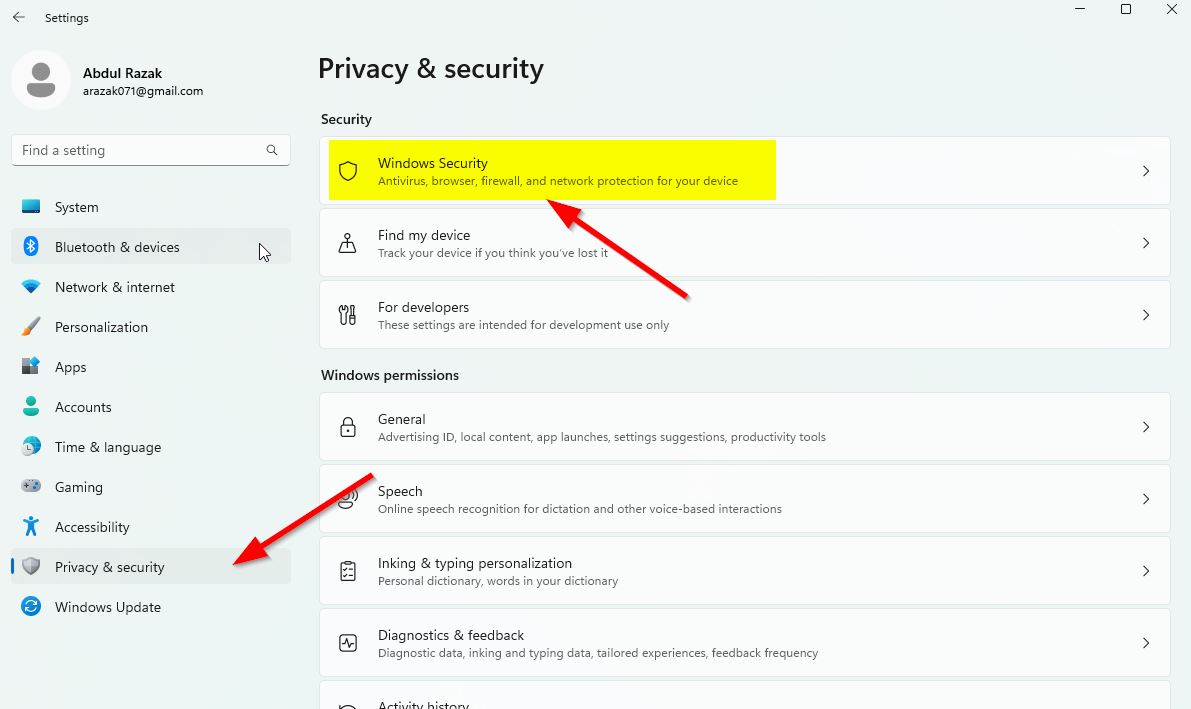
- Click on the Open Windows Security button.
- Head over to Virus & Threat Protection > Go to Manage Settings.
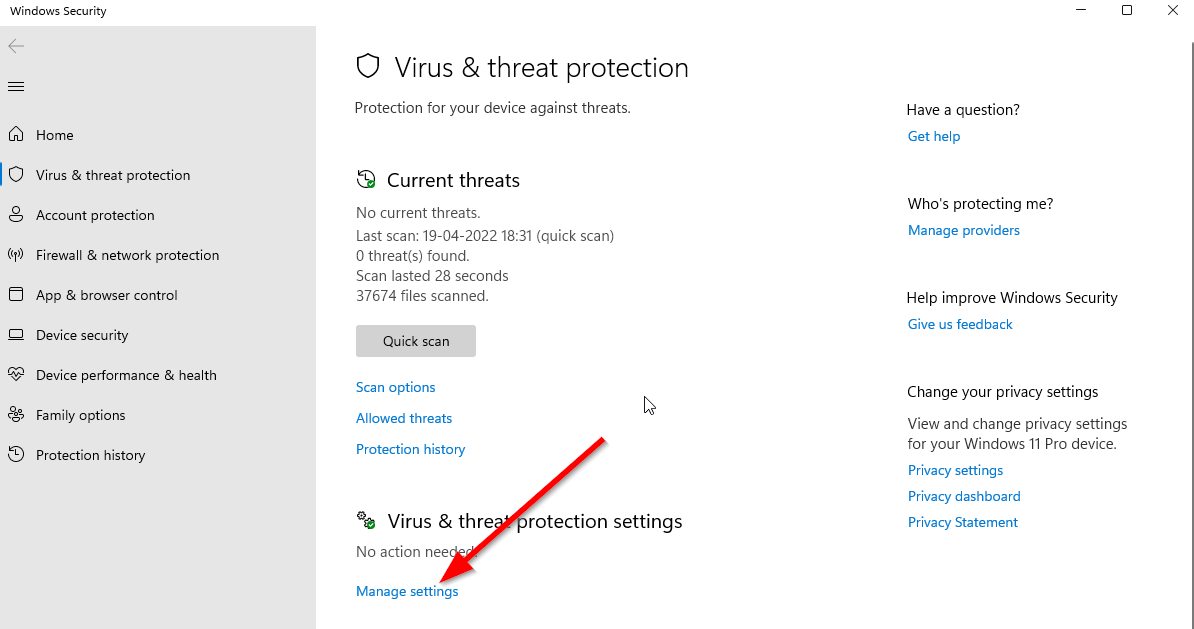
- Turn Off the Real-time protection toggle.
- Click on Yes (if asked) to proceed further.
Please Note: If you’re using a third-party antivirus software then try disabling the real-time protection manually to fix the program blocking issues.
13. Turn Off Overlay Apps
One thing you can try is turning off any unnecessary overlay apps running in the background to prevent conflicts with system resources or foreground running programs. Some overlay programs can consume high CPU or RAM resources, so disabling them manually could help in troubleshooting the issue.
Game Mode:
- Press the Win+I keys to open Settings.
- Click on Gaming > Go to Game Mode.
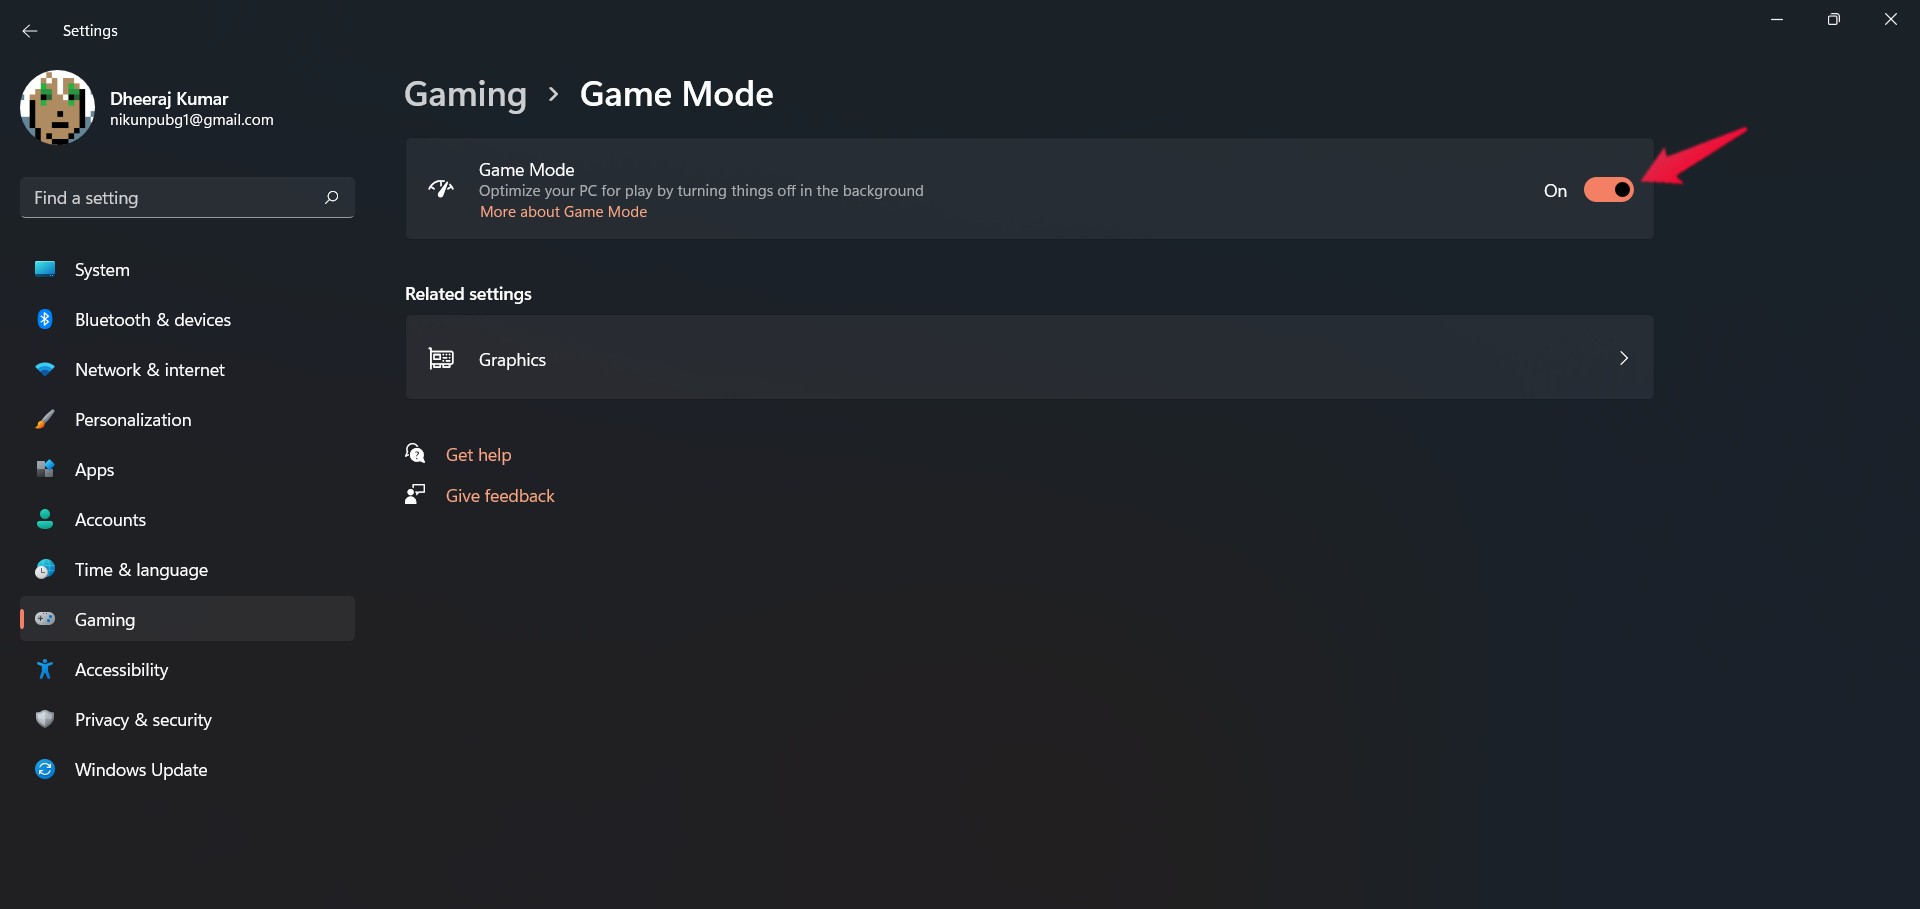
- Turn Off the toggle.
Xbox Game Bar:
- Press the Win+I keys to open Settings.
- Click on Gaming > Go to Game Bar.
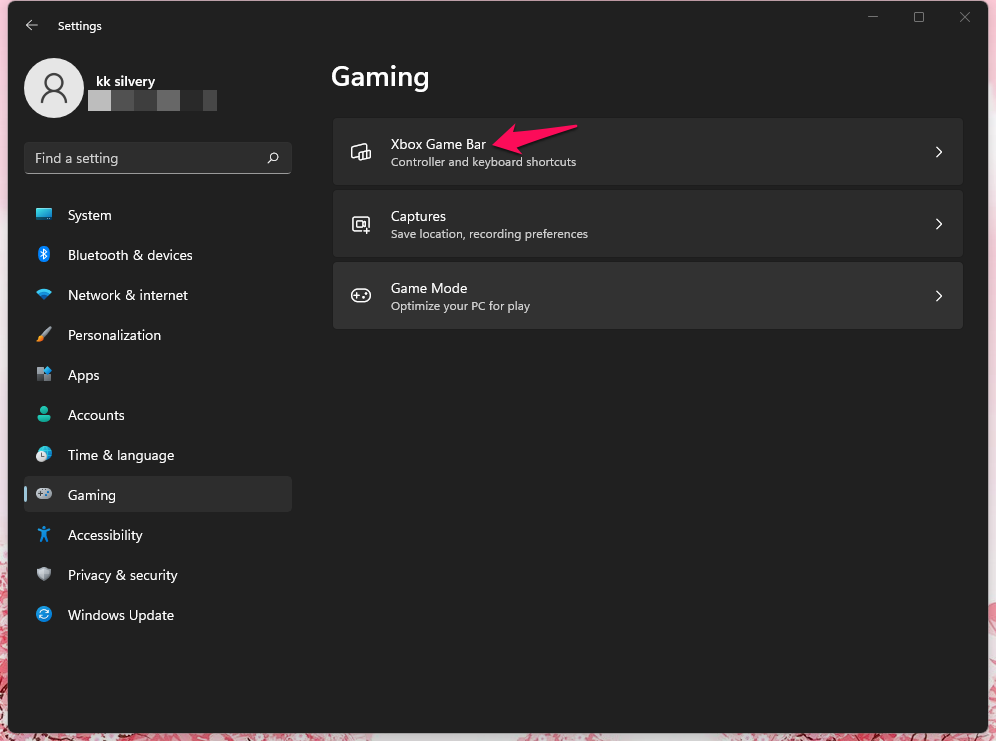
- Disable the Record game clips, screenshots, and broadcast using Game bar option.
Discord Overlay:
- Open Discord > Click on the gear icon at the bottom.
- Under App Settings, go to Overlay.
- Turn On the Enable in-game overlay option.
- Go to Games > Select Senua’s Saga Hellblade 2.
- Turn Off the Enable in-game overlay option.
- Once done, restart the system.
Nvidia GeForce Experience Overlay:
- Open Nvidia GeForce Experience.
- Head over to Settings.
- Click on General > Turn Off the In-Game Overlay toggle.
- Once done, restart the PC to apply changes.
You can also try disabling some of the overclocking applications such as MSI Afterburner etc.
14. Perform a Clean Boot
Multiple PC users reported that by using the clean boot method and disabling specific startup services, the system runs more smoothly than before. Performing a clean boot also fixes loading screen issues with the video games. So, you should follow the steps below.
- Press the Win+R keys to open the Run dialogue box.
- Type msconfig and hit Enter to open System Configuration.
- Go to Services > Select the Hide all Microsoft services checkbox.
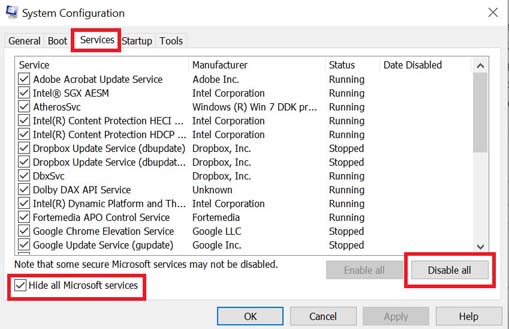
- Click on Disable all > Hit Apply and then OK to save changes.
- Then head over to Startup > Click on Open Task Manager.
- Click on the Startup tab > Check out the specific task and select it.
- Click on Disable to turn it off.
- Once done, restart your computer to apply changes.
15. Try Switching the Window Mode
Another thing you can do is use the Alt+Tab key shortcut from the game screen to switch between window modes whenever the Senua’s Saga Hellblade 2 game causes any stuck on the loading screen issue. It usually switches between window modes and helps the game system get past the loading screen if any temporary visual glitch is there.
16. Do a Clean Installation of the Graphics Driver
If none of the workarounds come in handy, ensure that the graphics card driver (Nvidia) is installed using the DDU (Display Drivers Uninstaller) tool. It’ll help you to uninstall the NVIDIA GPU driver from your computer in a clean format.
- Visit this link to grab your PC’s latest Display Drivers Uninstaller software.
- Run the file and install DDU > Turn Off the internet access on your computer temporarily.
- Launch the DDU tool > Select your graphics driver (NVIDIA) from the drop-down list.
- Click on Clean and restart (Highly Recommended).
- Once the driver is uninstalled from the PC, it will ask you to restart your computer.
- Make sure to reboot your PC > Enable the internet access again.
- Head to the official NVIDIA GeForce website to download the latest driver.
- Download the GeForce Experience app on your PC and install it.
- It would be best to connect the Nvidia GPU to the PC.
- Launch the NVIDIA GeForce Experience app.
- Check for graphics driver updates > If available, hit Download & Install.
- Once done, click on Custom Install. (You can also go for Express Installation)
- Enable the Perform a clean installation checkbox.
- Then proceed to Next > Follow the on-screen instructions to complete the installation.
- Once done, restart your PC to apply changes.
That’s it, guys. We hope this guide was helpful to you. If you have additional queries, you can comment below.
