In this tutorial, we will show you how to dual boot Chrome OS and Windows 10. The Linux kernel-based operating system designed by Google, Chrome OS has quickly scaled the popularity charts. One way to try out this OS is to go ahead and purchase the Chromebook. Although very much possible, isn’t that asking way too much of an effort and monetary value? Well in fact it is and hence the other option involves installing the Chrome OS on your Windows PC. However, the thing is we aren’t in a position yet to fully replace the Windows 10 with Chrome OS.
In such a scenario, the best bet is to dual boot the Chrome OS with Windows 10. In this tutorial, we will help you achieve just that. The efficiency of Google’s OS coupled with the features of Microsoft Windows on a single set up, what else could once ask for? On that note, here are all the required instructions. The tutorial might seem to be a little bit complicated and lengthy, therefore it is recommended to follow the steps very carefully and in the exact same manner as mentioned.
Page Contents
How to Dual Boot Chrome OS and Windows 10
Before we list out the steps to dual boot Chrome OS and Windows 10, there are a few requirements that your PC should qualify. Make sure to follow each one of them.
Prerequisites
- Your BIOS should support UEFI Boot.
- An Intel-based CPU and GPU is required. AMD isn’t yet tested, it may or may not give out desired results.
- USB flash drive with minimum of 16GB free space.
- Finally, to be on a safer side, we would recommend you to take a backup of all the important files
Downloads
- There are a couple of files that you need to download for the dual boot process. Here are all the required files along with their usage.
- First of all, download the Linux Mint Cinnamon image based on your CPU architecture, either 32 bit or 64 bit.
- Next up, download the Rufus tool to flash the Linux Mint Cinnamon on your pen drive.
- Download the official Chrome OS recovery image. Head over to the linked website and search for rammus. make sure to download the latest version, as of writing this is v version 80. All the devices with 4th-gen Intel CPU and newer should go for this image. On the other hand, 3rd-gen Intel CPU or older versions should download “samus”. AMD CPUs could download the “grunt” built.
- Also, download the Brunch framework. This will be used to create a generic Chrome OS image from the official recovery image. Make sure the extension of the file stands tar.gz.
- Finally, download the “multi_install.sh” script. This is needed to install the Chrome OS in the Windows partition.
These are all the required files. You may now proceed with the steps to dual boot Chrome OS and Windows 10. Follow along.
STEP 1: Managing Files
- Create a new folder and name it as Chrome OS. Make sure to create it in any drive that has considerable amount of free space.
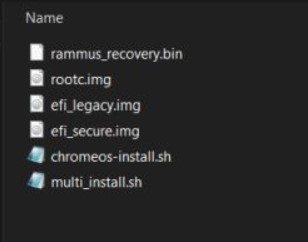
- Move the multi_install.sh file to that folder. Similarly, also extract the contents of the Brunch file inside the Chrome OS folder.
- Next up, extract the Chrome OS recovery image and you should get a file. Rename that file to rammus_recovery.bin.
- Move this bin file to the Chrome OS folder as well. You should now have the following six files inside the said folder:
STEP 2: Creating Partitions
Next, we will now have to create a separate partition for the dual boot of Chrome OS and Windows 10. Although you might go ahead with a single partition, it is recommended to go ahead with two different partitions. While there isn’t any hard and fast rule as to the size of these partitions, yet this guide will go ahead with a 100GB and another of 60GB partitions. The larger partition will be used for installing the Chrome OS whereas the smaller one will be used for mounting the image file. In other words, you could use this 60GB for Windows related tasks. Here is how to create these partitions:
- Click on the Windows icon to bring up the Start menu. Search for Create and format hard disk partitions.
- Open it, head over to the last disk, right-click on it and select Shrink Volume
- Under “Enter the amount of space to shrink in MB”, type in 160 in GB or 160000 in MB.
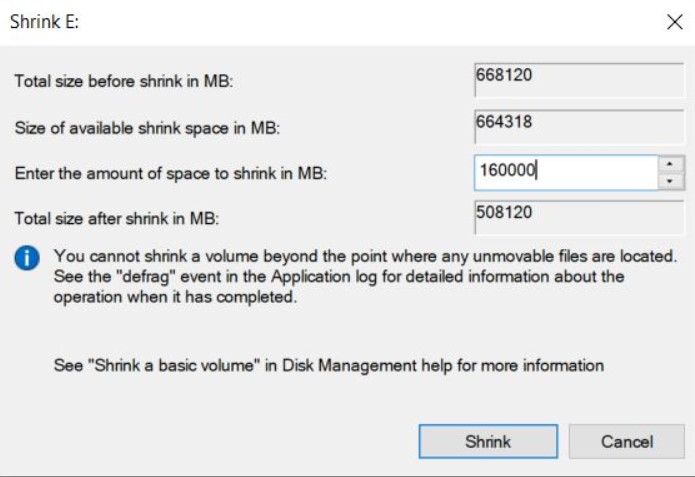
- Once done, click on the Shrink button.
- Now right-click on the unallocated partition and select New Simple Volume.
- Again, right-click on the 160GB partition and select Shrink Volume. This time, enter 60GB and again create a New Simple Volume, just as you have done above.
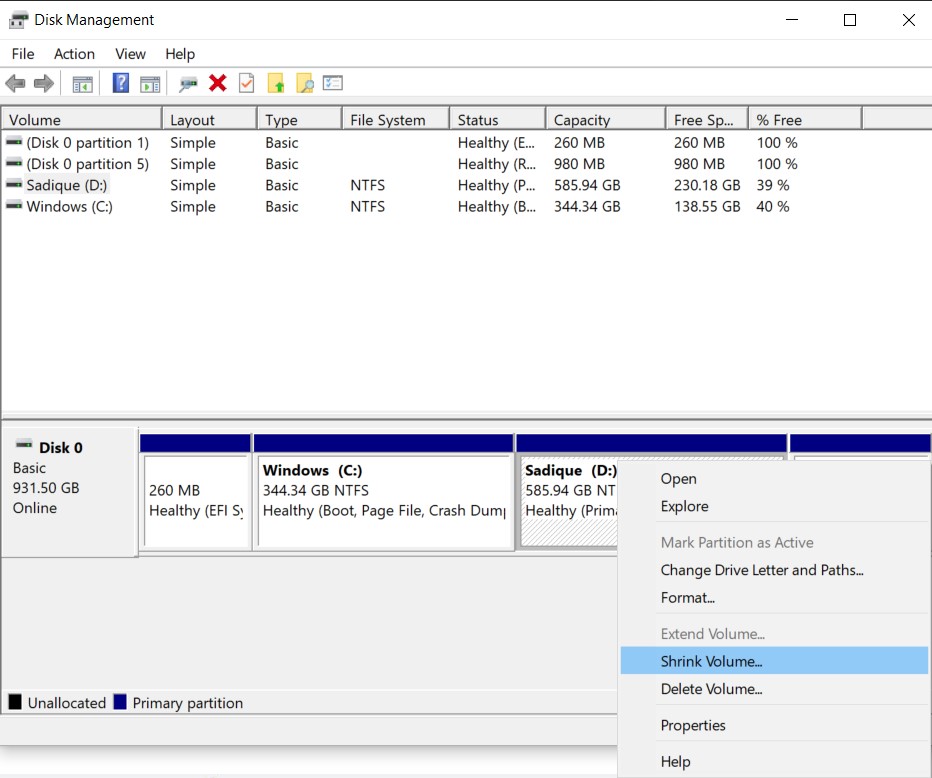
- Right-click on the 100GB partition and select Delete Volume. This will make it an unallocated partition.
STEP 3: Flashing Linux Mint Cinnamon
- Connect your Pen Drive to the PC and launch the Rufus application.
- Click on Select, browse to the Linux Mint Cinnamon ISO image and hit the Start button.
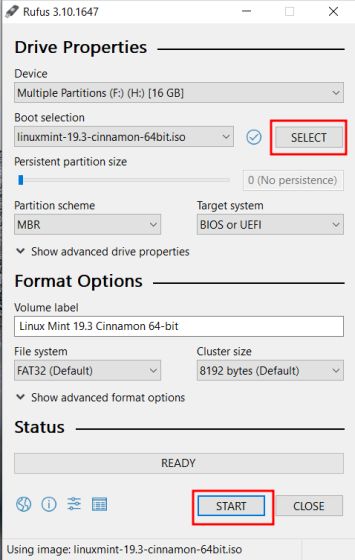
- Once that is done, you may close the Rufus. You will now have to boot your PC to the BIOS menu. Different PC have different key combinations. For example, Dell uses F12, HP uses F9, Lenovo F12, Toshiba F12 or F2, Acer F12, etc.
- Now from the Boot List option, select UEFI. next, go to the Security page and disable the Secure boot option.
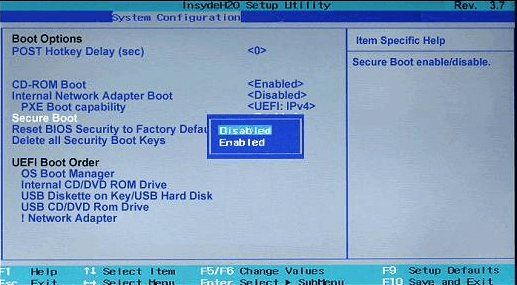
- Finally, Save all the changes and exit the menu. Start pressing the Boot key once again and this time select the USB drive from the Boot Options Menu.
- Your PC should now boot to the Linux Mint Cinnamon. We could now proceed with the installation of the Chrome OS.
STEP 4: Install Chrome OS
- Once your PC is booted to Linux Mint Cinnamon, connect it to the internet. This is needed to download some libraries and dependencies. Any connection will do- wireless (WiFi) or wired (ethernet).
- Head over to the Chrome OS folder and open the terminal there. Type in sudo sh multi_install.sh and hit Enter.
- All the necessary files will now be downloaded. As soon as that is done, a GParted window shall open. Select the “unallocated partition” that we had created of around 100GB and hit the Plus icon situated at the top left bar.
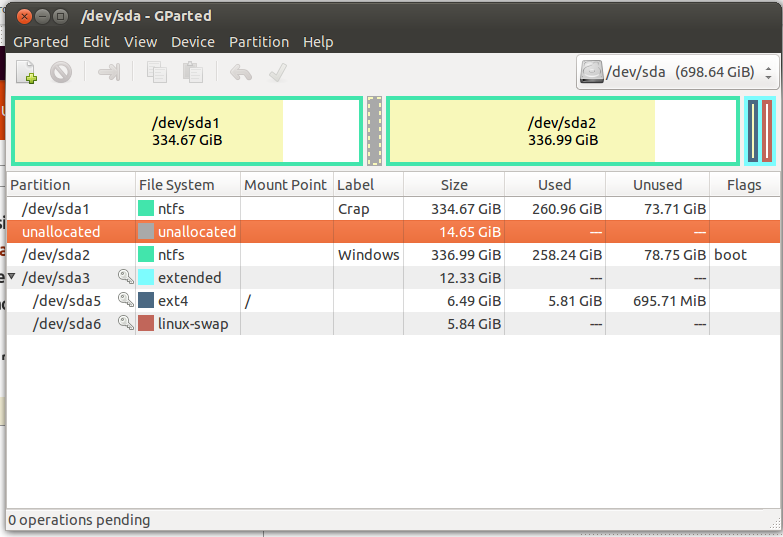
- Select NTFS from the File system section and hit Add. Then click on the tick mark situated at the top bar. This will bring a confirmation dialog box, hit Apply.
- From the GParted window keep a note of this partition, which should start with “sda” followed by a number.
- Now launch the Terminal window, enter the partition name and number, and hit Enter.
- It will confirm the partition details, once you are satisfied with that, type in yes and hit Enter.
- Linux Mint will then start with the installation process of Chrome OS on the Windows partition.
- As soon as the installation is completed, scroll to the top of the Command window and you should find the “menuentry” section. Copy all the contents (text) inside that section.
- Now go to C drive or any other of your choice, right-click and select New Document followed by Empty document. Give this file a .txt extension and save it.
- Open it and paste all the contents that we had copied from the “menuentry” section and again save the file.
- Finally restart your PC and remove the USB drive from it before that. This is because we will have to execute a few steps from the Windows 10 partition.
STEP 5: Dual Boot Chrome OS and Windows 10
We will now have to inform the PC to select the Chrome OS during the bootup. This is where the Grub2Win application will come in handy. Follow the below steps to effectively set it up:
- Download Grub2Win (Free) application and launch it.
- Click on the Manage Boot Menu button situated at the bottom.
- Then click on Add a New Entry button at the top bar.
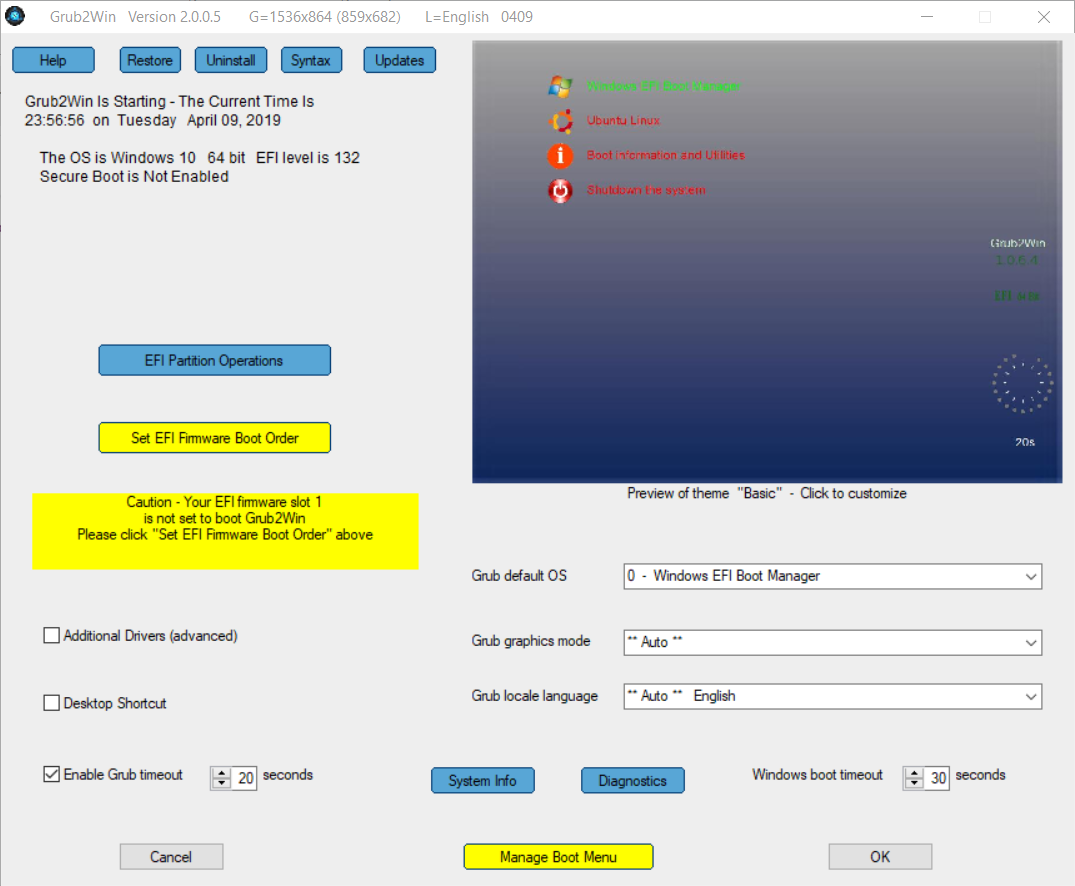
- Under Type, select submenu and under Title, type in Chrome OS.
- Then click on Edit Custom Code. Now paste the command that we had earlier copied from the Terminal window. The code should be starting from img_part. Furthermore, make sure there is no } in the end. Hit Apply > OK.
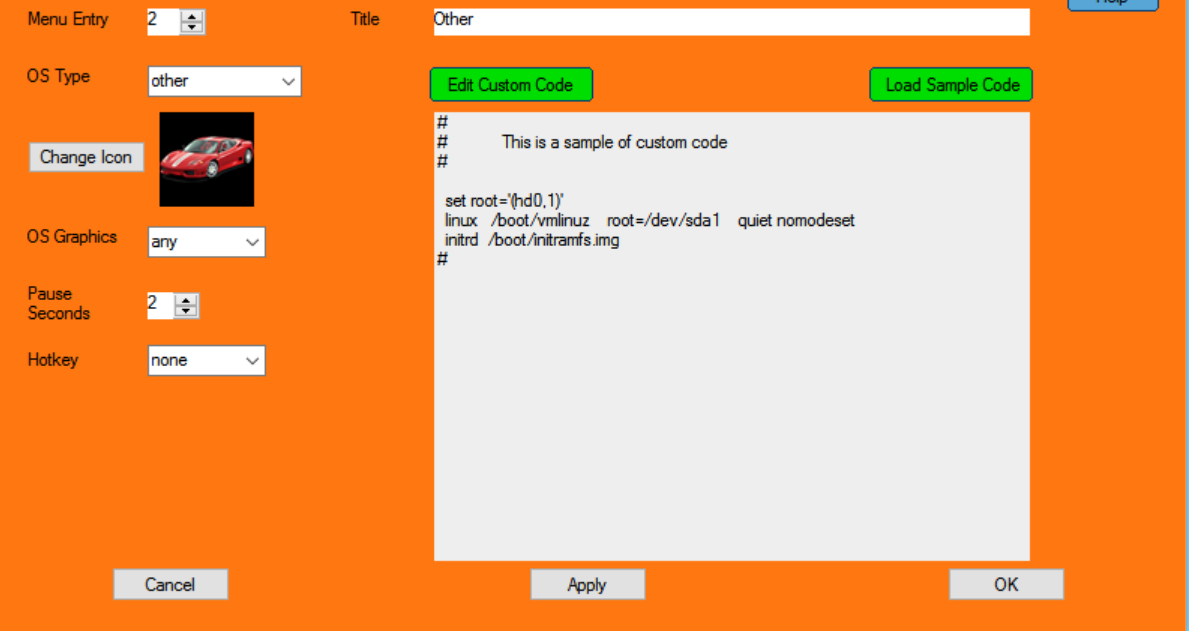
- Chrome OS has now been successfully added to the boot menu. We will now have to give it the top priority. For that, use the upward arrow keys situated at the extreme right.
- Restart your PC and from the Grub2Win interface, select Chrome OS.
- Log in with your Google account and enjoy the all the Chrome OS on your PC.
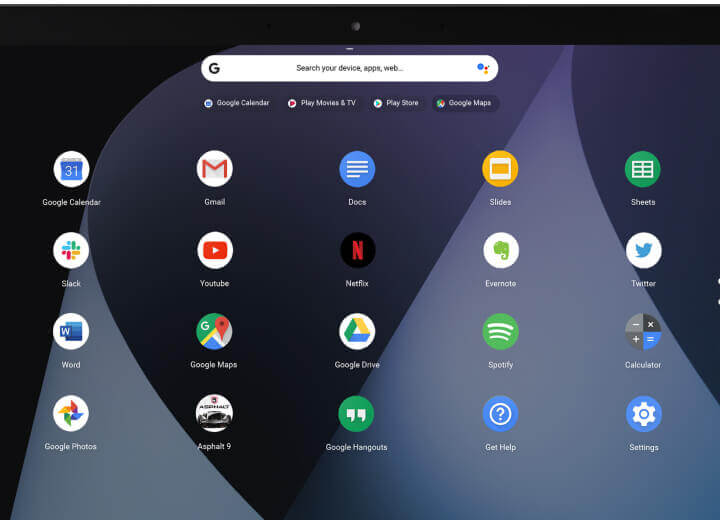
With this, we conclude the guide on how to dual boot Chrome OS and Windows 10 on your PC. Although the steps are slightly lengthy, yet the benefits are equally rewarding. On that note, if you have any queries concerning any of the aforementioned steps, drop in your issues in the comments section below. Rounding off, here are some iPhone Tips and Tricks, PC tips and tricks, and Android Tips and Trick that you should check out as well.

Uhhh this is useless, But you already know that