It seems that multiple Android device users are facing issues with the TWRP custom recovery to appear every time the system boots up after installing the custom firmware. According to the XDA Developers Forum, the issue is happening to several users even after flashing other Pixel ROMs on the device. If you’re one of the victims, you can check out this guide to Fix the Keep Booting into TWRP Recovery After Flashing ROM issue.
The problem is that previously the users did flash the custom firmware such as Pixel Plus ROM successfully using the TWRP custom recovery. Currently, they’re having issues with the TWRP recovery to boot every time they reboot the system after flashing the ROM. So, it’s quite a strange thing or issue that bothers the users a lot. Luckily, there is a possible fix for the issue that you can find below.

Page Contents
How to Fix Keep Booting into TWRP Recovery After Flashing ROM?
A big thanks to dhampire (XDA Senior Member) for sharing the working solution regarding this issue. So, without wasting any more time, let’s jump into the guide below.
Disclaimer:
- First of all, make sure to download and flash the latest version of TWRP Recovery on your device.
- Make sure to rename the TWRP file to twrp.img (.img stands for image file extension) for your ease while flashing it later.
- Now, you’ll need to flash the TWRP Recovery on your handset by following the steps below.
1. Flash TWRP Recovery
- First, make sure to enable the Developer Options and USB Debugging mode on your handset.
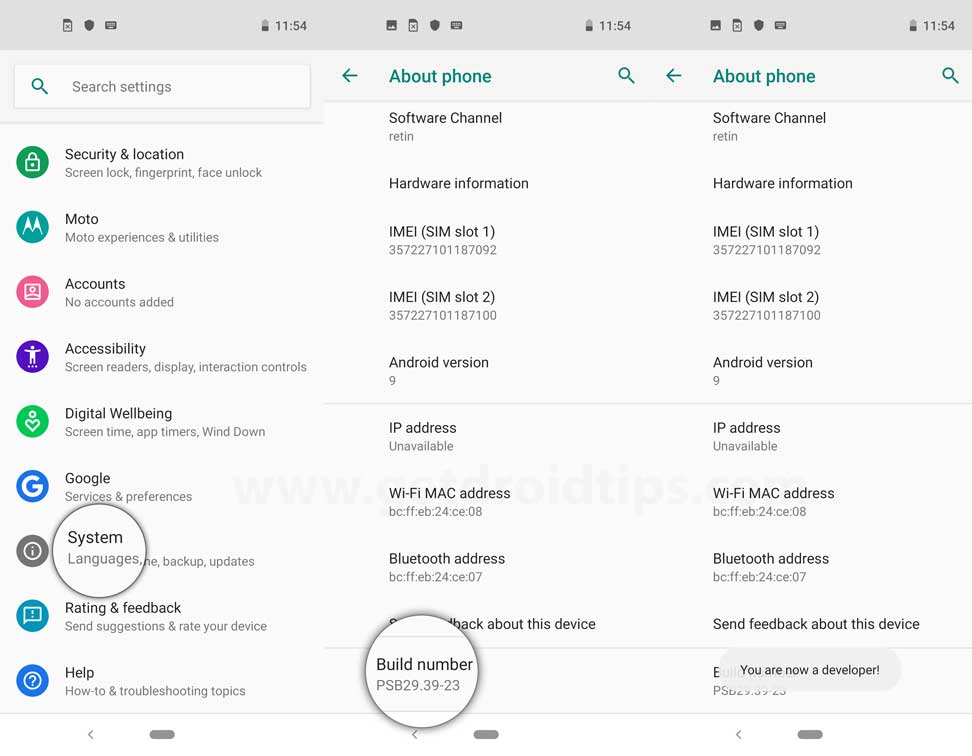
- Go to device Settings > System > About Phone > Tap on the Build Number 7 times to enable Developer options mode.

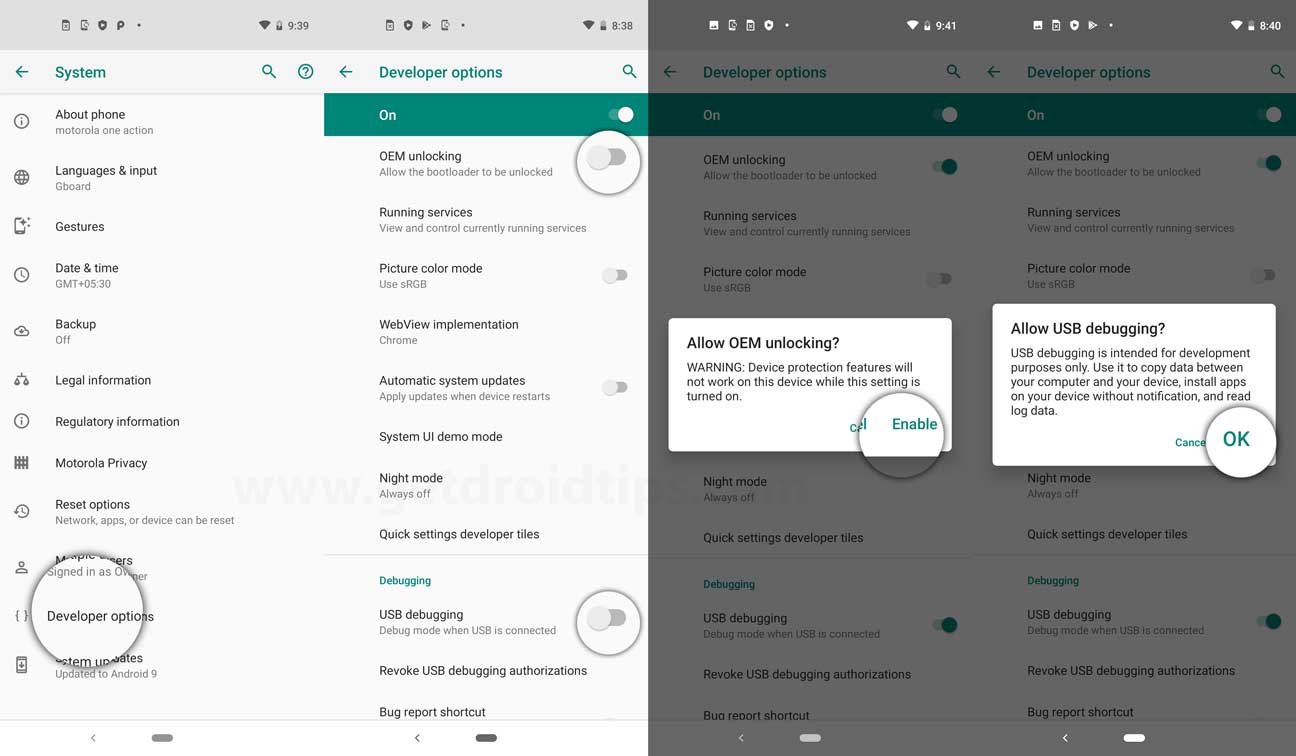
- Now, go to the Developer options in the Settings menu > Enable the USB debugging toggle.

- Now, download the ADB and Fastboot Tool (Platform Tools) on your PC.
- Extract the Platform Tools file and head over to the extracted ADB & Fastboot folder on your computer.
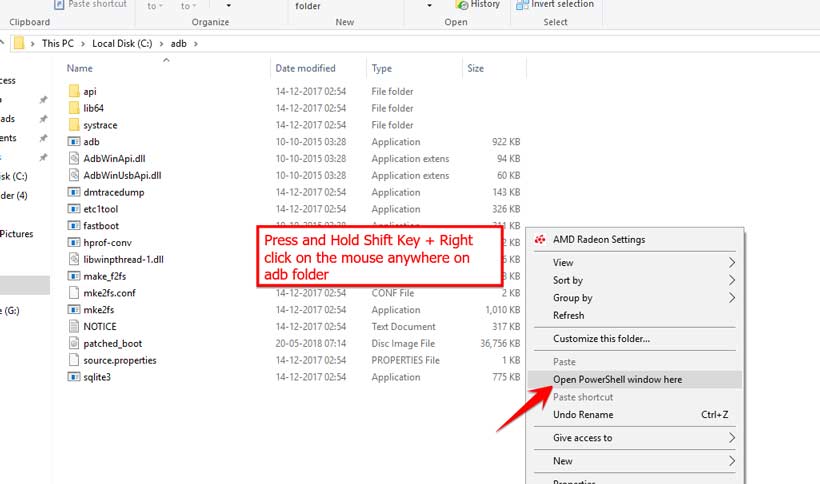
- Next, press and hold the Shift key + right mouse click on the blank area to open the context menu.
- Then click on Open PowerShell window here > If prompted by UAC, click on Yes to open the Command Prompt window.

- Now, you’ll need to simply turn off your device > Press and hold the Volume Up + Power button together for a few seconds to enter into the Fastboot mode.
- Make sure to connect it with the PC via a USB cable and then execute the following command:
adb reboot bootloader
- Now, your device is connected successfully as a fastboot device.
- Simply execute the following command to check whether the device is connected to fastboot or not:
fastboot devices
- It’ll give you a device ID that indicates your device is already connected in the fastboot mode.
- Next, you’ll need to flash the TWRP Recovery on your phone by executing the following command: [If you didn’t rename the TWRP file as mentioned above then make sure to type the correct file name instead of twrp.img]
fastboot flash recovery twrp.img
- Once the device successfully flashes the TWRP recovery, you can run the command below to boot into the recovery mode:
fastboot boot twrp.img
2. Use TWRP or OrangeFox Recovery Again
You’ll need to use the TWRP or OrangeFox Recovery again. It’s necessary. We usually recommend using OrangeFox Recovery to flash TWRP recovery. Because sometimes TWRP has some issues with the password lock – ‘not match password’ error while booting the Android system after flashing the custom firmware. If you want to use OrangeFox Recovery then download it here. Just flash the OrangeFox Recovery zip via TWRP like usually we do.
3. Boot to TWRP Recovery Again
Once you flashed the TWRP Recovery using OrangeFox, make sure to boot your device into TWRP Recovery again. Just run the following command:
fastboot boot twrp.img
4. Flash the Custom ROM Again
Finally, you will need to flash the Custom ROM (Pixel Plus or any other ROM) on your device again. You can check out this guide to get all the available best custom firmware for your model.
Now, you shouldn’t face any kind of booting issues with the TWRP recovery on your phone after flashing ROM.
That’s it, guys. We assume this guide was helpful to you. For further queries, you can comment below.
Credit: XDA
