Call of Duty: Modern Warfare 3 is a newly added edition that can be assumed as a sequel to the 2011 first-person shooter video game by Infinity Ward and Activision. As the latest title, the game offers a ground-breaking gaming experience with Captain Price and Task Force 141 to face off against the ultimate threat. Meanwhile, it seems that multiple players are facing the COD Modern Warfare 3 Error Your GPU Driver Version Does Not Meet The Recommended issue at their end.
If you’re one of the victims to encounter the “Your GPU driver version does not meet the minimum requirements for running Call of Duty: Modern Warfare 3. This will prevent the game from running properly. Please go through the manufacturer’s website to download and install newer ones.” error while launching Call of Duty: Modern Warfare III (2023) then you can check this full guide to resolve it. To be precise, the graphics card also known as the graphics processing unit (GPU) plays a major part in displaying content.

Page Contents
- Fix COD Modern Warfare 3 Error Your GPU Driver Version Does Not Meet The Recommended
- 1. Restart the PC
- 2. Check System Requirements
- 3. Run COD MWIII as an Administrator
- 4. Update Modern Warfare 3
- 5. Scan and Repair the Game Files
- 6. Check for Graphics Driver Updates
- 7. Use the Dedicated Graphics Card
- 8. Disable the Integrated Graphics Card
- 9. Update DirectX
- 10. Update Visual C++ Redistributables
- 11. Delete the Graphics Card Cache Files
- 12. Update Windows
- 13. Try Using System Restore Point
Fix COD Modern Warfare 3 Error Your GPU Driver Version Does Not Meet The Recommended
The GPU card and driver are necessary to render the visuals and graphics. Additionally, the higher frame rate also delivers a smooth and immersive gaming experience. A powerful and compatible graphics card can significantly improve the visual performance and visual quality of the games that we can’t deny. It also includes higher frame rates, shadows, particles, visual effects, depth of field, reflections, ambient occlusion, and more for impeccable gaming scenarios. But the compatibility issue can ruin everything.
In case, you’re seeing this error multiple times that means your graphics card driver becomes outdated or the graphics card itself isn’t compatible with the system requirements of the COD MWIII game. Conflicts with the outdated game version, corrupted game files, lack of admin access, DirectX version issues, Visual C++ Redistributable regarding conflicts, and more can be one of the primary reasons behind such an error. So, there is nothing to worry about it.
Fortunately, we’ve shared with you some workarounds that should come in handy. Make sure to follow all troubleshooting methods until the error has been fixed. So, without further ado, let’s jump into it.
1. Restart the PC
Before performing other workarounds, it’s recommended to reboot the system manually. By doing so, you’ll be able to clear temporary system glitches or cache data issues whatsoever. Go to the Start menu > Click the Power icon > Select Restart.
2. Check System Requirements
It looks like your PC specification isn’t compatible enough with the game’s system requirements to run the program smoothly. Sometimes a game may become incompatible after receiving new patch updates after the launch of the game. So, check out the following requirements to know better.
Minimum:
- OS: Windows 10 64 Bit (latest update)
- Processor: Intel Core i5-6600 or AMD Ryzen 5 1400
- Memory: 8 GB RAM
- Graphics: NVIDIA GeForce GTX 960 / GTX 1650 or AMD Radeon RX 470
- DirectX: Version 12
- Network: Broadband Internet connection
- Additional Notes: SSD with 149 GB available space
Recommended:
- OS: Windows 10 64 Bit (latest update) or Windows 11 64 Bit (latest update)
- Processor: Intel Core i7-6700K or AMD Ryzen 5 1600X
- Memory: 16 GB RAM
- Graphics: NVIDIA GeForce GTX 1080Ti / RTX 3060 or AMD Radeon RX 6600XT
- DirectX: Version 12
- Additional Notes: SSD with 149 GB available space
3. Run COD MWIII as an Administrator
You should run the Call of Duty Modern Warfare III game application as an administrator on Windows to allow the system user account control permission. Without having permission, some applications might not work properly. To do this:
- Right-click on the COD: MWIII application on your PC.
- Select Properties > Click on the Compatibility tab.

- Enable the Run this program as an administrator option.
- Now, click on Apply > Select OK to save changes.
- Once done, run the game to check for the issue again.
4. Update Modern Warfare 3
Sometimes an outdated game patch version can trouble you a lot due to stability issues or bugs. It’s recommended to check for the game updates manually by following the steps below.
Battle.net:
- Open Battle.net.
- Click on Game Library > Choose Modern Warfare III.
- Now, click on the cog wheel icon.
- Select Check for Updates.
- Make sure to download & install the update, if available.
Steam:
- Open Steam > Go to Game Library.
- Right-click on Modern Warfare III.
- Select Properties > Click on Updates.
- Head over to Automatic Updates.
- Select Only update this game when I launch it.
- It’ll automatically install updates whenever available.
Also Read
5. Scan and Repair the Game Files
Sometimes corrupted or missing game files on the PC might also trouble you while starting the game. It’s always better to verify and repair the game files by following the steps below on your PC to avoid errors.
Battle.net:
- Open Battle.net > Click on Modern Warfare III.
- Select the Cog Wheel icon next to the Play button.
- Now, select Scan and Repair > Wait for the repair to complete.
Steam:
- Open the Steam client > Go to Library.
- Right-click on Modern Warfare III in your library.
- Go to Settings and select Properties.
- Click on Local Files > Select Verify integrity of game files.
- Wait for the process to complete.
6. Check for Graphics Driver Updates
You should try to update the graphics driver manually by following the steps below. It’ll eventually fix an outdated graphics driver version or corrupted driver.
Recommended Update:
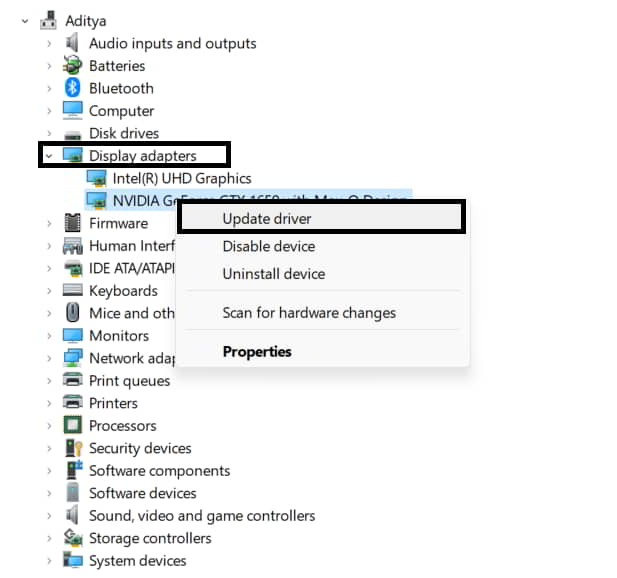
- Press the Win+X keys > Click on Device Manager from the list.
- Double-click on Display Adapters.
- Right-click on the dedicated graphics card that you use.

- Select Update Driver > Click on Search automatically for drivers.
- If there is an update available, it’ll automatically download & install the latest version.
- Once done, restart the computer to apply changes.
Manual Update:
If you can’t find any pending updates, head over to the official website of the respective graphics card brand below and search manually for the latest update. Do remember that you’ll always have to search for the latest driver version and specific for the model you’re using. If a new version is available for the graphics card, download the driver and install it on your PC. You can jump to the link below to do so:
7. Use the Dedicated Graphics Card
You should always use the dedicated graphics card on your PC to avoid game launching or graphical issues. In case, the integrated HD GPU is set as a default one then you’ll face issues.
For Nvidia:
- Right-click on the empty area on the desktop screen.
- Click on NVIDIA Control Panel.
- Select 3D Settings > Choose Manage 3D Settings in the left pane.
- Then select the Program Settings tab.
- Choose Call of Duty: Modern Warfare III from the drop-down list.
- If not available, click on Browse and go to the Call of Duty HQ directory.
- Open the sp23 folder > Add sp23-cod.exe to the list.
- Now, select a High-performance NVIDIA processor.
- Save changes and reboot the PC to apply changes.
For AMD:
Switchable Graphics offers several standard operating modes and can be configured to run a specific application using the desired GPU. AMD graphics card users should use the following steps.
- Right-click on the empty area on the desktop screen.
- Select AMD Radeon Settings from the context menu.
- Next, click on System > Select Switchable Graphics.
- Save changes and reboot the PC to apply changes.
8. Disable the Integrated Graphics Card
Sometimes the system may use an integrated graphics card by default which can cause multiple issues with the game launching experience or graphics-related conflicts. It’s suggested to disable the integrated graphics device on the PC by following the steps below.
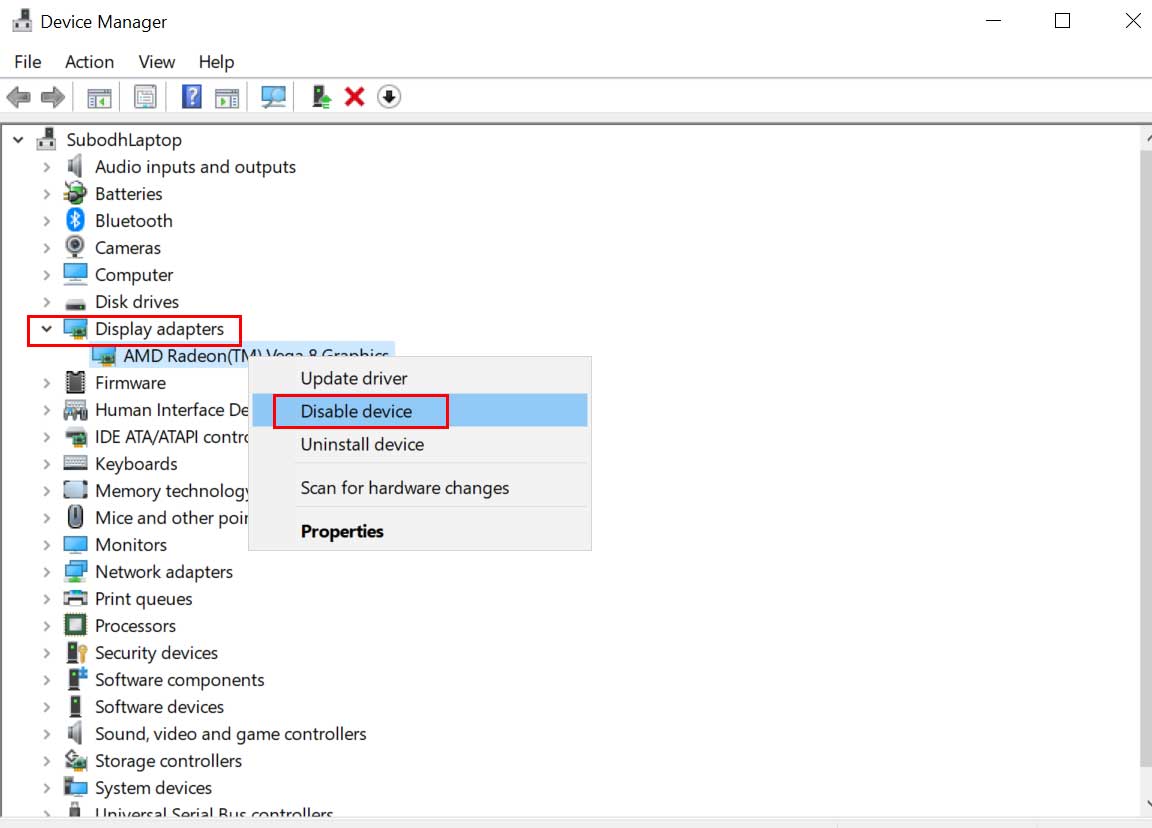
- Press the Win+X keys > Open Device Manager.
- Double-click on Display Adapters.
- Right-click on the integrated GPU > Click on Disable Device.

- If prompted, confirm the same.
- Once done, reboot the PC to apply changes.
9. Update DirectX
You can try updating or reinstalling DirectX on your Windows system by following the steps below. DirectX is a set of APIs that helps in visual quality or graphics in Windows. It has been used for developing and playing video games on Windows for years. Though updating Windows automatically installs the required version of DirectX on the machine, you should manually install the latest version.
- Press the Win+R keys to open the Run dialogue box.
- Type dxdiag and press Enter to open the DirectX Diagnostic Tool.
- Check the DirectX version that has been present on your system.
- Now, visit the official Microsoft website & grab the latest DirectX installer.
- Then run the installer and complete the DirectX installation process.
- Once done, you’re good to go.
10. Update Visual C++ Redistributables
Another thing you can do is to update Microsoft Visual C++ Redistributables on your Windows by following the steps below. The C++ runtime libraries are always required for running resource-heavy programs and video games smoothly which are basically developed by Visual Studio. It’s a useful component for Windows programs, especially AAA titles. So, if you’re running an outdated VCRedist version or don’t have any version then you should follow this method.
- Navigate to the Visual C++ Redistributables download page.
- Download and Install the latest version on the PC.
- Once done, reboot the PC to apply changes.
11. Delete the Graphics Card Cache Files
Make sure to remove the temporary cache files/folder of the respective graphics card that you’re using on the machine. Sometimes temporary cache files can cause several issues with the program launching or game performance without even your knowledge. Therefore, it’s recommended to delete the cache files of the graphics card. To do so:
NVIDIA:
- Press the Win+R keys to open the Run dialogue box.
- Type %localappdata% and hit Enter to open AppData.
- Now, find and open the NVIDIA folder inside the directory.
- Then find and open both the DXCache and the GLCache folder.
- Ensure to Delete all the items in those folders.
- Go back to the %localappdata% directory again.
- Next, locate and open the NVIDIA Corporation folder.
- Open the NV_Cache folder > Delete all the files inside the folder.
- Finally, close all programs, and reboot the PC to apply changes.
AMD:
- Open the AMD Radeon Software on your PC.
- Click on Settings (gear icon) > Click on the Graphics tab.
- Now, click to expand the Advanced menu.
- Scroll down and locate the Reset Shader Cache option.
- Click on Perform Reset.
- Once done, close the AMD Radeon Software.
- Finally, reboot the system.
12. Update Windows
It’s recommended to check for system updates on the Windows PC before getting into any other workarounds. Sometimes an outdated system build can cause several issues.
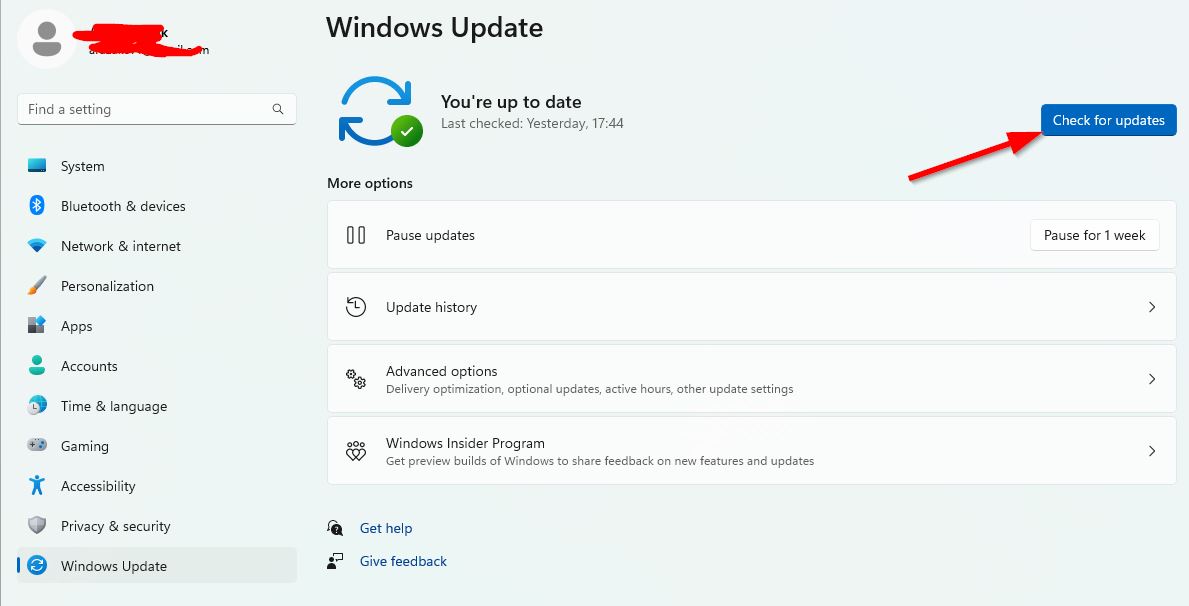
- Press the Win+I keys to open Windows Settings.
- Click on Update & Security.
- Select Check for updates under Windows Update.

- If there is a feature update available, select Download and Install.
- Wait until the software update is complete.
- Once done, restart your computer to apply changes.
13. Try Using System Restore Point
Last but not least, you can also try using the previously created System Restore Point on your machine to go back to the best state of the system. It’s a useful option to revert to the system back to a previous point where everything worked fine and that’s why you’ve created a system restore point at that time. To do so:
- Go to the Start menu > Type and search restore.
- Click on Create a restore point from the search result.
- Now, click on System Restore.
- Follow the on-screen prompts and select a system restore point that you created earlier.
- Then proceed with the further steps.
Note: If you haven’t created any restore point earlier then you won’t be able to find it.
That’s it, guys. We assume this guide was helpful to you. For additional queries, you can comment below.
