Byking Inc. and Bandai Namco Entertainment have released a new anime free-to-play battle royale title recently where players can pick their favourite character to team up and fight for the last one standing. This game includes a new 24-player battle royale experience but somehow players haven’t liked it that much on the Steam platform. Meanwhile, several players are experiencing the My Hero Ultra Rumble Network Error while getting into the multiplayer mode.
This error basically prevents players from getting into the gameplay experience or signing into the game which becomes frustrating. The particular network connection error is one of the common issues that you can find on most online co-op games including My Hero Ultra Rumble. Affected players are forced to be kicked out of the matchmaking joining screen while they try to get into it. Therefore, players become unable to get into the matchmaking process and are unable to play the game properly.
Page Contents
- My Hero Ultra Rumble Network Error Fix
- 1. Restart the PC
- 2. Check Your Internet Connection
- 3. Check the Server Status
- 4. Try Using a Different Server
- 5. Run the Game as an Administrator
- 6. Update My Hero Ultra Rumble
- 7. Verify and Repair the Game Files
- 8. Update Windows
- 9. Update the Network Driver
- 10. Disable Windows Firewall
- 11. Turn Off Antivirus
- 12. Change the DNS Address
- 13. Perform a Network Reset
- 14. Try Using a VPN Service or Proxy Server
- 15. Reinstall the Game
My Hero Ultra Rumble Network Error Fix
There can be several possible reasons behind the network error such as the game server connectivity issues, a poor internet connection, an outdated game patch version, corrupted game files, issues with the networking drivers, an outdated Windows version, conflicts with the DNS settings, Now, if you’re also one of the victims to encounter such an error then make sure to follow this troubleshooting guide to fix it.
You’ll need to perform all workarounds until the problem has been fixed. So, without further ado, let’s jump into it.
1. Restart the PC
Before going into any other workaround, it’s recommended to simply restart your PC to ensure there is no temporary system glitch or cache data issue. A normal reboot of the system mostly fixes several issues whatsoever.
2. Check Your Internet Connection
You can also check the internet connection at your end whether it’s working fine or not. A slow or unstable network connectivity can trigger several issues with the matchmaking or server connectivity. In some cases, too many devices are connected to the same network which can also reduce the data speed. If you’re using Wi-Fi, try using an ethernet connection for better stability. Otherwise, try using a different connection instead.
3. Check the Server Status
Make sure to check the current server status of the game and understand whether there is an issue with the server or not. Sometimes the server outage or downtime can trouble you a lot including the ‘failed to matchmaking’ error. Luckily, the game devs are aware of the matchmaking issue and they’ve officially acknowledged it on Twitter as you can see below. So, they’re investigating this issue and working on it.
[Notice]
We are aware of the following network issues:
– The network disconnects and returns to the title screen during login, matching, and battles.
– Matchmaking takes longer than usual.We are currently investigating this issue. Thank you for your reports and feedback!
— MY HERO ULTRA RUMBLE (@MyHeroUR) September 29, 2023
In case, you’re also getting frequent matchmaking errors then check out the official @MyHeroUR Twitter handle to check for the server updates. Additionally, you can also check the official MHUR website and the Discord server to get more info.
4. Try Using a Different Server
You should try using a different game server by following the steps below to check if the matchmaking error is still bothering you or not.
- Launch the My Hero Ultra Rumble game.
- Go to the Settings menu of the game.
- From the Gameplay option, you’ll need to click on Game Server.
- Now, select the EU or US server to check for the issue again.
5. Run the Game as an Administrator
It’s also recommended to always run the game executable application as an administrator on Windows so that the User Account Control (UAC) can allow all the access properly. Sometimes the system may think you’re trying to run the game without authorizing it. This is a one-time process, so you can follow the steps below.
- Right-click on the My Hero Ultra Rumble executable in the installation directory.
- Now, select Properties > Click on the Compatibility tab.

- Now, click on the Run this program as an administrator checkbox to enable it.
- Click on Apply and select OK to save changes.
6. Update My Hero Ultra Rumble
Even an outdated game patch version can trigger several potential issues with the game launching or server connectivity. It’s suggested to check for the game update periodically and install the latest update whenever available. You can follow the steps below to do the same.
- Open the Steam client > Go to Library.
- Click on My Hero Ultra Rumble from the list.
- Now, Steam will automatically search for the available update.
- If a new update is available, click on the Update button.
- Wait for a while until the game update completes.
- Once done, make sure to close the Steam client.
- Finally, reboot your PC to apply changes.
7. Verify and Repair the Game Files
Sometimes missing or corrupted game files on the PC may cause some issues with the game launching or matchmaking errors. So, scanning and repairing the game files might be helpful enough.
- Launch the Steam client > Click on Library.
- Right-click on My Hero Ultra Rumble from the list of installed games.
- Now, click on Properties > Go to Local Files.

- Click on Verify Integrity of Game Files.
- You’ll have to wait for the process until it gets completed.
- Once done, just restart your computer.
8. Update Windows
An outdated Windows OS version or build number can eventually trigger system performance issues, game launching issues, server connectivity errors, and more. You can follow the steps below to install the update.
- Press the Win+I keys to open Windows Settings.
- Click on Update & Security.
- Select Check for updates under Windows Update.
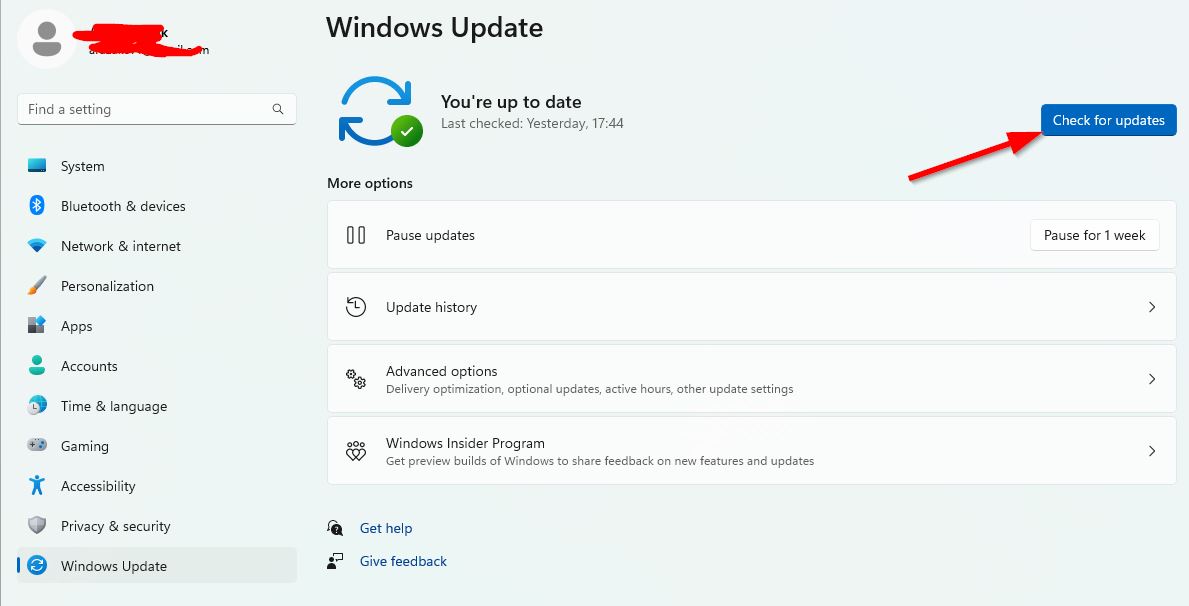
- If there is a feature update available, select Download and Install.
- Wait until the software update is complete.
- Once done, restart your computer to install the software update.
9. Update the Network Driver
It may also be possible that somehow your networking driver becomes outdated for a while and that’s why you’re encountering issues with the server connectivity. To do this:
- Press the Win+X keys to open the Quick Link Menu.
- Select Device Manager > Double-click on Network adapters.
- Now, right-click on the active network adapter.
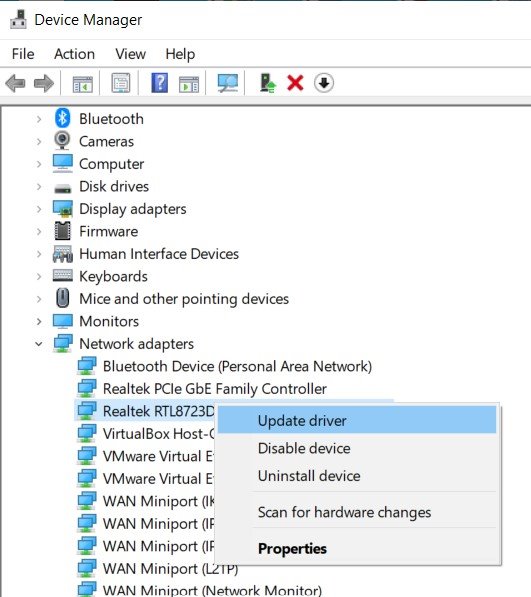
- Select Update driver > Choose Search automatically for drivers.
- If there is an update available, it’ll automatically download and install the update.
- Once done, you can restart your computer to apply changes.
10. Disable Windows Firewall
Windows Firewall basically prevents unauthorized ongoing connections from the PC to online servers. You can try turning it off temporarily to check for the issue again.
- Open the Start Menu > Type Windows Firewall.
- Click on Windows Defender Firewall to open from the search result.
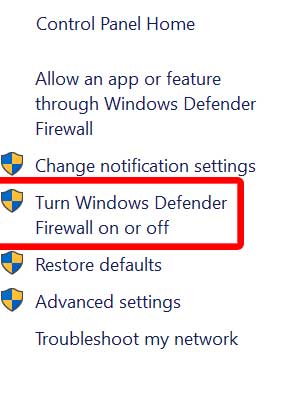
- Now, click on Turn Windows Defender Firewall on or off from the left pane.
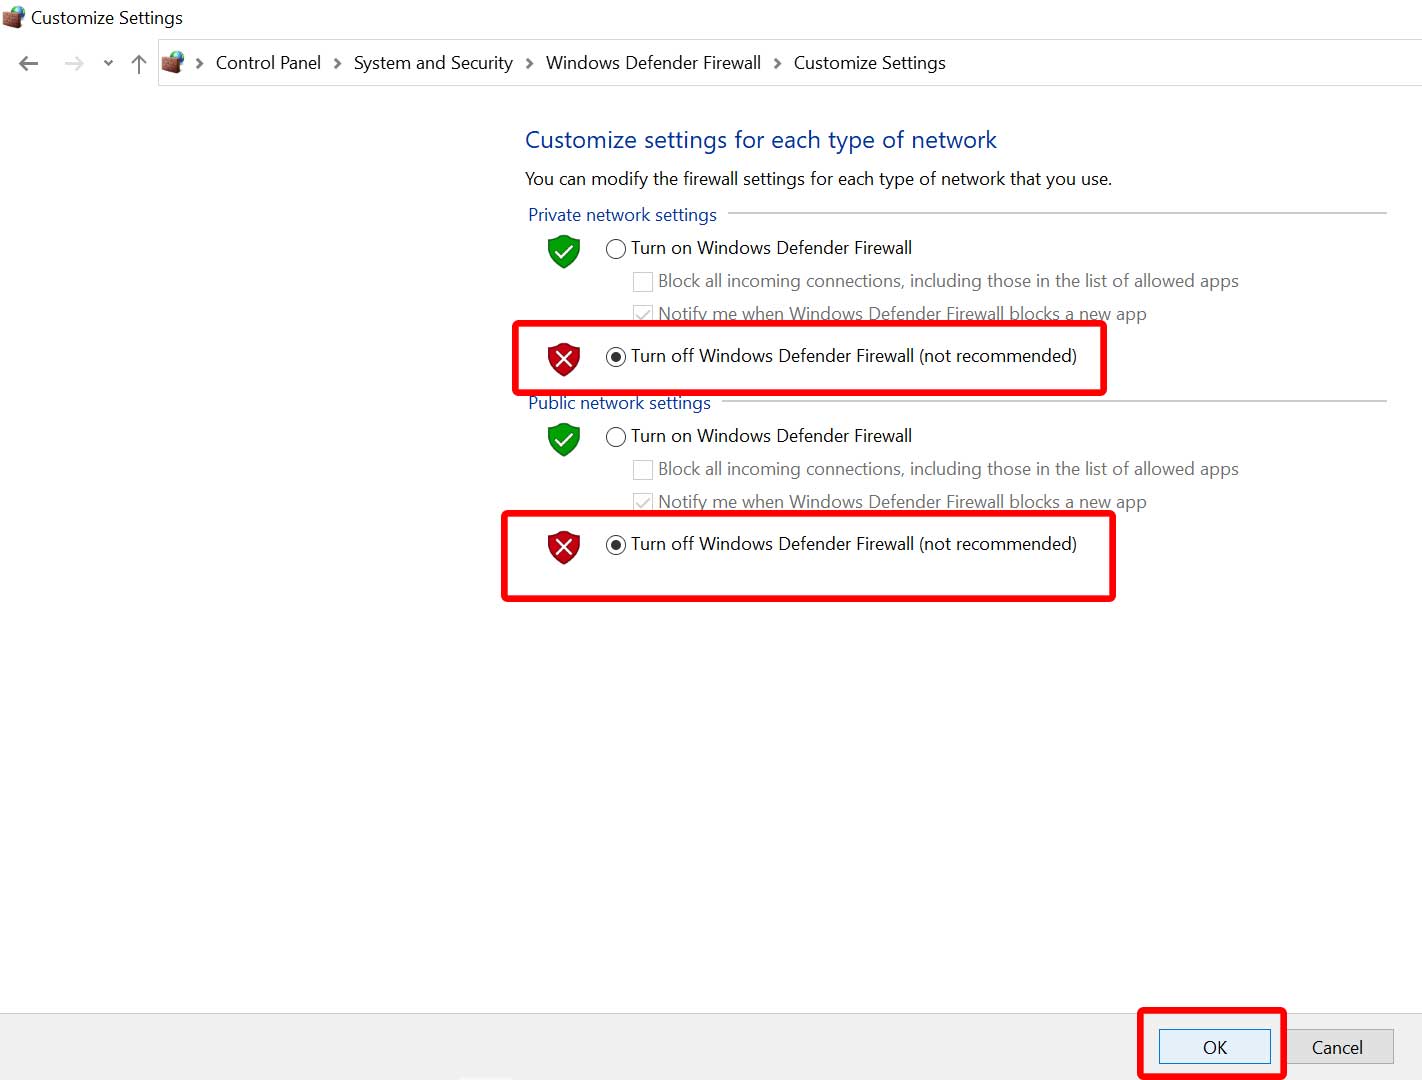
- Make sure to turn off all the Private, Domain, and Public Network Settings options.
- Finally, click on OK to save changes.
11. Turn Off Antivirus
You can also try turning off the Windows Defender antivirus protection on your PC to ensure there is no antivirus software blocking the game files from running properly.
- Press the Win+I keys to open Windows Settings.
- Click on Update & Security > Click on Windows Security from the left pane.
- Now, click on the Open Windows Security button.
- Go to Virus & Threat Protection > Click on Manage Settings.
- Next, you’ll need to Turn Off the Real-time Protection toggle.
- If prompted, click on Yes to proceed further.
Please Note: If you’re using any other third-party antivirus program on your PC then just turn off the real-time protection feature.
12. Change the DNS Address
Sometimes a custom DNS server address specified by your ISP (Internet Service Provider) might have issues with the game server connectivity. You should always try changing the DNS server address to a public domain such as Google DNS for better reachability across the globe and speed. Make sure to follow the steps below to easily add the Google Public DNS address on your PC and console to fix the particular issue.
- Press the Win+R keys to open the Run dialogue box.
- Now, type control and hit Enter to open Control Panel.
- Click on Network and Internet > Select Network and Sharing Center.
- Go to your Connections to select Ethernet, Wi-Fi, etc.
- Next, click on Properties > Double-click on Internet Protocol Version 4 (TCP /IPv4) to open a new window.
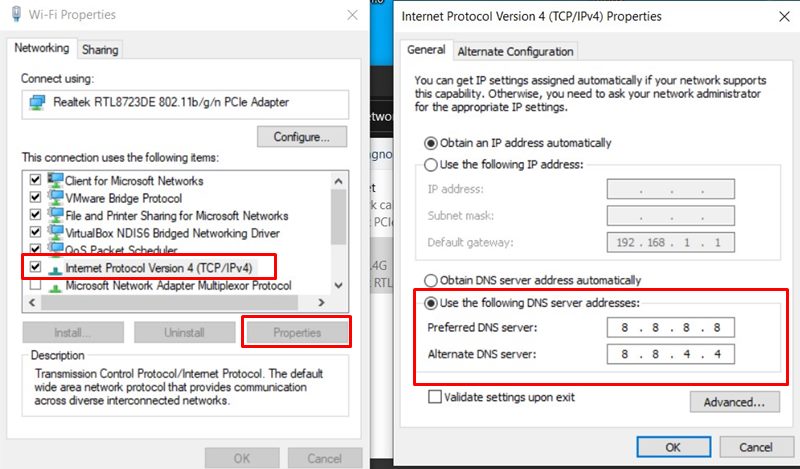
- Click on Use the following DNS server addresses and input 8.8.8.8 as a Preferred DNS server.
- Enter 8.8.4.4 as the Alternate DNS server > Click on the checkbox of Validate settings upon exit.
- Click on OK to confirm the changes > Reboot the PC to apply changes.
13. Perform a Network Reset
Another thing you can do is to perform a factory reset of your network settings on the Windows computer to set the factory defaults. In most cases, this method should work for everyone. Please keep in mind that you’ll need to set or connect to the respective network again after the factory reset.
Note: If you’re using a Wi-Fi network then note down the Wi-Fi password to join the network after performing the network reset.
- Press the Win+I keys to open Windows Settings.
- Go to Network & Internet > Scroll down the Status page to the bottom.
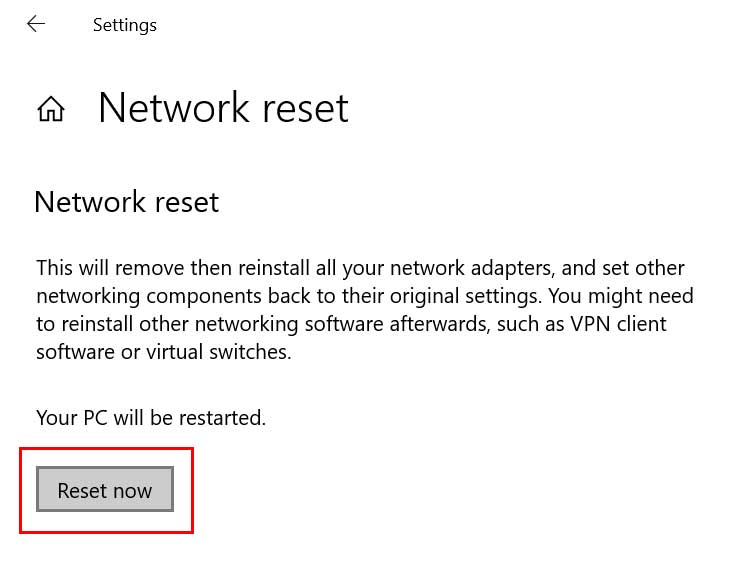
- Click on Network reset > Click on the Reset now button.
- Wait for the process to complete.
- Once done, your PC will reboot automatically.
- Then configure the Wi-Fi network again by adding the password.
14. Try Using a VPN Service or Proxy Server
Make sure to use a VPN (Virtual Private Network) service on the router or the gaming device directly to check if the server connectivity issue still appears or not. Do keep in mind that even though a VPN can be useful for connecting to the game servers or accessing online content quite easily, it can increase buffering in content loading or ping delay in video games.
15. Reinstall the Game
Try uninstalling and then reinstalling the My Hero Ultra Rumble game on your Windows computer to ensure there is no issue with the game installation directory. Some affected players did find this method useful. So, you should try it out.
- Launch the Steam client on your computer.
- Now, go to Library > Right-click on My Hero Ultra Rumble.
- Head over to Manage > Select Uninstall.
- If prompted, click Uninstall again.
- Follow the on-screen instructions to complete the uninstallation process.
- Once done, simply restart the PC to apply changes.
- Finally, launch Steam, and reinstall My Hero Ultra Rumble on another drive.
That’s it, guys. We assume this guide was helpful to you. Feel free to comment below for further queries.
