Inflexion Games has recently released a multiplayer open-world survival and adventure game called ‘Nightingale’ that allows players to make an epic journey of survival into a mysterious and dangerous place. Even though the overall visuals and gameplay experience are good enough, it seems that there are plenty of mixed reviews due to multiple errors, glitches, lags, etc. Meanwhile, a couple of players have started reporting about the Nightingale DirectX 12 Not Supported Error.
Since this is an early-access game, it’s prone to have some bugs or errors until the developers come up with a couple of patch fixes. If we take a quick look at the error notice, it says “DirectX 12 is not supported on your system”. This can be frustrating a lot and prevents players from enjoying the game properly. Well, the ‘DirectX 12 Not Supported’ error usually typically occurs whenever players try launching the game but it detects your system does not meet the requirements to run DirectX 12.

Page Contents
- Fix Nightingale DirectX 12 Not Supported Error
- 1. Reboot the PC
- 2. Your PC Doesn’t Meet the Requirements
- 3. Run Nightingale as an Administrator
- 4. Update Nightingale
- 5. Verify and Repair the Game Files
- 6. Check for Graphics Driver Updates
- 7. Run the Game in the Compatibility Mode
- 8. Install Pending Windows Updates
- 9. Run the Latest DirectX Installer
- 10. Force Run DirectX 12
- 11. Disable Overclocking Software
- 12. Turn Off Windows Firewall
- 13. Add the Game Exception to Antivirus
- 14. Reinstall Nightingale
- 15. Contact Support
Fix Nightingale DirectX 12 Not Supported Error
There are several reasons applicable behind the Directx 12 Not Supported error on your system while running Nightingale. The chances are high that somehow your system doesn’t meet the requirements, an outdated game patch version, an outdated graphics driver, issues with the DirectX version, lack of system admin access, the Windows version might be outdated, etc can occur DX12 not supported error.
Meanwhile, conflicts with third-party overclocking software, firewall or antivirus blocking, issues with the game installation, and more can be other potential reasons. As you’re now aware of the possible reasons, it’s time to jump into the troubleshooting methods below to try fixing this error at your end manually. Ensure to follow all workarounds until the problem has been fixed. So, without further ado, let’s jump into it.
1. Reboot the PC
First of all, you should restart your computer manually after force-closing the game and client to make sure there is no temporary cache data issue or glitch whatsoever. Sometimes a system reboot can also come in handy to fix multiple issues with the game launching or temporary DirectX-related errors.
2. Your PC Doesn’t Meet the Requirements
Another thing you can try is to check for the system requirements of the Nightingale game to ensure that your PC configuration meets the requirements or not. We’ve provided the minimum requirements below for you to cross-check with your computer specs.
- OS: Windows 10 64-Bit
- Processor: Intel Core i5-4430
- Memory: 16 GB RAM
- Graphics: Nvidia GeForce GTX 1060, Radeon RX 580 or Intel Arc A580
- DirectX: Version 12
- Network: Broadband Internet connection
- Storage: 70 GB available space
- Additional Notes: An Internet connection is required. SSD required. Windows 10 version 1909 (revision 18363.1350 or greater). Version 2004 (revision 19041.789 or greater). Version 20H2 (revision 19042.789 or greater).
3. Run Nightingale as an Administrator
It’s also recommended to run Nightingale as an administrator on the PC by following the steps below to allow the User Account Control (UAC) permission. It eventually allows the system to run the game client and game application properly without any permission conflicts.
- Right-click on the Nightingale.exe application on your PC.
- Select Properties > Click on the Compatibility tab.

- Enable the Run this program as an administrator option.
- Once done, click on Apply > Select OK to save changes.
4. Update Nightingale
You can try checking for the game updates manually at your end respective to the game client to ensure there is no issue with the outdated game patch version. Sometimes issues with the outdated game version can trigger multiple conflicts whatsoever.
For Steam:
- Open Steam and go to the Library.
- Click on Nightingale from the left pane.
- If an update is available, click on Update.
- Wait for some time until the update is completed.
- Once done, reboot the PC to apply changes.
For Epic Games Launcher:
- Open the Epic Games Launcher > Head over to Library.
- Now, click on the three dots icon next to Nightingale.
- Set the Auto Update option to ON.
- It should automatically install the available update.
5. Verify and Repair the Game Files
In some cases, corrupted or missing game files installed on the PC can cause several issues with graphics interference and startup errors. So, you should try repairing the game files on the client by following the steps below.
For Steam:
- Launch the Steam client > Click on Library.
- Right-click on Nightingale from the list.
- Click on Properties > Go to Local Files.

- Click on Verify Integrity of Game Files.
- Wait for this process to complete.
- Once done, reboot the PC to apply changes.
For Epic Games Launcher:
- Open the Epic Games Launcher > Click on Library.
- Click on the three-dots icon next to Nightingale.
- Now, click on Verify.
- Wait for the process to complete.
- Finally, restart the system, and run the game again.
6. Check for Graphics Driver Updates
An outdated or corrupted graphics driver version on your PC might also trouble you a lot. It seems running a graphics-intensive program without the up-to-date graphics driver may cause DirectX-related errors in most cases. Here we’ve mentioned both the recommended and manual updating process so that you can go through them accordingly.
Recommended Method:
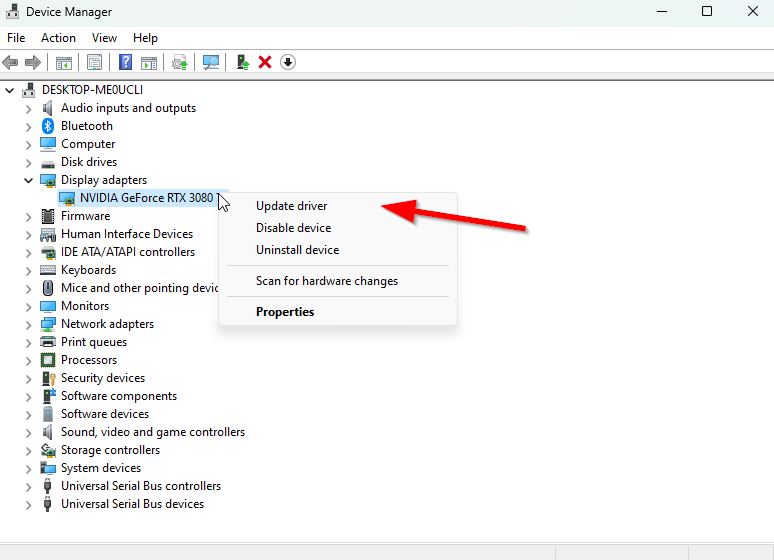
- Right-click on the Start Menu to open the Quick Link Menu.
- Click on Device Manager from the list.
- Double-click on Display Adapters to expand it.

- Right-click on the dedicated graphics card.
- Now, click on Update driver.
- Choose Search automatically for drivers.
- The system will automatically check for the available updates.
- An update will automatically download and install the latest version if available.
- Once done, you should restart your PC to apply the changes.
Manual Method:
If you can’t find any pending updates, then just head over to the official website of the respective website below and search manually for the latest update. If a new version is available for the graphics card, just download the driver and install it on your PC. You can jump to the link below to do so:
7. Run the Game in the Compatibility Mode
Well, if you’re not running the game in the compatibility mode on your low-spec computer or an outdated machine, then you’re doing it wrong. Making the compatibility factor can allow you to run the latest game more smoothly than earlier.
- Right-click on the Nightingale.exe application on your PC.
- Click on Properties > Click on the Compatibility tab.
- Enable the Run this program in compatibility mode for: checkbox.
- Select Windows 7/8 from the drop-down menu.
- Click on Apply > Click on OK to save changes.
8. Install Pending Windows Updates
An outdated Windows version or an outdated build version can cause issues with the latest game launching at times. We recommend you install pending Windows updates manually on your computer by following the steps below.
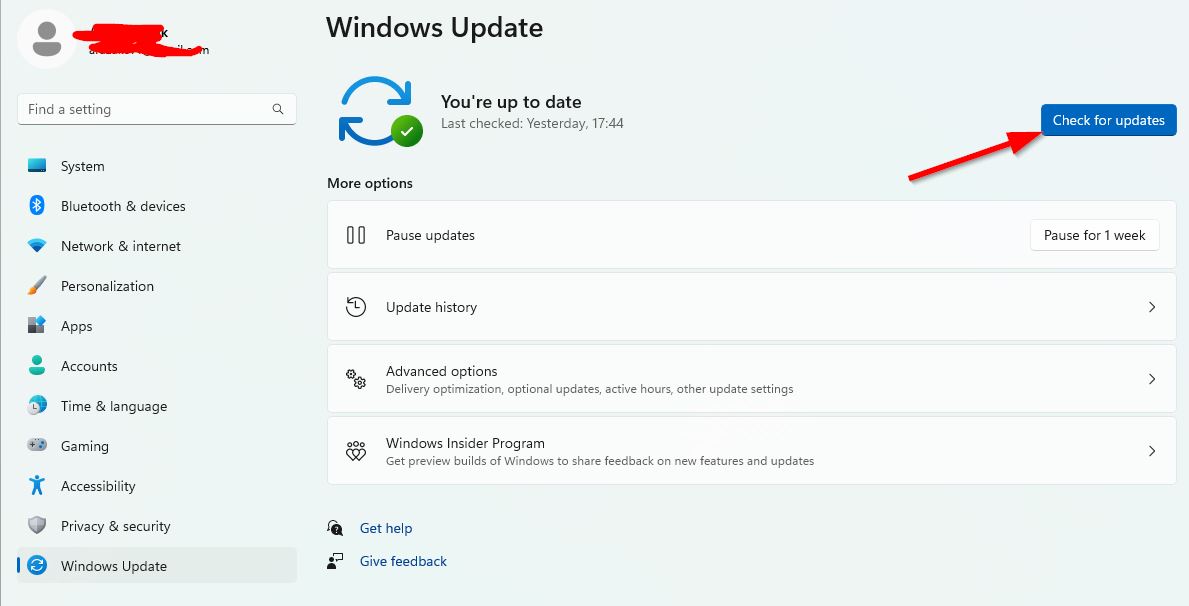
- Open Windows Settings by pressing the Win+I keys.
- Click on Windows Update from the left side.

- Click on the Check for updates button.
- The available update will be downloaded and installed automatically.
- Wait for the update to complete and reboot the PC.
9. Run the Latest DirectX Installer
It seems that you’re running the outdated DirectX version or somehow there are some issues. In case, there is no DirectX 12 version installed on your computer, you can experience several issues. Well, having the latest Windows version can also help in installing the latest DirectX 12 version on your system. So, you can check the steps below to manually run the latest DirectX installer application on your PC to install the DirectX 12 version.
- Visit the official Microsoft website and download the latest DirectX installer version.
- Run the installer and install DirectX completely.
- Once done, reboot the system to apply changes.
10. Force Run DirectX 12
In some cases, you may need to set launch options on the Steam client for Nightingale to make it compatible with DirectX 12.
- Open Steam > Click on Library.
- Right-click on Nightingale from the left pane.
- Click on Properties > Go to the General section.
- Go to Launch Options > Type -d3d12.
- Then try launching the game again.
11. Disable Overclocking Software
It’s also worth mentioning not to enable CPU/GPU overclocking on your PC if your game is crashing or having the DirectX not supported error while startup. Though using overclocking software can help in improving performances at times depending on the PC configuration, sometimes this may trouble you with the program running. You should disable overclocking software like MSI Afterburner, RivaTuner Statistics Server, etc to set the factory default clock speed.
12. Turn Off Windows Firewall
You should also disable the Windows Firewall program by following the steps below to ensure there are no blocking issues with the ongoing game connections to the servers. The chances are high that your Firewall security is troubling you to run the game properly.
- Open the Start menu > Search and open Control Panel.
- Search for firewall > Open Windows Firewall from the search result.

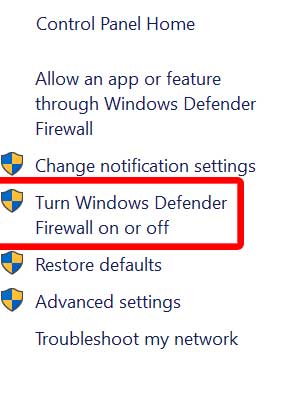
- Click on Turn Windows Firewall on or off from the left pane.
- Turn Off the Windows Firewall option.
- Once done, restart your system to apply changes.
13. Add the Game Exception to Antivirus
Sometimes the antivirus protection blocking issue with the Nightingale game application file can trouble you a lot. It’s better to whitelist the game and then check for the issue.
- Press the Win+I keys to open Windows Settings.
- Go to Privacy and Security > Click on Windows Security.
- Click on Virus and Threat Protection.
- Select Manage Ransomware Protection.
- Click on Allow an app through Controlled folder access.
- Now, click Add an allowed app.
- Click on Browse all apps > Select Nightingale.exe.
- Click on Open to save changes.
- Then click on Open to add it to the exception list.
14. Reinstall Nightingale
If none of the workarounds did come in handy then make sure to uninstall and reinstall the Nightingale game on your PC by following the steps below. You’ll be able to resolve multiple conflicts if any kind of game installation issue is there.
For Steam:
- Open the Steam client on your PC.
- Go to Library > Right-click on Nightingale.
- Navigate to Manage.
- Click on Uninstall > If prompted, click on Uninstall.
- Follow the on-screen instructions to complete it.
- Once done, restart the PC to apply changes.
- Launch Steam > Reinstall the Nightingale game.
For Epic Games Launcher:
- Open the Epic Games Launcher > Click on Library.
- Click on the three-dot icon of the Nightingale game.
- Now, click on Uninstall > Wait for the game to be deleted.
- Once done, reboot the PC to apply changes.
- Finally, open the Epic Games Launcher > Reinstall the game again.
15. Contact Support
Last but not least, you can contact Steam Support, Epic Games Support, or the official @PlayNightingale X handle to get dedicated support for this issue. Try submitting the support ticket for the same so that developers can investigate the problem further.
That’s it, guys. We hope you’ve found this troubleshooting guide useful. If you’ve any queries, you can comment below.
