The Overwatch 2 Replay feature is one of the useful things that you can get to learn from previous mistakes or notice how you can improve your gameplay and tactics in specific encounters. Unfortunately, several players are having issues with the Overwatch 2 Replays which aren’t appearing properly. Now, if you’re also one of the victims to experience the Overwatch 2 Replays Not Showing issue then don’t worry. This is a common issue and can be easily fixed with some workarounds.
Whenever players get into the Overwatch 2 career profile to see the team’s performance in the latest match, the match history section gets empty out of nowhere. Well, this is an unfortunate bug that anyone can experience in Overwatch 2. Though you can see game reports and highlights, replays are not available. However, this specific bug might not bother everyone as plenty of players don’t even watch replays because they just play for fun and time spent.
But if you’re a dedicated gamer or streamer, you’ll definitely need to improve your gameplay. Not only does this bug reduce the chances of skills getting improved but also ruins the review decision at the end of the match. Well, there is nothing to worry about it.
Also Read

Page Contents
- How to Fix If Overwatch 2 Replays Not Showing
- 1. Try Playing Different Game Modes
- 2. Play a Practice Session and Leave
- 3. Run the Game Launcher as an Administrator
- 4. Check Out the Server Status
- 5. Update Overwatch 2
- 6. Repair the Game Files
- 7. Reset In-Game Options
- 8. Clear the Battle.net Cache
- 9. Turn Off Windows Firewall
- 10. Disable Antivirus Protection
- 11. Perform a Clean Boot
- 12. Contact Blizzard Support
How to Fix If Overwatch 2 Replays Not Showing
Thankfully, this bug can be manually fixed until the developers come up with a patch soon. It seems that an outdated game version, corrupted data, antivirus or firewall blocking, etc. can be possible reasons behind this issue. Make sure to check out all the troubleshooting methods below that should come in handy. So, without further ado, let’s jump into it.
1. Try Playing Different Game Modes
First, you can try playing the different game modes like competitive, arcade, or unranked in Overwatch 2 and then go back to the Career Profile > History to check if the replays option is showing videos or not. Some of the affected players did find this trick helpful.
2. Play a Practice Session and Leave
Another thing you can do is to simply play practice sessions for a few minutes and then leave. After that head over to the replays feature and check for the issue again. Though it might not work for everyone, there is no harm in trying it.
3. Run the Game Launcher as an Administrator
Make sure to run the specific game launcher application as an administrator on your PC to grant the user account control permission.
- Right-click on the Battle.net or Steam application file on your PC.
- Select Properties > Click on the Compatibility tab.

- Select Run this program as an administrator checkbox to enable it.
- Click on Apply and select OK to save changes.
4. Check Out the Server Status
You should keep retrying the matchmaking or logging into the game server to check if the problem has been fixed or not. Whether there is a server downtime or maintenance happening on the server side, just visit the @PlayOverwatch Twitter account to get all the latest details and updates. You might need to wait for a couple of hours and then check if the server issue has been fixed or not. In case, the server works fine then skip to the next method.
5. Update Overwatch 2
An outdated game patch version might trigger multiple issues with the game launching or replays section. You should always check for the game update manually by following the steps below on your PC to fix several issues.
For Battle.net:
- Open the Battle.net launcher app on your PC.
- Click on the Overwatch 2 game.
- Next, click on the Settings menu (cogwheel icon).
- Select Check for Updates.
- Wait for the update process to be completed.
- If there is an update available, you should download and install the update.
For Steam:
- Open the Steam client > Go to Library.
- Right-click on Overwatch 2 from the list.
- Click on Manage > Select Properties.
- Now, click on the Updates tab.
- Click on Automatic Updates.
- Once a new update is available, click on the Update button.
- Wait for it to install and then run the game.
6. Repair the Game Files
Sometimes missing or corrupted game files on the PC can trigger multiple issues with the game launching or replaying feature unexpectedly. Make sure to verify and repair the installed game files by following the steps below.
For Steam:
- Launch Steam > Click on Library.
- Right-click on Overwatch 2 from the list of installed games.
- Now, click on Properties > Go to Local Files.

- Click on Verify Integrity of Game Files.
- You’ll have to wait for the process until it gets completed.
- Once done, just restart your computer.
For Battle.net:
- Launch the Battle.net client on your PC.
- Click on Overwatch 2 > Click on the Settings menu (cogwheel icon).
- Select Scan and Repair > Click on Begin Scan.
- Wait for the repair process to complete.
- Once done, reboot the PC to apply changes.
7. Reset In-Game Options
If you’re still experiencing the issue with replays not showing in Overwatch 2 then try to reset all your in-game settings to their default mode by following the steps below.
- Launch the Battle.net client > Click on Library.
- Select Overwatch 2 > Click on the cog icon (Options).
- Go to Game Settings > Click on the Reset In-Game Options.
- Just confirm the changes and relaunch the game.
8. Clear the Battle.net Cache
It’s also recommended to clear the Battle.net cache files from your PC by following the steps below. Sometimes the corrupted or outdated cache files might trouble you a lot.
- Press the Ctrl+Shift+ESC keys to open Task Manager.
- Click on the Details tab > Close all Blizzard tasks like Overwatch 2 and Battle.net.
- Press the Win+R keys to open the Run dialogue box.
- Now, type %ProgramData% in the box and hit Enter.
- Search for the Blizzard Entertainment and Battle.net folders.
- Simply Delete both the folders.
- Once done, run the Battle.net client, and play Overwatch 2 to check for the issue.
9. Turn Off Windows Firewall
The chances are that maybe your default Windows Defender Firewall protection or any third-party antivirus program is blocking the ongoing connections or game files from running properly. So, temporarily disable or turn off the real-time protection and firewall protection.
- Click on the Start Menu > Type firewall.
- Select Windows Defender Firewall from the search result.
- Now, click on Turn Windows Defender Firewall on or off from the left pane.
- Select the Turn off Windows Defender Firewall (not recommended) option for both the Private & Public Network Settings.
- Once selected, click on OK to save changes.
10. Disable Antivirus Protection
You can also try disabling the Windows Defender Antivirus or any third-party antivirus program manually to prevent unnecessary application blocking.
- Press the Win+I keys to open Windows Settings.
- Click on Update & Security > Click on Windows Security from the left pane.
- Click on the Open Windows Security button.
- Go to Virus & Threat Protection > Click on Manage Settings.
- Then turn off the Real-time protection option.
- If prompted, click on Yes to proceed further.
11. Perform a Clean Boot
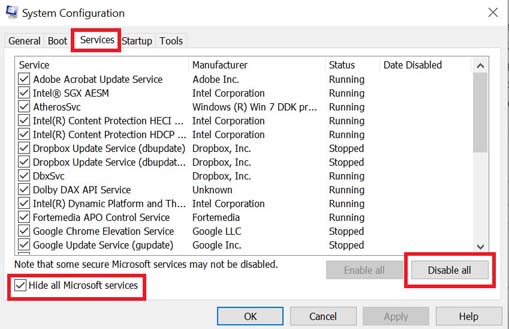
Some of the apps and their services may start automatically while booting the system right away. In that case, those apps or services will definitely use a lot of system resources which basically reduces the system’s performance. If you’re also feeling the same, make sure to perform a clean boot on your computer to check for the issue. To do that:
- Press the Win+R keys to open the Run dialogue box.
- Now, type msconfig and hit Enter to open System Configuration.
- Go to the Services tab > Enable the Hide all Microsoft services checkbox.

- Click on Disable all > Click on Apply and then OK to save changes.
- Now, go to the Startup tab > Click on Open Task Manager.
- The Task Manager interface will open. Here go to the Startup tab.
- Click on the particular task that has a higher startup impact.
- Once selected, click on Disable to turn them off from the startup process.
- Do the same steps for each program that has a higher startup impact.
- Finally, restart your PC to apply changes.
12. Contact Blizzard Support
If none of the methods worked for you then make sure to contact Blizzard Customer Support here to create a ticket to get further assistance on it. By submitting the report or ticket, you’ll be able to get a quicker resolution from the developers. It’ll also help the developers to investigate the issue better and provide a patch fix on the server side quite easily.
That’s it, guys. We assume this guide was helpful to you. For further queries, you can comment below.
