VOID Interactive has done a great job with Ready or Not which is an intense, tactical, first-person shooter title inspired by a modern-day world where the SWAT police units are asked to tackle hostile and control the situations. This game has received hundreds of thousands of positive reviews on Steam and runs quite well on Windows. Due to the Unreal Engine, Ready or Not delivers good visuals but nothing is immune to issues. It seems that several players are having the Ready or Not Out of Video Memory Error on the PC.
Well, this specific issue occurs whenever players try to launch the Ready or Not game on the computer quite often. It seems your PC configuration is lacking the video memory (VRAM) which usually crashes graphics-intensive programs. The Video Memory error can trouble you frequently due to graphical issues or conflicts with the graphics card driver. An outdated game version, missing game files, background running tasks, system file conflicts, low memory issues, and more can be other possible reasons.
Page Contents
- How to Fix Ready or Not Out of Video Memory Error on PC
- 1. Ensure Your PC Specs are Compatible
- 2. Check for the Memory Usage
- 3. Force Close and Relaunch the Game
- 4. Restart Your Computer
- 5. Try Closing Background Processes
- 6. Update Ready or Not
- 7. Scan and Repair the Game Files
- 8. Keep Your PC Cool Down
- 9. Check for Windows Updates
- 10. Update the Graphics Card Driver
- 11. Disable CPU or GPU Overclocking
- 12. Perform a Clean Boot
- 13. Run the SFC Scan
- 14. Increase the Virtual Memory
How to Fix Ready or Not Out of Video Memory Error on PC
The chances are possible that you may receive any of these error messages at your end which says “Ran Out of V-Ram”, “Ran Out of Video Memory”, or even “Out of Video Memory Trying to Allocate a Texture”. So, no matter whatever error message you’re getting while starting the Ready or Not game on your PC, you don’t need to worry about it. This error becomes quite common these days which you can experience with most of the graphics-hungry video games.
Fortunately, here we’ve shared with you some workarounds that should come in handy. Make sure to follow all troubleshooting methods until the problem has been fixed. So, without wasting any more time, let’s jump into it.
1. Ensure Your PC Specs are Compatible
You should check your PC specifications whether the system is compatible with running the Ready or Not game smoothly. Sometimes any kind of outdated configuration or incompatible specs can trigger a low video memory error while launching the game. In case, any hardware or software becomes outdated or incompatible then make sure to upgrade the specific part to be able to run the game.
Minimum Requirements:
- OS: 64-bit Windows 7, Windows 8.1, Windows 10
- Processor: Intel Core i5-4430 / AMD FX-6300
- Memory: 8 GB RAM
- Graphics: NVIDIA GeForce GTX 960 2GB / AMD Radeon R7 370 2GB
- DirectX: Version 11
- Storage: 90 GB available space
Recommended Requirements:
- OS: 64-bit Windows 10
- Processor: AMD Ryzen 5-1600 / Intel Core i5-7600K
- Memory: 8 GB RAM
- Graphics: Nvidia GTX 1060 6GB or better
- DirectX: Version 11
- Storage: 90 GB available space
2. Check for the Memory Usage
Another thing you should also check for the memory usage of Ready or Not from the system resources to identify if there is an issue with the memory usage. Sometimes other third-party tasks or background programs can trouble you a lot.
- Press the Ctrl+Shift+Esc keys to open Task Manager.
- Go to the Performance tab > Click on Memory.
Please Note: If the RAM usage is higher than expected (more than 80%) and the CPU usage is minimal that means you’ll need more physical RAM to avoid such issues. Installing more RAM sticks or upgrading the existing RAM to a higher one should fix the issue with out-of-video memory.
3. Force Close and Relaunch the Game
Well, force closing the game application & then relaunching it might fix several temporary issues with the game task itself. The chances are high that somehow your running game task is having conflicts with the system to perform properly. So, you should follow the steps below to relaunch the Ready or Not game.
- Exit and Close the Ready or Not game application on your PC.
- Now, head over to the Task Manager by pressing the Ctrl+Shift+Esc keys.
- Go to Processes > Right-click on the ReadyorNot.exe task.
- Click on End Task > Launch the game again.
4. Restart Your Computer
Restarting your computer after closing all the running programs is recommended to ensure there is no issue with the system glitch or cache data. Sometimes a temporary glitch can also cause multiple issues with the program running whatsoever. Make sure to open the Start menu > Go to the Power menu > Click on Restart.
5. Try Closing Background Processes
Unnecessary background tasks on the Windows system might cause slow performance and conflicts with the program running. You should close third-party unnecessary background processes manually to free up some system resources like CPU and RAM. You can follow the steps below to do so:
Please Note: Close third-party tasks only. Do not close crucial system processes unless you’re aware of what you’re doing. Otherwise, the system may crash or you may face other unexpected issues.
- Press the Ctrl+Shift+Esc keys to open Task Manager.
- Click on Processes > Click to select the specific task.
- Click on End Task.
- Now, perform the same steps for other third-party tasks that you want to close.
- Once done, close Task Manager, and reboot the PC.
6. Update Ready or Not
We should always recommend our readers manually check the available updates for video games via the client. An outdated game patch version can trigger startup issues or low video memory errors.
- Open Steam > Go to Library.
- Click on Ready or Not from the left side.
- Steam will automatically search for the available update.
- If a new update is available, click on Update.
- Wait for the update to complete it.
- Once done, reboot the PC to apply changes.
7. Scan and Repair the Game Files
Another thing you can also do is repair the installed game files on the PC by following the steps below. It looks like you’re having missing or corrupted game files on the system which can cause multiple issues with the game. To do so:
- Launch Steam > Click on Library.
- Right-click on Ready or Not from the list.
- Click on Properties > Go to Local Files.

- Click on Verify Integrity of Game Files.
- This process may take some time to complete. So, have some patience.
- Once done, reboot the PC to apply changes.
8. Keep Your PC Cool Down
You might need to keep your PC turned off for a couple of minutes to cool it down. If your PC hardware becomes overheated and there is no proper air ventilation present then you may encounter issues with the game graphics or performance on the system. So, make sure to shut down the computer for half an hour at least and then power it on to check for the issue. Do keep in mind that there is enough air circulation happening where the laptop or desktop is placed. If the air flow isn’t good enough then try changing the cooling fans or the cabinet.
9. Check for Windows Updates
An outdated Windows system version on the PC can also trigger multiple conflicts that we can’t deny. You should check the following steps to manually install the Windows updates on the PC.
- Press the Win+I keys to open Windows Settings.
- Click on Update & Security.
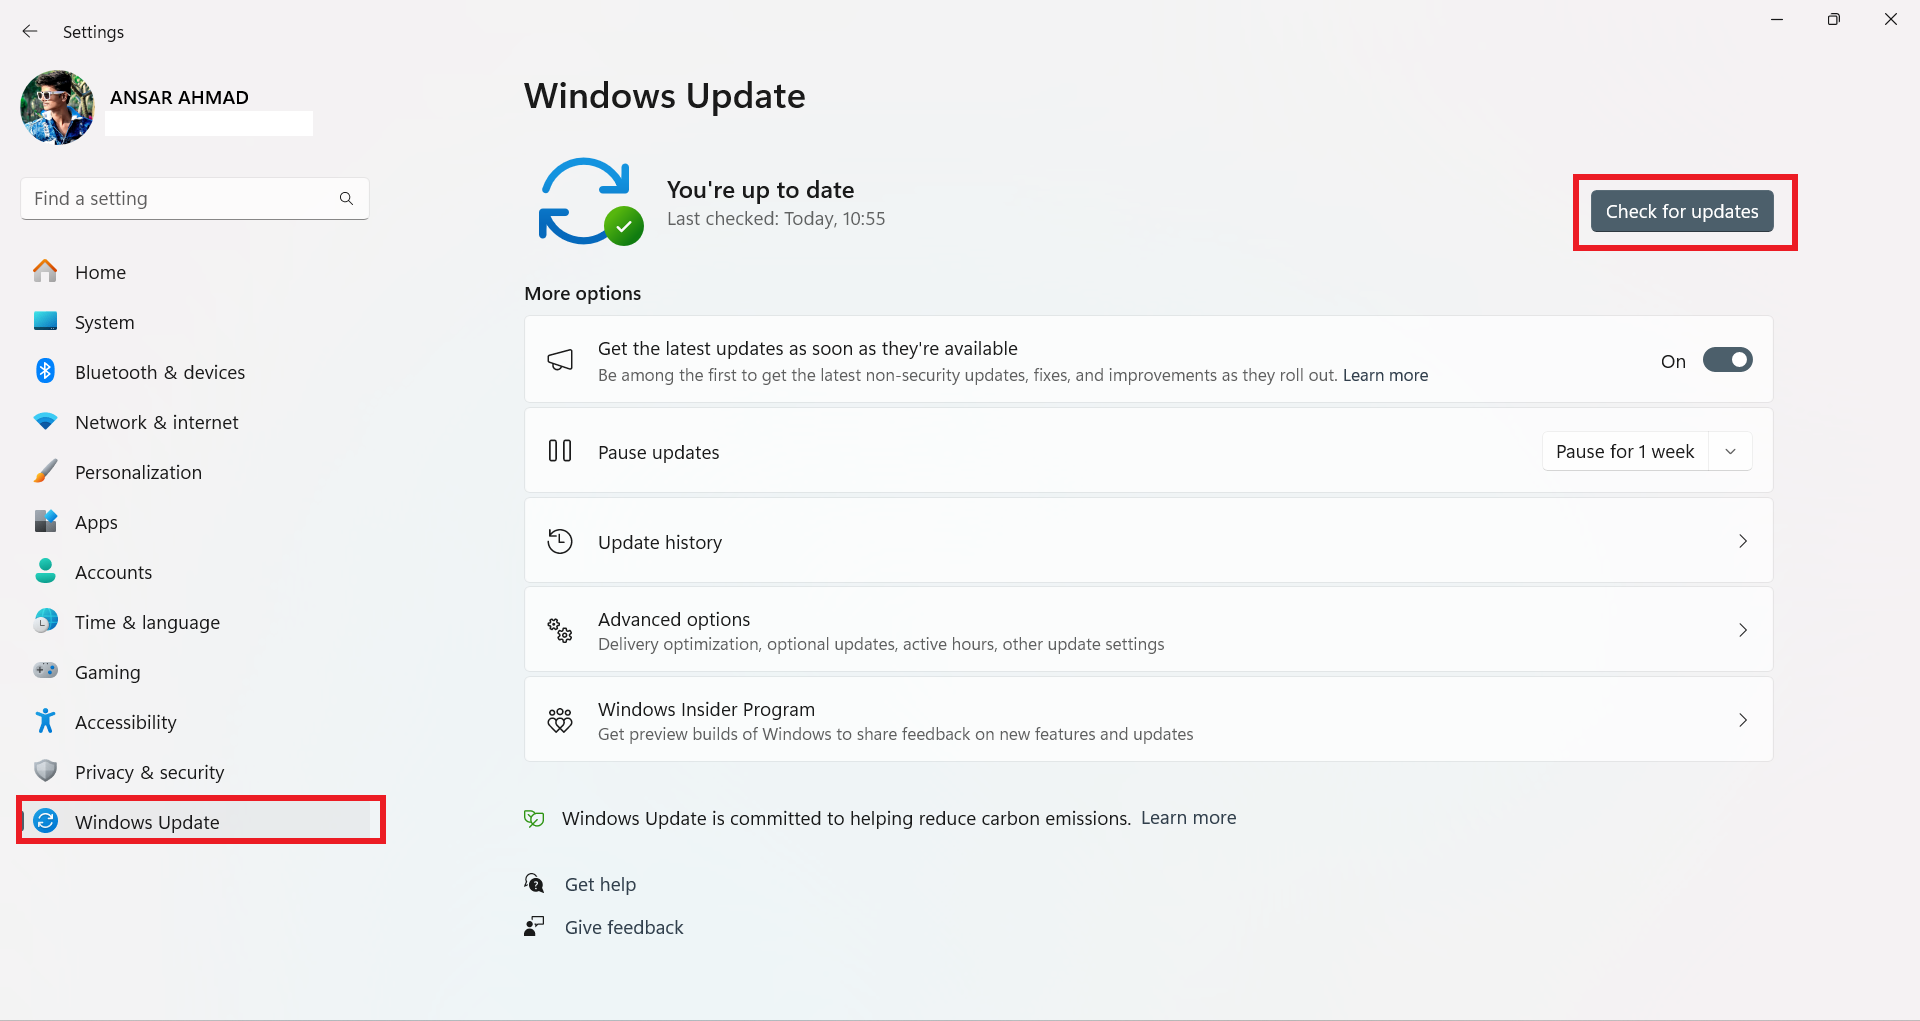
- Click on the Check for updates button.
- If a new update is available, click on Download and Install.
- Wait for the update to get installed.
- Once done, reboot your PC to apply changes.
10. Update the Graphics Card Driver
You should try checking the graphics driver update on your PC manually to ensure there is no issue with the graphics driver version. An outdated or corrupted graphics card driver can easily cause issues with the game running. To do that:
- Right-click on the Start Menu to open the Quick Link Menu.
- Click on Device Manager from the list.
- Double-click on Display Adapters to expand it.
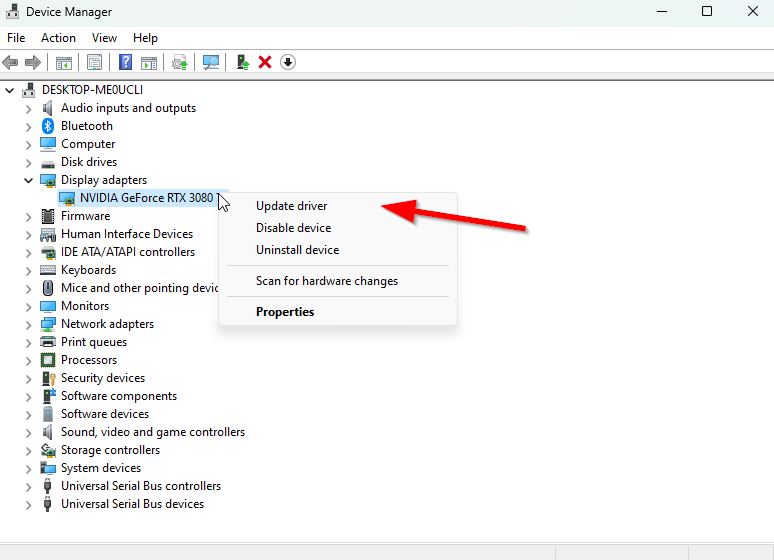
- Right-click on the dedicated graphics card.
- Now, click on Update driver.
- Choose Search automatically for drivers.
- The system will automatically check for the available updates.
- If a new update is available, download & install it.
- Once done, restart your PC.
If you can’t find any pending updates, navigate to the official website of the respective graphics card and search for the latest update. If a new version is available for the graphics card model, download and install it on the PC. You can check the website link below as per your GPU brand:
11. Disable CPU or GPU Overclocking
Sometimes overclocked CPU or GPU on the computer can trigger several issues with the program running. This may cause bottleneck issues and should be disabled temporarily or restored to the default mode. There are several tools available that work pretty well such as MSI Afterburner, Riva Tuner, AMD Ryzen Master, EVGA Precision X, and more.
12. Perform a Clean Boot
It’s also possible that some of the apps and their services may start automatically while booting the Windows system. So, this can consume too much internet data bandwidth and other system resources. You should manually disable third-party services and turn off specific programs from running while startup. To do so, follow the steps below.
- Press the Win+R keys to open the Run dialogue box.
- Type msconfig and hit Enter to open System Configuration.
- Go to the Services tab > Enable the Hide all Microsoft services checkbox.
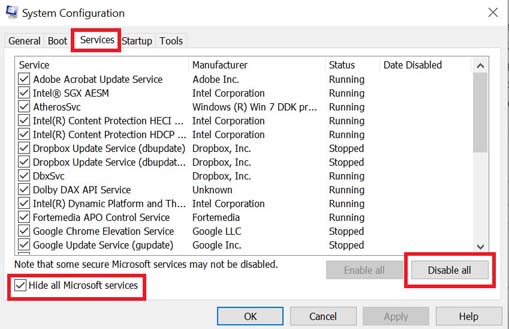
- Click on Disable all > Click on Apply and hit OK to save changes.
- Go to the Startup tab > Click on Open Task Manager.
- Click on the Startup tab in Task Manager.
- Now, click on the particular task that you want to disable.
- Select the task and click on Disable to turn it off.
- Make sure to disable startup tasks that have a higher impact.
- Do the same steps for each program that has a higher startup impact.
- Once done, restart your computer to apply changes.
13. Run the SFC Scan
The System File Checker (SFC) is a utility in the Microsoft Windows system that’s located in the C:\Windows\System32 folder. This utility tool or command simply helps users scan for corrupted Windows system files and restore them (if any). To do this:
- Open the Start Menu > Type cmd.
- Right-click on the Command Prompt app.
- Choose Run as administrator > If prompted by UAC, click on Yes.

- Type the following command and hit Enter to execute the System File Checker process.
sfc /scannow
- Have some patience until the process is completed.
- Once done, close cmd, and reboot your computer.
14. Increase the Virtual Memory
The chances are high that your physical RAM capacity is getting low and the system performance is getting affected badly. This will also impact the program running experiences. So, make sure to increase the virtual memory on your system by following the steps below. Several users have found this method helpful.
Please Note: You must be logged on as an administrator or a member of the Administrators group to complete this process. The network policy settings may also cause such issues if your computer is connected to a network.
- Open the Start menu > Click on Control Panel.
- Click on Performance and Maintenance > Go to System.
- From the Advanced tab, click on Settings under Performance.
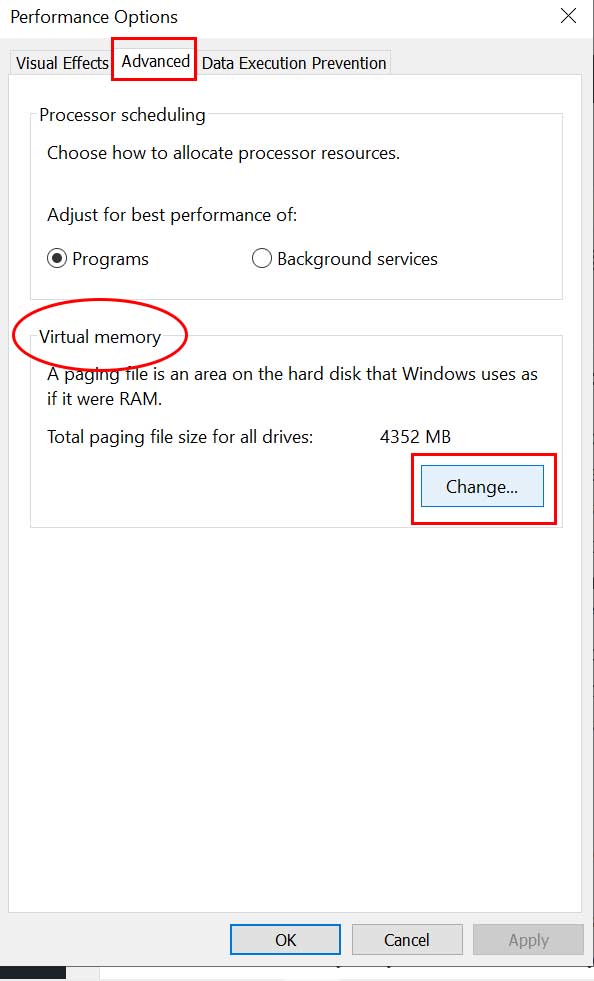
- On the Advanced tab, click on Change under Virtual Memory.
- Under Drive [Volume Label], click on the drive that contains the paging file you want to change.
- Under Paging file size for the selected drive, click on System Managed Size.
- Click on Set > If this option hasn’t been flagged previously, restart the PC after flagging it.
- Under Paging file size for selected drive, click on Custom size.
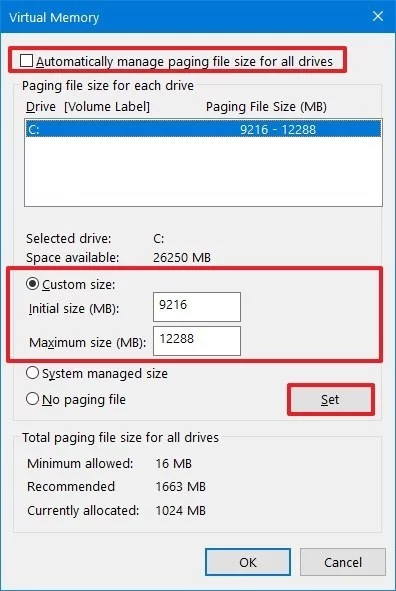
- Now, type a new paging file size in megabytes in the Initial size (MB) or Maximum size (MB) box.
- It should be 1.5x-2x higher than the physical RAM.
- Click on Set and Save changes.
- Restart the PC to apply changes.
That’s it, guys. We hope this guide was helpful to you. For further queries, you can comment below.
