Red Dead Redemption 2 is one of the most famous & stunning open-world action-adventure video games on the market that was initially released back in 2018, but it’s still doing well. This Red Dead Redemption sequel is nailing in terms of visuals. But just like other video games, this title is also having a couple of bugs or issues that we can’t deny at all. Meanwhile, some players face the Red Dead Redemption 2 Out of Memory Error on the PC.
So, if you’re also one of the victims of such an issue, follow this troubleshooting guide completely to fix it. According to multiple reports online, plenty of RDR2 players encounter the same “ERR_MEM_VIRTUAL_OF_MEMORY” error message while trying to launch the game on the PC. Some players can get into the gameplay, but suddenly, a specific error message starts appearing on the screen, and players have to exit the game.
Page Contents
Fix: Red Dead Redemption 2 Out of Memory Error
Even if you’re having a powerful gaming rig the chances are high that somehow the error may appear with the Red Dead Redemption 2 game quite often. Luckily, here we’ve managed to provide you with a couple of possible workarounds that should gonna come in handy. Make sure to follow all the troubleshooting methods one by one until the problem gets fixed. So, without further ado, let’s jump into it.
Also Read
1. Update Red Dead Redemption 2
First, you should check for the game update on the PC because an outdated game version can always trigger multiple issues with the launch or even during the gameplay sessions. The latest game patch update brings improvements, bug fixes, and, most importantly, additional features. It would be best if you always kept updating your game by following the steps below:
For Steam:
- Launch Steam on the PC > Click on LIBRARY.
- Right-click on Red Dead Redemption 2 from the left pane.
- Select Properties > Click on UPDATES from the left pane.
- Click on Always keep this game updated under the AUTOMATIC UPDATES section.
- Make sure to go back to LIBRARY and click on Red Dead Redemption 2 to open the game launch interface.
- If you see the Update button, just click on it to download and install the latest update.
- Wait for the process to be completed > Once done, just restart the PC to apply changes.
For Epic Games Launcher:
- Open the Epic Games Launcher on the PC > Go to Library.
- Click on the three-dot icon next to Red Dead Redemption 2.
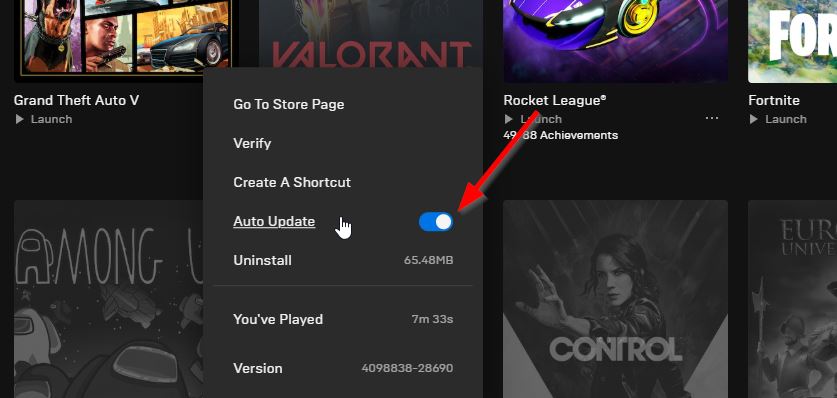
- Just click on the Auto Update toggle to turn it on.
- If an update is available, the game launcher will automatically search for it, and install the same in the background.
- Once done, restart the Epic Games Launcher to apply changes immediately.
For Rockstar Games Launcher:
- Open the Rockstar Games Launcher > Click on Red Dead Redemption 2 from the left pane.
- Go to Settings > Click on Red Dead Redemption 2 under the ‘My installed games’ section at the left pane.
- Make sure to click on Enable automatic updates to turn it on.
2. Update GPU Driver
It’s also recommended to update the graphics driver on the PC to ensure there is no outdated or missing GPU driver causing the game to crash or throw out memory-related errors whatsoever. To do that:
- Press Windows + X keys to open the Quick Start Menu.
- Now, click on Device Manager from the list > Double-click on Display adapters.
- Right-click on the dedicated graphics card that’s active.
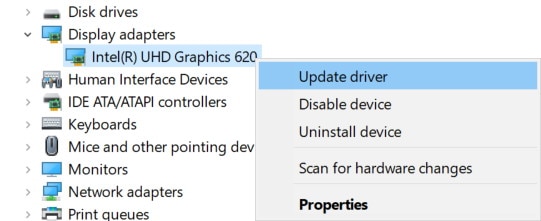
- Next, select Update driver > Choose to Search automatically for drivers.
- If there is an update available, it’ll automatically download & install the latest version.
- Once done, the system will reboot automatically. Otherwise, you can manually restart the system to apply changes.
If you can’t find any update, then make sure to head over to the official graphics card website and search manually for the latest update. If a new version is available, just download the file on your PC and install it. Whatever graphics card you use, jump to the link below as per the manufacturer.
3. Increase Virtual Memory
The chances are high that your physical RAM capacity is getting on its verge of working limit on the system due to plenty of background tasks as well as foreground tasks. It’s highly recommended to increase the virtual memory by setting up the paging file size on the PC. The paging file size should be higher than the actual RAM capacity to get better results. You can follow the steps below to increase the virtual memory size on your PC.
Please Note: You must be logged on as an administrator or a member of the Administrators group to complete this process. If your computer is connected to a network, the network policy settings may also cause such issues.
- Click on the Start menu > Click on Control Panel.
- Click on Performance and Maintenance > Go to System.
- From the Advanced tab, click on Settings under Performance.
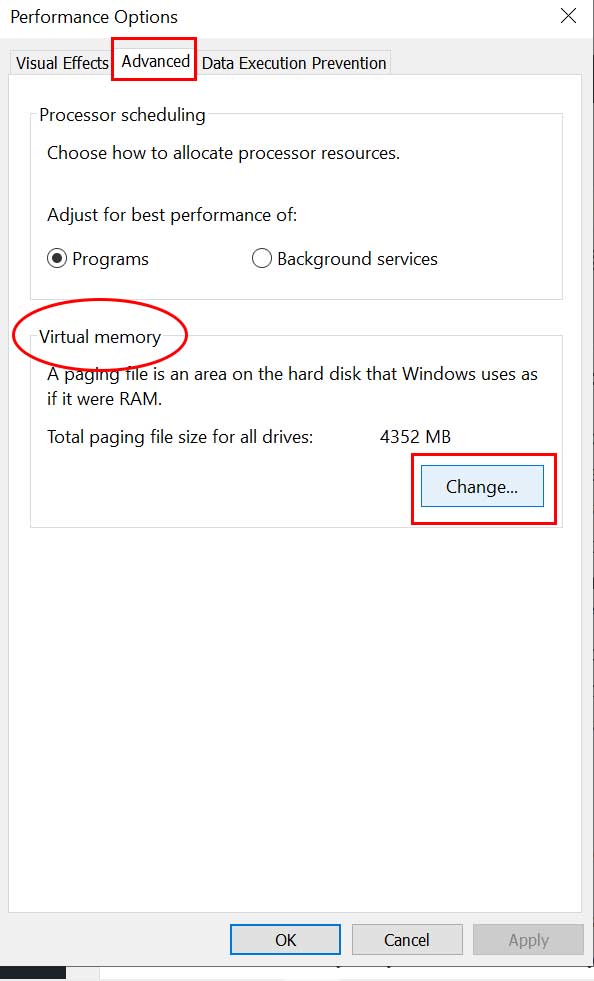
- On the Advanced tab, click on Change under Virtual memory.
- Under Drive [Volume Label], click on the drive that contains the paging file you want to change.
- Under Paging file size for the selected drive, click on System Managed Size > Click on Set.
- If this option hasn’t been flagged previously, restart the PC after flagging it.
- If the system paging file size is used to be System Managed then under Paging file size for selected drive, click on Custom size.
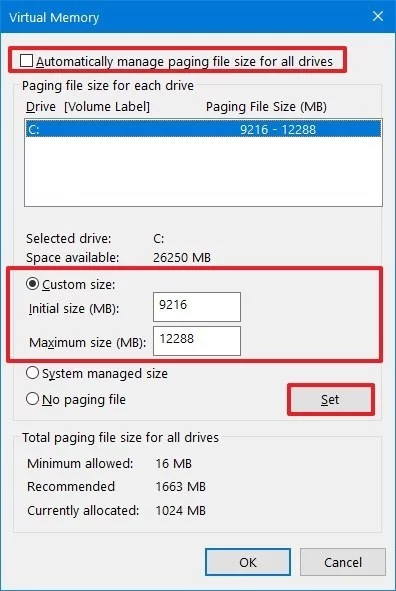
- Now, type a new paging file size in megabytes in the Initial size (MB) or Maximum size (MB) box. [It should be 1.5x-2x higher than the physical RAM]
- Click on Set and save changes > Restart the PC to apply changes.
In most cases, this particular method should fix the Red Dead Redemption 2 Out of Memory Error immediately. However, if you’re interested in upgrading the higher physical RAM then that would be much better than all of the workarounds, we guess.
4. Try Changing API from Vulkan to DirectX
The API (Application Programming Interface) in the Red Dead Redemption game is set to Vulkan by default. If you don’t know about Vulkan, it’s a computer application for handling computing and 3D graphics. However, plenty of affected players have found that the DirectX graphics API is most suitable for PC games to reduce crashes or other potential issues whatsoever. Therefore, we’re suggesting you change the Vulkan API to DirectX 12. To do so:
- Open the Red Dead Redemption 2 game on the PC > Go to the in-game SETTINGS menu.
- Click on GRAPHICS > Scroll down to the Advanced Settings option and set it Unlocked.
- Under the Graphics API section, make sure to change it to DirectX 12 from the drop-down list.
- Now, press the Enter key to apply changes > Reboot the game and check for the issue again.
5. Verify and Repair Game Files
The chances are high that corrupted or missing game files can eventually trigger multiple issues with the game launching. It’s recommended to verify and repair the game files on the PC via the game client to fix most of the game file-related issues completely. To do this:
For Steam:
- Open the Steam client > Go to LIBRARY.
- Right-click on Red Dead Redemption 2 from the left pane.
- Select Properties > Go to LOCAL FILES.

- Now, click on Verify integrity of game files > Wait for the process to be completed.
- Once done, make sure to reboot the PC to apply changes.
For Epic Games Launcher:
If in case, you’re using the Epic Games Launcher then you can follow the steps below to fix Red Dead Redemption 2 game files regarding issues.
- Open Epic Games Launcher > Go to Library.
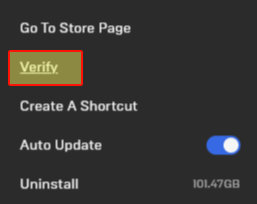
- Click on the three-dots icon next to Red Dead Redemption 2.
- Select Verify and wait for the process to be completed.
- Once done, make sure to reboot the PC to apply changes.
For Rockstar Games Launcher:
- Open the Rockstar Games Launcher on your PC.
- Next, make sure to sign in to the account > Go to Settings.
- Select the Red Dead Redemption 2 game from the list under My installed games on the left pane.
- Click on Verify Integrity under the Verify game file integrity option on the right pane.
- Wait for the process to be completed and a pop-up message will appear that your game is verified and ready to play.
- Launch the RDR2 game and check for the out-of-memory error again.
6. Update Windows
Sometimes an outdated Windows version or even an outdated build can eventually cause plenty of performance issues apart from program crashes, glitches, graphical issues, etc. It’s better to always check for the system update and install it whenever available. Though most Windows PCs do automatically download the latest update and notify you whether to install it or not, you can follow the steps below to manually perform it.
- Press Windows + I keys to open Windows Settings.
- Now, click on Update & Security > From the Windows Update section, click on Check for updates.
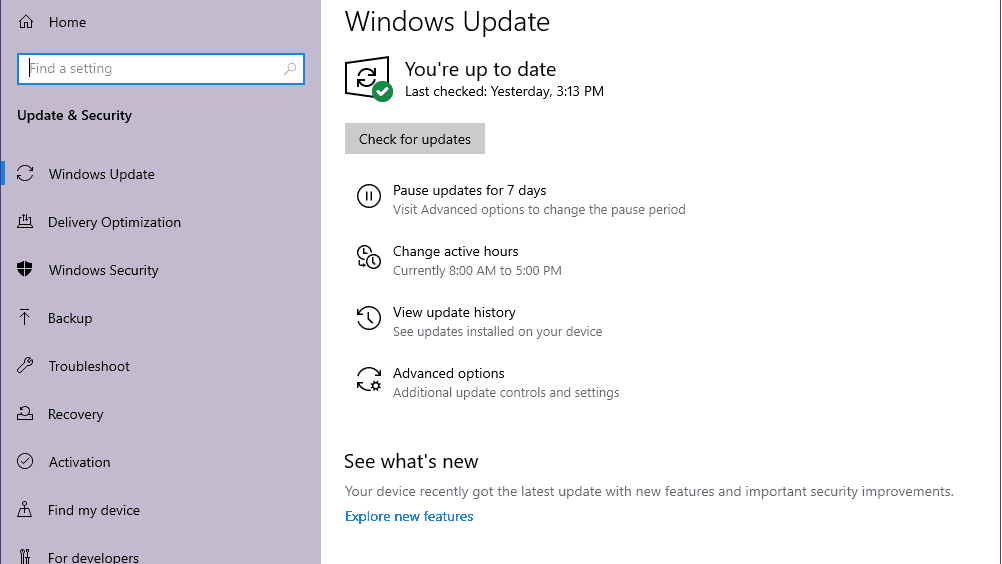
- If there is an update available, you can click on Download and Install.
- Wait for the process to complete the installation.
- Once done, make sure to reboot your computer to apply changes.
7. Perform a Clean Boot
Well, a clean boot of the system should come in handy in several ways because it helps the system to boot and run without running unnecessary startup programs. Plenty of third-party and even some stock programs start running in the background when the Windows system boots up on the machine. That basically consumes system resources and internet data without notifying you on the screen which can reduce the system performance. To do so:
- Press Windows + R keys to open the Run dialog box.
- Now, type msconfig and hit Enter to open System Configuration.
- Go to the Services tab > Enable the Hide all Microsoft services checkbox.
- Click on Disable all > Click on Apply and then OK to save changes.
- Now, go to the Startup tab > Click on Open Task Manager.
- The Task Manager interface will open. Here go to the Startup tab.
- Then click on the particular task which has a higher startup impact.
- Once selected, click on Disable to turn them off from the startup process.
- Do the same steps for each program that has a higher startup impact. [Such as Adobe Updater, OneDrive, Dropbox, any overlay apps, etc]
- Once done, make sure to restart your computer to apply changes.
- Now, your system may feel smoother and perform much better than before.
8. Contact Rockstar Support
If none of the methods worked for you then make sure to contact Rockstar Support for RDR2 to submit a report. Just create a ticket to get a faster resolution. It’s expected that the Rockstar Games team will deeply investigate the issue and try fixing it asap if more number of players start submitting the report about the same.
That’s it, guys. We assume this guide was helpful to you. For additional queries, you can comment below.

how to play rdr on 4 gb ram and intel 4000?