Well, if you’ve taken a lot of pictures of your vacation or party and trying to open the folder of your media files but the thumbnails take longer to load properly, this is the guide you’re looking for. It’s one of the most common problems for Windows 10 and obviously, a little bit frustrating. If you’re also facing the same problem, check this guide on How to Speed Up Loading Thumbnails on Windows 10?
This particular error mostly gets irritating whenever you need to quickly mark or send few important images to someone else or copy somewhere else. Basically, this issue happens whenever you create a separate folder for images, videos, etc. Although you may say that Windows 10 normally keeps cache data of all the folder or file thumbnails to load them up quickly, why such an issue appears.
It’s worth mentioning that over a period of time the data cache starts affecting because more & more files are being added to the system. That’s why File Explorer takes some seconds to load up thumbnails for displaying. Sometimes it can also possible that your system starts showing the incorrect previews or thumbnails of the media files.
Also Read
Page Contents
How to Speed Up Loading Thumbnails on Windows 10?
Luckily, we’ve shared a couple of possible ways to fix the thumbnail slow loading issue. So, without wasting any more time, let’s jump into the guide below.
1. Enable Thumbnail Option
The chances are high that something is occurring such as an issue with the Windows Settings. That can slow down the thumbnail loading time. To fix this issue, you should turn on the thumbnail option.
- Click on the Start Menu > Type Control Panel and click on it from the search result.
- From the Control Panel interface, click on System and Security.
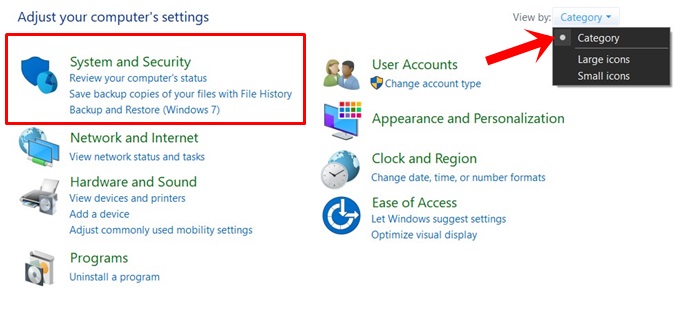
- Click on System > From the left pane, click on Advanced System Settings.
- Select System Properties > Make sure that you’re on the Advanced tab.
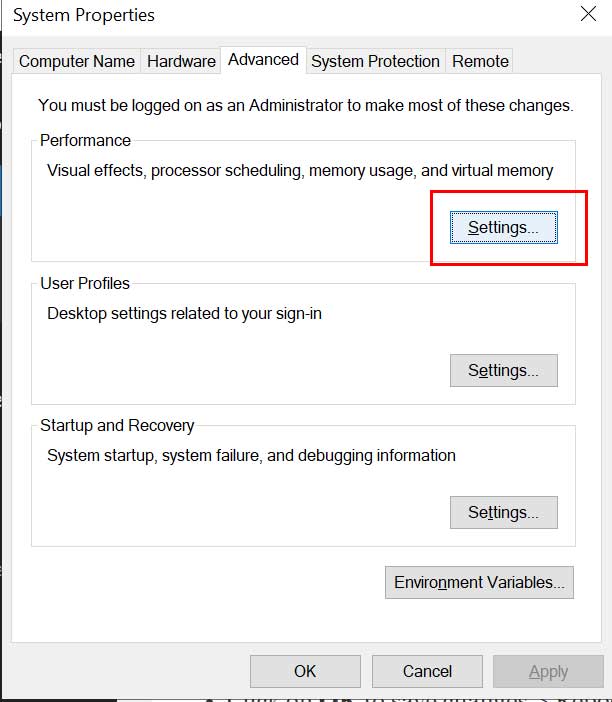
- Now, click on Settings from the Performance option.
- Enable the checkbox of “Show thumbnails instead of icons”.
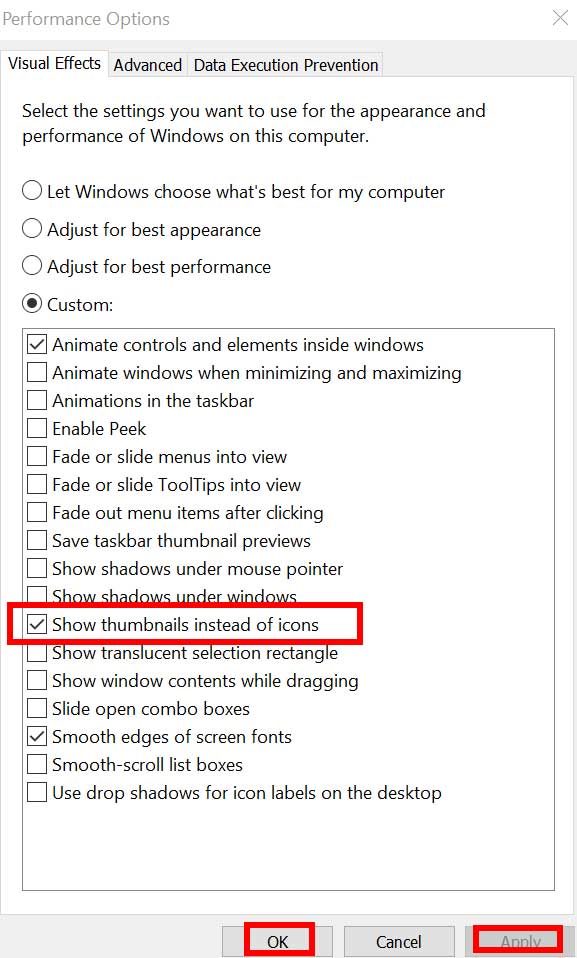
- If it’s already checked, make sure to uncheck and check it again then click on Apply > Select OK.
2. Rebuild Search Index
Whenever you create or add a new folder or even file, Windows File Explorer indexes those files quickly. This will basically allow you to find the files whenever you need them. But if the thumbnails are not loading quickly or showing incorrect thumbnails, the search index may not be up to date. Rebuilding the search index may help the Windows system to speed up the thumbnail loading time. To do so:
- Click on the Start Menu > Type Indexing Options and click on it from the search result.
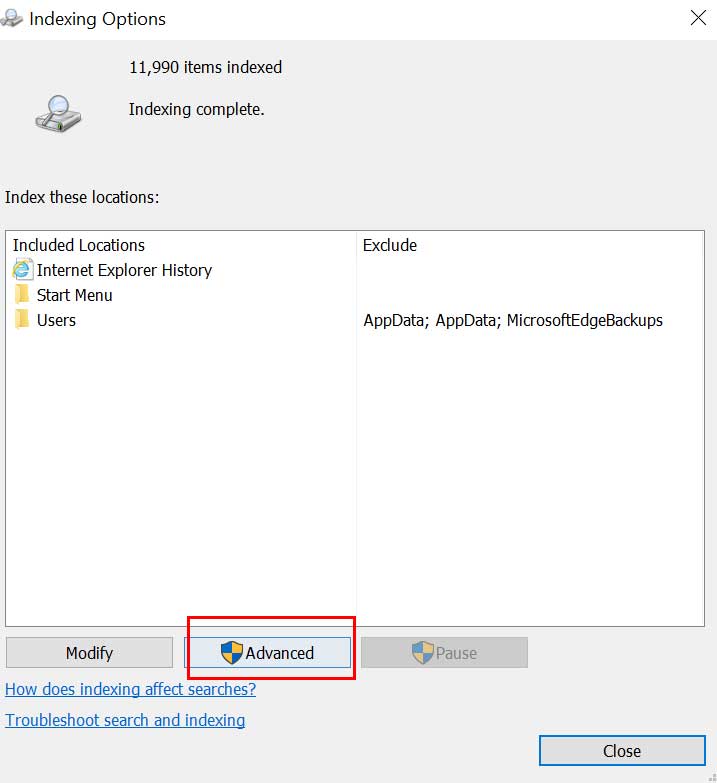
- Once the interface appears, click on the Advanced button.
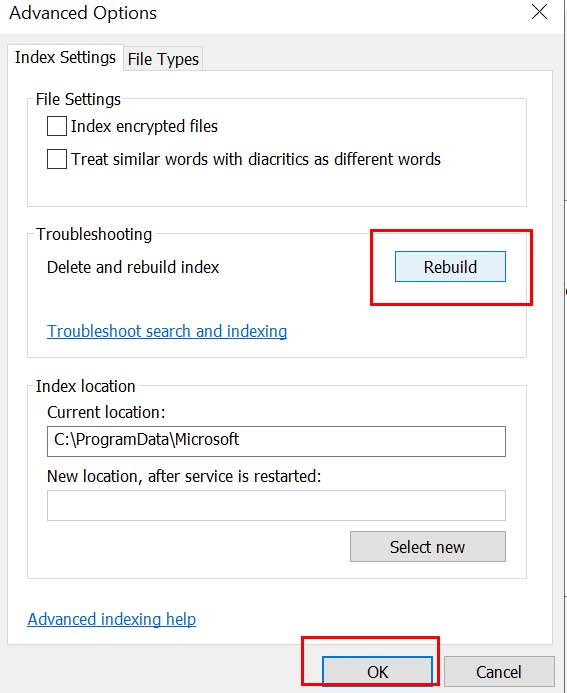
- Click on Rebuild to delete & rebuild indexes.
- Once done, you can restart your computer to check whether it does Speed Up Loading Thumbnails on Windows 10 or not.
3. Configure Group Policy
Windows 10 system allows users to tweak a couple of settings via the Group Policy. So, you’ll need to verify whether the thumbnail caching option is properly enabled or not. To do that:
- Click on the Start Menu > Type Group Policy and hit Enter.
- The Edit Group Policy window will open > Now, go to the path: User Configuration > Windows Components > File Explorer
- Locate ‘Turn off the caching of thumbnails in hidden thumbs.db files’.
- Double-click on it to open Properties.
- Now, if it’s set to Not Configured, make sure to set it to ‘Enabled’.
- Click on Apply and OK to save changes.
- Finally, restart your computer change effects.
4. Modify Thumbnail Cache Size
Another better way in order to speed up the thumbnail loading time is to simply change the thumbnail cache size. Although the default icon cache size is around 500KB in Windows, it’s better to change or increase the cache size. To edit the Windows Registry values, you can follow the steps below:
- Press Windows + R keys to open up the Run dialog box.
- Type regedit and hit Enter to open Registry Editor.
- If prompted by UAC, click Yes to allow the permission.
- Now, navigate to the following path:
HKEY_LOCAL_MACHINE\SOFTWARE\Microsoft\Windows\CurrentVersion\Explore
- Right-click on an empty space from the right pane > Click on New.
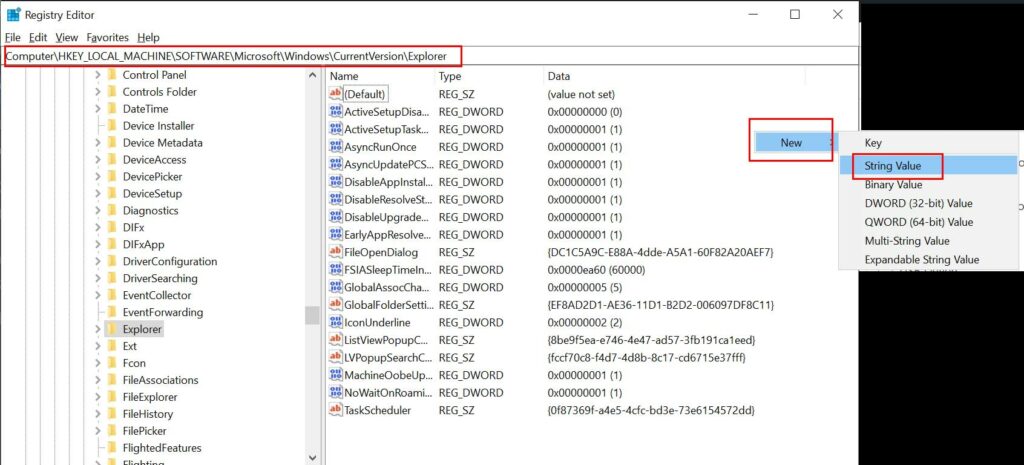
- Select the String Value option > Assign the new value “Maximum Cached Icons”.
- Once the Edit String window opens, enter the value 4096 and click OK.
This basically creates a 4MB cache file for thumbnails that’ll surely increase the loading speed. Additionally, you can enter a higher value like 8192 to create a higher thumbnail cache size.
- Once you’re done, click OK to save changes.
5. Check Registry Values
If none of the methods worked for you, try to speed up the thumbnail loading time in Windows 10 by checking the Registry Values properly. It indicates you can prevent Disk Cleanup automatically from cleaning up the saved cache unnecessarily. This can be done by tweaking one registry value and you’re good to go.
Please Note: It’s needless to say that Windows Registry includes all the necessary settings and configurations that can be used to run your Windows system properly all the time. So, it’s highly recommended to create a full backup of the registry values before doing any changes. Once done, you can follow the steps below.
- Press Windows + R keys to open up the Run dialog box.
- Type regedit and hit Enter to open Registry Editor.
- If prompted by UAC, click Yes to allow the permission.
- Now, navigate to the following path:
HKEY_LOCAL_MACHINE\SOFTWARE\Microsoft\Windows\CurrentVersion\Explorer\VolumeCaches\Thumbnail Cache
- Here you’ll see two values like Default and Autorun.
- Make sure to double-click on Autorun > Change the Value to 0 (zero).
That’s it, guys. We hope you’ve found this guide useful. For further queries, you can comment below.
