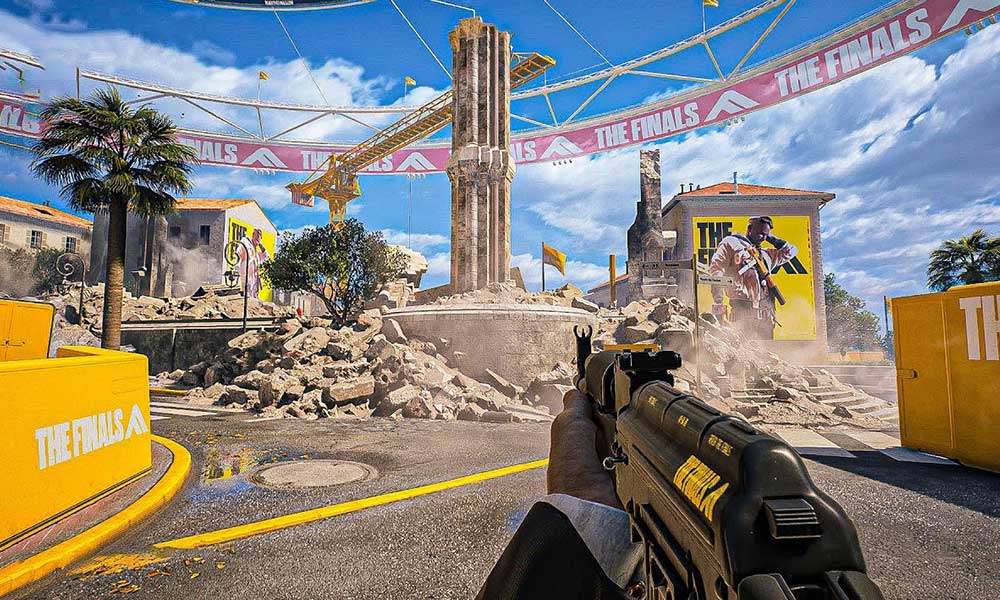
It’s always thrilling to have video games like The Finals which is a FPS title by Embark Studios. This game is focused on team-based matches on maps with a destructible environment where players can utilize the dynamic environment to combat opponents. But it’s also prone to several bugs and errors that we can’t deny. Several reports recently appeared that The Finals MISSING_ANGELSCRIPT_CALLSTACK Error caused unexpected crashes during the game startup on the PC.
This specific error not only causes game crashes but also disconnects players from the gameplay sessions which eventually end up losing matches. Some affected players also resemble this MISSING_ANGELSCRIPT_CALLSTACK error with the Blue Screen of Death (BSOD) error due to its nature. Well, if we talk about the possible reasons behind such an error, it’s quite clear that an outdated game version, corrupted graphics drivers, incompatible configurations, corrupted game files, etc are applicable in the first place.
However, we would like to mention that several other potential reasons can lie with the MISSING_ANGELSCRIPT_CALLSTACK error on your Windows computer such as an outdated Windows system, conflicts with the game configuration files, issues with the GPU overclocking, issues with the BIOS settings, and more. As we’re now aware of the reasons, there is nothing to worry about it.
The Finals MISSING_ANGELSCRIPT_CALLSTACK Error, How to Fix?
Fortunately, here we’ve shared with you some possible workarounds that should help in resolving the MISSING_ANGELSCRIPT_CALLSTACK error with The Finals game. Make sure to follow all troubleshooting methods until the problem has been fixed. So, without wasting any more time, let’s jump into it.
1. Restart the PC
First of all, you should restart the computer to ensure there is no issue with the temporary system glitch or cache data. To do this, check the following steps:
- Open the Start menu > Click on the Power icon.
- Select Restart to refresh the system.
2. Check for System Compatibility
It’s also recommended to check for system compatibility on your computer by following the steps below to ensure your PC specifications are capable of running The Finals properly.
Minimum:
- OS: Windows 10 or later 64-bit (latest update)
- Processor: Intel Core i5-6600K or AMD Ryzen R5 1600 processor
- Memory: 12 GB RAM
- Graphics: NVIDIA GeForce GTX 1050 Ti or AMD Radeon RX 580
- DirectX: Version 12
Recommended:
- OS: Windows 10 or later 64-bit (latest update)
- Processor: Intel Core i5-9600K or AMD Ryzen 5 3600 processor
- Memory: 16 GB RAM
- Graphics: NVIDIA GeForce RTX 2070 or AMD Radeon RX 5700 XT
- DirectX: Version 12
3. Run The Finals as an Administrator
Running the game application as an administrator on Windows can cause several issues if the system admin privilege doesn’t allow the program to perform properly. Several reports claim that this method has fixed this error for so many affected players.
- Go to the installed game directory on the PC.
- Right-click on The Finals (exe).
- Go to Properties > Click on the Compatibility tab.
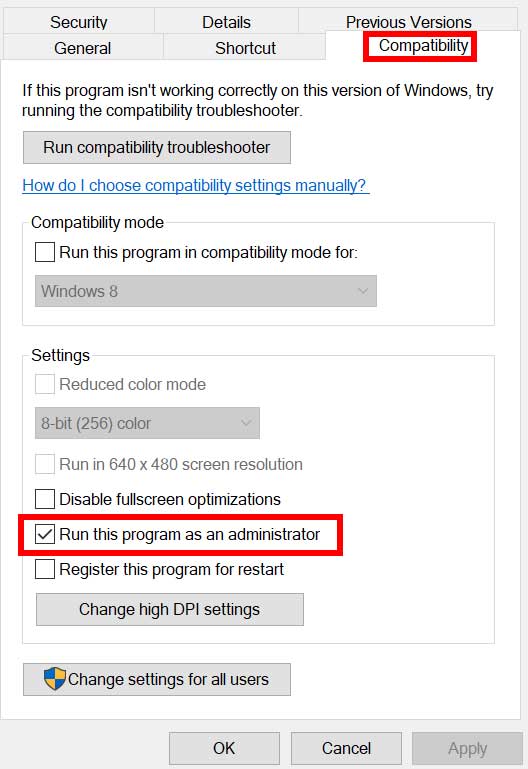
- Turn On the Run this program as an administrator option.
- Click on Apply and select OK to save changes.
4. Update The Finals
The chances are high that somehow an outdated game patch version on your PC might trouble you a lot. You should follow the steps below to check if the game has been up-to-date or not.
- Open Steam > Go to Library.
- Click on The Finals from the left pane.
- If a new update is available, click on Update.
- Once done, reboot the PC to apply changes.
5. Verify the Integrity of Game Files
Any corrupted or missing game files installed on the system might cause game-launching conflicts. It’s also suggested to verify and repair the installed game files on the system by following the steps below.
- Run the Steam client > Click on Library.
- Right-click on The Finals from the list.
- Click on Properties > Go to the Local Files files.
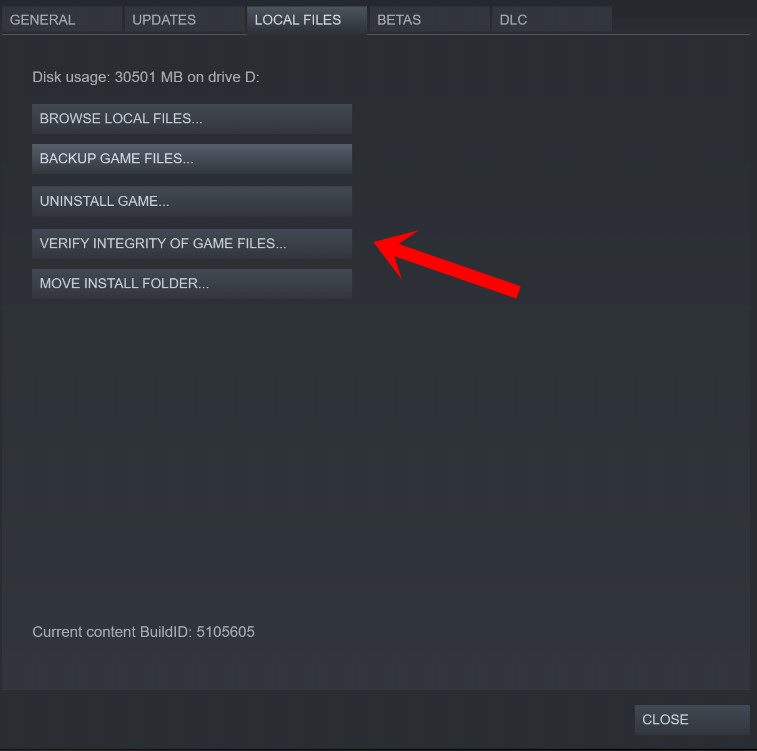
- Click on Verify Integrity of Game Files.
- Wait for it to complete and then restart the PC.
6. Update Your Windows OS
An outdated system software version on your specific console will ensure there will be no lags or hiccups whatsoever. You should always check for the system software updates at your console to avoid incompatibility issues or bugs. To do so:
- Press the Win+I keys to open Settings.
- Click on Windows Update from the left.
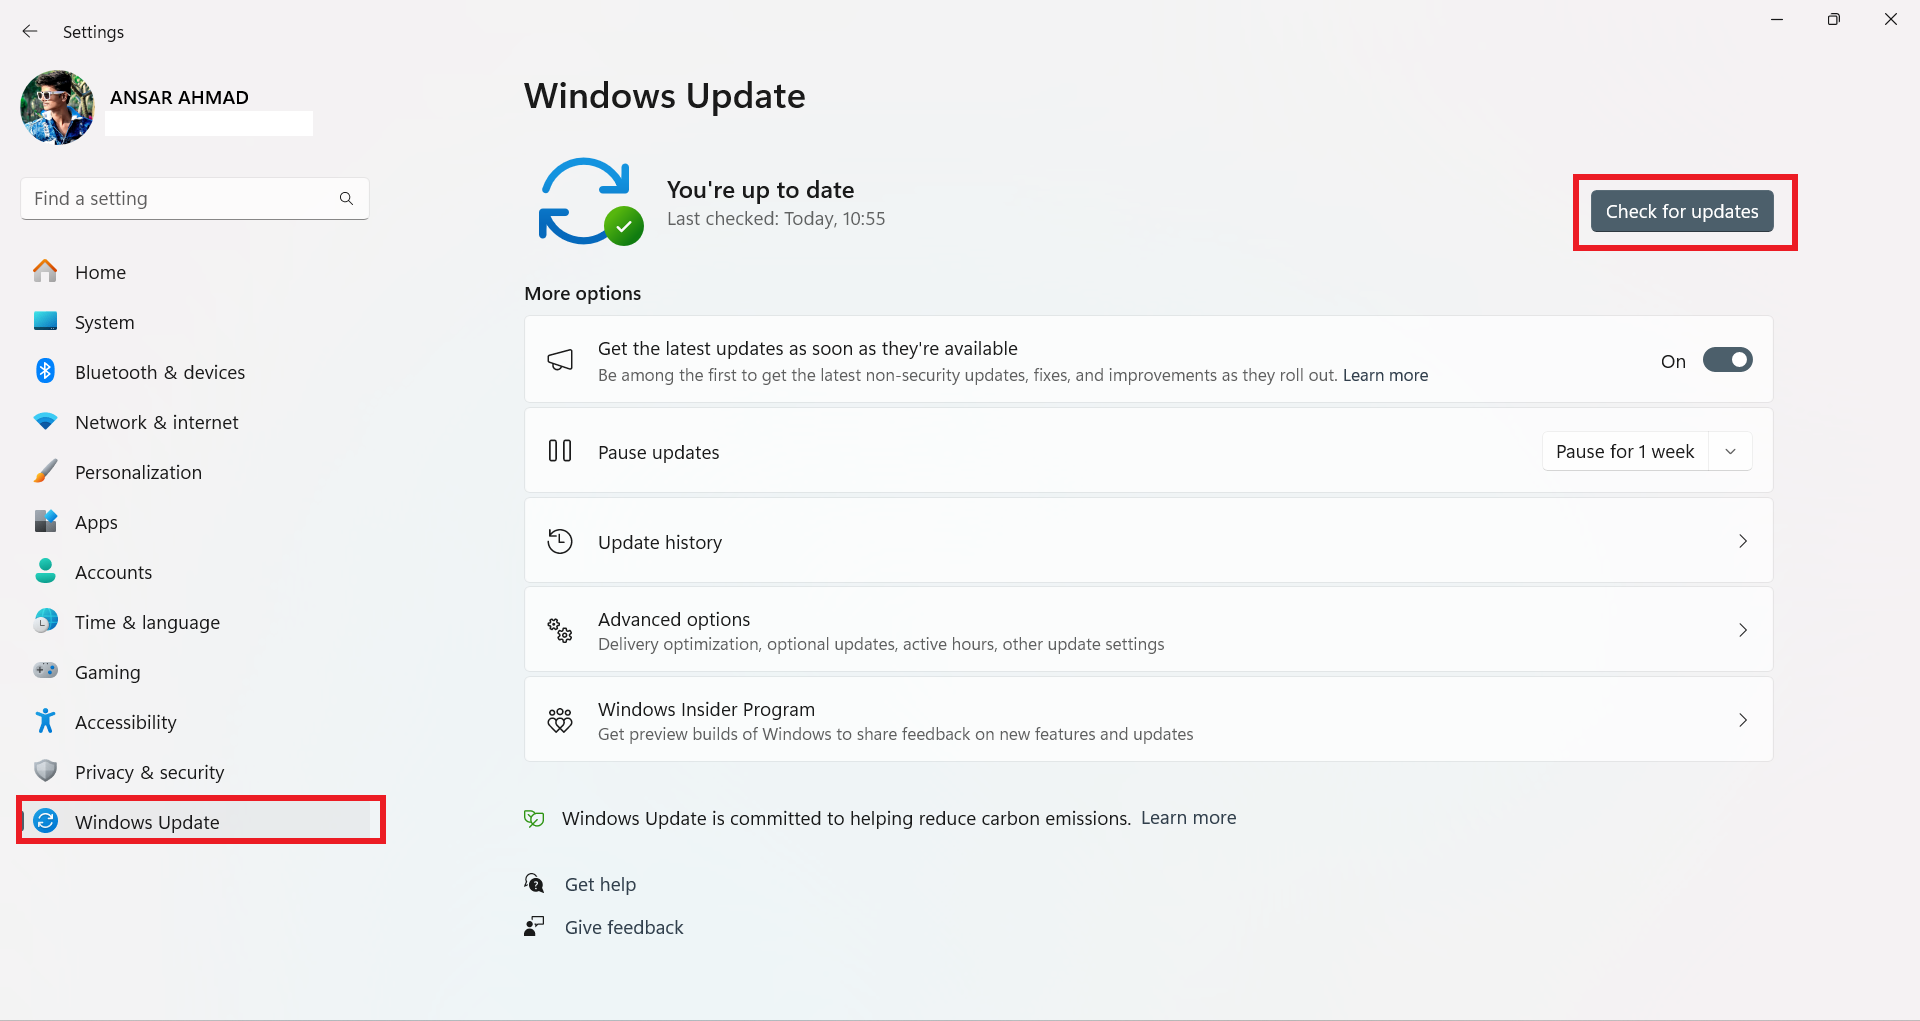
- Click on the Check for updates button.
- If there is a new update available, click on Download and Install.
- Once done, reboot your PC to apply changes.
7. Check for Graphics Driver Updates
An outdated or corrupted graphics card driver can trigger multiple issues with the games or system performance while running programs. It’s highly recommended to check the graphics driver update. You can follow the steps below to do so:
Recommended Method:
- Press the Win+X keys to open the Quick Link Menu.
- Click on Device Manager from the list > Double-click on Display adapters.
- Right-click on the dedicated graphics card that you’re using.
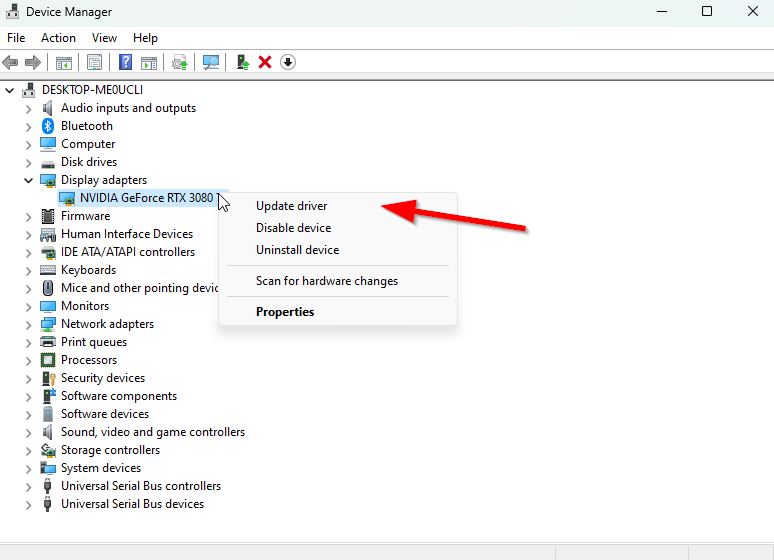
- Click on Update driver > Choose Search automatically for drivers.
- If the latest update is available, it’ll automatically download & install the latest version.
- Once done, restart the computer to apply changes immediately.
Manual Method:
Alternatively, you can manually download the latest graphics driver version and install it on the PC via the official website. Download the graphics driver file respective to your graphics card model and manufacturer from the links below.
8. Delete The Finals Folder from AppData
Some players also claimed that the installed game folder from the local AppData directory might contain corrupted or damaged files on the PC. This method will allow you to delete the game folder to fix the MISSING_ANGELSCRIPT_CALLSTACK error.
- Open the Windows Search menu > Type %appdata%.
- Go to the Local folder > Find and Delete The Finals folder.
- Now, restart your computer to check for the issue again.
9. Turn On Precision Boost Overdrive in BIOS
If you’re using an AMD processor then try enabling the PBO (Precision Boost Overdrive) enhancement in your BIOS settings. This feature will help in allocating power to your CPU cores which boosts performance and avoids several errors with programs. Just boot the computer to BIOS using the right key combinations depending on the motherboard you’re using. Then search for the PBO Enhancement or Precision Boost Overdrive setting and turn it on to Advanced. Do keep in mind that this method will increase your CPU’s temperature.
10. Delete the Old Configuration Files
Deleting old config files is your next best bet to fix the angelscript callstack error. Follow the steps below, but remember that this will reset all your settings in-game for The Finals.
- Press the Win+R keys to open the Run dialogue box.
- Go to %APPDATA%\Local\Discovery\Saved\SaveGames directory.
- Click on Open > Delete all files inside the folder.
11. Disable CPU or GPU Overclocking
Sometimes overclocked CPU or GPU on the PC might cause conflicts with the other hardware, which may trigger a bottleneck issue. It’s better to temporarily disable or restore the overclocked CPU/GPU to the factory default so that you can check out the potential reason behind the crashing issue. Multiple tools are available online to adjust overclocked CPU or GPU on the PC such as MSI Afterburner, Riva Tuner, AMD Ryzen Master, EVGA Precision X, etc.
12. Turn Off XMP in BIOS
Intel XMP allows you to easily overclock DDR3/DDR4 RAM(s) to its highest clock speed instead of the default one for better gaming performances which also works with unlocked Intel processors.
- Restart your computer > Press the Del/F2 keys to boot into BIOS while startup.
- Now, go to the Memory or Overclocking section in BIOS.
- Locate and Disable XMP.
13. Contact Support
If none of the troubleshooting did work for you, try contacting The Finals Help Center and submitting the support ticket to get better assistance on it.
That’s it, guys. We assume this guide was helpful to you. For additional queries, you can comment below.