Respawn Entertainment and Electronic Arts did launch Titanfall 2 as the FPS multiplayer action shooter video game that gives you the most advanced titan technology, single-player campaign, craziest weapons, plenty of customizations, and more. Though the title is doing really well, plenty of players are experiencing server connectivity issues while trying to connect to the game servers. If you’re also facing the Titanfall 2 keep losing connection and disconnecting problems then don’t fret.
As per multiple reports, Titanfall 2 players are getting the “Server Timed Out” message on the screen every time they launch the game on the PC and PS4 platforms. During the matchmaking sessions, unfortunate players are eventually kicked out from the server with an error message that says “Connection to the server timed out”. While some other players are getting the Error Code 429 during the Titanfall 2 gameplay. Are you also getting server connectivity errors? Check this guide to fix it.

Page Contents
- Fix: Titanfall 2 Keep Losing Connection and Disconnecting
- 1. Check the Server Status
- 2. Restart the PC or PS4
- 3. Run Titanfall 2 as an Administrator
- 4. Try Using VPN or Proxy Servers
- 5. Turn Off V-Sync in Titanfall 2
- 6. Run Titanfall 2 in Windows Compatibility Mode
- 7. Repair Microsoft Visual C++ Redistributables
- 8. Install DirectX
- 9. Update Titanfall 2
- 10. Scan and Repair the Game Files
- 11. Run the SFC Scan
- 12. Perform a Clean Boot
- 13. Check Your Internet Connection
- 14. Update the Networking Driver
- 15. Disable Antivirus Protection
- 16. Turn Off Windows Firewall
- 17. Reinstall Titanfall 2
Fix: Titanfall 2 Keep Losing Connection and Disconnecting
It’s actually a server-side issue due to the maintenance or outage in several regions. This happens whenever an overloaded number of active players try to join the game during peak hours. So, the chances are high that somehow server capacity or scalability is troubling the Titanfall 2 players. Luckily, here we’ve shared with you a couple of workarounds that should come in handy. Make sure to follow this troubleshooting guide to resolve this issue. Now, without further ado, let’s get into it.
1. Check the Server Status
First, you should check the Titanfall 2 server status here or the @TitanfallStatus Twitter to ensure there is a server downtime or maintenance happening or not. The chances are high that server downtime or outage is troubling players to get into the game. At the time of writing this article, we’re seeing that Electronic Arts servers do have some outage or technical issues. So, if you’re also facing the no-server found error or server timed out error then make sure to wait for a couple of hours and try again.
2. Restart the PC or PS4
You should also restart the PC or PS4 to cross-check if the temporary system glitch or cache data issue bothers you or not.
3. Run Titanfall 2 as an Administrator
It’s also recommended to always run the game executable file as administrator access on the Windows PC so the User Account Control (UAC) can allow all the access properly. Sometimes the system may think you’re trying to run the game without authorizing it. This is a one-time process for each game. Make sure to follow the steps below to do so:
- Right-click on the Titanfall 2.exe application on your PC.
- Now, select Properties > Click on the Compatibility tab.

- Now, click on the Run this program as an administrator checkbox to enable it.
- Click on Apply and select OK to save changes.
4. Try Using VPN or Proxy Servers
Try using a reliable VPN (Virtual Private Network) or proxy server at your end to bypass the server connectivity issue in some regions whatsoever. If you’re already using the VPN service and having the server timed out error then just turn it off and check for the issue again.
5. Turn Off V-Sync in Titanfall 2
You’ll need to simply turn off the V-Sync option in Titanfall 2 manually by following the steps below to ensure there is no screen tearing or glitch present.
- Launch the Steam client on your PC.
- Open the Titanfall 2 game.
- Then press the Escape key to go back to the main menu.
- Now, click on Options > Go to Video.
- Turn Off the Vertical Sync (V-Sync) option.
6. Run Titanfall 2 in Windows Compatibility Mode
It looks like the Titanfall 2 game isn’t capable enough to run on the Windows 10 or 11 version on your machine. You should try running the compatibility mode on your PC by following the steps below for the older Windows versions.
- Head over to the installed Titanfall 2 game directory.
- Right-click on the Titanfall 2.exe application.
- Choose Properties > Click on the Compatibility tab.
- Click on the Run this program in compatibility mode for checkbox to enable it.
- Select Windows 7 or Windows 8 from the drop-down menu.
- Then click on Apply and OK to save changes.
- Finally, you can reboot the PC to apply changes.
7. Repair Microsoft Visual C++ Redistributables
If your Windows computer isn’t running the latest version of the required version of the Microsft Visual C++ Runtime then you may encounter several issues whatsoever. To do that:
- Open the Start Menu > Search and open Apps & Features.
- Click on the Microsoft Visual C++ program(s) from the list individually.
- Select each program and click on Uninstall.
- Follow the on-screen instructions to complete uninstallation.
- Now, visit the official Microsoft website, and download the latest Microsoft Visual C++ Runtime.
- Once done, install VCRedist on your computer.
- Finally, restart the system to change effects.
8. Install DirectX
Another thing you’ll need to run the latest DirectX installer application on your PC by following the steps below. Sometimes an outdated or missing application can trouble the server connectivity issues. To do so:
- Visit the official Microsoft website and download the latest DirectX installer version.
- Run the installer and install DirectX completely.
- Once done, reboot the PC to apply changes.
9. Update Titanfall 2
Even an outdated game patch version can trigger several potential issues on the gaming device that lead to crashes, server connectivity errors, etc. It’s recommended to check for the game update periodically and install the latest update whenever available. You can follow the steps below to do the same.
For Steam:
- Open the Steam client > Go to Library.
- Click on Titanfall 2 from the list.
- Now, Steam will automatically search for the available update.
- If a new update is available, click on the Update button.
- Wait for a while until the game update completes.
- Once done, make sure to close the Steam client.
- Finally, reboot your PC to apply changes, and launch the Titanfall 2 game again.
For EA Desktop:
- Launch the EA Desktop client on the PC.
- Make sure that you’re logged into a valid EA account.
- Head over to the Profile section at the top right corner.
- Now, click on the down arrow icon next to the profile.
- Click on Settings from the drop-down menu.
- Click on the Download tab > Under the Updates section, Turn ON the Update games automatically toggle.
- Also, Turn ON the Enable background services toggle.
- Once done, restart the EA Desktop client to apply changes.
For PlayStation:
- From the home menu, open the game Library.
- Choose the Titanfall 2 game.
- Select the Options button > Select Check for Update.
- If there is an update available, make sure to install the update.
10. Scan and Repair the Game Files
Sometimes missing or corrupted game files on the PC may cause some issues with the game application launching or server connectivity errors. So, scanning and repairing the game files might be helpful enough.
For Steam:
- Launch the Steam client > Click on Library.
- Right-click on Titanfall 2 from the list of installed games.
- Now, click on Properties > Go to Local Files.

- Click on Verify Integrity of Game Files.
- You’ll have to wait for the process until it gets completed.
- Once done, just restart your computer.
For EA Desktop:
- Open the EA Desktop client > Go to My Collection.
- Right-click on Titanfall 2 from the list of games.
- Click on Repair and wait for the verification process to be completed.
- Once done, make sure to restart the computer to apply changes.
11. Run the SFC Scan
SFC (System File Checker) tool is useful to check whether any program file or a disk drive has some issues not on a Windows system. If there is an issue, you can try manually fixing it by following the steps below. To do this:
- Click on the Start Menu and type cmd.
- Now, right-click on Command Prompt from the search result.
- Select Run as administrator > If prompted, click on Yes to give admin privileges.
- Type the following command in the cmd window and hit Enter to execute it:
sfc /scannow

- Now, wait for the process to complete. Sometimes it may take extra time.
- Once done, reboot the PC, and check for the issue again.
12. Perform a Clean Boot
Multiple reports did claim that several third-party programs are always running in the background from the Windows boot. So, performing a clean boot and disabling conflicting startup apps will be crucial enough to get better performance.
- Press the Win+R keys to open the Run dialogue box.
- Now, type msconfig and hit Enter to open System Configuration.
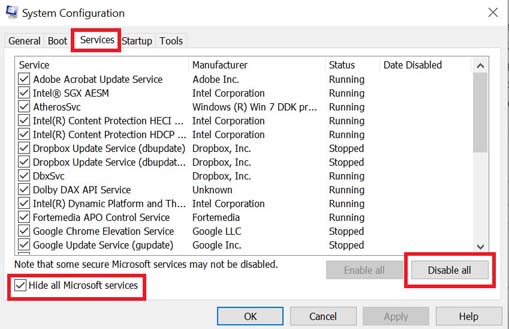
- Go to the Services tab > Enable the Hide all Microsoft services checkbox.

- Click on Disable all > Click on Apply and then OK to save changes.
- Now, go to the Startup tab > Click on Open Task Manager.
- Click on the Startup tab from Task Manager.
- Make sure to click on the particular task that has a higher startup impact.
- Once selected, click on Disable to turn it off. [Do the same steps for each program that has a higher startup impact]
- Finally, make sure to restart your computer to apply changes.
13. Check Your Internet Connection
The chances are also applicable that your internet connection is somehow having an issue with the slow speed or stability. It’s better to run a speed test of the connected internet online and try playing other multiplayer games. If in case, there is an issue with the internet connection at your end, try switching to a wired (ethernet) connection from Wi-Fi or vice versa to cross-check the issue. Make sure to contact your internet service provider (ISP) to get it checked, and ask to fix the issue.
14. Update the Networking Driver
Another thing you should do is try to update the network adapter driver on the PC to cross-check if the device driver is working fine or not. An outdated network driver can cause server connectivity glitches.
- Press the Win+X keys to open the Quick Link Menu.
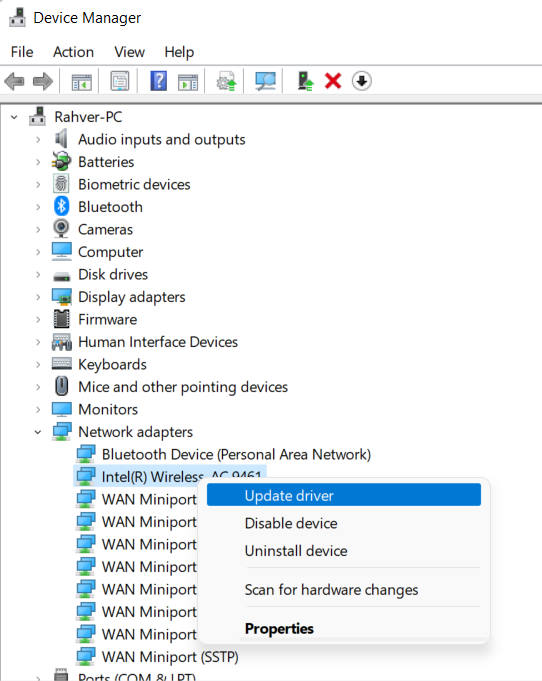
- Click on Device Manager from the list.
- Double-click on the Network adapters category to expand the list.
- Right-click on the specific network device.

- Select Update driver > Choose Search automatically for drivers.
- If there is an update available, it’ll automatically download and install the latest version.
- Once done, reboot your computer to apply changes.
15. Disable Antivirus Protection
You can also try turning off the Windows Defender antivirus protection on your PC to ensure there is no antivirus software blocking the game files from running properly.
- Press the Win+I keys to open Windows Settings.
- Click on Update & Security > Click on Windows Security from the left pane.
- Now, click on the Open Windows Security button.
- Go to Virus & threat protection > Click on Manage settings.
- Next, you’ll need to simply turn off the Real-time protection toggle.
- If prompted, click on Yes to proceed further.
If in case, you’re using any other third-party antivirus program on your PC then just turn off the real-time protection feature.
16. Turn Off Windows Firewall
In case, you’re using the default Windows Firewall protection on your PC to block unauthorized ongoing connections to the game servers then you should turn it off temporarily and check for the issue again. To do this:
- Click on the Start Menu > Type Firewall.
- Select Windows Defender Firewall from the search result.
- Now, click on Turn Windows Defender Firewall on or off from the left pane.
- Select the Turn off Windows Defender Firewall (not recommended) option for both the Private & Public Network Settings.
- Once selected, click on OK to save changes.
- Finally, restart your computer.
17. Reinstall Titanfall 2
If none of the methods worked for you, try uninstalling and then reinstalling the Titanfall 2 game on your PC to ensure there is no issue with the game installation directory. Some affected players did find this method useful. Though it’s not a good idea to reinstall a game always, there is nothing you can do.
For Steam:
- Launch the Steam client on your computer.
- Now, go to Library > Right-click on Titanfall 2.
- Go to Manage > Select Uninstall.
- If prompted, click on Uninstall again.
- Follow the on-screen instructions to complete it.
- Once done, restart the PC to apply changes.
- Finally, launch Steam, and reinstall Titanfall 2 on a different drive using the same Steam account.
For EA App:
- Open the EA app and log in to the valid account.
- Choose the Titanfall 2 game from the left side that you want to uninstall.
- Click on Manage > Click on Uninstall from the dropdown menu.
- Now, click on Yes to confirm that you want to uninstall the game.
- Wait for the game to be uninstalled and then restart the PC.
- Finally, launch the EA app, and reinstall the game.
For PlayStation:
- Go to the Titanfall 2 game in the Games Menu.
- Highlight the game and press the Options button on your controller.
- Select Delete from the menu and confirm it.
- Wait for the game to be uninstalled.
- Once done, reboot the console to apply changes.
- Head over to the PlayStation Store and reinstall the game again.
That’s it, guys. We hope this guide was helpful to you. Feel free to ask in the comment below for further queries.
