VALORANT by Riot Games does offer a 5v5 character-based tactical FPS that includes precise gunplay meets unique agent abilities. As Valorant is a free-to-play online hero shooter title for Windows, there are multiple bugs and errors present that we can’t deny. It seems that Valorant not updating for so many players after the recent patch update. Now, if you’re also one of the victims to encounter the Valorant Not Updating issue on your PC then check this guide to fix it.
Sometimes there might be several potential reasons applicable behind the specific game not updating on the PC such as a poor or unstable internet connection, networking issues, outdated network drivers, corrupted game files, low storage space, antivirus & firewall blocking issues, incompatible system configuration, etc. It’s always a better idea to simply check for the game updates manually from the launcher to ensure there is no conflict with the game version.
Also Read

Page Contents
- How to Fix If Valorant Not Updating on your PC
- 1. Restart the PC
- 2. Check the System Requirements
- 3. Run Valorant as an Administrator
- 4. Close Background Tasks
- 5. Redownload the Riot Client
- 6. Update Valorant
- 7. Reinstall Riot Vanguard
- 8. Temporarily Disable Antivirus
- 9. Disable Windows Firewall
- 10. Use Google DNS
- 11. Reinstall Valorant
- 12. Contact Riot Support
How to Fix If Valorant Not Updating on your PC
Luckily, here we’ve shared a couple of possible workarounds for you that should come in handy. We’ll recommend you follow all methods one by one until the problem gets fixed. So, without wasting any more time, let’s jump into it.
1. Restart the PC
It’s highly recommended to restart the PC completely to avoid temporary glitches or cache data issues that can avoid game launching or server connectivity issues whatsoever. Though it’s a common method, not everyone will get benefit from this step. Still, you should try this once before getting into the next step.
2. Check the System Requirements
Next, you’ll need to check if the system requirements of Valorant are compatible with your PC specifications or not. If the specification isn’t compatible then try upgrading the required hardware or software part and check for the issue again.
RECOMMENDED REQUIREMENTS:
- OS: Windows 10 (Build 17134+) or Windows 11 64-bit
- CPU: Intel i3-4150 or AMD Ryzen 3 1200
- GPU: GeForce GT 730 or Radeon R7 240
- RAM: 4 GB
- VRAM: 1 GB
3. Run Valorant as an Administrator
Another thing you can do is to allow the system admin access to your Valorant game executable application from the installed game folder to allow the game application which will avoid ongoing connections. To do so:
- Right-click on the Valorant.exe application file on your PC.
- Now, select Properties > Click on the Compatibility tab.

- Click on the Run this program as an administrator checkbox to enable it.
- Now, click on Apply and select OK to save changes.
4. Close Background Tasks
You should try closing all the unnecessary third-party background running tasks on the system that may consume a lot of system resources. Issues with the system resources can trigger game lags, crashes, errors, etc. Try to free up the storage and memory space as much as possible.
- Press the Ctrl+Shift+Esc keys to open Task Manager.
- Click on the Processes tab > Select the unnecessary third-party task that you want to close.
- Once selected, click on End Task.
- Make sure to do the steps for each task individually including the Riot Games task.
- Once done, just restart your computer to change the effects immediately.
5. Redownload the Riot Client
Some of the affected Valorant players did mention that re-downloading the Riot Client on the PC from the official Riot Games webpage and loading the Valorant game fixed the issue completely. The thing is that Riot Client checks for the game file automatically every time you launch Valorant. So, if there is an issue with the missing or corrupted game files, Riot Client will fix that itself.
6. Update Valorant
You’ll have to re-download the latest version of the Valorant game from the official Riot Games link and install the same. It’s highly recommended to have enough storage space to properly install the game.
7. Reinstall Riot Vanguard
The Riot Vanguard service might not initialize due to some unexpected reasons. You can try to reinstall the Riot Vanguard service on your system by following the steps below.
- Press the Windows key on the keyboard to open the Start menu.
- Search for Add or Remove Programs.
- Open this option and locate Riot Vanguard.
- Next, click on Vanguard > Choose Uninstall.
- Once done, make sure to reboot the PC.
- Then launch the Valorant game and the Vanguard service will get installed automatically.
8. Temporarily Disable Antivirus
In most scenarios, the stock or third-party antivirus software may block all the ongoing processes or connections of the game files which can eventually trigger multiple issues. You should turn off the antivirus software temporarily to check if the Valorant game is running fine or not. To do so:
- Press the Windows key to open the Start menu.
- Now, type Settings in the search bar, and click on it to open.
- Go to Windows & Security > Click on Windows Security from the left pane.
- Click on Open Windows Security > Go to Virus & Threat Protection.
- Next, click on the Manage Settings menu > Turn OFF the Real-time Protection feature.
- Finally, launch the Riot client and open Valorant.
9. Disable Windows Firewall
Well, you can try disabling the Windows Firewall by following the steps below to avoid the Valorant not updating issue. Windows Firewall might block unauthorized applications or ongoing server connections.
- Open the Start menu > Search for Control Panel and open it.
- Go to Systems and Security > Open Windows Firewall.
- Click on Turn Windows Defender Firewall on or off from the left pane.
- Select Turn off Windows Defender Firewall (not recommended) for both Private and Public Network Settings.
- Click on OK to save changes and then reboot the PC.
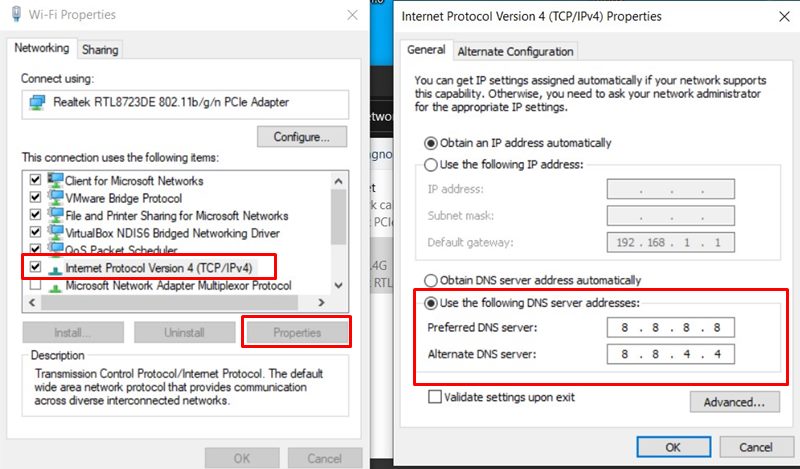
10. Use Google DNS
You can use a Google DNS address (public DNS) to ensure there is no server connectivity issue with the problematic game. Sometimes issues with your blocked DNS address that have been provided by the ISP may have some issues. To do this, you can follow the steps below.
- Press the Win+R keys to open the Run dialogue box.
- Type ncpa.cpl and click on OK to open the Network Connections page.
- Now, right-click on your active network adapter > Click on Properties.
- Choose Internet Protocol Version 4 (TCP/IPv4) > Select Properties.

- Click to select Use the following DNS server addresses.
- Now, enter 8.8.8.8 for the Preferred DNS server and 8.8.4.4 for the Alternate DNS server.
- Once done, click on OK to save changes.
- Make sure to restart your PC to apply changes.
11. Reinstall Valorant
Try uninstalling and reinstalling the Valorant game on your PC to remove any kind of system glitch or cache data issue. Sometimes a corrupted game installation can become stubborn enough to throw out launching errors. Just visit the official Riot Games website and download the latest version of the game installer file. Ensure to install the game on a different disk drive (if possible).
12. Contact Riot Support
If none of the workarounds did come in handy then make sure to Contact Riot Support for further assistance regarding the same issue. Creating a support ticket will help in fixing the error or help the developers to investigate it deeply.
That’s it, guys. We hope this guide was helpful to you. For further queries, you can comment below.
