A lot of Windows users have recently been complaining about an issue that their “Desktop Window Manager Consumes Too Much Memory”. Desktop Window Manager is basically a window manager in Windows Vista, 7, 8, and 10 versions. It is responsible for graphics effects like the Flip3D, live taskbar thumbnails, and transparent windows. The process, though, runs uninterrupted most of the time; however, if it starts consuming too much memory, it can result in a software crash or black screen.
Also Read
How to Fix Desktop Window Manager Consumes Too Much Memory?
If you are also one of those users who are suffering from the Desktop Window Manager consumes too much memory issue, then you have landed up in the right place. Today, in this article, we will explain some quick workarounds that will eventually help you in resolving the said issue. For more information, have a look down below:
FIX 1: Restart File Explorer from Task Manager:
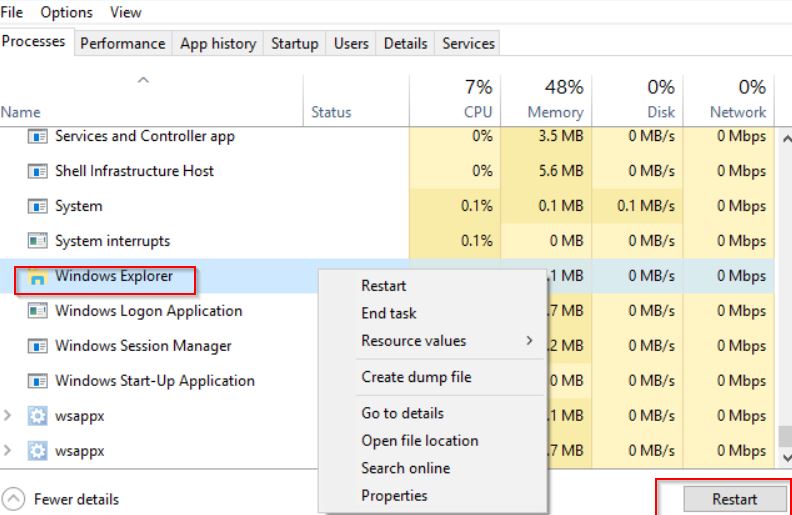
Before you begin with the other fixes, we recommend you try this workaround. Here all you need to do is, restart the File Explorer from Task Manager. For doing so, follow the steps given below:
- Firstly, right-click on the Windows icon of your Taskbar and select Task Manager from the context menu.

- Now inside the Task Manager window, locate Windows Explorer from the list of options and then click on the Restart tab given at the bottom right corner of the window.
FIX 2: Update or roll back the Intel graphics driver:
As per a lot of suffered users, while they tried to Update or Rollback the Intel Graphics Driver, the “Desktop Window Manager Consumes Too Much Memory” issue got solved for them. You can also try the same by following the fixes given below:
- Firstly, right-click on the Windows icon of your Taskbar and select Device Manager from the context menu.

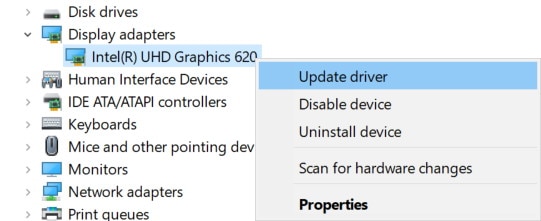
- Now inside the Device Manager window, expand Display Adapter, right-click on your Graphics driver, and select the option Update Driver from the context menu.
- On the next screen, click on the option Search automatically for drivers. Here you might get a pop-up stating The best drivers for your device are already installed. If so, navigate to the manufacturer’s website and check whether there is any available update for your GPU.
- Alternatively, you can also select the option Search for updated drivers on Windows Update. It will redirect you to the Windows Updates section. Here click on Optional updates and look if any driver update is available.
Apart from this method, if you want the work to get done quickly and easily, consider using a dedicated driver updating tool. There is a lot of driver updating tools available online, make sure you use one reliable amongst them.
FIX 3: Run a full system scan:
The Last fix you can try in order to resolve the “Desktop Window Manager Consumes Too Much Memory” issue is running a full system scan. For doing so, follow the steps given below:
- Firstly, go to the desktop search bar, type Settings, and launch the relevant search result.
- Now inside the Settings window, navigate to the Update & Security section.

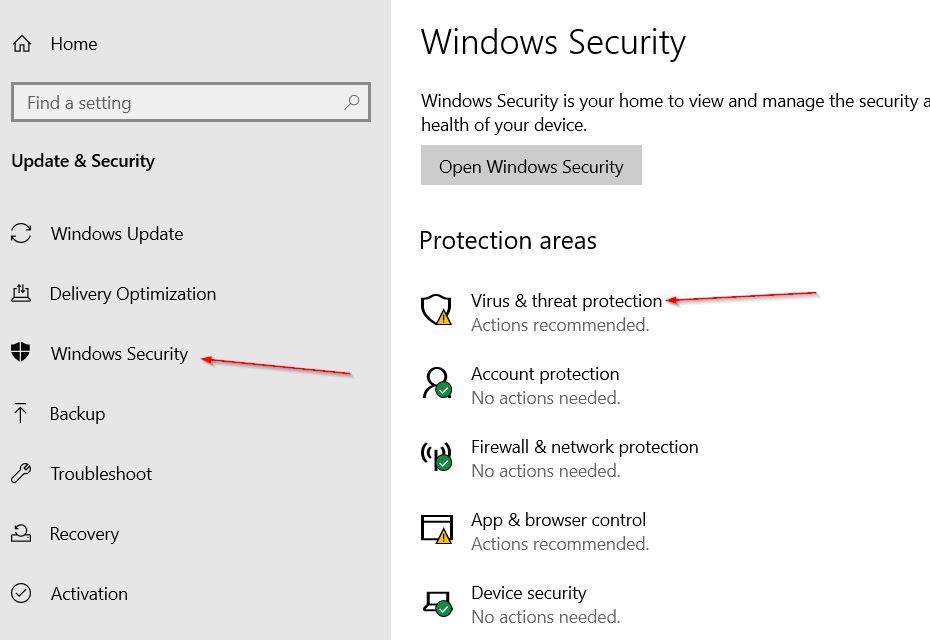
- Now on the left-pane menu, click on the Windows Security option, and then on the right-pane menu, under the Protection areas section, click on Virus and Threat protection.
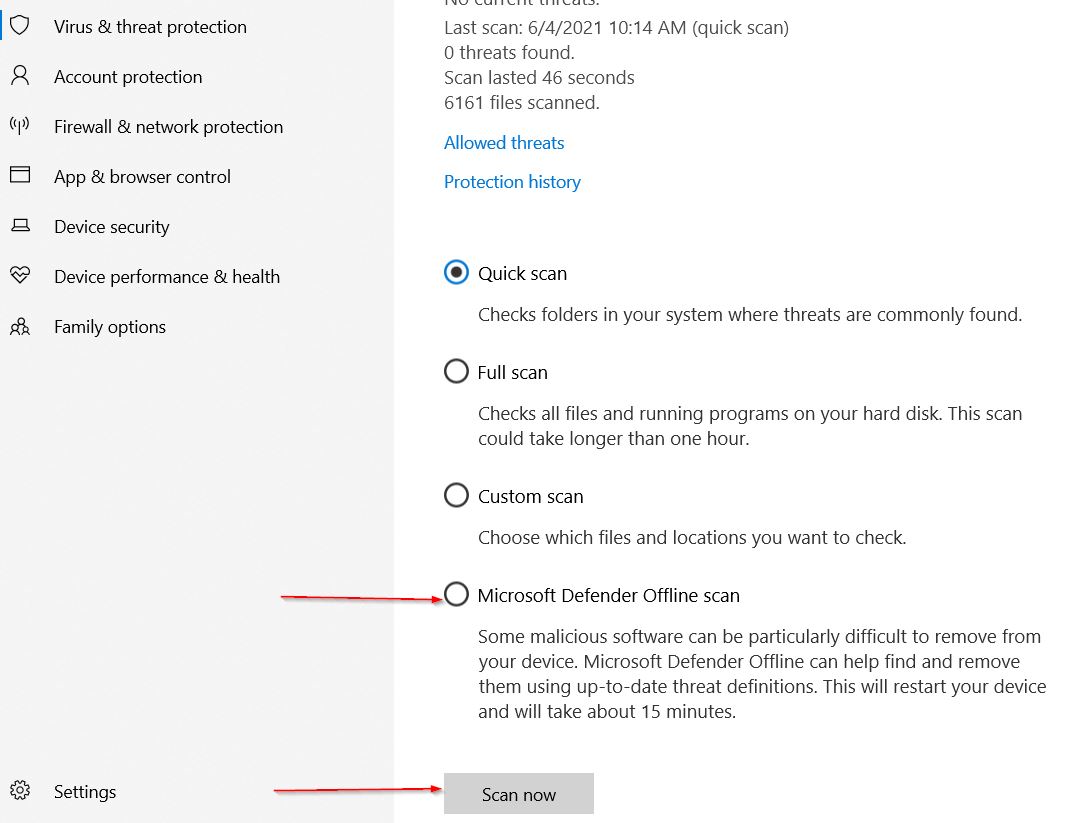
- Further, scroll down and click on Scan Options.

- Now on the next screen, click on the circular button before the options Microsoft Defender Offline Scan and then click on the Scan now tab.
NOTE: Before you do that, please ensure that all the windows are closed, and all your essential work is saved.
- Click on the Scan tab, and it will restart your computer.
During this process, Windows will shut down and perform an offline scan. Once after that, when your computer restarts, check whether the Desktop Window Manager is still consuming several resources or whether the issue is solved now.
These were the top three fixes for the Desktop Window Manager Consumes Too Much Memory issue. Until now, there is no official fix released by the official website; however, these fixes in the article above have been successfully resolved the issue for a lot of suffered users.
By the end of this article, we hope that you will find all the information mentioned here as helpful and relevant. After reading this article if you have any queries or feedback, please write down the comment in the below comment box.
