It’s been almost 5 years since Microsoft has released Windows 10 officially and at the time of writing this article, it’s still running with the latest builds. However, Windows 10 was never bug-free or error-free at all and it continues. It seems that plenty of users are getting affected by the Windows 10 System Sounds not Playing issue which is frustrating. If you’re one of them, follow this guide.
According to multiple reports, affected Windows 10 users are unable to use the system sound. It basically starts appearing after installing the latest Windows update or due to the corrupted system files. Although mostly the hardware-related issues are quite major for PC users, the software bug or error can also ruin the whole user experience whatsoever.
Also Read
Page Contents
- Fix: Windows 10 System Sounds not Playing
- 1. Enable Windows System Sound Scheme
- 2. Disable Sound Fading
- 3. Run SFC
- 4. Run DISM
- 5. Repair Flash Player
- 6. Perform a Clean Boot
- 7. Check Connected Audio Devices
- 8. Run Audio Troubleshooter
- 9. Update Audio Driver
- 10. Reinstall Audio Driver
- 11. Select Playback Audio Device as Default
- 12. Use a System Restore Point
Fix: Windows 10 System Sounds not Playing
Sometimes it can also possible that maybe your Windows System Sound Scheme is disabled for some reasons and that can cause troubles. Meanwhile, enabling the crossfading feature on your computer can also trigger such an issue. So, without wasting any more time, let’s jump into the guide below.

1. Enable Windows System Sound Scheme
First of all, you should check and enable your Windows System Sound Scheme on the computer to ensure that the default sound scheme is running properly.
Make sure that there are several aspects that might cause this issue even by using third-party software.
- Click on the Start Menu > Type Control Panel.
- Click on it to open from the search result.
- If prompted by UAC (User Account Control), click on Yes to allow admin access.
- Now, click on Hardware and Sound > Again click on Sound from the list.
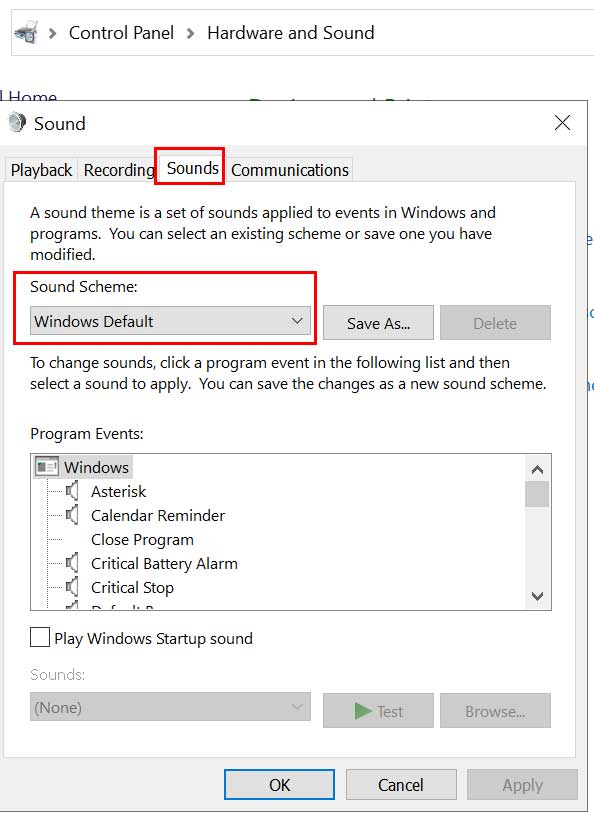
- Once the Sound interface opens, go to the Sounds tab.
- Select your Sound Scheme and click on Apply to save changes. [Set to Windows Default]
- Once done, restart your computer, and check for the issue.
2. Disable Sound Fading
Some of the monitors like ASUS models offer the sound fading feature by default. This particularly allows a nice effect for longer sounds and the speakers will also completely miss isolated sounds. If in case, you feel the same and want to disable this feature, make sure to follow the steps below:
- Press Windows + I keys to open Windows Settings.
- Click on Apps > Scroll down the list of installed programs and locate the audio program that you want to remove.
- Click on it to expand the menu and select Uninstall. [If prompted by UAC, click on Yes to allow the permission]
- Follow the on-screen instructions to complete the uninstallation process.
- Once done, make sure to reboot the computer in order to fix the Windows 10 System Sounds not Playing issue.
3. Run SFC
The System File Checker (SFC) is a utility tool for the Windows operating system that simply allows users to scan for corrupted or missing Windows system files and restore them automatically. This method should resolve the sound system-related issues completely.
- Click on the Start Menu and type cmd.
- Now, right-click on Command Prompt from the search result.
- Select Run as administrator > If prompted, click on Yes to give admin privileges.
- Once the command prompt window opens, type the following command and hit Enter to execute it:
SFC /scannow
- Now, wait for the process to complete.
- Make sure to restart your computer to apply changes.
4. Run DISM
Deployment Image Servicing and Management (DISM) is a command-line tool that can be used to mount and service Windows images before deployment. If in case, running SFC doesn’t work for you, try running DISM by following the steps below:
- Click on the Start Menu and type cmd.
- Now, right-click on Command Prompt from the search result.
- Select Run as administrator > If prompted, click on Yes to give admin privileges.
- Once the command prompt window opens, type the following command and hit Enter to execute it:
DISM /Online /Cleanup-Image /CheckHealth
- Type the following command and press Enter:
DISM /Online /Cleanup-Image /RestoreHealth
- Now, wait for the process to complete and exit the command prompt.
- Finally, restart your computer, and check whether the Windows 10 System Sounds not Playing issue has been fixed or not.
5. Repair Flash Player
It may also possible that the particular issue can appear due to the conflict of the system sounds with an Adobe Flash Player registry key. In that scenario, you should try repairing the flash player on your Windows 10 computer via the Registry Editor. To do this:
- Press Windows + R keys to open the Run dialog box.
- Now, type regedit and hit Enter to open the Registry Editor.
- If prompted by UAC, click on Yes to allow the admin permission.
- Search for the following path on the Registry Editor interface:
My Computer\HKEY_LOCAL_MACHINE\SOFTWARE\Microsoft\Windows NT\CurrentVersion\Drivers32
- Next, right-click on the Drivers32 > Click on New.
- Select the String Value > Type wavemapper as the Value name.
- Enter msacm32.drv as the Value data > Click on OK to save changes.
- So, once the wavemapper string is created, restart your computer.
- Finally, you can see if the Windows 10 System Sounds not Playing issue has been fixed or not.
6. Perform a Clean Boot
Well, some of the rogue third-party programs can also cause several issues with the system functions that may end up with performance, display, or even audio-related problems whatsoever. So, we’ll recommend you performing a clean boot to resolve such an issue properly. To do that:
- Press Windows + R keys to open the Run dialog box.
- Now, type msconfig and hit Enter to open the System Configuration window.
- Go to the Services tab > Enable the Hide all Microsoft services checkbox.
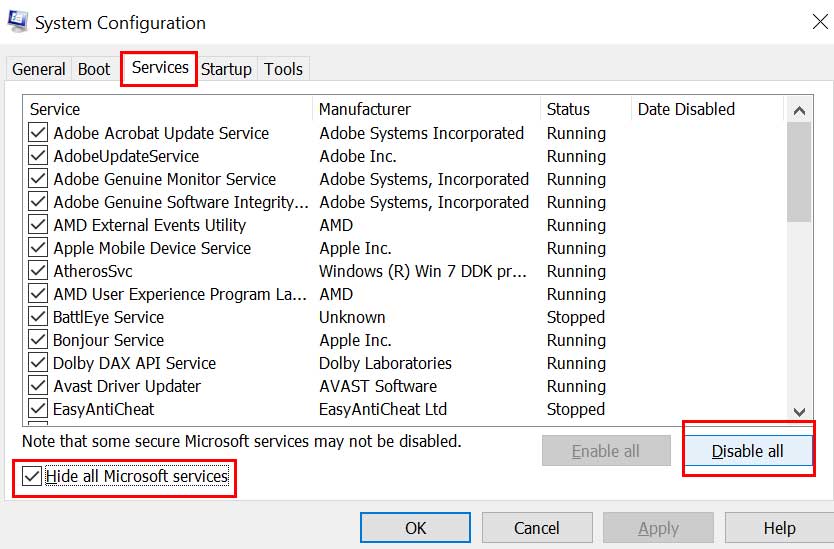
- Check all the services from the list and click on Disable all.
- Click on Apply and then OK to save changes.
- Now, click on the Startup tab > Click on Open Task Manager.
- Go to the Startup tab > Click on the particular tasks which are enabled for startup boot.
- Then select Disable for each task one by one.
- Once done, reboot your computer to change effects.
7. Check Connected Audio Devices
Make sure to cross-check your connected audio devices as well. Such as physically check audio cables and volume level. Meanwhile, check whether the connected speakers or headphones are plugged properly into the audio input/output ports or not.
Then you can check the volume levels by right-clicking on the speaker icon from the Taskbar system tray. Here select the Volume Mixer and check for it. You can also connect the same audio devices to another computer or laptop to check whether there is an issue with audio devices or not.
8. Run Audio Troubleshooter
If the above methods don’t work for you, try running the audio troubleshooter method on your Windows 10 from the Settings menu. It’ll automatically check for possible errors or reasons and try fixing them. To do so:
- Press Windows + I keys to open Windows Settings.
- Click on Update & Security > Click on Troubleshoot from the left pane.
- Click on the Additional troubleshooters option > Make sure to click on Playing Audio.
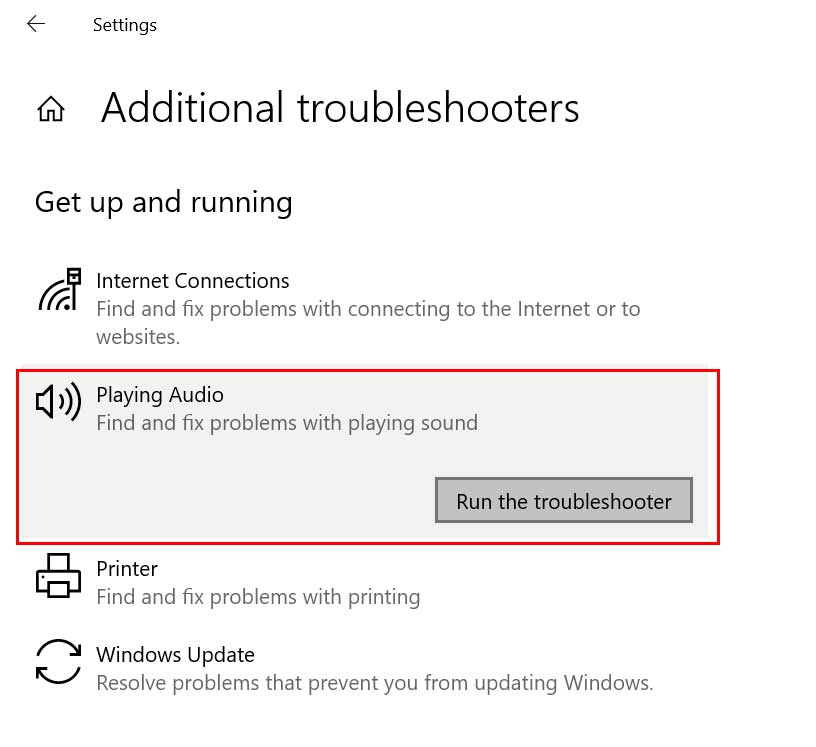
- Select Run the troubleshooter > Wait for the process to complete.
- Once done, you can reboot your computer to apply changes.
9. Update Audio Driver
It’s needless to say that updating the audio driver can also resolve several issues on your Windows 10 computer. Sometimes an older patch version or buggy driver can trigger audio not playing problems. Therefore, you should check updates for the audio driver and install them.
- Press Windows + X keys to open the Quick Start Menu.
- Now, click on Device Manager > Double-click on Sound, Video, and Game Controllers.
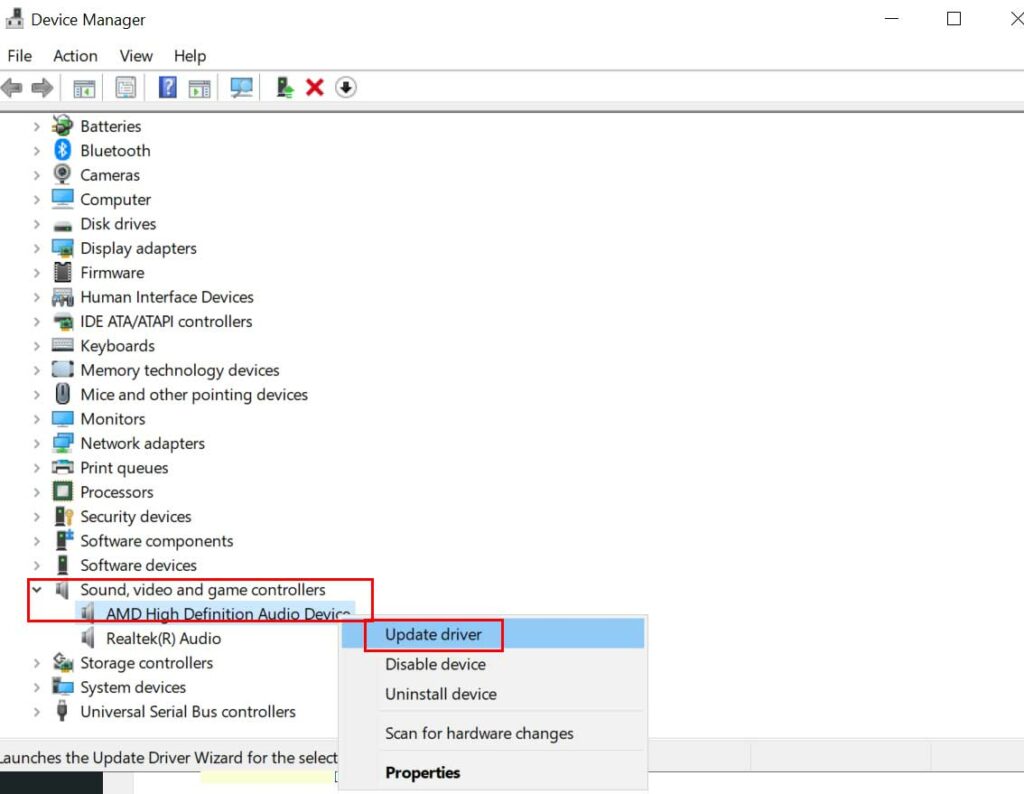
- Right-click on the active device > Select Update driver.
- Choose Search automatically for drivers. If there is an update available, it’ll automatically download and install the update.
- Once done, make sure to restart your computer to apply changes.
10. Reinstall Audio Driver
The chances are also high that updating the audio driver may not fix the Windows 10 System Sounds not Playing issue. If you want to completely resolve it, make sure to uninstall and reinstall the audio driver properly. To do this:
- Head over to the respective manufacturer’s website and download the latest sound driver file on your computer.
- Now, press Windows + X keys to open the Quick Start Menu.
- Select Device Manager from the list > Double-click on Sound, Video, and Game Controllers.
- Right-click on your audio device > Select Uninstall Device.
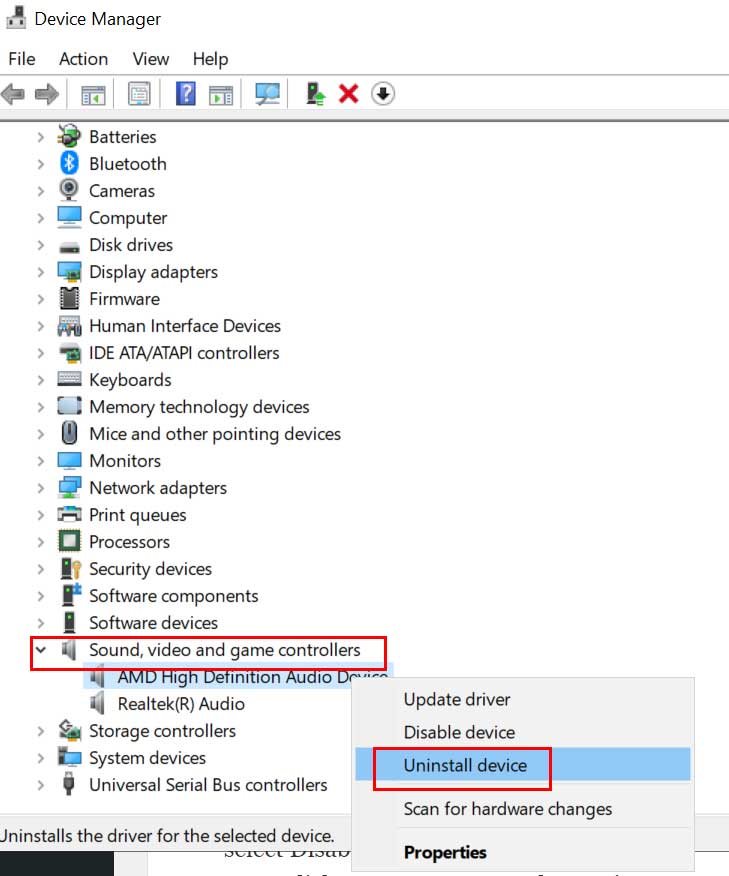
- Make sure to enable the Delete the Driver Software for This Device checkbox.
- Then click on Uninstall again to complete the process.
- Next, install the downloaded latest sound driver file.
- Restart your computer to apply changes to check for the issue.
11. Select Playback Audio Device as Default
Make sure to verify the currently connected audio device whether it’s selected as the system default or not. If your attached speakers or headphones are using a USB port or HDMI port then you should select that device as a default one. To do this:
- Click on the Start Menu > Type Sound and open it from the search result.
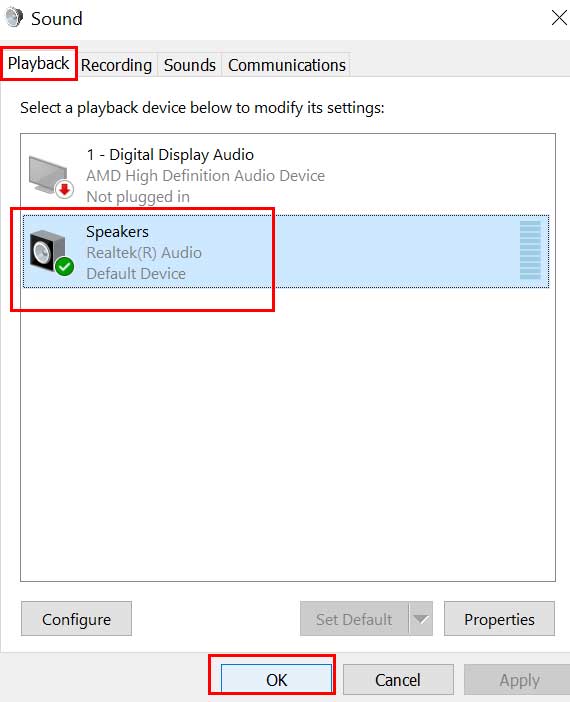
- Now, click on the Playback tab > Make sure to select your active or connected audio device.
- Select Set Default and you’re good to go.
12. Use a System Restore Point
If none of the above methods worked for you, try using a system restore point to go back to the previous good state of your Windows computer to avoid such issues. But make sure that you’ve already created a system restore point on your computer that seems really good to you. If in case, you didn’t create a system restore point previously, this method isn’t for you.
- Press Windows + R keys to open the Run dialog box.
- Type rstrui and hit Enter to open System Restore.
- Click to select Choose a different restore point from the System Restore interface.
- Now, click on Next > Enable Show more restore points checkbox.
- Select your preferred system restore point that doesn’t have any kind of issues.
- Click on Next to proceed > Select Finish to roll back Windows to the selected restore point.
- Once done, your system will reboot to apply changes.
That’s it, guys. We assume this guide was helpful to you. For further queries, you can comment below.
