The Windows Experience Index Score is used to measure your PC hardware as well as software configuration and performance. It makes use of the Windows System Assessment Tool (WinSAT) and tests five crucial components of your PC. These include the processor, the physical memory, the desktop graphics hardware, the gaming graphics hardware, and the primary hard disk drive. It then lists out the results assigning a base score to each of them, which varies from 1.0 to 9.9.
Although there is no hard and fast rule, a higher score usually indicates your PC will perform better (and faster) than it’s counterpart with a lower base score. As far as the overall system score is concerned, it doesn’t assign the average score of all the five components. Rather, the least score among these five components is assigned as the overall system score.
Furthermore, starting with Windows 8, Microsoft removed the Windows Experience Index, however, the Windows System Assessment Tool is still available even for the Windows 10 build. And in this guide, we will be making use of just that. So without further ado, here are the required steps to check your Windows Experience Index Score in Windows 10. Follow along.
Also Read
Page Contents
Check your Windows Experience Index Score in Windows 10
There exist three different methods through which you could check your PC’s WEI. You could try out any of these methods. However, we will be listing them in the order of the least steps involved to the most. As mentioned before, the following five components will be tested: 3D gaming graphics, Desktop graphics, System memory (RAM), Sequential read throughput of hard disk, and Processing speed and capability.
Method 1: Via PowerShell
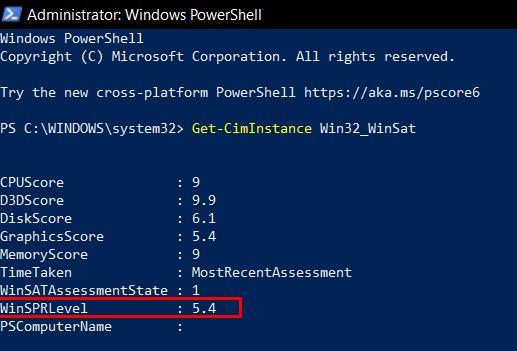
- Head over to the Start menu and search for Powershell. Launch it as an administrator.
- Type in the below command and hit Enter:
Get-CimInstance Win32_WinSat
- It will then list out the base score for all the five components, ranging from 1.1 to 9.9. The overall score or the WinSPR level will be the lowest of the five.
So this was the easiest way of checking the Windows Experience Index Score in Windows 10. Let’s see now turn our attention towards the CMD method.
Method 2: Check Windows Experience Index Score Via Command Prompt
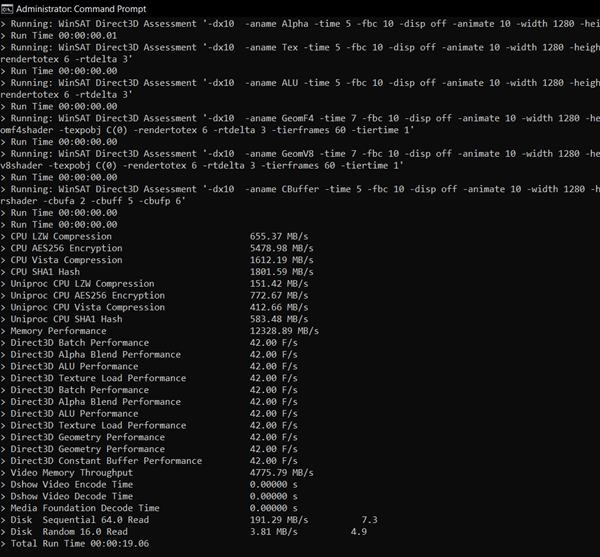
- Click on the Start menu and search for Command prompt. Launch it with administrative privileges.
- Execute the below command in the CMD window:
winsat formal
- It will take a few seconds for the process to complete.
- When that is done, launch the File Explorer and copy-paste the below location in the address bar:
C:\Windows\Performance\WinSAT\DataStore
- There you might find quite a few files with the following format:
[date of test] Formal.Assessment (Recent).WinSAT.xml
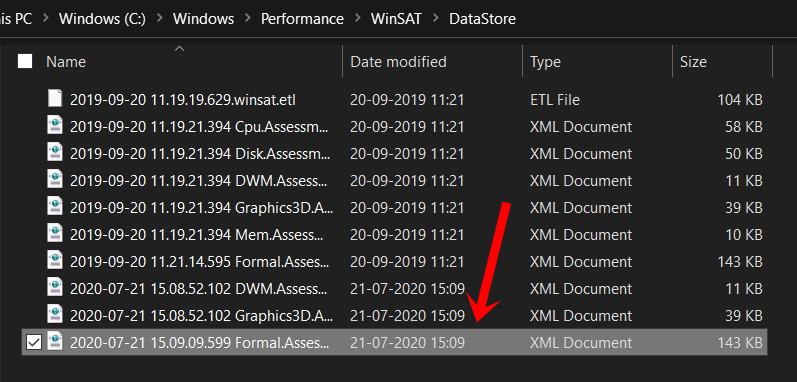
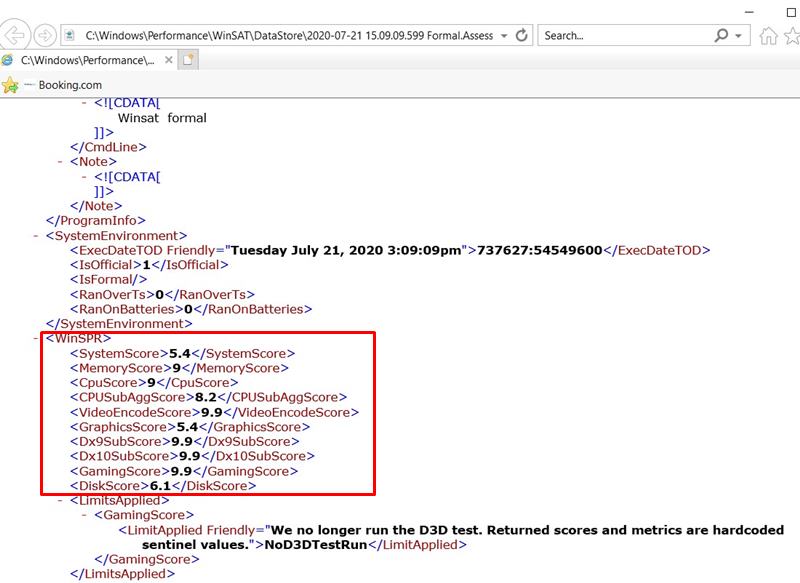
- Launch the most recent one. Since it is an XML file, any web browser should be able to open it.
- The score will be listed under the WinSPR section, with the System Score being the overall score. Again, it isn’t the weighted average, but rather equal to the minimum of the score of the five components.
Method 3: Using Performance Monitor
This is the lengthiest of all the three methods and requires quite a lot of steps to be executed. But it will give you an inside-out knowledge about the Windows Experience Index Score. With that said, here are the required instructions:
- Head over to the Start menu, search for and launch the Performance Monitor.
- Then head over to the left menu bar and click on Data Collector Sets.
- Click on System followed by System Diagnostics. Then right-click on System Diagnostics and select Start from the menu.
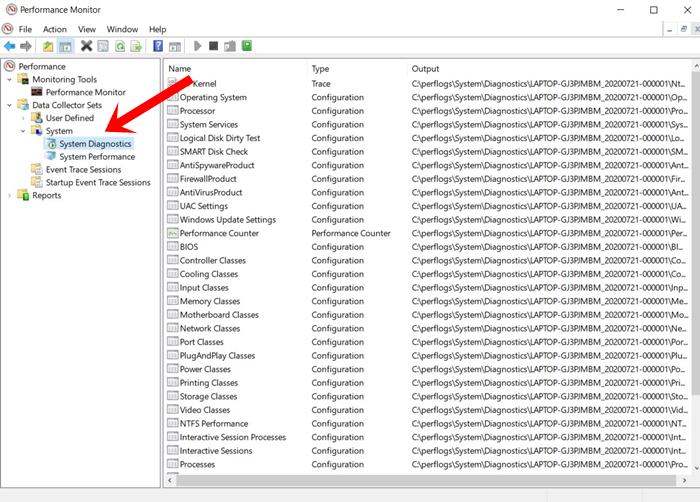
- The test should a couple of minutes to finish. Once that is done, head over to the Report section from the left menu bar.
- Then go to System > System Diagnostics and click on your PC name.
- You should then see the System Diagnostic Report will appear. Scroll down until you reach the Hardware Configuration.
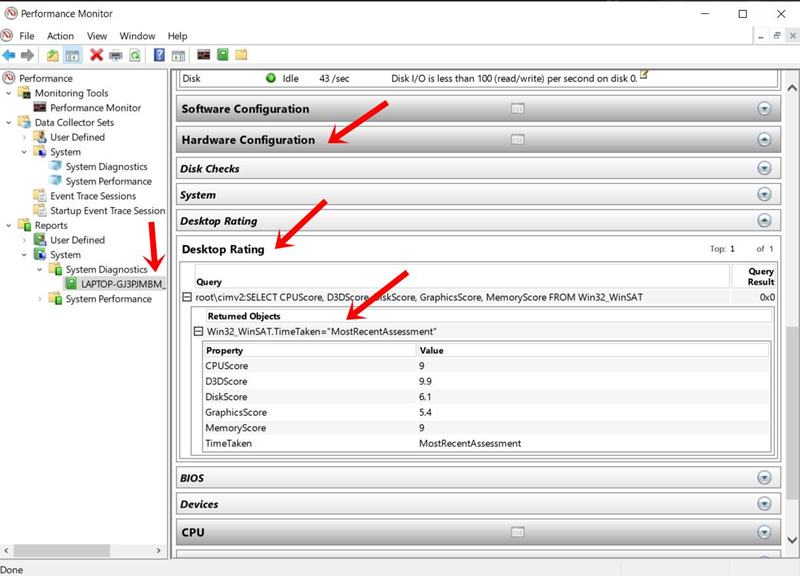
- Under the Hardware Configuration section, click on Desktop Rating to further expand it.
- Then click on the plus sign in the bottom left corner and again do the same. There you should see the score under the WinSAT section.
So with this, we conclude the guide on how to check the Windows Experience Index Score on your Windows 10 PC. We have shared three different methods for the same. Do let us know in the comments which one you ultimately settled down for. Rounding off, here are some iPhone Tips and Tricks, PC tips and tricks, and Android Tips and Trick that you should check out as well.
