Ubisoft’s XDefiant is a free-to-play, first-person arena shooter video game where you as a player try to compete in fast-paced online matches to be the best. As the game is in the beta stage right now, there might be some bugs or errors present that can take some time to get fixed. Meanwhile, some beta testers are claiming that it could be a stunning game as an alternative to Warzone or Battlefield. But some players saying that XDefiant Keeps Crashing on Startup on the PC.
It is also prone to the black screen, graphical glitches, FPS drops, stutters, etc that can appear on the PC while launching or even during the gameplay sessions unexpectedly. As such issues or bugs are quite common among PC gamers, we really can’t blame Ubisoft for that because there are multiple reasons applicable that you should know. Tom Clancy’s XDefiant crashes at startup due to an outdated game version, graphical issues, Firewall conflicts, background tasks, corrupted files, and more.

Page Contents
- Fix: XDefiant Keeps Crashing on Startup on the PC
- 1. Check System Requirements for XDefiant
- 2. Restart the PC
- 3. Run XDefiant as Administrator
- 4. Disable Fullscreen Optimizations
- 5. Check for XDefiant Updates
- 6. Verify and Repair the Game Files
- 7. Update the Graphics Card Driver
- 8. Log Out of the Ubisoft Account and Log Back Again
- 9. Update Windows
- 10. Allow XDefiant in Windows Firewall
- 11. Temporarily Disable Windows Defender (Antivirus)
- 12. Install Microsoft Visual C++ Redistributables
- 13. Close Unnecessary Background Tasks
- 14. Check the Ubisoft Connect Server Status
- 15. Turn Off Overlay Applications
Fix: XDefiant Keeps Crashing on Startup on the PC
Fortunately, here we’ve shared with you a couple of potential workarounds that should come in handy. Make sure to follow all troubleshooting methods one by one until the problem has been fixed. So, without wasting any more time, let’s jump into it.
1. Check System Requirements for XDefiant
First, you should have to check for the system requirements of XDefiant to understand whether your PC configuration is compatible enough or not. Sometimes not meeting the system requirements of the game can eventually cause several issues with the game launching because we all have different kinds of PC specifications from new to old and low-end to higher-end.
Minimum Requirements:
- Operating system: Windows 10, Windows 11 (64-bit versions)
- Processor: AMD Ryzen5 1400 @ 3.2GHz, Intel i7-4790K @ 4.0GHz, or better
- RAM: 8 GB (running dual-channel mode)
- Video card: AMD Radeon RX 560 (4 GB), NVIDIA GeForce GTX 1050Ti (4 GB), or better
- Hard drive: 65 GB available storage
- DirectX version: DirectX 11
- Operating system: Windows 10, Windows 11 (64-bit versions)
- Processor: AMD Ryzen5 1600 @ 3.2GHz, Intel i7-4790K @ 4.0GHz, or better
- RAM: 16 GB (running dual-channel mode)
- Video card: AMD Radeon RX 580 (8 GB), NVIDIA GeForce GTX 1060 (6 GB), or better
- Hard drive: 65 GB available storage (SSD recommended)
- DirectX version: DirectX 11
2. Restart the PC
The chances are high that somehow your PC is going through a temporary system glitch or cache data issue. In that scenario, the system resources of the PC might gonna encounter several problems whatsoever. So, make sure to restart the computer properly to check for the issue. Multiple reports are coming out that a normal reboot of the PC can easily fix temporary glitches.
3. Run XDefiant as Administrator
Make sure to run the game exe file as an administrator to avoid user account control regarding privilege issues. You should also run the Steam client as an administrator on your PC. To do this:
- Right-click on the XDefiant application on your PC.
- Select Properties > Click on the Compatibility tab.

- Make sure to click on the Run this program as an administrator checkbox to checkmark it.
- Click on Apply and select OK to save changes.
4. Disable Fullscreen Optimizations
You can try disabling the fullscreen optimizations on the Windows computer to ensure there is no issue with the fullscreen display feature in some scenarios. Some of the PC users did find this trick helpful. So, you can try it out.
- Right-click on the XDefiant application on your PC.
- Select Properties > Click on the Compatibility tab.
- Click on Disable fullscreen optimizations to select it.
- Then click on Apply and select OK to save changes.
5. Check for XDefiant Updates
It’s always a better idea to check for XDefiant updates on the PC by following the steps below. An outdated game patch version can eventually cause several issues with the game launching or connecting to the game servers occasionally.
- Launch Ubisoft Connect on the PC.
- Click on the Games tab > Under the My Games section, select the XDefiant game tile.
- Now, click on Update to check for available updates.
- Once done, make sure to reboot the PC to apply changes.
6. Verify and Repair the Game Files
It’s worth mentioning that verifying and repairing the installed game files on the PC might fix the corrupted or missing game files. You should check out the following steps to do so.
- Open Ubisoft Connect on the PC.
- Go to the Games tab > Click on XDefiant.
- Select Properties > From the Local Files section, click on Verify Files.
- Now, wait for the verification process to finish and then reboot the PC.
7. Update the Graphics Card Driver
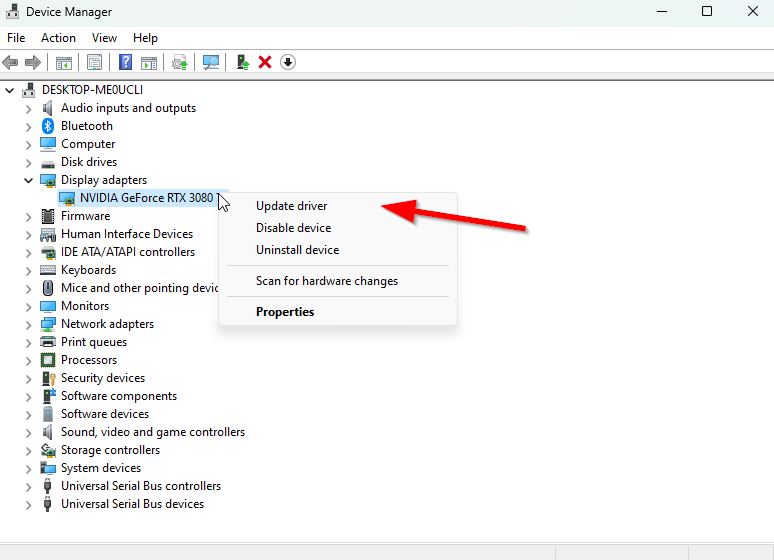
You should try checking for the graphics driver update on your Windows PC and installing the latest version to ensure no update is pending at your end. An outdated or missing graphics driver can trigger issues with properly functioning graphics-intensive programs. To do that:
- Right-click on the Start Menu to open up the Quick Link Menu.
- Click on Device Manager from the list.
- Double-click on Display Adapters to expand it.

- Right-click on the dedicated graphics card name that’s active.
- Now, click on Update driver.
- Choose Search automatically for drivers.
- The system will automatically check for the available update.
- If an update is available, it’ll automatically download and install the latest version.
- Once done, you should restart your PC to apply the changes.
If you can’t find any pending updates then just head over to the official website of Nvidia website below and search manually for the latest update. If a new version is available for the graphics card, just download the driver and install it on your PC. You can jump to the link below to do so:
8. Log Out of the Ubisoft Account and Log Back Again
You should try logging out of the Ubisoft account and then logging back into the account again to resolve the issue. Make sure to check the following steps to do so:
- Open Ubisoft Connect on the PC.
- Click on your profile picture in the top-right corner.
- Select Log out > After signing out, you should sign back into your account.
9. Update Windows
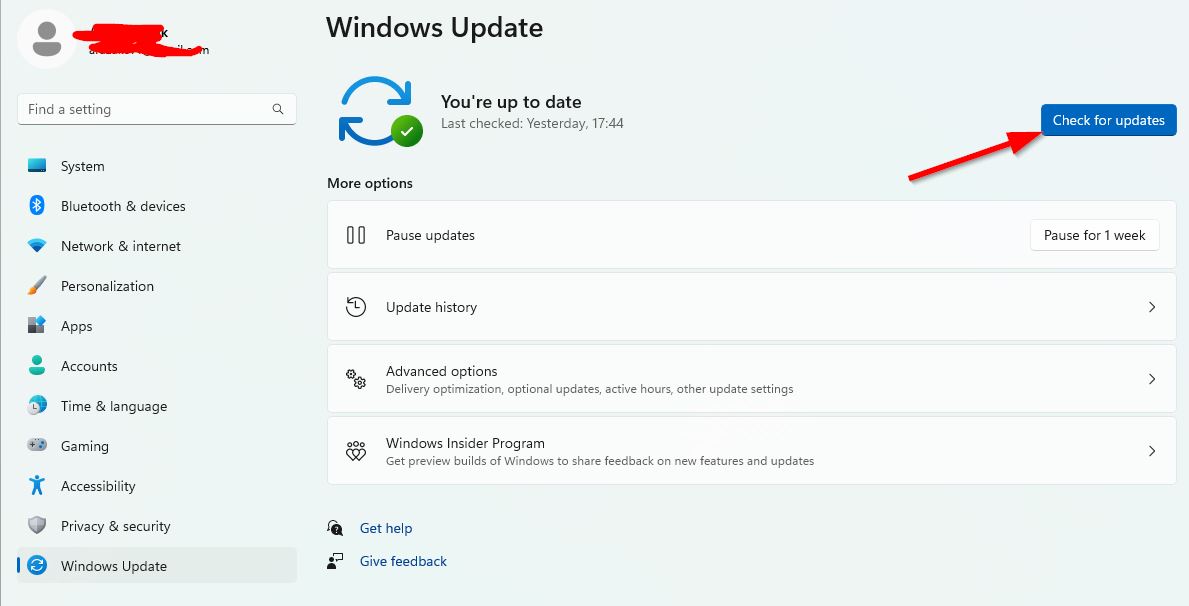
An outdated Windows OS version or build number can eventually trigger performance issues, program crashes, device driver connectivity issues, and so on. Just like updating the game, it’s also always recommended to update the system software to the latest version. To do so:
- Press the Win+I keys to open Windows Settings.
- Click on Update & Security.
- Select Check for updates under Windows Update.

- If there is a feature update available, select Download and Install.
- Wait for a while to complete the software update process.
- Once done, restart your computer to install the update.
10. Allow XDefiant in Windows Firewall
You should also allow the XDefiant application manually in Windows Firewall by following the steps below to ensure the Firewall program isn’t blocking the ongoing connections to the Ubisoft services from your end.
- Press the Win+I keys to open Windows Settings.
- Click on Update & Security > Click on Windows Security from the left pane.
- Click on Virus & threat protection > Click on Firewall & network protection.
- Go to Allow an app through firewall > Click on Change settings.
- Scroll the list and select XDefiant for both the Private & Public domains.
- If the game isn’t on the list, click on Allow another app.
- Browse and add XDefiant in Firewall > Click on OK to save changes.
- Once done, you can also add Ubisoft Connect to Firewall.
- Finally, reboot your computer to change the effects.
11. Temporarily Disable Windows Defender (Antivirus)
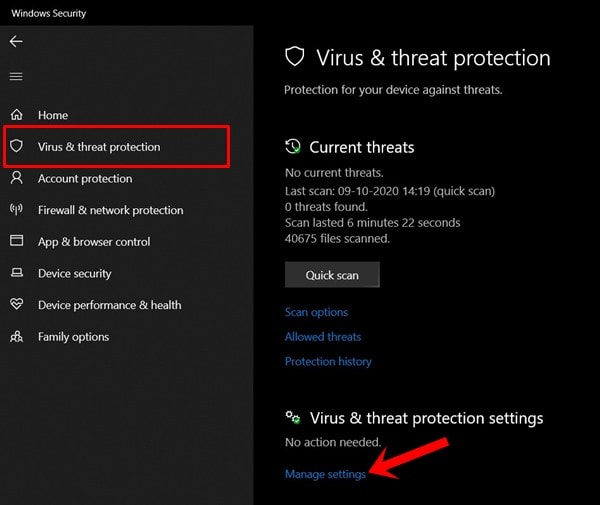
Here you can temporarily disable Windows Defender (antivirus) software by following the steps below to ensure there is no issue with the antivirus blocking the game application.
- Press the Win+I keys to open Windows Settings.
- Now, click on Update & Security > Click on Windows Security from the left pane.
- Click on the Open Windows Security button.
- Go to Virus & Threat Protection > Click on Manage Settings.

- Just Turn Off the Real-time protection option.
- If prompted, click on Yes to proceed further.
12. Install Microsoft Visual C++ Redistributables
Another thing you should do is simply install Microsoft Visual C++ Redistributables on your Windows computer by following the steps below to ensure your system is working fine with the vc_redist files.
- Open Ubisoft Connect on your PC.
- Go to Games > Click on XDefiant.
- Click on Properties > Select Local Files.
- Select the Open Folder option to open the XDefiant installation folder.
- Open the Tools folder > Open the vc_redist folder.
- Then you can install the following programs:
- vc_redist_2015.x64.exe
- vc_redist_2015.x86.exe
- vcredist_x64_2010.exe
- vcredist_x64_2012.exe
- Finally, restart your PC to apply changes.
13. Close Unnecessary Background Tasks
Unnecessary background running tasks or programs can eat up a lot of system resources like CPU or Memory usage that literally reduces system performance. Hence, the startup crashing, lagging, and not loading issues appear quite often. Simply, close all the unnecessary background running tasks completely. To do this:
- Press the Ctrl+Shift+Esc keys to open Task Manager.
- Now, click on the Processes tab > Click to select tasks that are unnecessarily running in the background and consuming enough system resources.
- Click on End Task to close processes one by one.
- Once done, restart your system.
14. Check the Ubisoft Connect Server Status
You should check the Ubisoft Connect Server Status here to ensure there is no issue with the online services. Sometimes problems with the online services can also occur with game launching issues or server connectivity issues. If that’s the thing, you should wait for a couple of hours and then try again.
15. Turn Off Overlay Applications
It seems that a couple of popular applications do have their own overlay program that can eventually run in the background and cause issues with the gaming performance or even launching issues. You should turn them off to fix the issue by following the steps below:
Disable Discord Overlay:
- Launch the Discord app > Click on the gear icon at the bottom.
- Click on Overlay under App Settings > Turn on the Enable in-game overlay.
- Click on the Games tab > Select XDefiant.
- Finally, Turn Off the Enable in-game overlay option.
- Make sure to reboot your PC to apply changes.
Disable Xbox Game Bar:
- Press the Win+I keys to open Windows Settings.
- Click on Gaming > Go to Game Bar.
- Turn Off the Record game clips, screenshots, and broadcast using Game bar option.
If in case, you’re unable to find out the Game Bar option then just search for it from the Windows Settings menu.
Disable Nvidia GeForce Experience Overlay:
- Launch the Nvidia GeForce Experience app > Head over to Settings.
- Click on the General tab > Disable the In-Game Overlay option.
- Finally, restart the PC to apply changes, and launch the game again.
Disable Ubisoft Connect Overlay:
- Launch the Ubisoft Connect app on your PC.
- Make sure that you’re signed in to your Ubisoft account.
- Next, click on the hamburger menu icon at the top left corner.
- Select Settings > Go to the General tab.
- Then Uncheck the Enable in-game overlay for supported games checkbox to disable it.
Also do keep in mind that you should disable some other overlay apps like MSI Afterburner, Rivatuner, RGB software, or any other third-party overlay apps that run in the background always.
That’s it, guys. We hope this guide was helpful to you. For further queries, you can comment below.
