In this guide, we will show you how to fix the CCleaner Installer not working issue on your Windows 10 PC. Over the course of time, a lot of temporary data, cache cookies might get accrued. Along the same lines, unwanted Registry items and broken shortcuts might also take up a major chunk of storage on your PC. To deal with these unnecessary storage consumptions, there are quite a few third-party apps available for the Windows OS.
And CCleaner is right there at the top. Apart from the aforementioned task, it could also be used to delete passwords, Internet files, browsing history, configuration files, and the likes. You just need to install it via its installer app and that’s it. However, it isn’t as easy as it may sound. The reason? Well, many users aren’t able to use the CCleaner Installer on their Windows 10 PC. If you also facing this issue, then this guide is here to help you out. Follow along for the detailed instructions.
Also Read
Page Contents
Fix: CCleaner Installer Doesn’t Work in Windows 10
As far as the reason for the aforementioned issue is concerned, there could be quite a few ones. To begin with, the Windows Defender Firewall might prevent the installer from running. Likewise, if the app is running in a restrictive environment or isn’t granted the necessary Group or user permissions, then you might face this issue as well. Along the same lines, issues with the current variant and build of the installer could also result in the said error.
Likewise, if an older version of CCleaner isn’t completely removed from the system or some of its processes are running in the background, then it might also conflict with the proper functioning of the installer. With that said, this guide will list out instructions to rectify these issues which in turn will fix the CCleaner Installer not working issue on your Windows 10 PC as well. Follow along.
Fix 1: Disable Windows Firewall
In some instances, the Windows Firewall might become a little overprotective and could flag a program as a potentially harmful one, even if that is not the case. So the best bet, in this case, is to temporarily disable the Firewall or add the app to the former’s exclusion list. Both the instructions are given hereby.
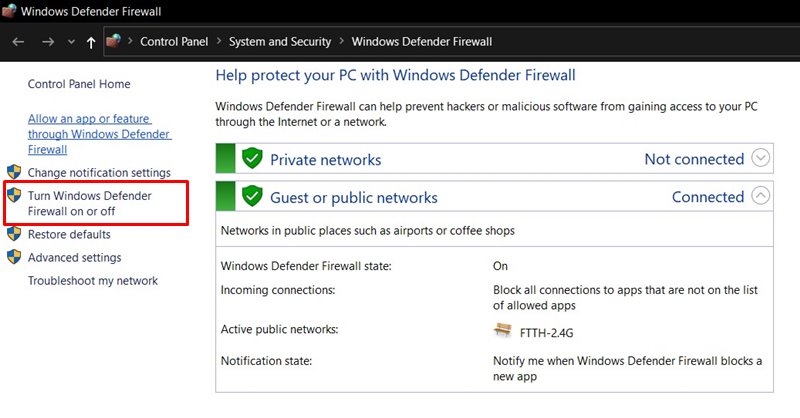
- To begin with, search for the Windows Defender Firewall from the Start menu.
- Then select Turn Windows Defender Firewall On or Off from the left menu bar.
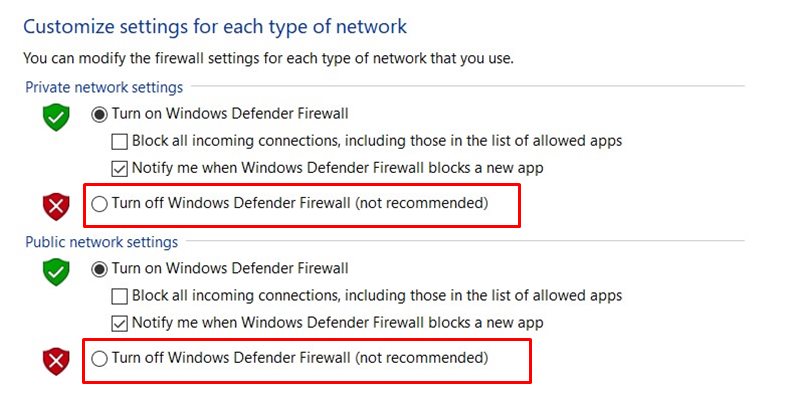
- Next up, enable the Turn off Windows Defender Firewall option under both the Public and Private network sections.
- On the other hand, if you wish to add the app to the exclusion list, then click on Allow an app or program through Windows Defender Firewall.
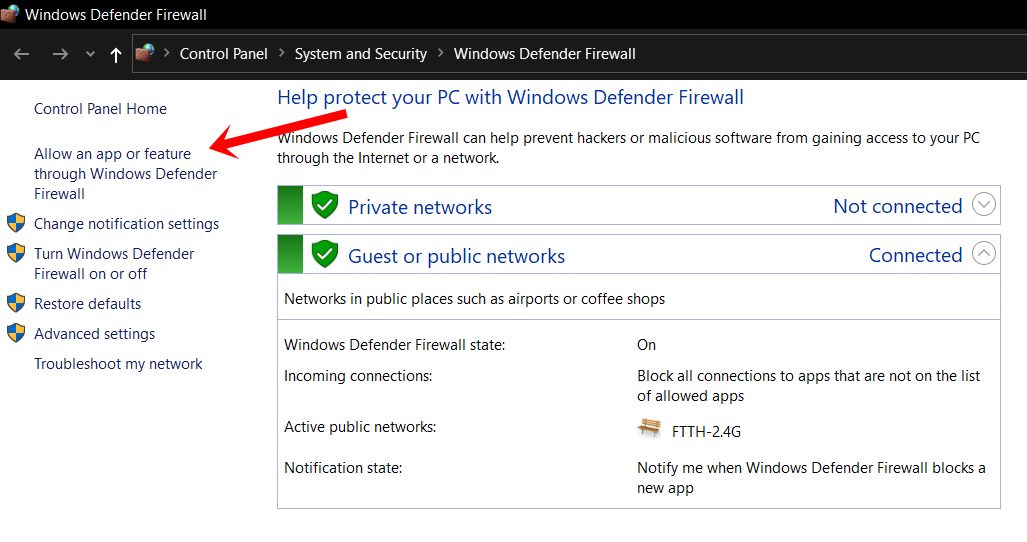
- Then click on Change Settings from the subsequent dialog box that appears. You will need administrative privileges to carry out this task.
- Select the app from the list and hit OK. However, if it isn’t there, then click on the Allow Another App button, navigate to the app’s installation directory and select it.
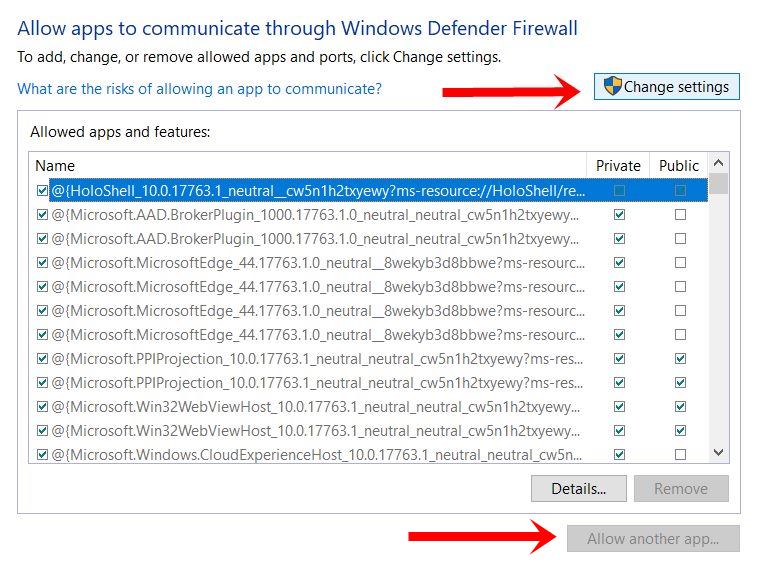
- Once done, reboot your PC and then check if it fixes the CCleaner Installer not working issue on your Windows 10 PC.
Fix 2: Verify Group and User Permission
If the group or individual user profiles aren’t given the required permission to deal with setup files, then those set of users won’t be able to carry out the installation. Here’s how to deal with this issue:
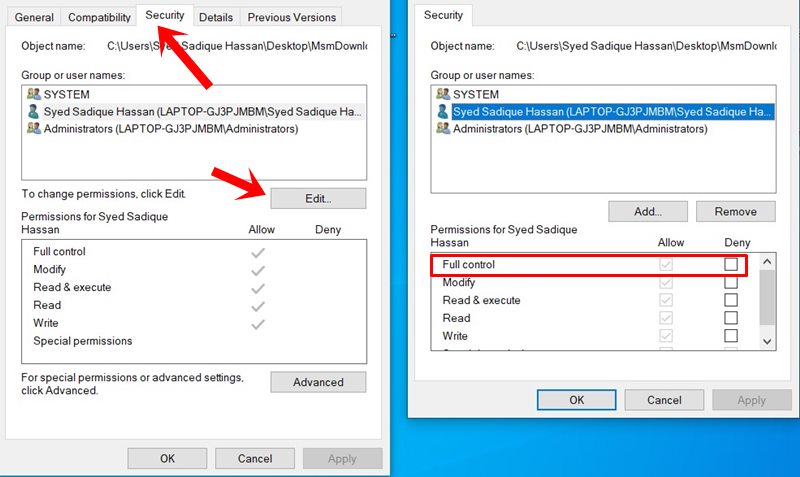
- Right-click on the CCleaner’s installation file and select Properties.
- Then go to the Security tab, select Users from the list and click Edit.
- Allow the Full Control for this profile and click on Apply > OK.
- See if it is able to fix the CCleaner Installer not working issue on your Windows 10 PC.
Fix 3: Give it Administrative Rights
Since the app functions are mostly related to the system level such as deleting Registry items or old Windows Installation files, it requires an unrestrictive environment to function. Hence it is recommended that you launch the app by granting it the required admirative privileges.
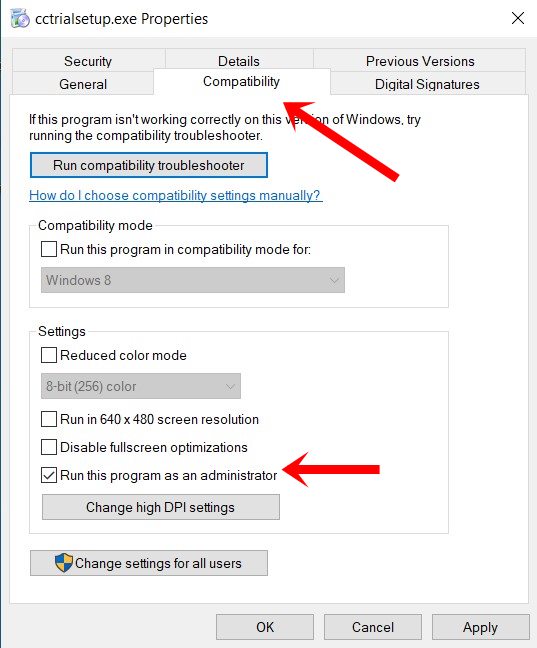
- To do so, right-click on the installer file and select Properties.
- Then go to the Compatibility section
- Enable the Run this program as an administrator option.
- Click Apply > OK and check if the CCleaner Installer not working issue on Windows 10 has been fixed or not.
Fix 4: Try out Another Version/Build
If the current version of the installer is causing some issues, then you could also install an older build of this app. Once installed, launch the app and then update it from within the app itself. However, if you still face some issues, then you could try out another variant of this app as well. CCleaner also comes with Slim and Portable Builds.

The first one is a trimmed down version of the app and only has the absolutely necessary components. On the other hand, its portable build doesn’t need any installation. You could directly access the app by launching its EXE. So in case, the CCleaner Installer is not working on your Windows 10 PC, then you could try out the aforementioned builds as well.
Fix 5: Verify CCleaner’s existing files don’t exist
If you have already tried out the app in the past, chances are some of its files might still be present on your PC. So if you proceed with the installation of the newer build, it might lead to version conflicts. Hence it is of paramount importance to reverify that there are no existing CCleaner files.
Therefore head over to its installation directory (default is C:\Program Files\CCleaner) and delete all the existing files, if it exists. Then proceed ahead with the usage of CCleaner Installer and check if its not working issue on Windows 10 has been fixed or not.
Fix 6: Other Fixes
Some users have attempted a few other workarounds and were able to rectify this issue. The first of which is to reverify the installation directory. In some instances, the installation location of the file might not match the target location. If that’s the case, then you could modify the target and sync it with the actual location of the file.
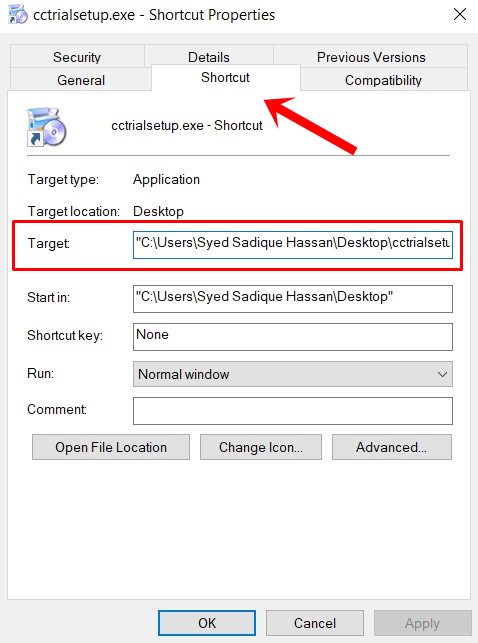
To do so, right-click on the file, select Properties, and go to the Shortcut tab. Then make sure that the target to which it is pointing is the same as the location of the file, and not to any temporary location or a USB drive.
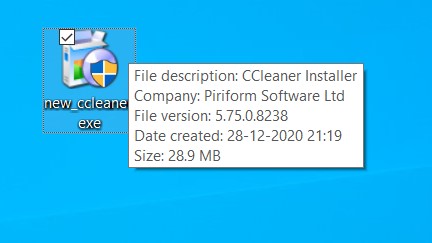
On the other hand, the second fix calls for renaming the installer file and giving it another name. So right-click on it, select Rename and carry out the desired task (as an example, we have renamed it to new_ccleaner, see above image). After this, try launching the app and see if the issue has been fixed or not.
With this, we conclude the guide on how to fix the CCleaner Installer not working issue on your Windows 10 PC issue. We have shared six different methods for the same, any one of which should work out in your favor. Do let us know in the comments which one managed to spell out success. Rounding off, here are some iPhone Tips and Tricks, PC tips and tricks, and Android Tips and Tricks that you should check out as well.
