Counter-Strike 2 (CS2) is the successor to CS:GO by Valve Corporation which ensures better features, huge improvements, and enhanced graphics overall. Initially, CS2 went as a Limited Test for the selected Counter-Strike Global Offensive players. Though the game can be played by anyone as per rumours which indicate the launch is imminent, it seems that several players are having multiple issues or bugs. Well, the Counter-Strike 2 (CS2) mouse acceleration issue is one of them that prevents players from moving and aiming.
The mouse acceleration issue specifically in the CS2 game affects the overall gaming experience due to the mouse cursor behaving weirdly on the screen which also affects the aiming or moving of the character in the scene. It directly ruins the precise aiming or inconsistent aiming apart from mouse movements physically. Even though the mouse sensitivity works great on the system and with other games, Counter-Strike 2 seems to have specific bugs with the mouse sensitivity.

Page Contents
Fix: Counter-Strike 2 (CS2) Mouse Acceleration Issue
Here mouse acceleration states to change in the cursor speed depending on how fast you move in the game and aim-shoot. The mismatch of the mouse cursor speed in the game or weird behaviour leads to difficulties. In case, you’re also encountering the same mouse acceleration issues with CS2 for a while then don’t fret. Here we’ve shared with you a couple of potential workarounds that should come in handy. Make sure to follow all troubleshooting methods until the problem has been fixed. So, without further ado, let’s jump into it.
1. Restart the PC
You can try restarting the PC manually to ensure there is no issue with the system glitch or cache data. The chances are high that conflicts with the Windows system are troubling you with running the in-game mouse acceleration.
2. Run CS2 as an Administrator
Another thing you can do is to run the Counter-Strike 2 game application on the PC as an administrator to check if the problem has been fixed or not. Allowing the User Account Control (UAC) access to the system can run the program smoothly. It basically avoids conflicts with the game tasks.
- Open the Steam client > Go to Library.
- Right-click on Counter-Strike 2 from the left side.
- Go to Manage > Click on Browse local files.
- Right-click on the Counter-Strike 2 application on your PC.
- Click on Properties > Click on the Compatibility tab.

- Click on the Run this program as an administrator checkbox to enable it.
- Once done, click on Apply > Select OK to save changes.
3. Update Counter-Strike 2
We should also recommend you check for the game update manually at your end via the Steam client to ensure there is no outdated game version conflicting with the game launching or mouse sensitivity. An outdated game patch version can trigger several potential issues that we can’t deny. To do this:
- Open Steam > Go to Library.
- Click on Counter-Strike 2 from the left pane.
- Steam will automatically search for the available update.
- If there is an update available, click on the Update button.
- Now, wait for the update to complete.
- Once done, restart the PC to apply the changes.
Note: If the update isn’t available that means your game is already running the latest version.
4. Verify and Repair the Game Files
You should also verify and repair the installed game files on the PC manually by following the steps below. Sometimes corrupted or missing game files can be another reason for several conflicts like mouse sensitivity or gameplay issues.
- Launch the Steam client > Click on Library.
- Right-click on Counter-Strike 2 from the list of installed games.
- Now, click on Properties > Go to Local Files.

- Click on Verify Integrity of Game Files.
- You’ll have to wait for the process until it gets completed.
- Once done, just restart your computer.
5. Disconnect and Reconnect Mouse
It’s recommended to simply disconnect and reconnect the mouse manually whether you’re using a wired one or wireless one on the PC to check if the problem has been fixed or not. A loose connectivity or non-detection of the mouse can trigger multiple issues.
6. Update Mouse Driver
An outdated mouse driver on the PC can also trouble you a lot when it comes to stability or bugs. The chances are high that your mouse driver becomes outdated and buggy enough to continue using it. Make sure to check for the mouse driver update on the system by following the steps below.
- Press the Win+X keys to open the Quick Link Menu.
- Click on Device Manager from the list to open it.
- Now, double-click on Mice and other pointing devices to expand it.
- Right-click on the active mouse device that you’re using and want to update.
- Click on Update driver > Click on Search automatically for drivers.
- The system will automatically check for the available updates.
- If there is an update available, it’ll automatically download and install the update.
- Once done, you should restart your PC to apply changes.
7. Disable Enhanced Pointer Precision
If the mouse acceleration feature is enabled by default on your Windows computer no matter whether you’re using Windows 10 or Windows 11, make sure to manually turn it off by following the steps below. By disabling the mouse acceleration feature, you’ll be able to fix multiple issues with the in-game mouse cursor moving as well as the precision pointer.
- Open the Start menu > Search and open Control Panel.
- Click on Hardware and Sound > Click on Mouse under Devices and Printers.
- Under the Mouse Properties section, go to the Pointer Options tab.
- From Motion, just uncheck the Enhance Pointer Precision checkbox to disable it.
- Click on Apply and then OK to save changes.
8. Adjust Mouse Sensitivity in Windows
In case, you’re using a gaming mouse or multi-DPI mouse then you should try increasing or decreasing the mouse DPI (sensitivity) value in order to cross-check whether the mouse acceleration issue has been fixed or not. Just open the mouse configuration software and try to set the value lower or higher in order to fix the issue.
However, if you’ve a basic mouse then you can use the Windows default Mouse settings option by following the steps below:
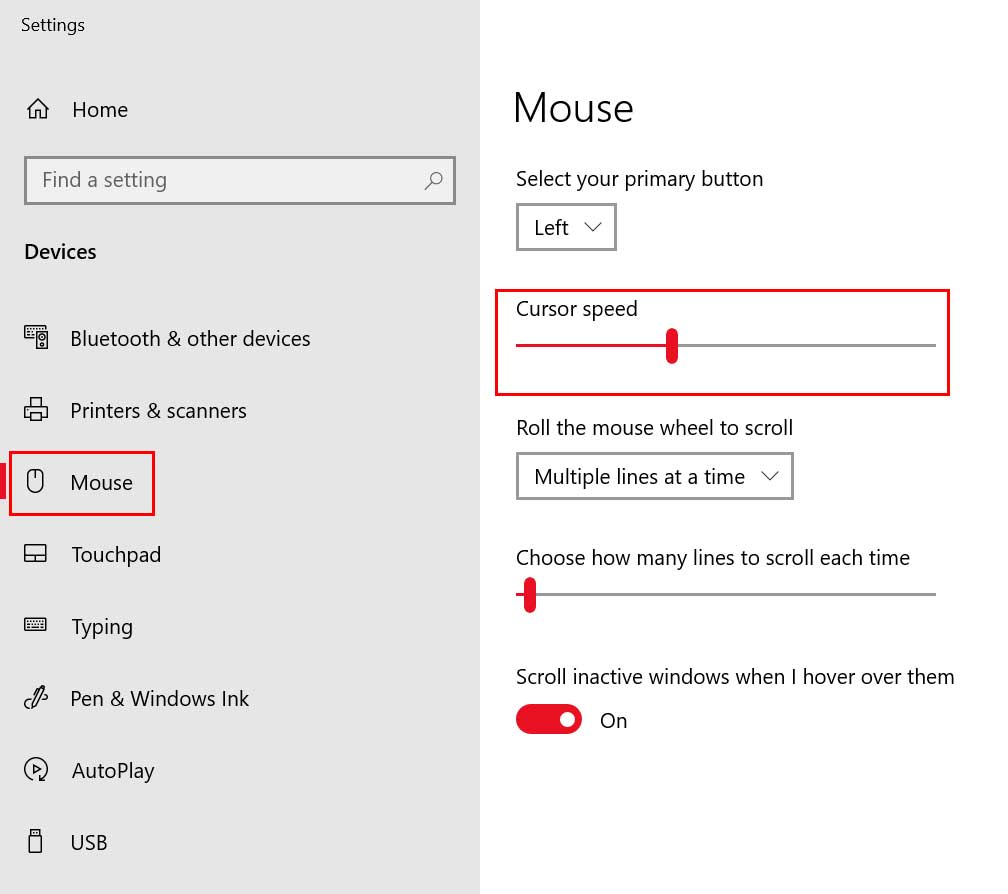
- Press the Win+I keys to open Windows Settings.
- Now, click on Devices > Select Mouse from the left pane.

- Here you can increase or decrease the mouse cursor speed according to your preference.
- Additionally, you can choose and select the scrolling speed or sensitivity for your external mouse.
Whereas if you don’t use an external mouse and having issues with the touchpad on your laptop then do the following steps:
- Press the Win+I keys to open Windows Settings.
- Now, click on Touchpad > Here you can select your preferred cursor speed, touchpad sensitivity, multiple actions of the touchpad clicks, scrolling, zooming, gestures, and more.
Please Note: If you’re using a gaming mouse or a fully featured DPI mouse with a dedicated physical DPI button then just press the DPI minus button a few times to reduce the sensitivity directly from the mouse hardware.
9. Adjust Mouse Keys Acceleration
Last but not least, you can also try adjusting the ‘mouse keys acceleration’ slider as per your preference to get better sensitivity while playing games.
- Press the Win+I keys to open Windows Settings.
- Click on Accessibility from the left pane.
- Scroll down and click on Mouse.
- Click on Mouse Keys to turn on the toggle.
- Now, Drag the Mouse keys acceleration slider to adjust the speed.
- Once done, turn off the Mouse keys toggle again.
That’s it, guys. We assume this guide was helpful to you. For further queries, you can comment below.
Also Read
