Whenever you buy a new smartphone, it comes with bloatware. Sometimes there are several brand-specific apps pre-installed on your new device, and sometimes there are some additional applications that the manufacturer includes in the name of profit. In some countries, carriers allow their customers to buy smartphones, and one such big US carrier company is T-Mobile. And Android phones brought through T-Mobile are never free of bloatware.
One particular application that is common with every Android phone brought through T-Mobile is the T-Mobile application. With other applications, you can uninstall them from the Settings menu. But the T-Mobile application cannot even be uninstalled using the conventional method. You can’t even force stop or disable this application on your device. This can be annoying for people who are selective about the apps that they want to have on their phones. So in this article will guide you on how you can easily uninstall the T-Mobile application from your smartphone without even using a computer. Now, without any further ado, let’s get into it.
Also Read
![]()
Page Contents
How to Delete the T-Mobile App from Any Android Phone?
Not having control over the installed apps can be worrying for some as it is tough to keep track of which applications are collecting your data. The collection of personal data is a major security threat to smartphone users. Hence, it is best to keep only those applications on your smartphone that you trust.
Uninstalling applications that are built into the OS required ADB. And up until Android 11, ADB is something that required a computer and a command prompt window. But that is not the case anymore. Yes, we will be using ADB in this method, but we won’t need a PC or the command prompt window. So first, let’s see what the requirements for this method are.
Requirements:
- Android 11 or higher (some models with Android 9/One UI 1.0 will also work).
- Access to a Wi-Fi network.
- $3 to buy an app from an independent developer.
Enable Developer Options:
- Open up the Settings app on your smartphone.
- Scroll to the bottom, and you will find About phone there.
- Get inside the About Phone section and find the Build number there.
- Tap on the Build Number seven times in quick succession, and that will unlock your developer options. You should see a small message on your screen that reads, “you are now a developer.”
Enable Wireless Debugging:
Wireless Debugging is the feature that has been finally added to Android 11. It was available on some smartphones, even with Android 9. But now, every smartphone with Android 11 has this feature in the developer options menu. This method will work with your Android 9 or 10 device if you do not have the wireless debugging option hidden in your phone settings.
To open up Developer options on your smartphone,
- open the Settings app.
- Look for the option “Developer options.”
- If you don’t find it in the main screen of your Settings menu, then search for developer options in the search bar of your settings menu.
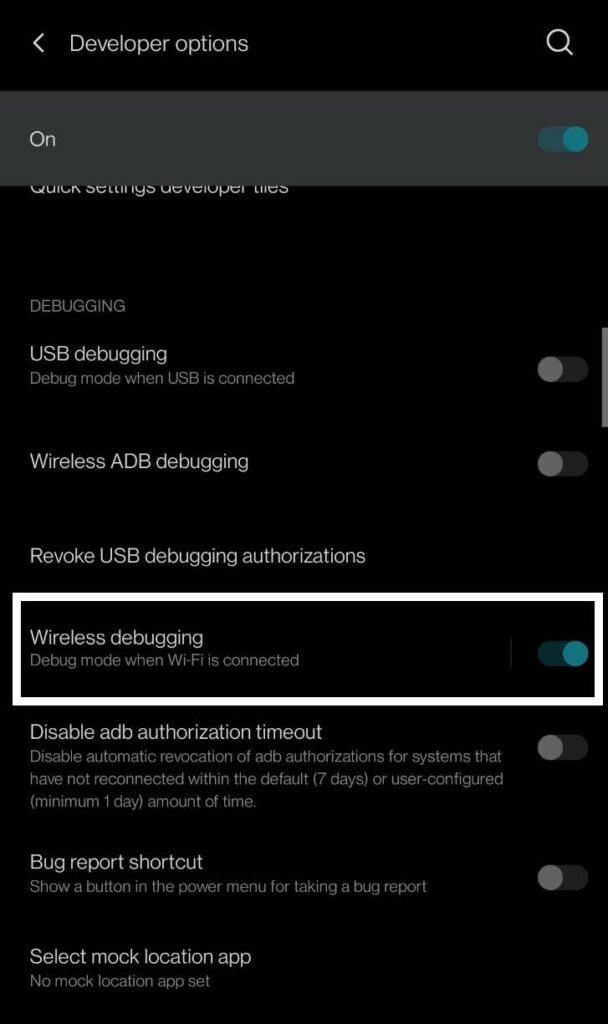
- Once you are inside the Developer Options menu, look for “Wireless Debugging.” Once you see it, turn on the toggle for it. To enable Wireless Debugging, you will need to have your device connected to a WiFi network. It will not use any data, so you can connect to any network that you prefer.

Install LADB:
Now you need to download the application that will make the entire process possible without the requirement of the PC. This application is called LADB, and it is available in the Google Play Store. It is developed by an independent developer and downloading it only costs 3$. Click on this link to open up the Play Store page of the LADB application.
LADB stands for Local ADB, and it will allow you to create an ADB server on your phone. You can then connect directly to it from your phone. You won’t have to use a computer.
Connect to the Virtual Shell:
Now you need to connect LADB’s localhost to your phone’s wireless ADB function. This process will differ depending on the version of Android running on your smartphone.
Android 11
This process is a bit complicated for smartphones running on Android 11. This is because the Wireless Debugging feature was added as a part of the Android 11 OS. So there are some additional measures of security involved now.
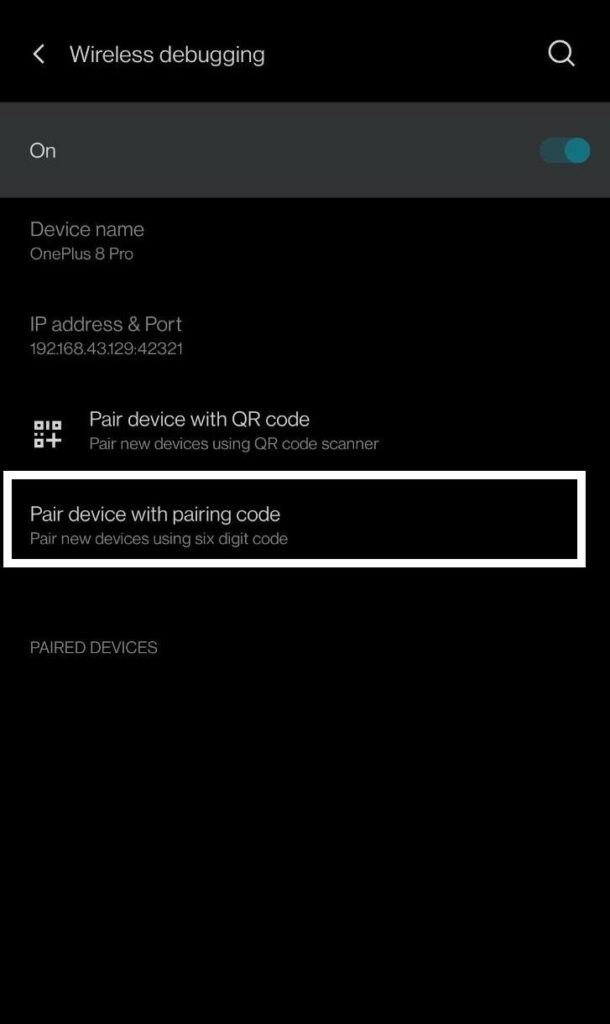
Open the LADB application on your smartphone, and it will ask for the port number and the pairing code. This information is available in the Wireless debugging setting inside the Developer options. To access that information, go back to Settings on your phone, and inside Settings, tap on Developer Options again. Inside Developer Options, you will find Wireless Debugging with the toggle enabled for it. Don’t touch the toggle. Keep it on, and tap on the “Wireless Debugging” text. It will open a submenu. Here, you will see the option “Pair device with pairing code.” Tapping on it will provide the information required by the LADB application. However, the pairing code that shows up here changes every time the user goes back. So to enter the correct PIN, you need to open both the LADB application and the Wireless Debugging settings in split-screen mode.
Once you have both the LADB and Developer Options in split-screen mode, tap on the Wireless Debugging and then tap on “Pair device with pairing code.”

You will see a few numbers in a pop-up now. You need to copy those numbers from the Settings screen onto the LADB application screen. In the settings screen, you will see a series of number under IP address and Port. These numbers will be divided by a colon. The number you see after the colon is what you need to enter into the Port field in LADB. Then the pairing code on the settings screen will go to the pairing code box in the LADB application. After you are done with that, tap on Okay in the LADB application.
You will now see a message on your screen that reads, “Waiting for device to accept connection.” Just wait a couple of minutes for the connection to be established. Once that is done, you will see a message on the screen that reads “Wireless debugging connected.”
Android 9 & 10
This process is really easy if you are using an Android 9 or Android 10 device. Just open the LADB application, check the box next to “Always allow”, and select “Allow” when prompted to “Allow USB Debugging.”
The command line window will show up on your screen, ready to take command.
Delete the T-Mobile application:
You need to copy and paste a couple of lines for deleting the app from your phone.
- Tap and hold on the line mentioned below to select the entire line and then choose Copy.
pm uninstall user –0 com.tmobile.pr.mytmobile
- Now go to the LADB application and paste this copied command into the input field at the bottom of the screen. Then hit the enter key on your smartphone’s virtual keyboard.
- You will see a pop-up on your screen that reads “success.” You will notice that the T-Mobile application is no longer present on your smartphone.
- If you ever wish to get the application back on your phone, like the way it was, you need to follow the same procedure discussed till now and in the LADB app, enter the following command.
pm install-existing com.tmobile.pr.mytmobile
Since the T-Mobile app is present on your smartphone by default and deleting it is an alteration to the default phone settings. So if you ever factory reset your smartphone, it will show up in your phone’s applications list again. Then you will have to follow the same process again to delete it from your phone.
This is how you can Delete the T-Mobile App from Any Android Phone. If you have any questions or queries about this article, then comment down below, and we will get back to you. Also, be sure to check out our other articles on iPhone tips and tricks, Android tips and tricks, PC tips and tricks, and much more for more useful information.

This is a very interesting find that will soon be used with extreme prejudice. Your English grammar is quite good for a 2nd language. What is your 1st language?