EA Sports FC 24 is the latest football simulation video game from Electronic Arts that has been doing pretty well in the gaming community. FIFA franchise collaboration has ended with FIFA 23, and now EA is moving as a standalone franchise to continue the journey with EA Sports FC lineup. The title is currently in the early access stage, indicating plenty of bugs or issues are present. Meanwhile, several players are facing the EA Sports FC 24 DirectX DXGI_ERROR_ACCESS_DENIED error in EA Sports FC 24.
As the error notice suggests, it’s related to the DirectX error, which is most probably happening due to the missing DirectX version or an outdated DirectX version. Otherwise, an outdated game patch version, corrupted game files, not running the game with admin access, issues with the game documents folder, an outdated graphics driver, an outdated system software, display mode conflicts, and more. Now, if you’re also facing the same error, follow this guide to fix it.

Page Contents
- EA Sports FC 24 DirectX DXGI_ERROR_ACCESS_DENIED Error
- 1. Rename FC24 Folder
- 2. Update Windows
- 3. Check for EA Sports FC 24 Updates
- 4. Verify and Repair the Game Files
- 5. Update the Graphics Driver
- 6. Run the Game as an Administrator
- 7. Update DirectX
- 8. Set the Windowed Screen Mode
- 9. Change the MachineGuid Value
- 10. Run the SFC Scan
- 11. Install Microsoft Visual C++ Redistributables and .NET Framework
EA Sports FC 24 DirectX DXGI_ERROR_ACCESS_DENIED Error
Luckily, here we’ve shared with you a couple of potential workarounds that should come in handy. So, without wasting any more time, let’s jump into it.
1. Rename FC24 Folder
As per the EA Forum reports, multiple players are claiming to Rename the Documents folder to the FC24CS on the PC to ensure there is no issue with the DirectX DXGI_ERROR_ACCESS_DENIED. Once done, restart the computer to apply changes immediately.
2. Update Windows
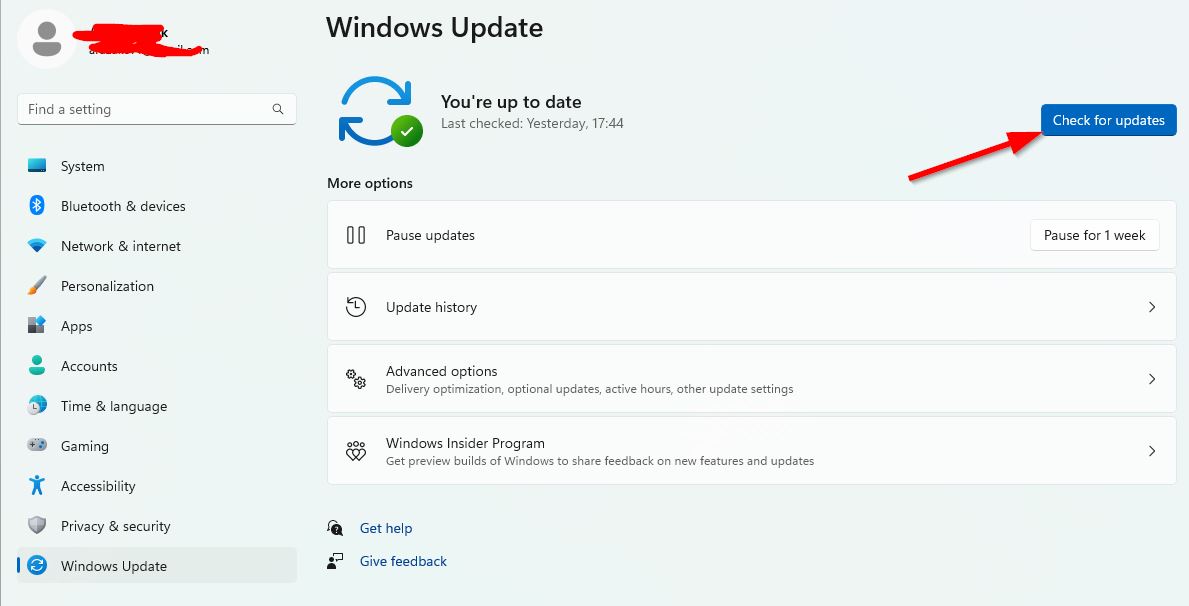
Updating your Windows OS build to the latest version is always a good idea to fix multiple issues or glitches with the system. An outdated Windows can trouble you a lot with DirectX errors.
- Press the Win+I keys to open Windows Settings.
- Now, click on Update & Security > From the Windows Update section, click on Check for updates.

- If there is an update available, you can click on Download and Install.
- Wait for the process to complete the installation.
- Once done, make sure to reboot your computer to apply changes.
3. Check for EA Sports FC 24 Updates
In case, you haven’t updated your EA Sports FC 24 game for a while, then make sure to follow the steps below to check for updates and install the latest patch (if available). To do this:
For Steam:
- Open the Steam client > Go to Library.
- Click on EA Sports FC 24 from the left pane.
- It’ll automatically search for the available update.
- If there is an update available, make sure to click on Update.
- Wait for some time as it may take a while.
- Once done, restart the PC to apply changes.
For Epic Games Launcher:
- Open the Epic Games Launcher > Go to Library.
- Click on EA Sports FC 24 from the left pane.
- Click on the three-dot icon > Check the auto-update to get a new update installation automatically.
- It’ll automatically search for the available update.
- If there is an update available, make sure to click on Update.
- Finally, reboot your PC to apply changes.
For EA Desktop:
- Launch the EA Desktop client on the PC.
- Make sure that you’re logged into a valid EA account.
- Head over to the Profile section at the top right corner.
- Now, click on the down arrow icon next to the profile.
- Click on Settings from the drop-down menu.
- Click on the Download tab.
- Under the Updates section, you’ll need to Turn ON the Update games automatically toggle.
- You should also Turn ON the Enable background services toggle to keep things going smoothly.
- Once done, restart the EA Desktop client again to apply changes immediately.
4. Verify and Repair the Game Files
Verifying and repairing the game files automatically using the game client is also recommended. It’ll ensure to repair of the corrupted or missing game files on the PC.
For Steam:
- Open up Steam > Go to Library.
- Right-click on the EA Sports FC 24 game.
- Click on Properties > Go to the Local Files tab.
- Select Verify Integrity of Game Files…
- This process will start and try repairing game files.
- Let the process be completed. Once done, close the Steam client.
- Restart your computer to apply changes.
For Epic Games Launcher:
- Open the Epic Games Launcher > Click on EA Sports FC 24 in the library.
- Click on the three-dot icon next to the game.
- Select the Manage option.
- Now, click on the Verify option.
- Confirm the task and wait for it to complete.
- Once done, reboot the PC to apply changes.
For EA Desktop:
- Open the EA Desktop client > Go to My Collection.
- Now, right-click on EA Sports FC 24 from the list of games.
- Click on Repair and wait for the verification process to be completed.
- Once done, make sure to restart the computer to apply changes.
5. Update the Graphics Driver
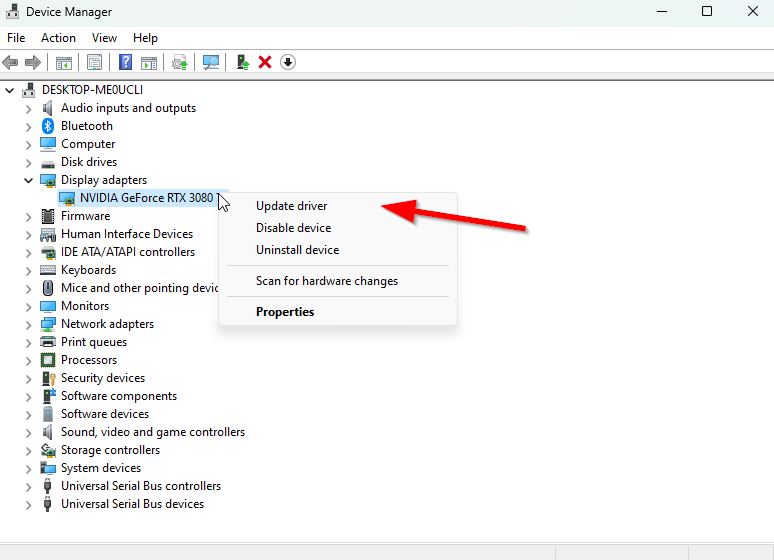
An outdated or corrupted graphics card driver can trigger multiple issues with the games or system performance while running programs. It’s highly recommended to check the graphics driver update. To do so:
- Press the Win+X keys to open the Quick Link Menu.
- Click on Device Manager from the list > Double-click on Display adapters.
- Right-click on the dedicated graphics card that you’re currently using.

- Click on Update driver > Choose Search automatically for drivers.
- If there is the latest update available, it’ll automatically download & install the latest version.
- Once done, restart the computer to apply changes immediately.
Alternatively, you can manually download the latest version of the graphics driver and install it on the PC via the official website. Make sure to download the graphics driver file respective to your graphics card model and manufacturer.
6. Run the Game as an Administrator
Make sure to run the game app file on your PC as an administrator access to allow the User Account Control (UAC) access to the system. In some cases, your system requires the UAC access permission to run a program which is quite important. By following the steps below you’ll have to allow the admin access for once and it won’t ask you for the same again. To do so:
- Go to the installed EA Sports FC 24 game directory.
- Right-click on the application file on your PC.
- Click on Properties > Click on the Compatibility tab.

- Click on the Run this program as an administrator checkbox to enable it.
- Once done, click on Apply and then OK to save changes.
7. Update DirectX
Another thing you’ll need to do is simply run the latest DirectX installer application on your PC and run the installer program to get the latest DirectX version. An outdated DirectX version will cause several issues with the program launching and conflicts with the system processes. To do so:
- Visit the official Microsoft website and download the latest DirectX installer version.
- Run the installer and install DirectX completely.
- Once done, reboot the PC to apply changes.
8. Set the Windowed Screen Mode
Multiple reports claim that changing the fullscreen to the windowed screen mode has done the trick and fixed multiple issues. After starting the game, press the Alt+Enter key to switch to the windowed screen mode. It mostly avoids DirectX-related errors.
9. Change the MachineGuid Value
Still, encountering the DirectX error while launching EA Sports FC 24? Don’t worry. You can try changing the MachineGuid value from the registry editor by following the steps below. It looks like there are conflicts with the ‘PipelineLibraryPcDx12.cpp’ file.
Please Note: Create a registry editor full backup before making any changes in the value.
- Open the Start menu and search for Registry Editor.
- Open Registry Editor > Locate LOCAL_MACHINE.
- Click on Microsoft > Select Cryptography.
- Change the MachineGuild value to d1eb246e-6243-4460-a88e-5d4e52b1ef6b.
- Make sure to save the changes and restart the PC.
- Finally, run the game again.
10. Run the SFC Scan
SFC (System File Checker) tool is useful to check whether any program file or a disk drive has some issues not on a Windows system. If there is an issue, you can try manually fixing it by following the steps below. To do this:
- Click on the Start Menu and type cmd.
- Now, right-click on Command Prompt from the search result.
- Select Run as administrator > If prompted, click on Yes to give admin privileges.
- Type the following command in the cmd window and hit Enter to execute it:
sfc /scannow

- Now, wait for the process to complete. Sometimes it may take extra time.
- Once done, reboot the PC, and check for the issue again.
11. Install Microsoft Visual C++ Redistributables and .NET Framework
If your Windows computer isn’t running the latest version of the required version of the Microsft Visual C++ Runtime or .NET Framework then you may encounter several issues whatsoever. To do that:
- Open the Start Menu > Search and open Apps & Features.
- Click on the Microsoft Visual C++ program(s) from the list individually.
- Select each program and click on Uninstall.
- Follow the on-screen instructions to complete uninstallation.
- Now, visit the official Microsoft website, and download the latest Microsoft Visual C++ Runtime.
- Once done, install VCRedist on your computer.
- Then visit the official .NET Framework site and download the latest installer.
- Run the installer and complete the installation process.
- Finally, restart the system to change effects.
That’s it, guys. We assume this guide was helpful to you. For further queries, you can comment below.
Also Read
