The Elder Scrolls Online also known as ESO, is a massively multiplayer online role-playing game that has been developed by ZeniMax Online Studios and published by Bethesda Softworks. You can easily join over 22 million players in the award-winning online multiplayer RPG to get into the limitless adventure of the Elder Scrolls world. Just battle, craft, steal, explore, and have different abilities. Meanwhile, several players facing the Elder Scrolls Online Not Enough Space Error.
Whenever players try to download and install The Elder Scrolls Online on the PC via Steam, the specific ‘DOWNLOADERROR_NOTENOUGHSPACE’ error indicates there is a low storage space on their hard drive. Now, if you’re continuously getting this error then don’t worry. It seems that The Elder Scrolls Online client requires at least 95GB of free storage space on the Windows computer and at least 135GB on the Mac to completely install the operations.

Page Contents
Fix: Elder Scrolls Online Not Enough Space Error
It’s also worth mentioning that 15% of the hard drive space should be free or empty after installing the game to run it smoothly. Luckily, there are a couple of possible workarounds mentioned below that should come in handy. Make sure to follow all methods until the problem has been fixed. So, without further ado, let’s jump into it.
1. Restart the PC
You should restart the PC manually to ensure there is no issue with the system performance or any kind of temporary glitches whatsoever.
2. Run Steam as an Administrator
Make sure to run the Steam client on the PC as an administrator to allow the system admin permission. It’ll ensure that the application will run smoothly without any admin permission issues.
- Right-click on the Steam app on your PC.
- Select Properties > Click on the Compatibility tab.

- Click on the Run this program as an administrator checkbox to enable it.
- Once done, click on Apply > Click on OK to save changes.
3. Free Up the Storage Space
Another thing you should do is to simply free up the storage space on the PC (especially the game installation disk drive) to check if the problem has been fixed or not. The chances are high that somehow the low storage space before the game installation and even after installing the game on the computer. So, in both cases, unfortunate players are having some issues.
4. Update The Elder Scrolls Online
If you haven’t updated your game for a while then make sure to follow the steps below to check for updates and install the latest patch (if available). To do this:
For Steam:
- Open the Steam client > Go to Library.
- Click on The Elder Scrolls Online from the left pane.
- It’ll automatically search for the available update.
- If there is an update available, click on Update.
- Wait for some time to install the update.
- Once done, close the Steam client, and restart the PC.
For Epic Games Launcher:
- Open the Epic Games Launcher > Head over to Library.
- Now, click on the three dots icon next to The Elder Scrolls Online.
- Make sure the Auto Update option is turned on.
- Whenever the update is available, it’ll automatically install the update.
5. Verify the Integrity of the Game Files
In case, there is an issue with the game files and somehow it gets corrupted or missing then ensure to perform this method to easily check for the issue.
- Launch the Steam client > Click on Library.
- Right-click on The Elder Scrolls Online from the list of installed games.
- Now, click on Properties > Go to Local Files.

- Click on Verify Integrity of Game Files.
- You’ll have to wait for the process until it gets completed.
- Once done, just restart your computer.
For Epic Games Launcher:
- Open Epic Games Launcher > Go to Library.
- Click on The Elder Scrolls Online.
- Next, click on the three-dot icon next to the game.
- Select the Manage option > Click on the Verify option.
- Confirm the task and wait for it to complete.
- Once done, reboot the PC to apply changes.
6. Disable Antivirus
You’ll have to turn off the Windows Security protection to avoid multiple issues with The Elder Scrolls Online. Just follow the steps below:
- Press the Win+I keys to open Windows Settings.
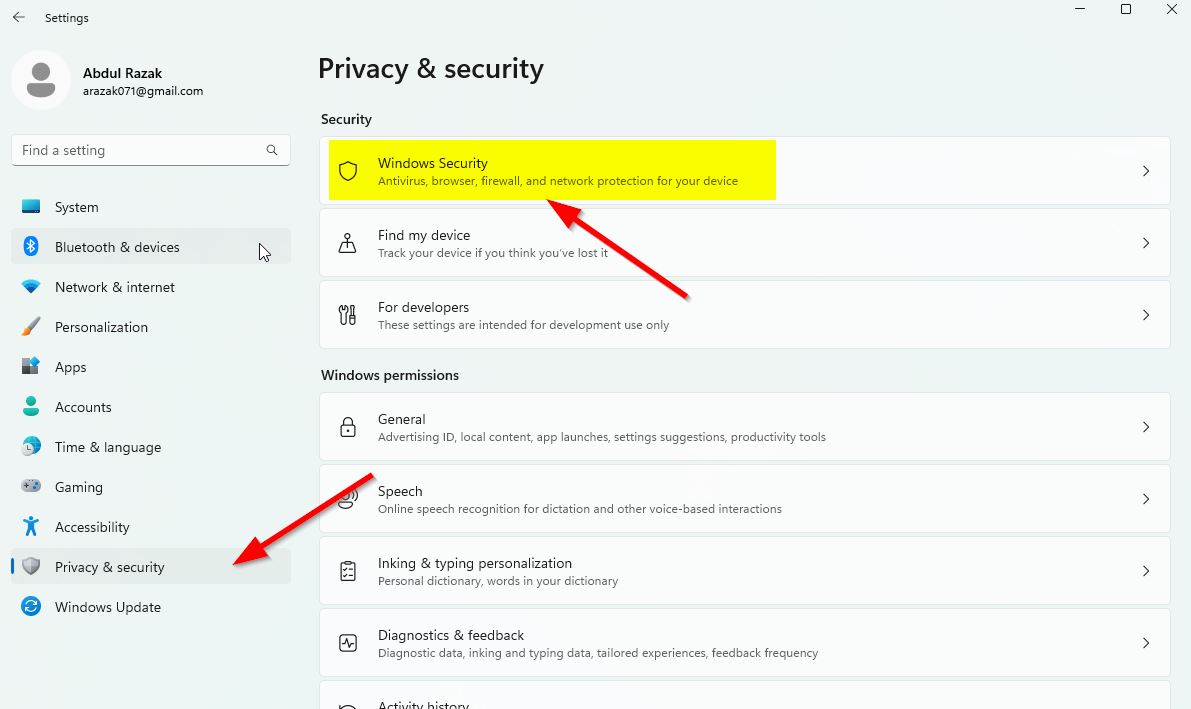
- Click on Update & Security > Click on Windows Security from the left pane.

- Now, click on the Open Windows Security button.
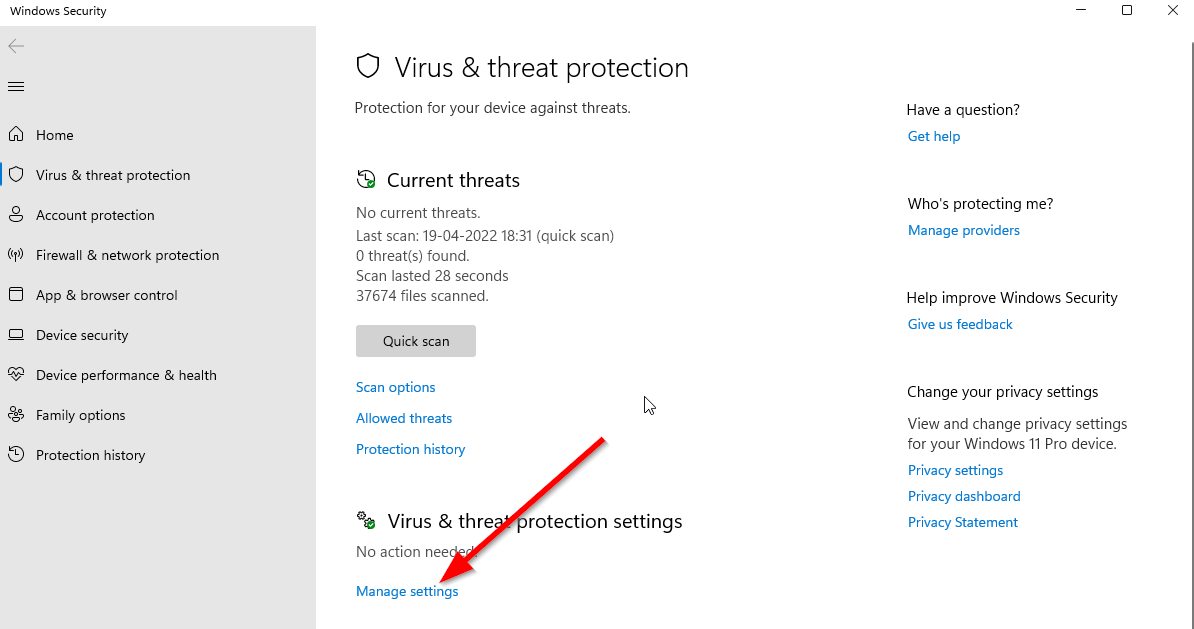
- Go to Virus & Threat Protection > Click on Manage settings.

- Next, you’ll need to turn off the Real-time protection toggle.
- If prompted, click on Yes to proceed further.
If you’re using a third-party antivirus software then try turning off the real-time protection manually to fix program blocking issues.
7. Turn Off Windows Firewall
The chances are high enough that maybe your default Windows Defender Firewall protection or any third-party antivirus program is preventing the ongoing connections or game files from running properly. So, make sure to temporarily disable or turn off the real-time protection and firewall protection. Then you should try running the game to check if The Elder Scrolls Online not enough space error on the PC issue has been fixed or not. To do this:
- Click on the Start Menu > Search for Windows Defender Firewall and open it.
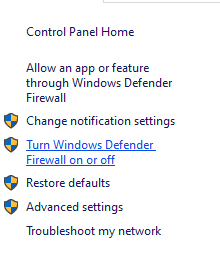
- Now, click on Turn Windows Defender Firewall on or off from the left pane.

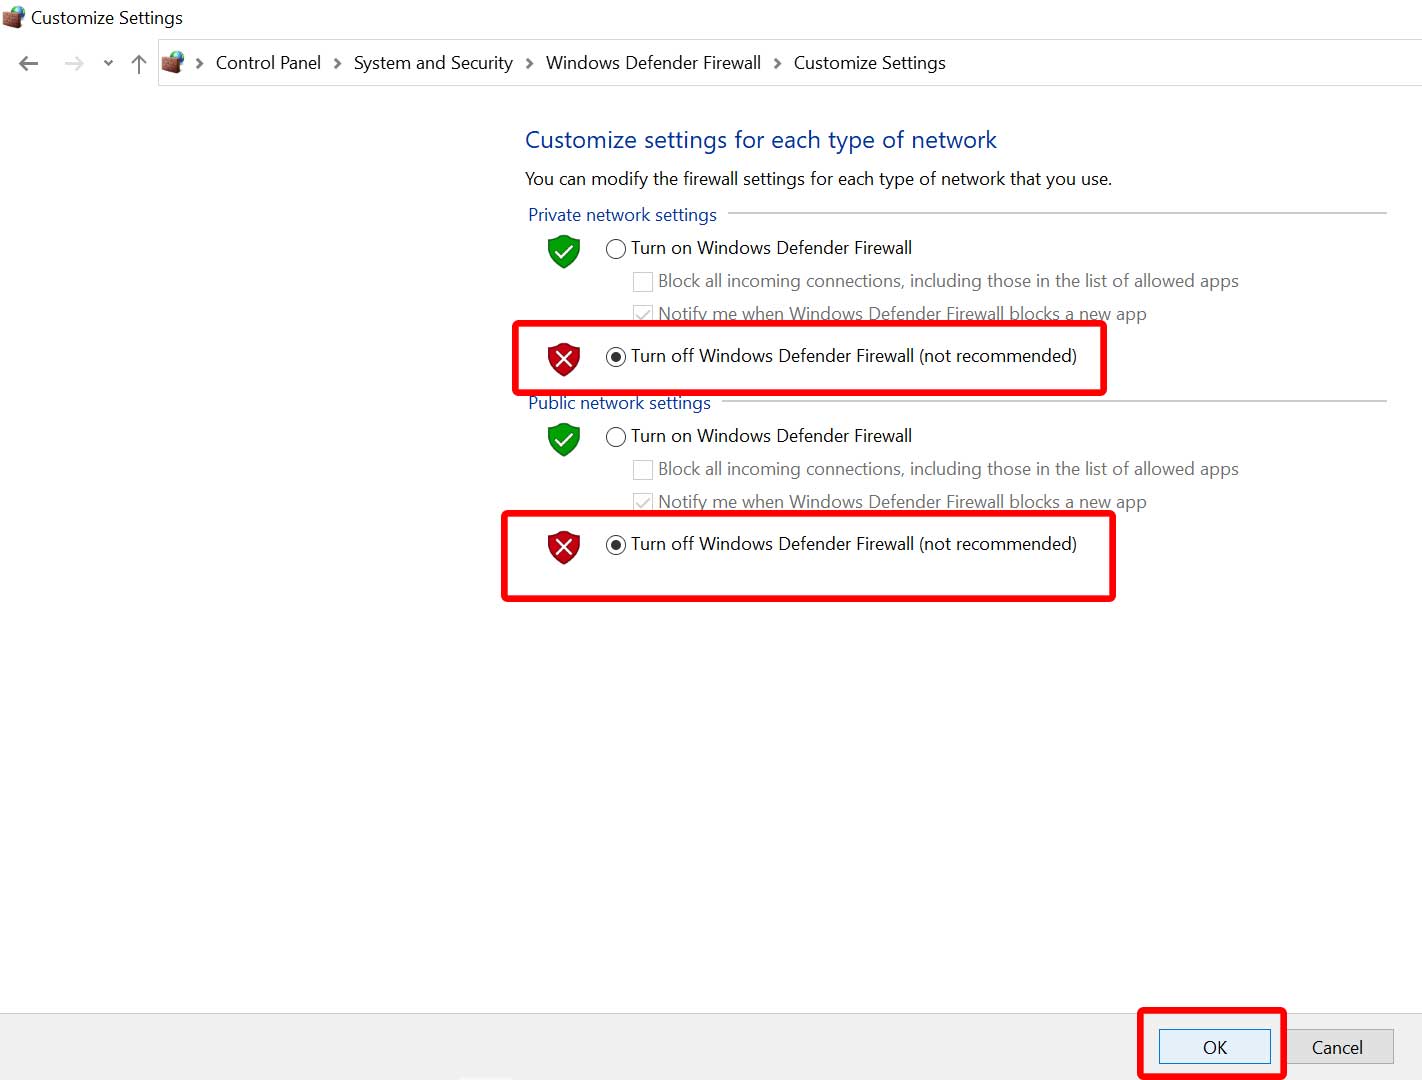
- Select the Turn off Windows Defender Firewall (not recommended) option for both the Private & Public Network Settings.

- Once selected, click on OK to save changes.
- Finally, restart your computer to apply the changes.
8. Delete the Local App Data folder
Make sure to delete the local app data folder of The Elder Scrolls Online game to check if the low space error is still bothering you or not. To do this:
- Press the Start menu > Copy and Paste %localappdata% on the search bar.
- Hit the Enter key to open the Local AppData folder.
- Locate and select The Elder Scrolls Online folder.
- Now, Delete the folder completely.
- Once done, restart the PC, and check for the issue again.
That’s it, guys. We hope this guide was helpful to you. For further queries, you can comment below.
