In this guide, I’m going to show you two ways to fix Windows 10 compressing files automatically on your computer. Now, this is not any kind of error. As You know the hard drives of Windows computers have a limited capacity.
Once the hard drive starts filling up, then automatically the system will compress the files. The scope of compression is local. That means if you copy the file to auxiliary storage the file won’t be compressed anymore but that’s not the case if you compress any file or folder using the ZIP file mechanism.
This is also known as NTFS file compression. The idea is to compress the files to make space in a hard disk drive that is already running short of storage. Users can stop the system from compressing their files to NTFS format. There are two methods to do that as I have mentioned earlier.

Page Contents
How To Fix: Files in Windows 10 Automatically Compressing
One of the methods to fix NTFS file compression is to make changes in the properties of the drive or file that Windows is compressing.
Secondly, you can also use the command prompt and issue commands. Using the commands you can compress single as well as multiple files and subfolders under a particular folder. I have explained the steps in detail. Check it out.
Fix Compression to NTFS in Windows 10 by Changing Drive Properties
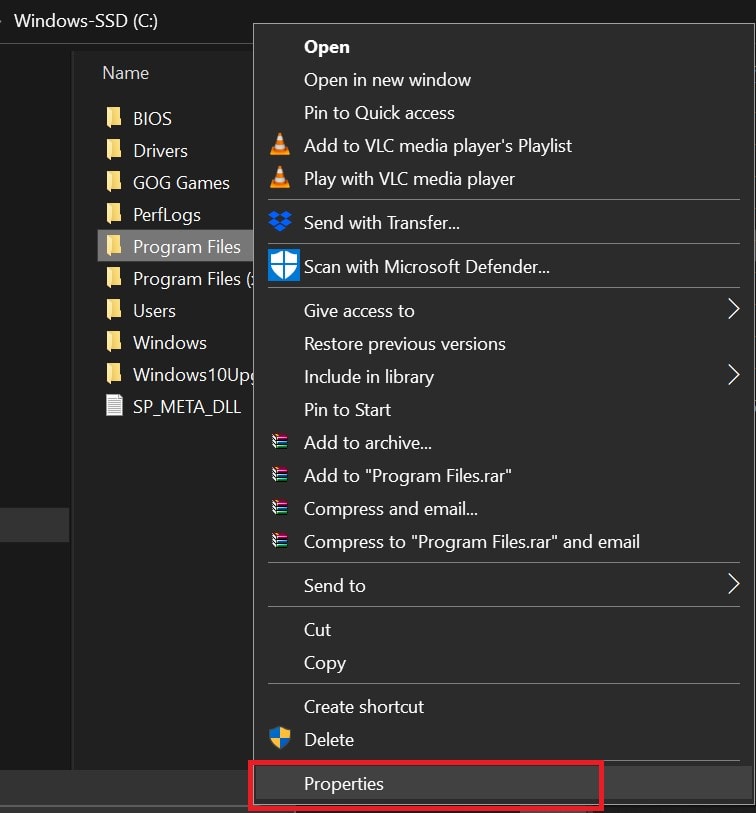
- Go to the drive that Windows is compressing into NTFS format
- Right-click on the folder/drive

- From the menu navigate to Properties
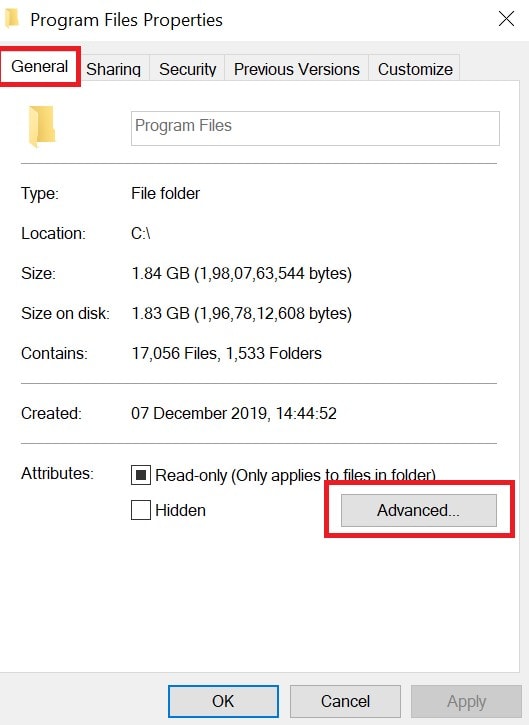
- Go to General

- Click on Advanced and go to Advanced Attributes
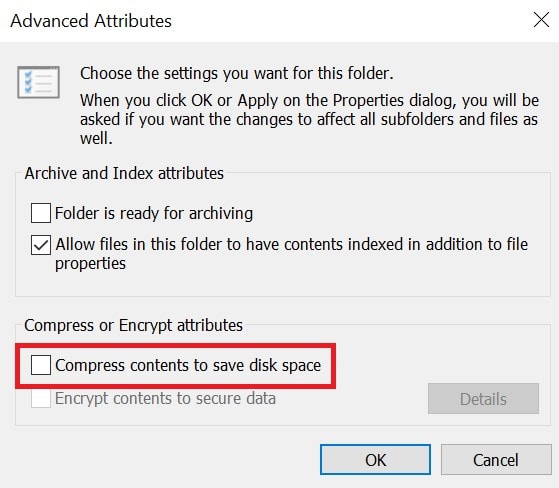
- Now navigate to Compress or Encrypt attributes

- Click to uncheck the checkbox Compress contents to save disk space
- Finally, click OK and click Apply
Can You Apply the Changes to Subfolders
Right before making the change a dialog box Confirm Attribute Changes will show up. It will provide you two options.
Uncompress only the selected folder or all other subfolders under the main folder. Select as per your requirement.
Fix Files Compressing Automatically Using Command Prompt
If you are a little bit tech-savvy, then you can use the Command Prompt to uncompress the files, folders, subfolders, and drives that Windows OS is compressing automatically.
- For uncompressing a single file, simply type compact /u filename
- To uncompress all the files in a folder compact /u *
- For uncompressing the current folder as well as its subfolders, give the following command compact /u /s *
Note: when you uncompress any drive folder, you would continue to run out of storage space of that drive as compressing would create some disk space. After uncompressing, that won’t be possible.
So, those are the two methods to fix automatic compressing of files and folders in Windows 10 due to the shortage of storage space in the hard drive.
