The online multiplayer game genre has its separate fanbase and, in the recent past, has seen tremendous growth in players. One of the popular games of this genre is Destiny 2, which came out in 2017 and is still a popular title among the masses. This first-person shooter game was developed by Bungie, and it was initially released for the two gaming consoles, Play Station 4 and Xbox One, in 2017 and later on saw release for Microsoft Windows. Destiny 2 is also now available on Google Stadia.
After the update, multiple PC gamers face issues with Destiny 2 games apart from crashes, lags, stutters, frame drops, and more. Multiple players face it regardless of whether the PC is powerful regarding Destiny 2 not launching or not loading issues on the Windows PC.
Also Read

Page Contents
- Destiny 2 Specs Requirement:
- Fix: Destiny 2 Not Responding or Loading on the PC
- 1. Run the Launcher as an Administrator
- 2. Update Graphics Drivers
- 3. End Background Processes
- 4. Disable Steam Overlay
- 5. Disable Steam Input
- 6. Run the game in Windowed Mode
- 7. Disable DirectX 12
- 8. Set Correct Rendering Device
- 9. Disable Multi-Threaded Rendering
- 10. Turn Off Antivirus Protection
- 11. Repair Game Files
- 12. Update Destiny 2
Destiny 2 Specs Requirement:
| Operating System | Windows 7, 8, or Windows 10 64-bit |
| Processor | Intel Core i3 3250 3.5 GHz / AMD FX-4350 4.2 GHz |
| Graphics | NVIDIA GeForce GTX 660 2GB / AMD Radeon HD 7850 2GB |
| Memory | 6 GB RAM |
| Storage | 104GB Free Space |
| Network | Broadband Internet connection |
Fix: Destiny 2 Not Responding or Loading on the PC
Luckily, some possible workarounds are mentioned below to fix the easily won’t launch or not loading issue. So, without wasting any more time, let’s jump into it.
1. Run the Launcher as an Administrator
First, you should try running the game launcher as an administrator on Windows to allow the launcher program and the game files to run properly. Not running the game or client as an administrator, you may find it pretty difficult to avoid crashes or not launching issues that require UAC (User Account Control) access. Ensure to follow the steps below to do so:
- Right-click on Steam/Epic Games Launcher exe shortcut file on your PC.
- Now, select Properties > Click on the Compatibility tab.

- Make sure to click on the Run this program as an administrator checkbox to checkmark it.
- Click on Apply and select OK to save changes.
- Now, you can just double-click on the game exe file to launch it.
You can also do the same steps for the Destiny 2 game executable file to ensure the game application has UAC access.
2. Update Graphics Drivers
Make sure to update your graphics driver on the PC because an outdated GPU driver may trigger multiple issues with the game launching. You should try checking the graphics driver update and installing it (if available). To do that:
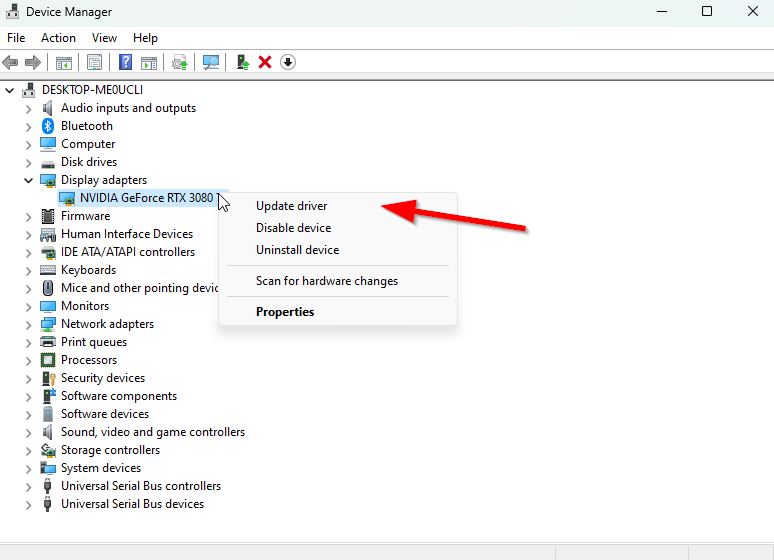
- Right-click on the Start Menu to open up the Quick Access Menu.
- Click on Device Manager from the list to open the interface.
- Now, you’ll need to double-click on Display adapters to expand it.

- Then right-click on the dedicated graphics card that’s active.
- Next, click on Update driver > Choose Search automatically for drivers.
- The system will automatically check for the available update.
- An update will automatically download and install the latest version if available.
- Once done, make sure to restart your PC to apply the changes.
If you can’t find any update, you can go to the official graphics card website and manually search for the update. If in case, a new version is available, just download the file on your PC and install it. You can find out the official manufacturer’s website link below.
3. End Background Processes
Make sure to end the background process on your system because unnecessary tasks can easily trouble the resource-hungry applications to run properly. If in case, your system becomes laggy or slow, the system resources are getting low at that moment. To remove unwanted processes:
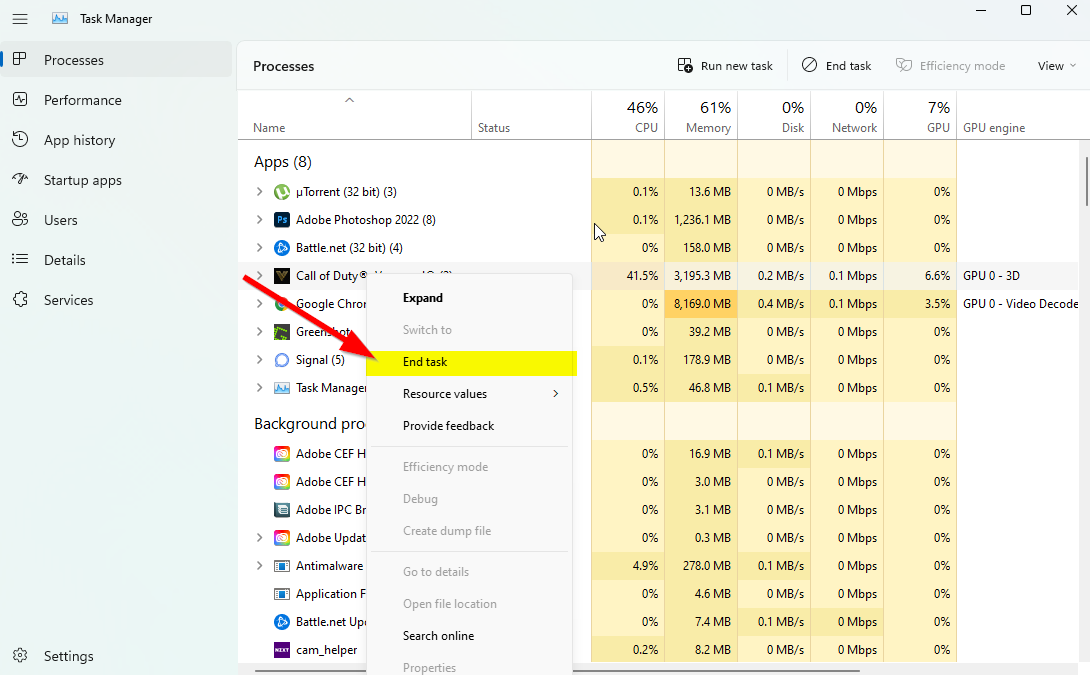
- Press Ctrl + Shift + Esc shortcut keys on the keyboard to open Task Manager.

- Click on the Processes tab > Make sure to select the task you want to close individually.
- Then click on End Task to close it.
- As mentioned, do the same steps for each task that you want to close.
- Once done, close the Task Manager window, and restart your PC.
4. Disable Steam Overlay
Multiple affected players have started reporting that Steam overlay is running in the background which is troubling a lot. In-Game overlay apps may consume higher system resources which can easily trigger issues with the game launching.
- Open the Steam client > Go to Library.
- Now, right-click on Destiny 2 > Select Properties.
- Head over to the General section > Here just uncheck the Enable the Steam Overlay while in-game checkbox.
- Go back to Library > Launch Destiny 2 to check if the game is still not launching.
5. Disable Steam Input
A couple of players did find this trick useful to simply disable the Steam Input option by following the steps below. It somehow fixes the game not launching or stuck at the loading screen issue. To do that:
- Launch the Steam client > Go to Library.
- Right-click on Destiny 2 > Click on Controller.
- Set ‘OVERRIDE FOR Destiny 2’ to ‘Disable Steam Input’.
- Finally, you should try launching the game again to check for the issue.
6. Run the game in Windowed Mode
If in case, the game seems to crash a lot then you can try setting up the Display Mode to Windowed from Full Screen. To do that:
- Click on the Windows icon to open the Start Menu > Type %LOCALAPPDATA% on the search bar and open it.
- Go to the %LOCALAPPDATA% folder > Search for the ‘Prospect’ folder.
- Open the mentioned folder and go to the Saved > Config > WindowsNoEditor directory.
- Under the WindowsNoEditor folder, you’ll find a file called ‘GameUserSettings’.
- Open the user settings file using any text editor > Set ‘FullscreenMode=1’ to ‘FullscreenMode=0’ to save changes.
- Finally, try launching the game again to check for the issue.
7. Disable DirectX 12
If you use DirectX 12 on the PC, you can try turning it off. As the DirectX 12 version is the latest one available for Windows, it may be possible that your PC configuration isn’t capable of running it. To turn it off:
- Just head over to Settings > Video > Set ‘Enable DX12’ to ‘Off’.
- Restart Destiny 2 game after applying changes.
8. Set Correct Rendering Device
Make sure to select the correct rendering device from the game settings menu that you can find below. To do so:
- Open the Steam client and then launch Destiny 2 game > Go to the Video Settings menu from the game.
- Go to ‘Selected Rendering Device’ > Select your dedicated GPU. [Do not leave it to ‘Default’]
- Once done, reboot the game to save changes.
9. Disable Multi-Threaded Rendering
It seems that the in-game video settings menu in Destiny 2 title has a multi-threaded rendering option enabled, somehow conflicting with the game crashing quite often. Make sure to disable the multi-threaded rendering option from the game menu to try resolving the issue. If using an AMD processor, turn it off and reboot the game to apply changes.
10. Turn Off Antivirus Protection
You should try turning off the Windows Defender protection on your PC to ensure no antivirus software is blocking the game files from running properly. To turn it off:
- Press Windows + I shortcut keys to open the Windows Settings menu.
- Click on Update & Security > Click on Windows Security from the left pane.
- Now, click on the Open Windows Security button.
- Go to Virus & threat protection > Click on Manage settings.
- Next, you’ll need to turn off the Real-time protection toggle simply.
- If prompted, click on Yes to proceed further.
If you’re using any other antivirus program on your PC, then turn it off. However, if you’re not interested in disabling the antivirus software on the PC, you can just whitelist the game files to the antivirus software. To do that:
- Open the Steam client > Go to Library.
- Click on Destiny 2 from the list of installed games.
- Now, click on the Settings icon next to Destiny 2 game page.
- Click on Manage > Go to Browse local files.
- Next, open the Prospect folder > Binaries > Win64.
- You’ll find out a file ‘Prospect-Win64-Shipping’ under the Win64 folder.
- Make sure to click to select the file and then add it to the list.
- You’re good to go.
11. Repair Game Files
A corrupted or missing games files on the PC can eventually trigger multiple issues with the game launching or performance whatsoever. To do so:
For Steam:
- Launch the Steam client > Click on Library.
- Right-click on Destiny 2 from the list of installed games.
- Now, click on Properties > Go to Local Files.

- Click on Verify Integrity of Game Files.
- You’ll have to wait for the process until it gets completed.
- Once done, just restart your computer.
For Epic Games Launcher:
- Open the Epic Games Launcher > Click on Library.
- Click on the three-dots icon of Destiny 2.
- Click on Verify, and it’ll start verifying the game files.
- Wait for the process to complete and restart the launcher.
- It should fix Destiny 2 Crashing issue on your PC.
12. Update Destiny 2
If none of the methods worked for you, check for Destiny 2 game update because an outdated game version can have bugs or stability issues. So, if you haven’t updated your game for a while, then follow the steps below to check for updates and install the latest update.
For Steam:
- Open the Steam client > Go to Library > Click on Destiny 2 from the left pane.
- It’ll automatically search for the available update. If there is an update available, make sure to click on Update.
- Wait some time to install the update > Close the Steam client.
- Finally, reboot your PC to apply changes and launch the game again.
For Epic Games Launcher:
- Open the Epic Games Launcher > Head over to Library.
- Now, click on the three dots icon of Destiny 2.
- Make sure the Auto Update option is turned on.
That’s it, guys. We assume this guide was helpful to you. For further queries, you can comment below.
