Football Manager 2022 is a football-management simulation video game that has been developed by Sports Interactive and published by Sega in November 2022. It has been released for Android, macOS, Xbox One, iOS, Windows, etc platforms. The title has received plenty of positive reviews on Steam but some players are unfortunate enough to encounter the Football Manager 2022 DXGI ERROR DEVICE REMOVED Error on the Windows PC.
Now, if you’re also one of them, make sure to follow this troubleshooting guide to easily fix such an issue. The DXGI ERROR DEVICE REMOVED error is most probably a DirectX-related error and it’s causing some issue with the active graphics card on your desktop/laptop. Somehow either the DirectX version is outdated or corrupted or there is an issue with the graphics card during running the program.
Also Read
Page Contents
- Fix Football Manager 2022 DXGI ERROR DEVICE REMOVED Error
- 1. Check Minimum System Requirements
- 2. Run DirectX Diagnostic Tool
- 3. Update DirectX
- 4. Update Graphics Driver
- 5. Update Windows
- 6. Verify Integrity of Game Files on Steam
- 7. Install Microsoft Visual Studio
- 8. Update the Game
- 9. Set Low Configuration (Intel GPU)
- 10. Disable Overclocking of GPU
- 11. Adjust V-Sync from Nvidia Control Panel (Nvidia GPU)
- 12. Choose High-Performance Nvidia Processor
- 13. Send GPU Dump file to Sega Support
Fix Football Manager 2022 DXGI ERROR DEVICE REMOVED Error
If you’re receiving this error message consistently then the chances are high enough that your graphics card is either overclocked or your PC configuration isn’t meeting the minimum system requirements of the Football Manager 2022 game. So, without wasting any more time, let’s jump into the guide below.
1. Check Minimum System Requirements
It’s always recommended to check out the minimum system requirements of the game with your PC configuration whether the problem is arising due to the compatibility issue or not. Sometimes having issues with the PC configuration or lower hardware specs can cause such DirectX-related issues whatsoever.
- Requires a 64-bit processor and operating system
- OS: Windows 7 (SP1), 8/8.1, 10 (Update 1903/May 2019 or later) – 64-bit
- Processor: Intel Core 2 or AMD Athlon 64 – 1.8 GHz+
- Memory: 4 GB RAM
- Graphics: Intel GMA X4500, NVIDIA GeForce 9600M GT or AMD/ATI Mobility Radeon HD 3650 – 256MB VRAM
- DirectX: Version 11
- Storage: 7GB of available space
2. Run DirectX Diagnostic Tool
You should also check whether your DirectX version is running at the latest version or not. To do so:
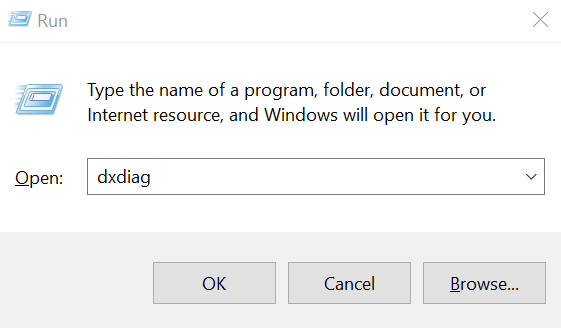
- Press Windows + R keys to open the Run dialog box.
- Now, type dxdiag and hit Enter to open DirectX Diagnostic Tool.
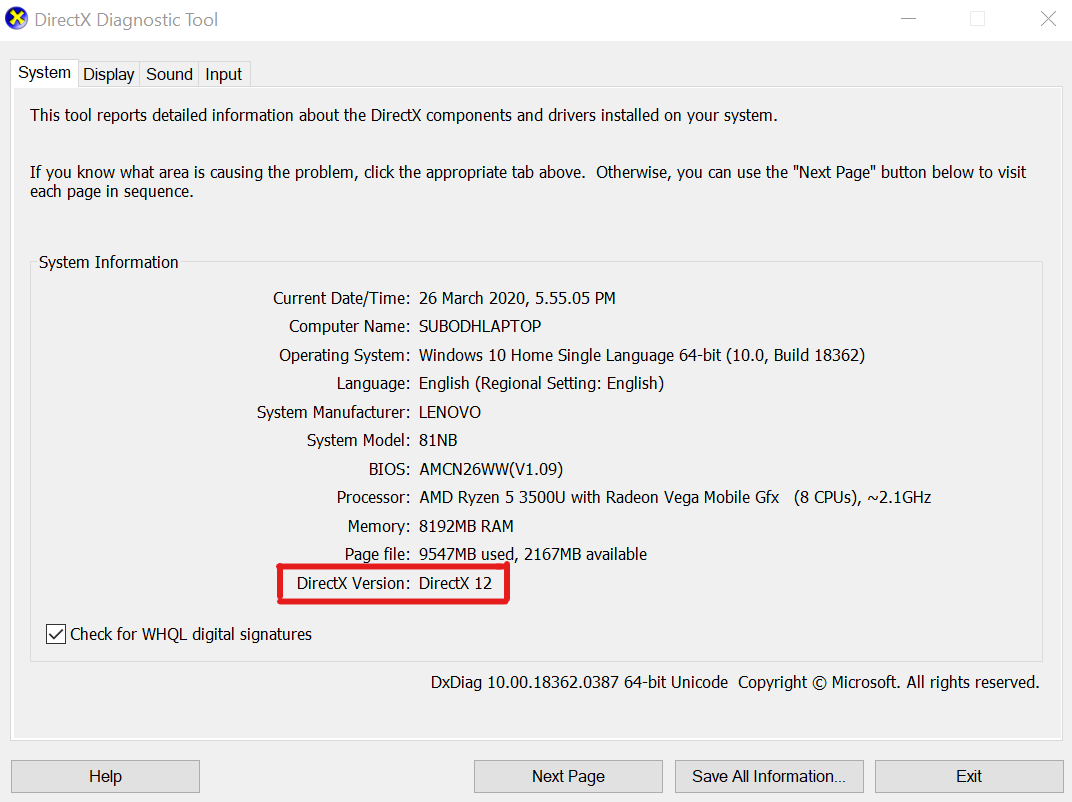
- Once the DirectX Diagnostic Tool window opens, you can check out the DirectX version from the System tab.
- Navigate to the Display tab > Here you can additionally check DirectX 3D Feature Levels and other DirectX Features too.
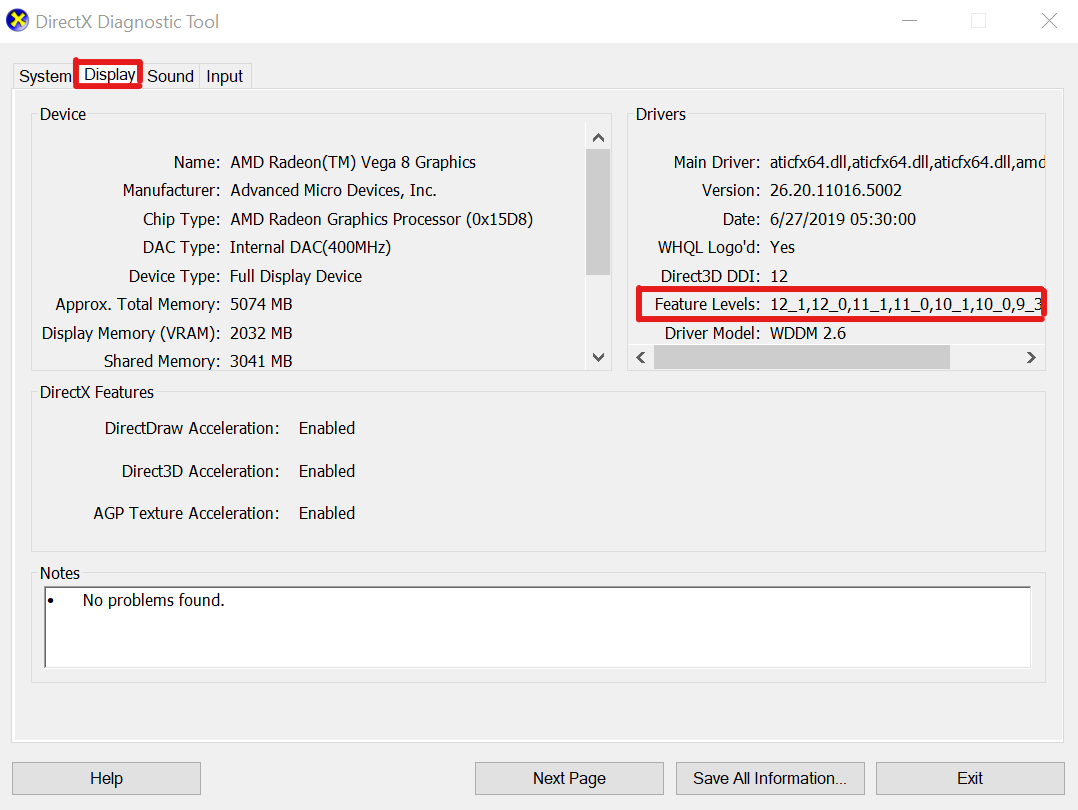
If it shows lower than the DirectX version 11 then you should try following the next methods one by one.
3. Update DirectX
It’s worth mentioning to try updating the DirectX version on your computer to fix the issue. Just head over to the Microsoft website and download the DirectX End-User Runtime Web Installer file. Then simply install it on your system as usual.
4. Update Graphics Driver
The chances are also high that your graphics driver is outdated for a while or somehow gets corrupted. So, it’s always better to update the GPU driver on your Windows computer to ensure there is no issue with the GPU driver whatsoever.
- Press Windows + X keys to open the Quick Start Menu.
- Now, click on Device Manager from the list > Double-click on Display adapters.
- Right-click on the dedicated graphics card that’s active.
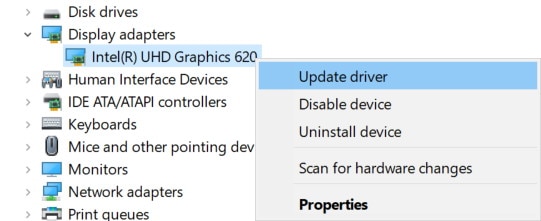
- Click on Update driver > Select Search automatically for drivers.
- If there is an update available, it’ll automatically download & install the latest version.
- Once done, make sure to manually reboot the system to change effects immediately.
5. Update Windows
Sometimes having an outdated Windows OS build can also cause several issues with the program launching. It’s a good idea to simply check for Windows updates and install them (if available). To do this:
- Press Windows + I keys to open Windows Settings.
- Now, click on Update & Security > From the Windows Update section, click on Check for updates.
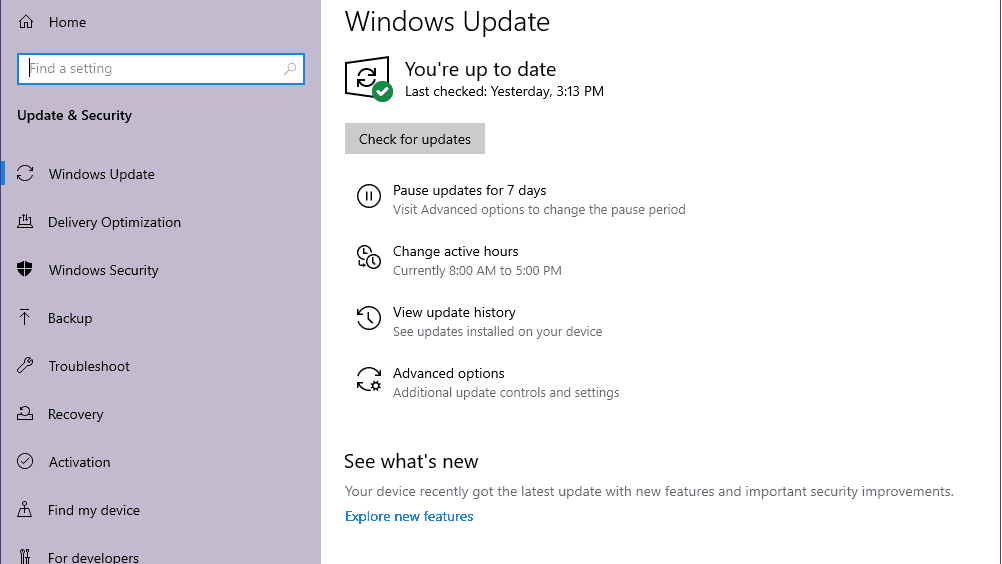
- If there is an update available, you can click on Download and Install.
- Wait for the process to complete the installation.
- Once done, make sure to reboot your computer to apply changes.
6. Verify Integrity of Game Files on Steam
You should always check for the integrity of game files on the Steam client and try repairing the corrupted or missing files. To do this:
- Open the Steam client > Go to Library.
- Right-click on Football Manager 2022 from the list of installed games.
- Then click on Properties > Navigate to Local Files.

- Click on Verify Integrity of Game Files > Now, wait for the verification process to be completed.
- Once done, make sure to reboot the PC to apply changes.
7. Install Microsoft Visual Studio
You should also try installing or updating the Microsoft Visual Studio on the Windows PC to fix any kind of potential Microsoft .NET or Microsoft Visual C++ Redistributables file issues.
8. Update the Game
It’s needless to update the game to check for the issue. Sometimes the current version of the game may have some bugs or stability issues that should be fixed with a new patch update. To do so:
- Open the Steam client > Go to Library.
- Click on Football Manager 2022 from the left pane.
- It’ll automatically search for the available update. If there is an update available, make sure to click on Update.
- Wait for the update process to complete > Then make sure to reboot the PC to change effects.
9. Set Low Configuration (Intel GPU)
If you have an Intel processor with low specifications (Intel Celeron/Pentium Nxxx series with below 2.2Ghz) then make sure to set a low configuration on the PC and then try launching the game by following the steps below:
- Open the Steam client on your PC > Go to your Games Library.
- Right-click on Football Manager 2022 from the list of the installed games list.
- Click on Properties > Select General > Click on Set Launch Options.
- Then make sure to type the specific command-line argument in the box: –config very_low
- Finally, click on OK to save changes > Close the window and launch Football Manager 2022 again using Steam.
10. Disable Overclocking of GPU
The chances are high that your graphics card is overclocked and that’s why during launching the Football Manager 2022 game, the DXGI ERROR DEVICE REMOVED Error is appearing to you. In that scenario, it’s worth mentioning that disabling the GPU overclocked feature manually using MSI Afterburner or RivaTuner or Nvidia Inspector or EVGA Precision X tools, etc.
11. Adjust V-Sync from Nvidia Control Panel (Nvidia GPU)
Try adjusting the vertical sync option on your Windows computer to simply fix the compatibility or game running issues whatsoever. To do so:
- Open the Nvidia Control Panel menu > Click on Manage 3D Settings.
- Select Program Settings > Choose the Football Manager 2022 game from the list.
- If in case, the game file isn’t available there, you’ll need to add it manually.
- Once the game is added to the list, make sure to set the Vertical Sync option to ‘Adaptive half refresh rate’.
- Ensure to save changes and then restart the game > Now, disable the in-game vertical sync option from the in-game graphics menu.
- You’ll also have to set Fullscreen for the display mode to apply changes.
12. Choose High-Performance Nvidia Processor
- Right-click on your PC desktop screen > Select ‘NVIDIA Control Panel’ from the context menu.
- Under Select a Task, choose to ‘Manage 3D Settings’.
- Now, navigate to the ‘Global Settings’ tab > Choose ‘High-performance NVIDIA processor’ under the preferred graphics processor drop-down menu.
- Make sure to save changes and reboot the system.
13. Send GPU Dump file to Sega Support
If you have an NVIDIA graphics card and you’re still facing issues with the DXGI ERROR DEVICE REMOVED Error then you should collect the GPU dump file in your crash dumps folder called “GPU_Info_[version].gpudump”, and send it to Sega Support for further assistance on it. To do so:
- Head over to the C:\Users\Your Windows Username\Documents\Sports Interactive\Football Manager 2022\crash dumps file location on your PC.
- Copy the file and attach it to the Sega Support ticket with your problem so that the team can go through the potential issue.
That’s it, guys. We assume this guide was helpful to you. For further queries, you can comment below.
