Minecraft is a 3D sandbox simulation video game by Mojang Studios and Xbox Game Studios where players can create and break blocks in a seamless virtual world. There are two game modes Survival and Creative. All in all, players need to collect food & building supplies, interact with block-like creatures, survive actions, and more. Though it’s been more than a decade since this title was in the market, some players find it difficult. While the Minecraft GLFW Error 65542 (Driver Does Not Support OpenGL) bother players a lot.
Popular games like Minecraft are one of them to deal with GLFW Error 65542 which indicates the driver does not support OpenGL. To be precise, the error message says “GLFW Error 65542: WGL: The driver does not appear to support OpenGL. Please make sure you have up-to-date drivers (see aka.ms/mcdriver for instructions).” So, this is a commonly known issue among Minecraft (Jave Edition) players which appears on the screen pop-up whenever they start the Minecraft Launcher.
It basically suggests you update the graphics card driver to the latest version possible to avoid the OpenGL compatibility issue depending on which graphics card model you’re using. However, the chances are high that somehow the outdated game patch version, an outdated Windows version, graphics driver-related installation issues, stability or compatibility issues with the installed GPU drivers, conflicts with the opengl32.dll file, and more can be reasons behind the GLFW Error 65542 with Minecraft.

Page Contents
- Fix Minecraft GLFW Error 65542 (Driver Does Not Support OpenGL)
- 1. Restart the PC
- 2. Restart the Minecraft Launcher
- 3. Check for System Requirements
- 5. Check for Optional Updates
- 6. Update Graphics Drivers
- 7. Grab the latest Java Edition
- 8. Replace the ‘opengl32.dll’ File
- 9. Update Minecraft
- 10. Reinstall the Graphics Driver
- 11. Reinstall Minecraft
- 12. Try Installing a Different Version of Minecraft
Fix Minecraft GLFW Error 65542 (Driver Does Not Support OpenGL)
Although you don’t actually require OpenGL to run Minecraft, having the same might help in improving the overall graphics experience in the gameplay for some players. If you’re sure about OpenGL then make sure your graphics card is compatible with it to avoid errors while running the Minecraft game. Fortunately, here we’ve shared with you some potential workarounds that should come in handy. Make sure to follow all troubleshooting methods until the error is gone. So, without further ado, let’s jump into it.
1. Restart the PC
First, you should reboot the PC after closing the game to ensure there is no issue with the temporary glitch or cache data. It might not be helpful for everyone but you should try it out. Some PC gamers have found this trick useful.
2. Restart the Minecraft Launcher
You should also try closing the Minecraft Launcher and restarting the same. It might allow the system to run the Minecraft Launcher without any residual task running in the background. To do so:
- Press the Ctrl+Shift+ Esc keys to open Task Manager.
- Click on the Processes tab > Select the minecraftlauncher.exe or javaw.exe task.
- Now, click on End Task to close it.
- Finally, open the Minecraft launcher, and check for the issue again.
3. Check for System Requirements
Another thing you should do is to check for the system requirements of Minecraft to ensure there is no issue with the compatibility between the game & PC specs at your end. Sometimes an outdated graphics driver or an incompatible graphics card can also trouble you a lot.
| Hardware | Required Specification | Recommended Specification |
| CPU | Intel Core i3-4150 or Intel Celeron N4100 / AMD A8-6600K | Intel Core i7-6500U / AMD FX-4100 |
| RAM | 2 GB | 8 GB |
| GPU | Integrated: Intel HD Graphics 4400 or AMD Radeon R5 series with OpenGL 4.4
Discrete: Nvidia GeForce 400 Series or AMD Radeon HD 8000 series with OpenGL 4.4 |
Discrete: Nvidia GeForce 940M or Radeon HD 7750 |
| HDD | Minimum of 2 GB for game core, maps, and other files | 4 GB |
4. Update Windows
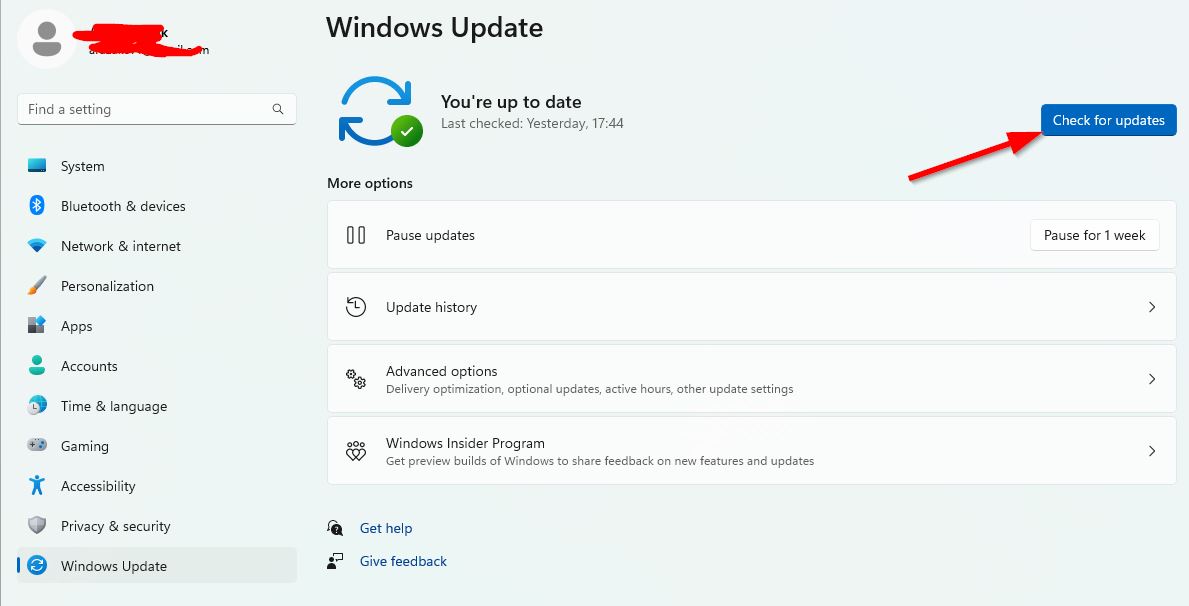
It’s recommended to check for system updates on the Windows PC before getting into any other workarounds. Sometimes an outdated system build can cause several issues.
- Press the Win+I keys to open Windows Settings.
- Click on Update & Security.
- Select Check for updates under Windows Update.

- If there is a feature update available, select Download and Install.
- Wait until the software update is complete.
- Once done, restart your computer to apply changes.
5. Check for Optional Updates
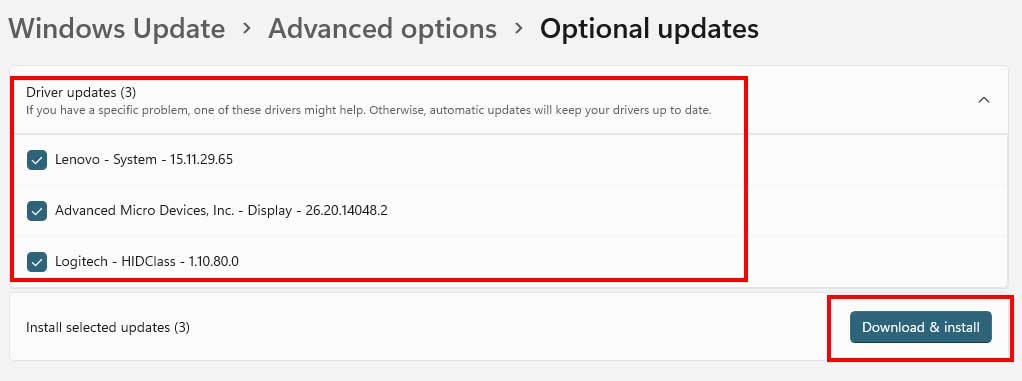
Additionally, you should also check for the optional updates by following the steps below because sometimes a couple of driver updates or security patch updates might appear here that can help you to fix several bugs or issues whatsoever.
- Press the Win+I keys to open Settings.
- Click on Windows Update > Click on Advanced Options.
- Scroll down to locate Additional options.

- Click on Optional updates > If there is an update available, you can select the update.
- Now, click on Download & Install > Wait some time to update it.
- Finally, reboot the system manually.
6. Update Graphics Drivers
Sometimes issues with the graphics card driver such as an outdated driver or corrupted driver on the system can eventually trigger multiple conflicts while playing video games. It’s suggested to check for the graphics driver and install the latest driver version.
Recommended Update:
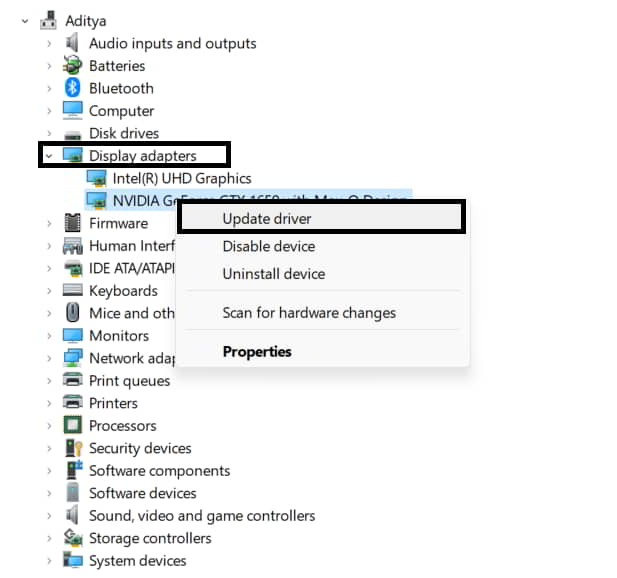
- Press the Win+X keys > Click on Device Manager from the list.
- Double-click on Display Adapters.
- Right-click on the dedicated graphics card that you use.

- Select Update Driver > Click on Search automatically for drivers.
- If there is an update available, it’ll automatically download & install the latest version.
- Once done, restart the computer to apply changes.
Manual Update:
If you can’t find any pending updates, head over to the official website of the respective graphics card brand below and search manually for the latest update. Do remember that you’ll always have to search for the latest driver version and specific for the model you’re using. If a new version is available for the graphics card, download the driver and install it on your PC. You can jump to the link below to do so:
7. Grab the latest Java Edition
It’s also recommended to download the Java 21 version on your PC and then install it to fix multiple issues with the graphics driver or OpenGL. To do so:
- Open the link and download the standard installer package file.
- Now, run the package file as an administrator.
- From the Java Setup wizard window, click on Next > Click on Next again.
- Once done, click on Close to exit the window.
You’ve now successfully installed or updated the Java version on your Windows. You should be able to open the Minecraft server from now on. However, if this method doesn’t work for you, try following another method below.
8. Replace the ‘opengl32.dll’ File
‘OpenGL32.dll’ is a DLL extension file that comes under OpenGL and can be used for rendering 2D or 3D graphics. In some cases, the OpenGL32.dll may get corrupted due to unexpected reasons and you’ll have to download & replace the file in the directory to avoid GLFW Error 65542 (Driver Does Not Support OpenGL) error. To do so:
- Download the DLL file manually from this link.
- Scroll down a bit and click on the Download button.
- Once downloaded, go to the Downloads folder.
- Now, right-click on the ZIP folder > Click on Extract to Opengl32.dll.
- Once extracted, head over to the specific folder.
- Then press the Ctrl+C keys to copy the OpenGL32.dll file.
- Next, go to the
C:\Program Files\Java\jdk-16.0.2\binpath. - Press the Ctrl+V keys to paste the copied file.
- Click on Continue (if prompted).
- Once done, launch Minecraft, and see if the error still appears.
9. Update Minecraft
You should also check for the Minecraft game updates directly from the Microsoft Store application on your computer to ensure there is no issue with the game version. An outdated game version may trigger multiple issues with the game launching or server connectivity whatsoever. To do so:
- Open the Microsoft Store App > Click on Library.
- Now, click on Get Updates to install all the available app updates.
- Wait for the update process as it may take some time.
- You’ll need to ensure you have a working internet connection.
- Once done, reboot the PC to apply changes.
10. Reinstall the Graphics Driver
It’s better to manually download the latest version of the graphics driver and install it directly from the official website respective to your graphics card manufacturer. Nvidia graphics card users can update the GeForce Experience app via the Nvidia official site. Meanwhile, AMD graphics card users can visit the AMD website for the same. Now, follow the steps below to uninstall and reinstall the driver.
- Right-click on the Start Menu > Open Device Manager.
- Now, double-click on Display Adapters.
- Then right-click on the dedicated graphics card.
- Select Uninstall device > If prompted, click on Uninstall again to confirm the task.
- Wait for the uninstallation process to be completed.
- Once done, make sure to reboot the PC to apply changes.
- Finally, head over to the downloaded graphics driver file and install it manually.
11. Reinstall Minecraft
If the above workarounds didn’t help then make sure to uninstall and reinstall the Minecraft game on the Windows system by following the steps below.
- Press the Win+R keys to open the Run dialogue box.
- Now, type %appdata% and hit Enter to open the AppData folder.
- Navigate to the Minecraft folder.
- Ensure to copy-paste the Minecraft folder to a different location as a backup.
- Then select the folder content and hit Delete to remove all files.
- Next, press the Win+R keys again to open the Run dialogue box.
- Type %temp% and hit Enter to open the location of the Temporary files.
- Select all files and Delete all of them. [If some files won’t be deleted, just skip them].
- Go to the Start menu > Search and open Control Panel.
- Click on Uninstall a program.
- Now, click on Minecraft and select Uninstall.
- Follow the on-screen instructions to complete the uninstallation process.
- Restart the PC to apply changes.
- Download and Reinstall Minecraft from the official Mojang website.
- Finally, run Minecraft again.
12. Try Installing a Different Version of Minecraft
Last but not least, if the error persists then make sure to install a different Minecraft version on your PC by following the steps below. It might also help in fixing the OpenGL error up to some extent.
- To install the previous version of Minecraft, open the TL Launcher.
- Select the previous Minecraft version (older than what you’re using).
- Click on Install and wait for it to complete.
- Once done, run the game to check for the issue.
That’s it, guys. We hope this guide was helpful to you. For further queries, you can comment below.
