Audio is an important factor in shaping your gaming experience. It doesn’t matter whether you are a pro or noob. You definitely require to hear the sounds of the game to be able to properly play it. However, if there are problems with the audio driver, then you won’t be able to hear the sound. Today, I will explain how to fix the Nvidia Virtual Audio Device issue.
You can try to uninstall and reinstall the driver. Also, you can try to integrate the GeForce Experience application into the Nvidia GPU. I have explained both of these methods in this guide and how you should do it. Keep following this article to know more about that.
Also Read

Page Contents
How to Fix Nvidia Virtual Audio Device (Wave Ex) Driver Issue
We will start with uninstalling the Nvidia driver from the PC. To do it we have to boot the computer using the safe boot.
Uninstalling the Nvidia Driver
- Open the run application dialog box by pressing Windows + R key
- type msconfig > click OK
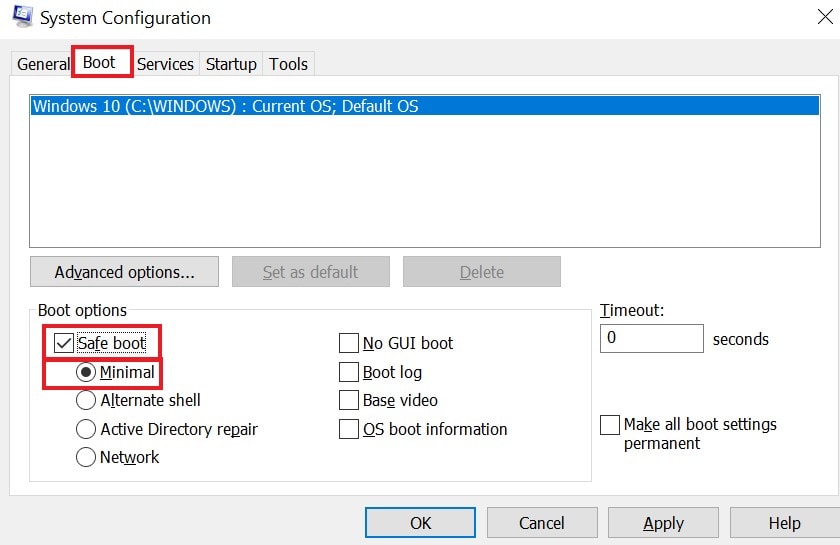
- Then in the System Configuration dialog box that opens click on the second tab Boot
- Click the checkbox Safe Boot

- From the options with radio buttons click on Minimal
- Now restart your PC and it will boot with Safe Mode.
- Go to This PC > Local Disk (C) > navigate to Nvidia folder
- Delete the Nvidia folder
- Again press Windows + R to open the run dialog box
- type devmgmt. msc and hit enter
- From the list of connected devices click on Uninstall
- Restart your PC.
Also Read: Fix: NVIDIA High Definition Audio Not Plugged In Error
Reinstalling the Nvidia Driver
To fix the Nvidia virtual audio device, you need to reinstall the driver. In the previous section, we uninstalled the driver. Now, we will reinstall the driver.
Before going into the installation process, you need to visit the official website of Nvidia. They have a download section where you have to look for the latest driver available for your PC. Do check for compatibility before downloading the driver.
- Press Windows + R
- Type msconfig and hit enter
- The System Configuration dialog box will show up
- You have to uncheck the Safe boot option
- Now restart your PC
- It’s time to install the driver that you downloaded previously
- It will be a clean installation
- Select Custom installation
- Check on all the appropriate boxes for installation options
- Next click on the checkbox Perform Clean Install
- To finish the process restart your PC
Integrate GeForce Experience to Your GPU to Fix the Nvidia Virtual Audio Device Issue
GeForce Experience has an auto-detect driver feature. It will detect the GPU installed on your PC and mention the updates you need to install.
First, you have to download and install the GeForce Experience application. Keep in mind that your GPU should be connected to the computer monitor.
- Once installed open the GeForce Experience
- Navigate to the Drivers tab
- Click on Check for Updates
- The latest drivers available will show up
- Next, click on Custom Install to open the file
That’s it. To fix the Nvidia virtual audio device, you have to carry out these troubleshooting methods. These are quite easy to do. Even after implementing these fixes if you are facing issues with the audio drivers, then I suggest taking your PC to an official support and maintenance center to fix it. I’m sure professional people will fix up the issue.
Also Read
