If you are unable to access the NVIDIA Control Panel on your Windows 11/10, then the below-given fixes shall help you out. The graphics’ drivers control panel allows you to adjust image settings, manage 3D settings, Set PhysX configuration, and use tons of other Global and Program settings. However, many users aren’t able to find the said option on their desktop, Start menu, or even the context menu. As to the reason for the same, here are some of the most common ones.
To begin with, it might be issues related to Nvidia services, the nvcplui file not running, issues with the Nvidia Control Panel app, or in some instances, there might be a problem or two with the Display.NvContainer file. Likewise, old graphics drivers might also be the cause of this issue. In this regard, given below are some of the methods to fix these issues, which in turn should bring back the Nvidia Control Panel on your Windows 11/10 PC.
Also Read
Download Dolby Audio Driver for Windows 11/10/8.1
Fix: Windows 11 Nvidia Control Panel Not Responding
How To Fix External Hard Drive I/O Device Error in Windows 11/10
Fix: Win+Shift+S Not Working on Windows 11/10
Fix: NVIDIA Drivers Not Installing 2023
Best Nvidia Control Panel Settings for FPS and Performance Improvement
Will GPU Prices Drop in 2023 or 2024?
Page Contents
- How to Fix NVIDIA Control Panel not showing in Windows 11/10
- Fix 1: Update Graphics Drivers
- Fix 2: Restart Nvidia Control Panel Services
- Fix 3: Manually Adding the Nvidia Control Panel to Desktop
- Fix 4: Reinstall Nvidia Control Panel App
- Fix 5: Manually Adding Nvidia Control Panel to the Context Menu
- Fix 6: Copy Display.NvContainer file to Startup Directory
- Fix 7: Reinstall Drivers
How to Fix NVIDIA Control Panel not showing in Windows 11/10
Here are the various fixes to rectify the aforementioned errors. There isn’t any universal fix for the same, you should try out each of these fixes until you achieve success. Follow along.
Fix 1: Update Graphics Drivers
Well, it could just be the case that you are using outdated graphics drivers and hence facing the issues. So before moving ahead to other fixes, you should start off with updating the drivers to the latest version. Here are the required steps for the same:
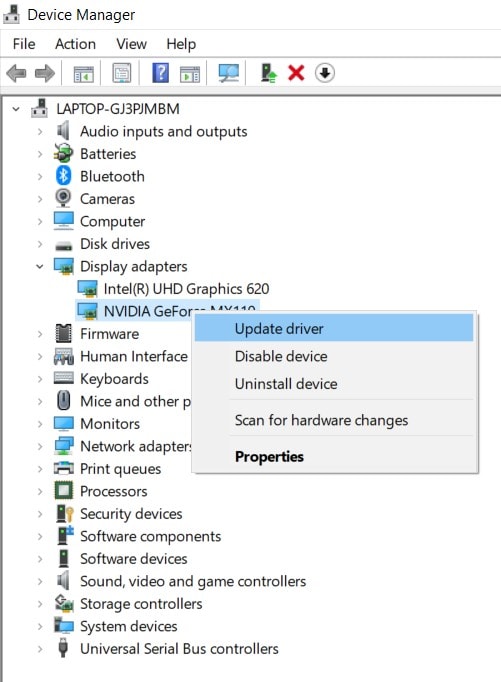
- Right-click on the Windows icon situated at the taskbar and select Device Manager.
- Head over to the Display Adapter section and click it to further expand its menu.
- Right-click on the Nvidia graphics drivers and select Update Drivers.
- In the subsequent dialog box that appears, select Search automatically for updated graphics drivers.
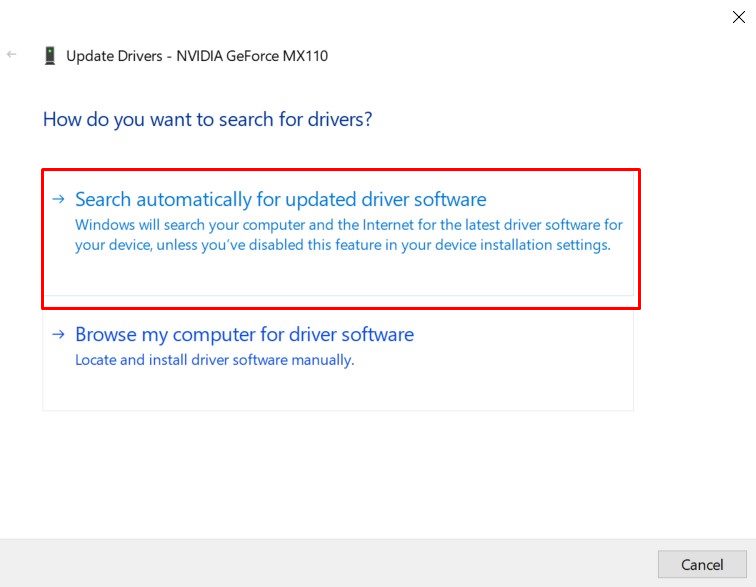
- Windows will then search online for the latest drivers and then install it.
Once that is done, restart your PC and check if the NVIDIA control panel is now visible on your Windows 11/10 PC.
Fix 2: Restart Nvidia Control Panel Services
In some instances, the background apps and services of Nvidia might not be running or facing some issues. So the best bet, in that case, is to restart the concerned Nvidia services. Follow the below steps to do so:
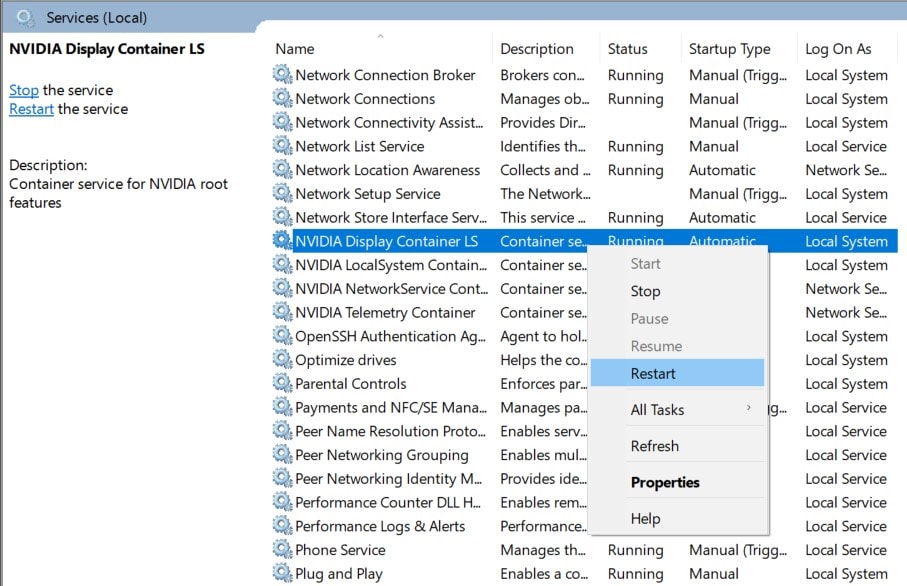
- Launch the Run dialog box using Windows+R shortcut key combination.
- Type in services.msc in the dialog box and hit Enter. This will launch the Services menu.
- Scroll to the Nvidia services, right-click on it, and select Restart.
- You will have to do so for all the Nvidia services present there.
After this, restart your PC and see whether you are able to bring back the NVIDIA control panel option on your Windows 11/10 PC or not.
Also Read: Fix: NVIDIA High Definition Audio Not Plugged In Error
Fix 3: Manually Adding the Nvidia Control Panel to Desktop
You could also manually add the Nvidia Control Panel option to your desktop as a shortcut.
- To do so, launch File Manager and go to the following location:
C:\Program Files\NVIDIA Corporation
- Within that, go to the Control Panel Client folder and there you should see the nvcplui file.
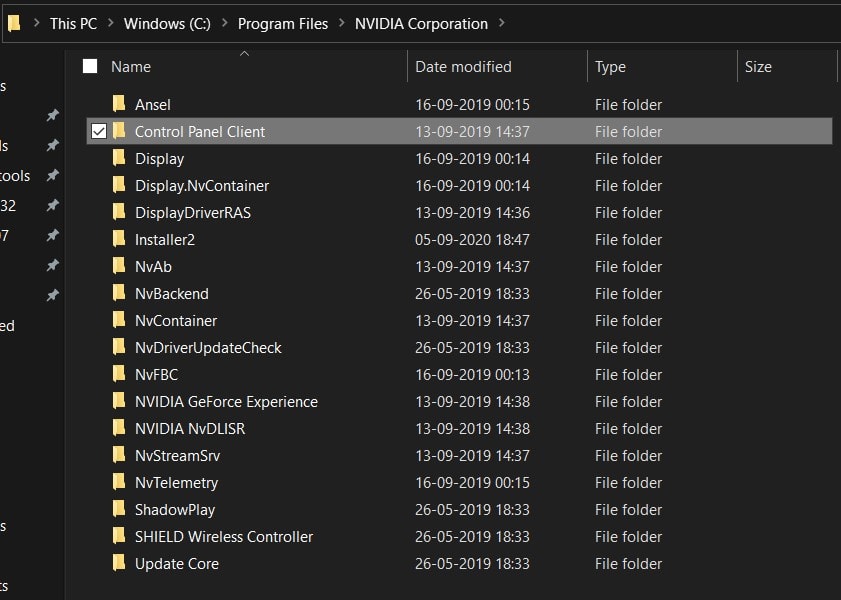
- Right-click on that file and select Create shortcut. The shortcut of that file will be created on your desktop.
- Finally, right-click on that shortcut file, head over to the Compatibility tab, and check the Run this program as an administrator option. Click Apply > OK.
You could now easily access the Nvidia Control Panel right from this shortcut on your Windows 11/10 PC as and when required.
Fix 4: Reinstall Nvidia Control Panel App
Issues with the Nvidia’s Control Panel app might also throw in the above-mentioned error. In that case, you could re-install the latest version of this app onto your PC.

- First off, use the Windows+I shortcut keys to launch the Settings page.
- Then go to the Apps section and search for Nvidia Control Panel. It is already there, then uninstall it right away.
- After that, go to the Microsoft Store and download the latest version of this app.
- Install it and then restart your PC. See if you could now access the Nvidia Control Panel on Windows 10 or not.
Fix 5: Manually Adding Nvidia Control Panel to the Context Menu
If you are able to access the app from the desktop or Start menu but not from the context menu, then you could take the manual approach. Here’s how:
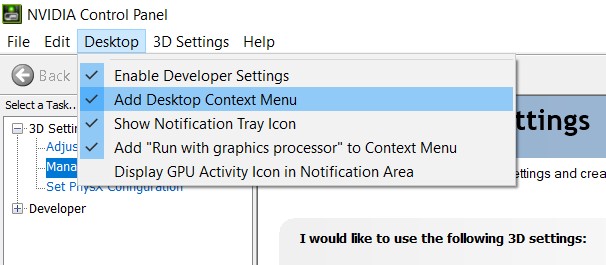
- Launch the Nvidia Control Panel app from your desktop or Start menu of your Windows PC.
- Then go to the Desktop menu and select the Add Desktop Context Menu option.
- That’s it. It will now appear in the right-menu from now on.
Also Read: Fix: NVIDIA High Definition Audio Not Plugged In Error
Fix 6: Copy Display.NvContainer file to Startup Directory
Some users have also reportedly able to get back the Nvidia Control Panel by placing the Display.NvContainer file inside the Startup folder.
- For that, open File Explorer on your PC and navigate to the following location:
C:\Program Files\NVIDIA Corporation\Display.NvContainer
- Within that folder, you should see the NVDisplay.Container file, copy it.

- Then launch the Run dialog box (using Windows+R shortcut), type in shell:startup, and hit Enter.
- It will take you to the Startup folder. Paste the NVDisplay.Container file inside this folder.

- Once you have pasted the file, right-click on it and select Properties. Then go to the Compatibility section and tick mark the Run this program as an administrator option.
Finally, restart your PC and you should get back the Nvidia Control Panel on your Windows PC. If not, then you will have to take the help of the nuclear method.
Fix 7: Reinstall Drivers
If none of the above methods managed to fix the issue, then uninstalling and reinstalling the Nvidia Graphics Card drivers is the only way forward. Here is how it could be done:
- Search for Device Manager from the Start menu.
- Within that, go the Display Adapter section and expand it.
- Then right-click on your Nvidia drivers and select Uninstall device.
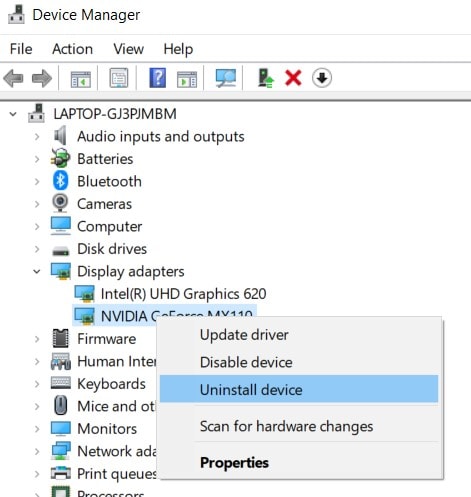
- Once it is removed, go to the Nvidia Download Driver page and input the desired information related to Product Series, Type, OS, among others.
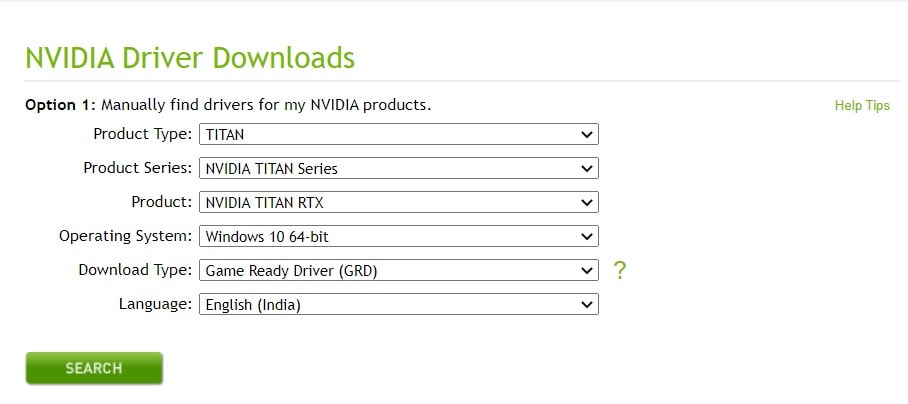
- Then download and install these drivers by following the on-screen instructions. After the installation is complete, restart your PC and the error should be fixed by now.
With this, we conclude the guide on how to fix the NVIDIA control panel not showing in Windows 11/10 issue. All in all, we have shared different methods. Do let us know in the comments which method worked out for you. Likewise, here are some other iPhone Tips and Tricks, PC tips and tricks, and Android Tips and Trick that deserve your attention as well.
Also Read
