Tom Clancy’s The Division 2 is an online action RPG (role-playing game) that has been developed by Massive Entertainment and published by Ubisoft back in February 2019. This game basically offers more expansion in missions and challenges, advanced innovations, etc. However, the chances are high enough that you’re encountering issues with The Division 2 Crashing on your Windows PC while trying to launch it. If so, you can follow this guide to fix it.
It’s quite expected to have such crashing issues on the PC when players try to launch the game which is frustrating a lot. Sometimes the game may not launch at all which is almost a similar issue. Luckily, here we’ve shared a couple of possible workarounds that should gonna help you out. No matter which PC configuration you’re using, most PC games do come with several bugs or stability issues that might conflict with the startup process.
Also Read
Why The Division 2 Keeps Crashing?
It seems that the startup crashing issue with the PC games might occur due to compatibility issues with your PC and the game. Whereas an outdated game version, outdated graphics drivers, older game launcher version, outdated Windows, unnecessary background running tasks, etc can cause several issues with the game launching.
Additionally, issues with the startup apps, outdated DirectX version, an overclocked CPU/GPU, issues with the Microsoft Visual C++ Redistributables, overlay apps, antivirus program issues, etc can trigger multiple issues with the game on the Windows PC like startup crashing.
- Maybe your PC configuration becomes outdated or incompatible with the system requirements of The Division 2 game. To cross-check it, you can check the system requirements below.
- A missing or corrupted game file can also trigger multiple issues like crashing, lagging.
- Somehow your Windows OS or GPU driver version becomes outdated.
- Maybe the DirectX version isn’t up-to-date properly.
- An outdated graphics card can also become incompatible with the Direct3D Feature Level sometimes.
- Maybe The Division 2 game or the Steam client becomes outdated for a while.
- A couple of unnecessary background running tasks can also eat up a lot of system resources that can cause crashing issues.
- Sometimes the default Windows Defender Firewall or any third-party Antivirus program can also block game executable files to run properly.
Minimum System Requirements:
- OS: 64-bit Windows 7 SP1 | 8.1 | 10
- CPU: AMD FX-6350 | Intel Core I5-2500K
- GPU: AMD Radeon R9 280X | NVIDIA GeForce GTX 780
- RAM: 8 GB
- VRAM: 3 GB
- DIRECT X: DirectX 11 | 12
Recommended System Requirements:
- OS: 64-bit Windows 10
- CPU: AMD Ryzen 5 1500X | Intel Core I7-4790
- GPU: AMD RX 480 | NVIDIA GeForce GTX 970
- RAM: 8 GB
- VRAM: 4 GB
- DIRECT X: DirectX 11 | 12
How to Fix The Division 2 Crashing issue
Here we’ve shared some of the possible solutions that you can perform manually yourself in order to solve this issue completely. So, without wasting any more time, let’s get into it.
1. Run The Division 2 file directly
If you’re unable to launch the Division 2 game properly via the Steam client then make sure to run the TheDivision2.exe file directly from the installed game folder. To do so:
- Open Steam > Click on Library.
- Now, right-click on The Division 2 from the list.
- Click on Manage > Click on Browse local files.
- Double-click the TheDivision2.exe file from the installed game folder.
- It should run the game if there are any issues with your Steam launcher.
2. Run the game as Administrator
Sometimes running a program on Windows without having admin access can upset you because the User Account Control system doesn’t give proper access to run it. So, allowing the administrator access is necessary for every game on Windows PC/Laptop. To do that:
- Right-click on the installed TheDivision2.exe file.
- Select Properties > Click on the Compatibility tab.
- Enable the Run this program as an administrator checkbox.
- Click on Apply and hit OK to save changes.
3. Update Graphics Drivers
If you’re using the Nvidia graphics card then update the GeForce Experience app on your PC from the Nvidia official site here. But if you’re using the AMD graphics card on your system, then update the latest AMD Drivers from here.
Otherwise, you can manually update the driver from your system.
- Press Windows + X keys to open the Quick Access Menu.
- Now, select Device Manager > Double-click on Display adapters to expand it.
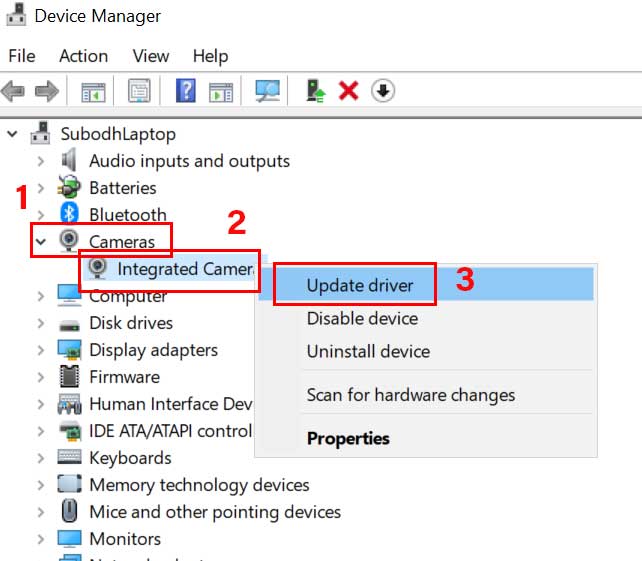
- Right-click on the active or dedicated graphics card > Select Update driver.
- Choose Search automatically for drivers > If there is an update available, it’ll automatically download and install the update.
- So, let the process to complete. Once done, restart your system.
4. Run Windows Compatibility Troubleshooter
Windows Program Compatibility Troubleshooter is an inbuilt utility tool that allows users to cross-check whether the particular program is capable of running on the current Windows OS or not. If not, the user can select an older generation Windows OS version for the program to run properly.
- Head over to the installed directory of The Division 2 game on your computer. [Usually, it may be found at C:\Program Files (x86)\Ubisoft\Ubisoft Game Launcher\games\Tom Clancy’s The Division 2]
- If you have installed the game on a different drive then go to that location.
- Now, right-click on ‘TheDivision.exe’ file > Select Properties.
- Go to the Compatibility tab > Enable ‘Run this program in compatibility mode for:’ according to your preference.
- Click on Change high DPI settings.
- Enable the checkbox next to ‘Override high DPI scaling behavior’.
- Select ‘Scaling performed by: Application’.
- Click on OK to save changes.
- Finally, enable the checkbox next to ‘Disable fullscreen optimizations’ > Click on Apply and then OK to save changes.
5. Modify Virtual Memory Size
If in case, your RAM space is low and you feel that your game crashes due to insufficient RAM then you should modify the virtual memory size and the automatic paging file size. To do so:
- Go to File Explorer and right-click on This PC.
- Select Properties > Click on Advanced system settings from the left pane.
- If prompted by UAC, click on Yes to give administrator privileges.
- Now, click on the Advanced tab from the System Properties option.
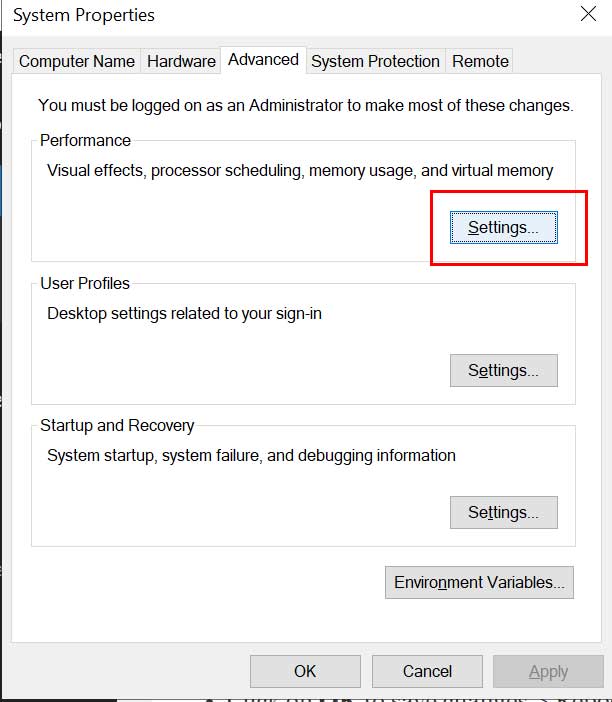
- Click on Settings from the Performance section.
- Go to the Advanced tab from the Performance Options window.
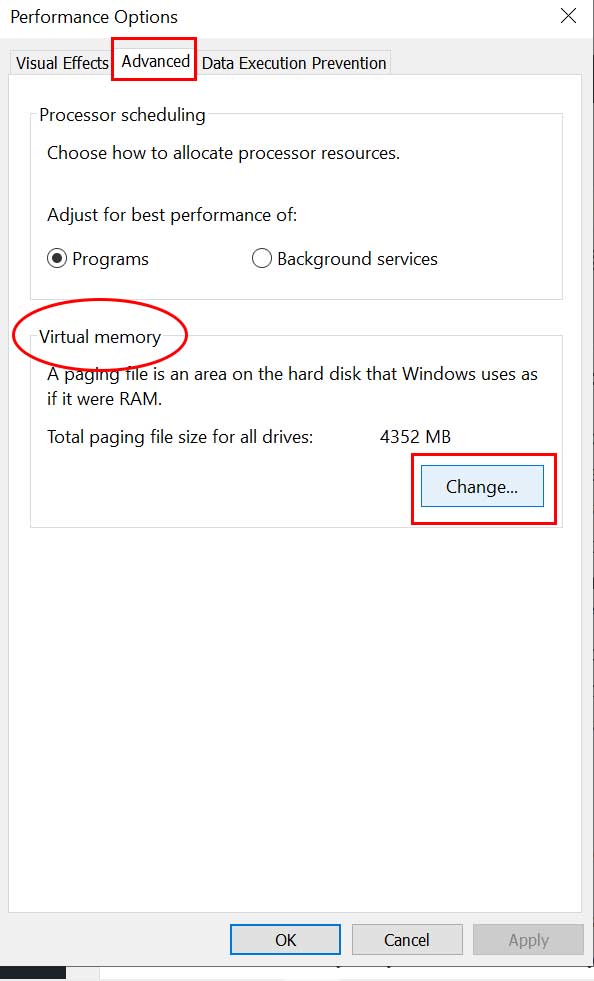
- Next, click on Change from the Virtual Memory section.
- Here Checkmark the checkbox of ‘Automatically manage paging file size for all drives’.
- Click on OK to save changes > Reboot your computer.
6. Turn Off Nvidia V-Sync for The Division 2
The Vertical Sync (V-Sync) in your game can be known as G-Sync or FreeSync. Now, the problem is that this particular feature although doesn’t come in handy that much but it affects the gameplay a lot. Plenty of graphics issues, crashes, low FPS count can happen due to enabled V-Sync. As Nvidia Control Panel also comes with V-Sync, you should turn it off.
- Right-click on your desktop screen (blank).
- Select Nvidia Control Panel > Go to 3D Settings.
- Click on Manage 3D Settings > Select Program Settings.
- Now, you’ll have to add your installed The Division 2 game folder. [The default path should be like C:\Program Files (x86)\Ubisoft\Ubisoft Game Launcher\games\Tom Clancy’s The Division 2]
- If in case, you’ve installed your ‘The Division 2’ game to a different drive, select accordingly.
- Once added, scroll down to the list, and select Off for Vertical Sync.
- Click on Apply to save changes.
- Finally, you can try launching The Division 2 game to check whether it’s still Keeps Crashing or not.
7. Change Task Priority
It can also possible that somehow the Windows system is unable to keep loading your game due to plenty of other ongoing tasks in the background. If that’s happening with you, make sure to follow the steps below:
- Press Windows + X keys to open the Quick Access Menu.
- Now, select Task Manager > Go to the Details tab.
- Search for The Division 2 task > Right-click on it.
- Select Priority > Set it to High.
- If prompted by UAC for permissions to change it, click on Change Priority.
- Once done, make sure to relaunch the game and check for The Division 2 Crashing issue again.
8. Lower In-Game Graphics Settings
Additionally, you can try lowering the in-game graphics settings to cross-check if the problem has been fixed/reduced or not.
- Open The Division 2 game > Go to Settings.
- Head over to Graphics – Shadow Quality.
- Set it to Low > Set Spot Shadows to Low.
- Contact Shadows – Off.
- Particle Detail – High.
- Reflection Quality – Low.
- Vegetation Quality – Medium.
- Local Reflection Quality – Off.
- Ambient Occlusion – Medium.
- Object Detail – 50.
- Terrain Quality – Medium.
- Finally, select Apply to save all of these changes.
9. Disable Steam Overlay
- Open Steam on your Windows.
- Head over to the Settings > Click on the In-Game option.
- Click on the checkbox to disable “Enable the Steam Overlay while in-game“.
- Once the checkbox mark is removed, click on OK.
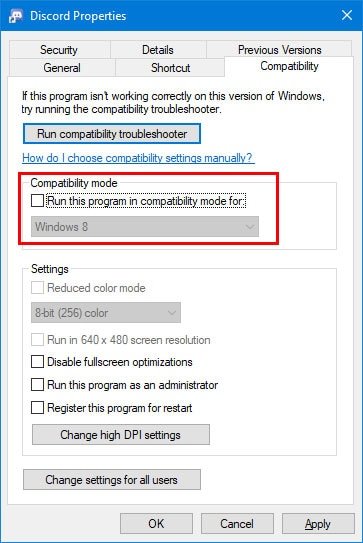
10. Adjust Discord Settings
- Launch Discord > Click on User Settings.
- Select Voice & Video from the left sidebar.
- Scroll down a bit and click on the Advanced.
- Next, disable OpenH264 Video Codec provided by Cisco System, Inc.
- Then disable Enable Quality of Service High Packet Priority.
- Click on Overlay.
- Disable in-game overlay.
- Next, click on Appearance.
- Scroll down to the bottom Advanced.
- Disable Hardware Acceleration.
- Once done, restart the Discord or restart the system.
11. Adjust Nvidia Control Panel Settings
- Click on Adjust image settings with preview under 3D settings.
- Select Use the advanced 3D image settings.
- Next, open the Nvidia Control Panel.
- Click on Manage 3D settings.
- Then select Global Settings.
- Now, adjust some of the additional settings:
- Turn off Image Sharpening
- Turn on Threaded Optimization
- Power Management: Prefer Maximum Performance
- Low Latency Mode: Off
- Texture Filtering Quality: Performance
12. Adjust AMD Control Panel Settings
- Click on Global Graphics.
- Disable Radeon Anti-Lag
- Disable Radeon Boost
- Image Sharpening: Off
- Anti-Aliasing Mode: Use Application settings
- Set Anti-aliasing Method to Multi-sampling
- Morphological Filtering: Off
- Anisotropic Filtering: Disabled
- Texture Filtering Quality: Performance
- Surface Format Optimization: Enabled
- Tesselation Mode: AMD Optimized
- Turn off Wait for V-sync
- OpenGL Triple Buffering: Off
- Shader Cache: AMD optimized
- Turn off Maximum Tesselation Level
- GPU Workload: Graphics
- Radeon Chill: Off
- Frame Rate Target Control: Disabled
13. Verify Game Files
The Division 2 PC gamers on Steam can follow the below steps:
- Open the Steam Library by logging into the account
- Right-click on The Division 2
- Click on Properties
- Select the Local Files tab
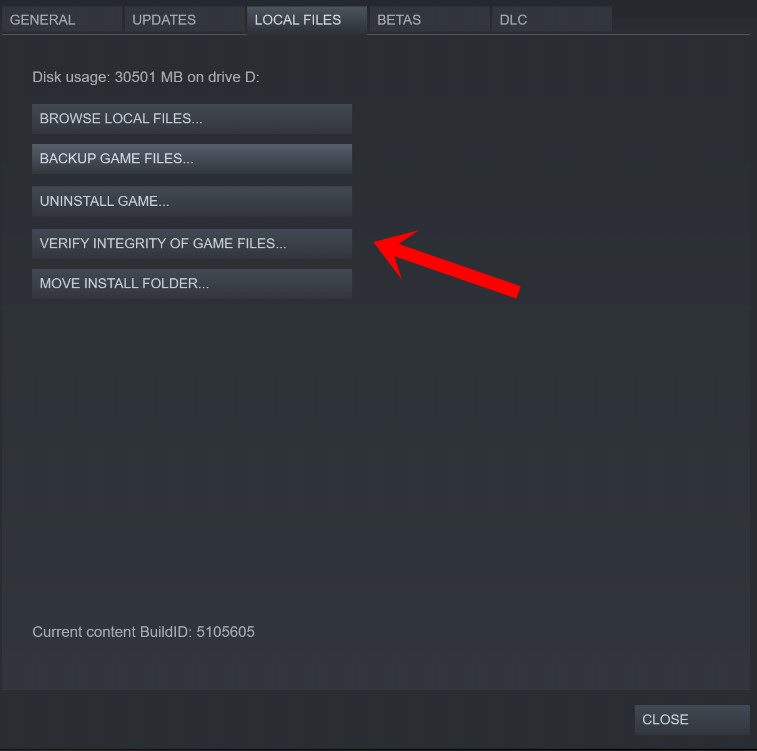
- Then click on Verify Integrity of Game Files
- Wait for the process and then restart the game to check whether the issue has been fixed or not.
14. Temporarily Disable Antivirus
It’s also worth mentioning that temporarily disabling the antivirus program on your Windows computer may come in handy in most cases. In order to protect your system and data, the antivirus program can block several files or ongoing connections as well. So, you can follow the steps below to temporarily disable the antivirus program and check whether the game is launching properly or not.
- Press Windows + I keys to open the Windows Settings menu.
- Click on Update & Security > Click on Windows Security from the left pane.
- Go to Virus & threat protection > Click on Manage settings.
- Next, you’ll need to simply turn off the Real-time protection toggle.
- If prompted, click on Yes to proceed further.
- Additionally, you can also turn off Cloud-delivered protection, Tamper protection if you want.
This method should fix The Division 2 Crashing issue.
15. Uninstall Windows 10 Updates (Unstable/Buggy Versions)
A couple of days ago, Microsoft has released a new update for Windows 10 with KB4535996. The KB4535996 cumulative update for Windows 10 is quite buggy and causing so many errors or problems.
- Go to Start menu > Click on Settings
- Next, click on Update and Security
- Click on View update history
- Now, if you can see that there is an update having KB4535996 has been already installed. Make sure to uninstall it.
- Here you will see the Uninstall updates option on the top of the page.
- Click on it and select that particular update version.
- Right-click on it and select Uninstall.
- It may take some time to delete that update and your system may restart automatically.
- Have some patience and you can also manually reboot your Windows PC (if required).
16. Clean Temporary Files
- Press Windows key + R on your keyboard to open the RUN program.
- Now, type %temp% and press enter
- You will get a bunch of temporary files on a page.
- Select all files by pressing Ctrl + A on the keyboard.
Next, press Shift + Delete on the keyboard to remove all the files. - Sometimes some of the temporary files can’t be deleted. So, leave them as it is and close it.
17. Use CPU and GPU Clock Speed at Default Settings
If you’ve overclocked your GPU speed and experiencing the crashing or stuttering issue on the gameplay or at the launching, make sure to use the MSI Afterburner tool or Zotac firestorm to underclock or set the default clock speed. Now, you can try again to run the game whether it’s working or not.
If the above-mentioned steps won’t work for you, make sure to follow the final possible step below.
18. Reset and Update BIOS (CMOS)
- Shut down your computer and unplug the power cord from the power source.
- Now, remove the side panel of the CPU.
- Ensure that you’re grounded and locate the CMOS battery on the motherboard. There is only one circular CMOS battery which is easily noticeable.
- Next, remove the CMOS battery quite gently. If you don’t know how to do it, you can search for it online.
- Once removed, clean it with a cloth and wait for around a couple of minutes.
- Finally, place the battery back like before and close the side panel of the CPU.
- Plugin the power cord to the power source again and restart your PC.
- Now, run Steam as an administrator and launch The Division 2 game to check whether the crashing issue has been fixed or not.
We assume that now you’re able to run the game properly on your computer without any crashing or lagging. Have some queries? Feel free to comment below.