Due to the open-source nature of Android, there are a lot of customization options available to developers and users. It requires the device bootloader to be unlocked first and then you’ll be able to flash custom firmware, mods, and rooting via Magisk, too. So, installing Magisk can be done via TWRP recovery or flashing Magisk Patched Boot Image via Fastboot. Here we’ve shared steps to Patch Stock Boot Image via Magisk and Flash it using Fastboot.
You are extracting the stock boot.img file from the stock firmware is one of the safest ways of rooting. These days Stock ROMs do come with payload.bin or OZIP format, and you’ll have to decrypt the firmware package to get the stock boot.img file. Later, you can easily patch the extracted boot.img file on your handset via Magisk, then you can flash patched boot.img file via fastboot commands to enable root access on your Android device completely.
Also Read

Page Contents
What is Magisk?
Magisk is a very powerful and useful tool that enables root access on Android devices without even touching or breaking system partition or its core files. So, it’s quite safe to use and doesn’t conflict with any other apps or services whatsoever. That’s why Magisk root is also known as ‘Systemless Root’.
A big thanks to topjohnwu (XDA Recognized Developer) for developing such an amazing tool for Android devices to easily install root. It also offers a wide range of custom modules that replaces Xposed Framework more efficiently. While Magisk is also capable of avoiding Google’s SafetyNet security feature so that most of the banking apps can run without any issues. There are plenty of benefits or features available on Magisk.
Also Read
Patch Stock Boot Image via Magisk and Flash it using Fastboot
Now, without wasting any more time, let’s jump into the guide below. Make sure to follow all the mentioned requirements that are necessary to successfully complete the flashing of the Magisk patched boot image file on your Android device for enabling root access.
Warning: GetDroidTips won’t be held responsible for any kind of issues or errors that may happen on your device during/after following this guide. We’ll recommend you to take a full data backup before doing anything else and proceed at your own risk.
Requirements:
- Take a complete backup of the device data first.
- The device bootloader should be unlocked too.
- You’ll also require a computer and a USB cable to connect your handset with the PC.
- Download and Install ADB & Fastboot binaries on your PC.
- Download and Install Android USB Drivers on your computer.
- Enable Developer Options on your phone. [Settings > About Phone > Tap on Build number for 7 times to enable Developer options]
- Next, enable USB Debugging on your device. [Settings > Developer options > USB Debugging > Turn it on]
- Download Magisk zip and Magisk Manager below.
- You’ll have to download the latest Stock ROM file for your device model from the respective official website.
Download Links:
Steps to Flash Magisk Patched Boot Image using Fastboot
- First, you’ll have to extract the Stock Boot Image File from the Stock ROM. You can check out this guide to extract the stock boot.img file from the stock firmware of the device model you downloaded.
- Then, make sure to transfer the boot.img file to the phone’s internal or external storage.
- Next, make sure to install the latest Magisk Manager app on your handset.
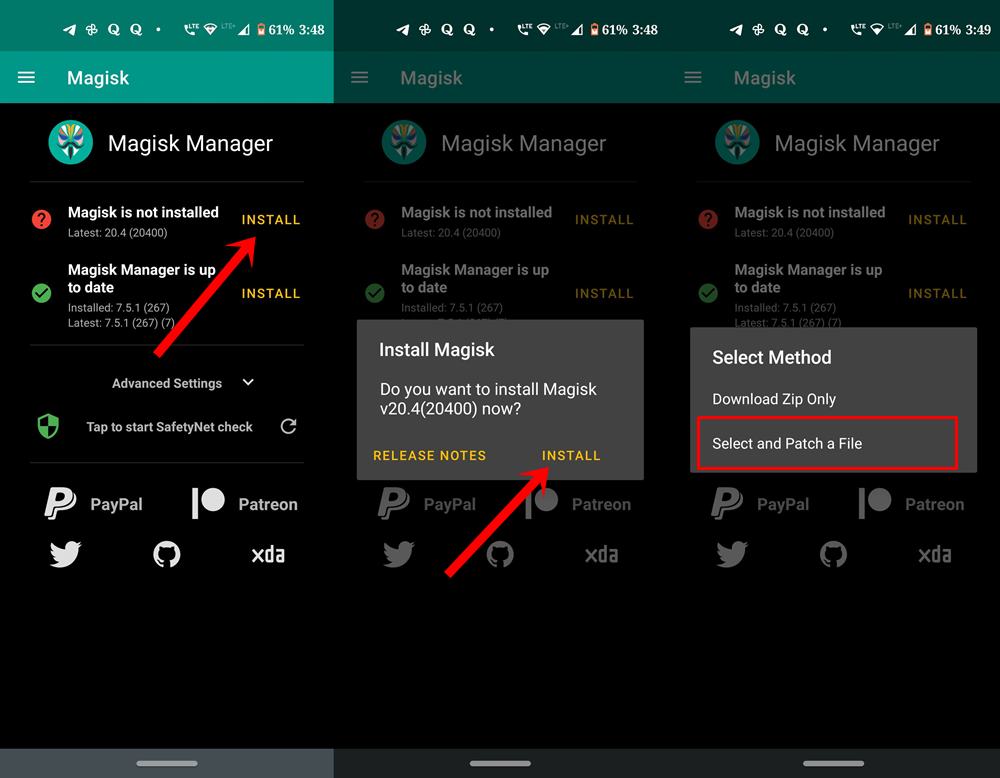
- Open the ‘Magisk Manager’ app > Hit ‘Install’ then choose ‘Install’ again.

- Once done, tap on ‘Select and Patch a File’ > Head over to the storage and select the extracted stock boot.img file that you’ve moved earlier.
- After selecting the stock boot.img file, the Magisk Manager will automatically patch it on your device.
- Then magisk_patched.img file will be saved on your device automatically. [Check the ‘Download’ folder of the internal storage]
- Now, it’s important to transfer the magisk_patched.img file to your PC where you’ve installed ADB & Fastboot. [Inside the ADB & Fastboot folder]
- Next, you’ll have to connect your device to the PC via a USB cable.
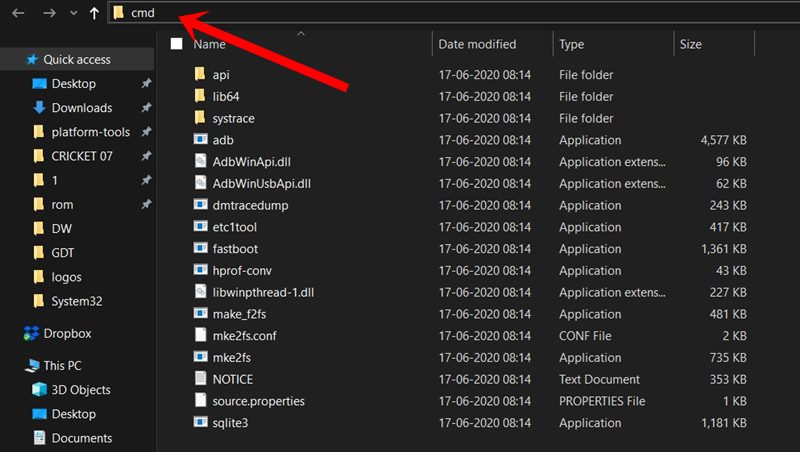
- Head over to the installed ADB & Fastboot folder (Platform Tools folder) > Type cmd on the address bar and hit Enter to open Command Prompt. [If prompted by UAC, click on Yes to run it as administrator]

- Now, run the following command line on the Command Prompt window to check whether the device is properly detected in fastboot or not:
fastboot devices
- Then run the following command to easily boot your Android device into the Fastboot (Bootloader) mode:
fastboot reboot bootloader
- Next, run the following command to flash the patched boot image file on your handset:
fastboot flash boot magisk_patched.img
- For devices with an A/B partition, you’ll need to flash the patched boot image file to both partitions. In that case, you will have to run both these commands one by one:
fastboot flash boot_a magisk_patched.img

fastboot flash boot_b magisk_patched.img
- Finally, run the command below to normally restart your device into the system:
fastboot reboot
- Wait for the device to boot into the system.
- Voila! Your device is rooted now via Magisk and you’ve successfully flashed the patched boot image file using the Fastboot method.
- Enjoy!
Finally, you can open the Magisk Manager app to check whether the root is enabled or not. Make sure to check for the latest Magisk updates from the application itself.
That’s it, guys. We assume this guide was helpful to you. For further queries, you can comment below.
