Steel City Interactive has recently released an authentic boxing simulation video game called ‘Undisputed‘ on January 31, 2023, which is available for the Windows, PlayStation, and Xbox platforms. It features true-to-life visuals, bone-jarring action, and more licensed boxers offering excellent control over movements and actions. Meanwhile, some players are facing the Undisputed Keeps Crashing issue on Startup on the PC, which is frustrating.
Since its release, several Undisputed players on the PC have encountered multiple bugs or issues that we can’t deny, like graphical glitches, lags, stutters, black screen, and more. As the game is quite new, developers will need some time to investigate such issues and provide a permanent solution. However, we can say that PC startup crashes might occur for multiple reasons, which you can check and fix accordingly.

Page Contents
- Why Undisputed is Crashing?
- Fix: Undisputed Keeps Crashing on Startup on the PC
- 1. Reboot the Game and PC
- 2. Check System Requirements
- 3. End Tasks from the Background
- 4. Run the Game Application as Administrator
- 5. Keep Your Undisputed Game Up-to-date
- 6. Repair Game Files
- 7. Update Windows
- 8. Update Graphics Card Driver
- 9. Change Power Options
- 10. Disable Overlay Applications
- 11. Whitelist Undisputed in Windows Firewall
- 12. Add an Exception for Undisputed in Windows Antivirus
- 13. Perform a Clean Boot on Windows
Why Undisputed is Crashing?
If we talk about the game not launching or the startup crashing issue with the PC games then the chances are high that your PC configuration isn’t compatible enough or the system software is outdated, or the game version becomes outdated for a while. Whereas issues with the installed software/applications, an outdated graphics driver, conflicts with the third-party applications, unnecessary third-party processes, etc, cause crashes.
Issues with the antivirus software blocking, adjustment with the power options, conflicts with the startup apps, running the game without admin permission, etc, might also trigger, and more can cause startup crashes quite often. It becomes quite common among PC gamers to experience such issues no matter what configuration they’re using or which game they’re playing. So, there is nothing to worry about.
Fix: Undisputed Keeps Crashing on Startup on the PC
Fortunately, you can now follow this guide to check all the possible workarounds to resolve such an issue on the PC. Now, without further ado, let’s jump into it.
1. Reboot the Game and PC
You can try rebooting the Undisputed game on the PC to refresh the system and game cache data easily. You should do the same to check for the issue.
2. Check System Requirements
Second, you can check the Undisputed game’s system requirements to ensure your PC is meeting the compatibility to run this game smoothly. Now, if you’re using outdated hardware or software, upgrade the particular item to make it compatible.
| Minimum Requirements: | Recommended Requirements: |
| OS: Windows 8 or higher | OS: Windows 10 |
| Processor: Intel i5 7500 (3.4GHz) OR AMD 5 1600 (3.2GHz) | Processor: Intel i7-9700K (3.70GHz) OR AMD Ryzen 5 3600 (4.2GHz) |
| Memory: 8 GB RAM | Memory: 16 GB RAM |
| Graphics: GeForce GTX 1660 OR AMD Rx 590 | Graphics: NVIDIA GeForce RTX 3070 / RTX 2070 OR AMD Radeon RX 5700 XT |
| DirectX: Version 11 | DirectX: Version 12 |
| Storage: 40 GB available space | Storage: 40 GB available space |
| Sound Card: 100% DirectX 11 compatible sound card | Sound Card: 100% DirectX 12 compatible sound card |
3. End Tasks from the Background
Some reports claim that closing the background running tasks from your system might also help reduce game crashes, lags, stutters, etc, issues in some cases. So, you can follow the steps below to end unnecessary background tasks easily.
- Press the Ctrl+Shift+Esc keys to open Task Manager.
- Go to the Processes tab and check which tasks consume higher resources like CPU or Memory.
- Now, click to select the specific task which is not necessary.
- Then select End Task to close it forcefully.
- Ensure to do the same steps for each third-party task consuming higher resources.
- Once done, restart your PC to apply changes.
4. Run the Game Application as Administrator
It’s also suggested to run the Undisputed game application as administrator on the PC to grant the User Account Control (UAC) permission to avoid startup crashes. You can follow the steps below to allow the admin permission for one time.
- Open the installed directory of Undisputed.
- Right-click on the game application to open the context menu.
- Now, click on Properties > Go to the Compatibility tab.

- Click to select the Run this program as an administrator checkbox.
- Once selected, click on Apply > Click on OK to save changes.
- Now, you can run the game to check for the issue.
To allow admin access, you should also do the same steps for your game launcher, like Steam.
5. Keep Your Undisputed Game Up-to-date
We recommend you check the game update manually by following the steps below respective to your game client. It seems that an outdated game version might cause trouble in launching the game due to stability issues or bugs.
- Open Steam and go to the Library.
- Click on Undisputed from the list of installed games.
- If there is an update available, click on Update.
- Wait for a while to complete the update process.
- Once done, reboot the PC to apply changes.
6. Repair Game Files
If you’ve been a PC gamer for a couple of years, then you should know that some corrupted or missing game files might trigger the game launching issues. So, you can follow the steps below to verify and repair the installed game files on the PC to get back on track.
- Open the Steam client > Click on Library.
- Right-click on Undisputed from the list of installed games.
- Click on Properties > Go to the Local Files tab.

- Click on Verify Integrity of Game Files.
- Wait for some time to complete the repair.
- Once done, you can reboot the PC to apply changes.
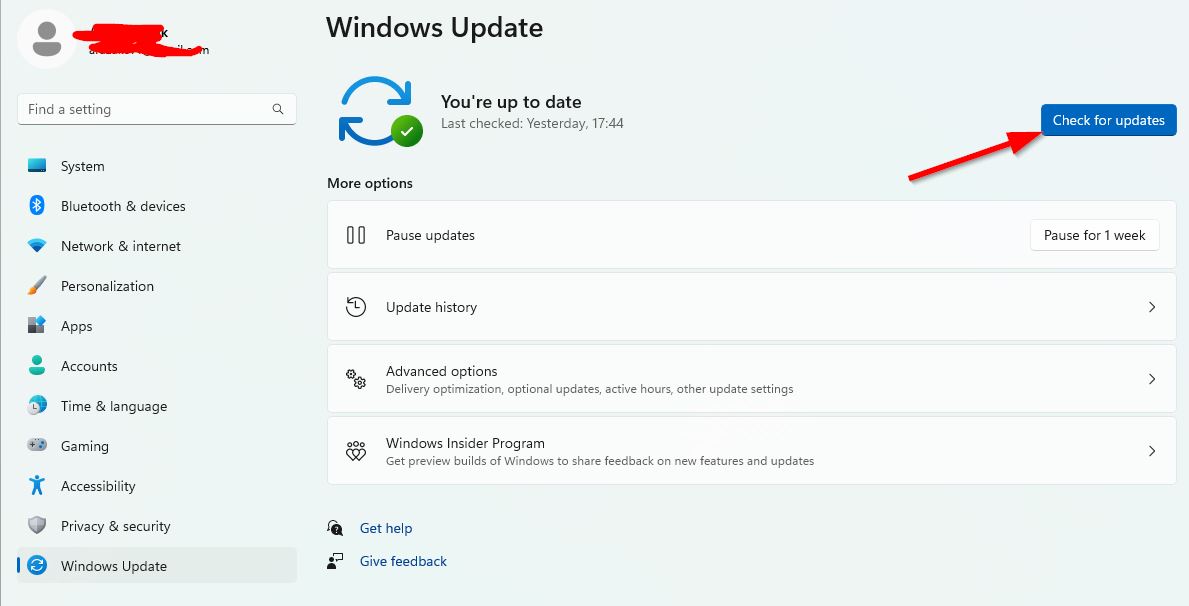
7. Update Windows
You can also keep checking for the Windows software update on the machine to ensure you’re running the latest OS version or the build number. Microsoft gradually provides software updates silently that you may not notice in some cases. So, you can follow the steps below to easily check for the Windows update and install the same.
- Press the Win+I keys to open Windows Settings.
- Click on Windows Update > Click on Check for updates.

- If there is an update available, click on Download and Install.
- Wait for the update process to complete.
- Once done, reboot your PC to apply changes.
8. Update Graphics Card Driver
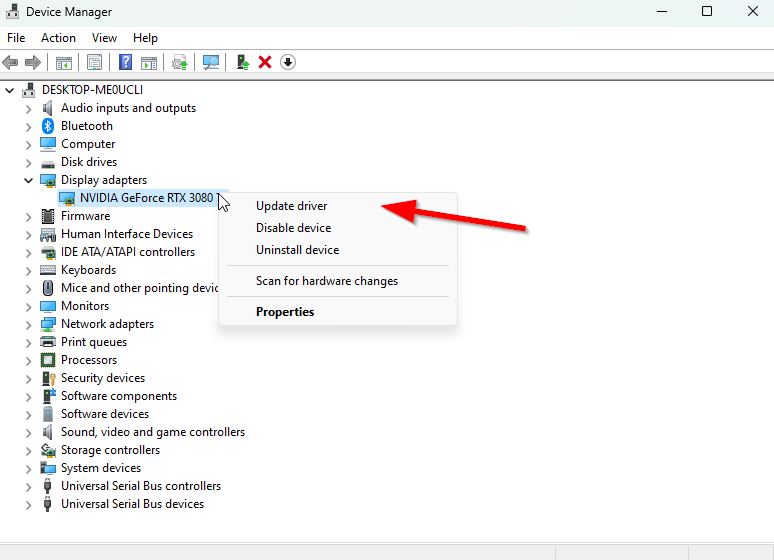
Make sure to manually check for the graphics card driver update on the PC by following the steps below to cross-check whether an outdated graphics driver is troubling the game application to run properly. There are two methods to easily check for updates and install the update of the GPU driver that you can check below.
Via Device Manager:
- Press the Win+X keys to open the Quick Link Menu.
- Open Device Manager from the list > Then expand the Display adapters option.

- Right-click on the particular GPU card and select Update driver.
- Click on Search automatically for drivers.
- If there is an update available, the system will automatically download and install it.
- Once done, restart your system to apply changes.
Via Website:
You can also try directly visiting the respective website of your graphics card brand to download the latest version of the GPU driver. Once downloaded as per the graphics card model, you can simply install it on the PC.
9. Change Power Options
In some cases, issues with the balanced power options on your Windows machine might trigger performance decreases which directly affects the game launching or gameplay experience. You should follow the steps below to easily set the high-performance power mode.
- Open the Start Menu > Search and open Control Panel.
- Select Hardware and Sound > Choose Power Options.
- Now, select High Performance > Reboot the PC to apply changes.
10. Disable Overlay Applications
Sometimes third-party overlay applications might also trouble in system performance which can affect the game launching issue. Overlay apps can help users in multiple ways but they can always run in the background even though you’re not using them. That’s why disabling overlay apps will be necessary.
Disable Discord Overlay:
- Open the Discord app > Go to Settings (gear icon) at the bottom.
- Go to App Settings and click on Overlay.
- Now, turn on the Enable in-game overlay.
- Click on Games > Select Undisputed.
- Turn Off the Enable in-game overlay toggle.
Disable Xbox Game Bar:
- Press the Win+I keys to open Windows Settings.
- Click on Gaming > Select Game Bar.
- Turn Off the Record game clips, screenshots, and broadcast using the Game bar option.
Disable Nvidia GeForce Experience Overlay:
- Open the Nvidia GeForce Experience app > Go to Settings.
- Select General > Disable the In-Game Overlay option.
Disable Steam Overlay:
- Open Steam > Click on Library.
- Right-click on Undisputed > Click on Properties.
- Select General > Turn OFF the Enable the Steam Overlay while in-game option.
Please Note: The chances are high that you’re using some other third-party overlay apps like MSI Afterburner, Rivatuner, RGB lighting software, etc. If so, you should turn them off too.
11. Whitelist Undisputed in Windows Firewall
You should also try allowing the Undisputed game program in the Windows Firewall protection by following the steps below to reduce crashes, errors, etc.
- Open the Start menu > Search and open Control Panel.
- Go to Systems and Security > Open Windows Firewall.
- Select Allow an app or feature through Windows Firewall.
- Now, click on Change settings > Select Allow another app.
- Select Browse > Click to select Undisputed.
- Click on Add and make sure to save changes.
12. Add an Exception for Undisputed in Windows Antivirus
Additionally, you should perform the steps below to manually add Undisputed as an exception in the antivirus settings to avoid blocking.
- Press the Win+I keys to open Windows Settings.
- Go to Privacy and Security > Click on Windows Security.
- Click on Virus and threat protection > Select Manage ransomware protection.
- Select Allow an app through Controlled folder access > Click on Add an allowed app.
- Click on Browse all apps > Now, select Undisputed.
- Then click on Open > Make sure to save changes.
13. Perform a Clean Boot on Windows
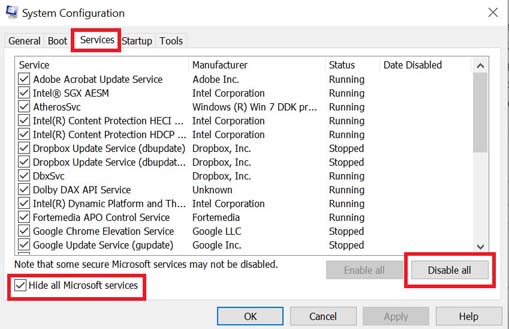
Another thing you can do is perform a clean boot method on your Windows machine to hide all Microsoft services from the system and then disable startup apps altogether. Several Windows users claimed that the clean boot method did help the system boot up quicker and increase the system performance in all aspects. We’ll suggest you follow the steps below to do it.
- Press the Win+R keys to open the Run dialog box.
- Type msconfig and hit Enter to open System Configuration.
- Go to Services > Select the Hide all Microsoft services checkbox.

- Now, click on Disable all to turn off other services from booting automatically while startup.
- Click on Apply and OK to save changes.
- Once done, click on Startup > Choose Open Task Manager.
- Click on the Startup tab > Make sure to choose the particular task with a higher startup impact.
- Finally, click on Disable to turn it off, and disable the rest of the high-impact programs.
That’s it, guys. We hope this guide was helpful to you. For additional queries, you can comment below.
Also Read

if you really have to do all of this for the stupid game to run properly, just refund and buy something better