Gunfire Games and Gearbox Publishing recently released Remnant 2 as a third-person shooter action role-playing video game that allows players to be survivors of humanity against new deadly creatures and god-like bosses across terrifying worlds. You can go solo or co-op with two other friends to explore and stop evil from destroying. As the game is relatively new in the market, it has some issues, and we can’t deny it—meanwhile, some players facing the Remnant 2 Low Level Fatal Error on the PC.
According to multiple reports, a specific low-level fatal error occurs whenever players beat the first boss or try launching the game. It says “LowLevelFatalError [File: C:\Unreal_TC\Engine\Source\Runtime\RenderCore\Private\ShaderCodeArchive.cpp] [Line: 354] ShaderCodeArchive::DecompressShader(): Could not decompress shader (GetShaderCompressionFormat=Oodle)”. Affected players tried reinstalling the game and the graphics driver on the PC. But that didn’t help.

Page Contents
- How to Fix Remnant 2 Low-Level Fatal Error
- 1. Reboot the PC
- 2. Run the Game as an Administrator
- 3. Update Remnant 2
- 4. Verify and Repair the Game Files
- 5. Disable Game Optimization
- 6. Update the Graphics Driver
- 7. Run the Game in the Compatibility Mode
- 8. Force Run DirectX 11
- 9. Update DirectX and Visual C++ Redistributables
- 10. Disable Antivirus Protection
- 11. Switch to the Dedicated Graphics Card
- 12. Disable Overlay Apps
- 13. Disable CPU or GPU Overclocking
How to Fix Remnant 2 Low-Level Fatal Error
Luckily, here we’ve shared with you possible workarounds that should come in handy. The chances are high that conflicts with the installed game files, issues with the Microsoft Visual C++ Redistributables, an outdated game patch version, issues with overlay apps, an outdated graphics driver, antivirus blocking, etc, can be potential reasons behind the low-level fatal error. Make sure to follow all methods until the problem has been fixed. So, without wasting any more time, let’s jump into it.
1. Reboot the PC
Before doing anything else, restart the PC to ensure there is no issue with the because even a normal system reboot can also help fix several errors. As some players did find this method useful, you should also perform it.
2. Run the Game as an Administrator
The chances are high that you’re not running the Remnant 2 game on the PC with admin access, which might conflict with the user account control (UAC) regarding permission issues. So, you should also run the game application, the Steam client, or the Epic Games Launcher as an administrator on your PC. To do this:
- Right-click on the Remnant 2 application on your PC.
- Select Properties > Click on the Compatibility tab.

- Then click on the Run this program as an administrator checkbox to enable it.
- Click on Apply and select OK to save changes.
- Once done, do the same steps to run the Steam client or Epic Games Launcher as an administrator.
3. Update Remnant 2
We should also recommend you manually check for the game update at your end via the Steam client or Epic Games Launcher to ensure there is no outdated game version conflicting with the game startup. An outdated game patch version can trigger several issues that might trigger crashes or fatal errors. To do this:
For Steam:
- Open Steam and go to the Library.
- Click on Remnant 2 from the left pane.
- Steam will automatically search for the available update.
- If there is an update available, click on Update.
- Make sure to wait for some time until the update is completed.
- Once done, ensure to reboot the PC to apply changes.
For Epic Games Launcher:
- Open the Epic Games Launcher > Head over to Library.
- Now, click on the three dots icon next to Remnant 2.
- Make sure the Auto Update option is turned on.
- It should automatically install the available update.
4. Verify and Repair the Game Files
Needless to say, issues with corrupted or missing game files on the PC might cause game-launching errors in some cases. In case your game starts to load for a few seconds and then closes automatically or doesn’t launch at all, then it’s better to verify and repair the installed game files on the PC by following the steps below:
For Steam:
- Launch the Steam client > Click on Library.
- Right-click on Remnant 2 from the list.
- Click on Properties > Go to Local Files.

- Click on Verify Integrity of Game Files.
- This process may take some time to complete. So, have some patience.
- Once done, make sure to reboot the PC to apply changes.
For Epic Games Launcher:
- Open the Epic Games Launcher > Click on Library.
- Click on the three-dots icon next to Remnant 2.
- Click on Verify, wait for the process to complete, and restart the launcher.
5. Disable Game Optimization
Another thing you should do is disable the game optimization feature from the Nvidia GeForce Experience app on the PC. Sometimes, Nvidia graphics users might get into trouble for optimizing the overall gameplay experience. If you face a low-level fatal error, turn it off for the specific game. To do so:
- Open the Nvidia GeForce Experience app.
- Click on the Settings menu (gear icon).
- Select Games > Remove the checkmark next to Automatically Optimize newly added games.
6. Update the Graphics Driver
It’s important to regularly check for updates to your graphics driver on your Windows PC to ensure that you have the latest version installed and that no updates are pending. If you are using graphics-intensive programs, an outdated or missing graphics driver can cause issues with their proper functioning. To update your graphics driver, follow these steps:
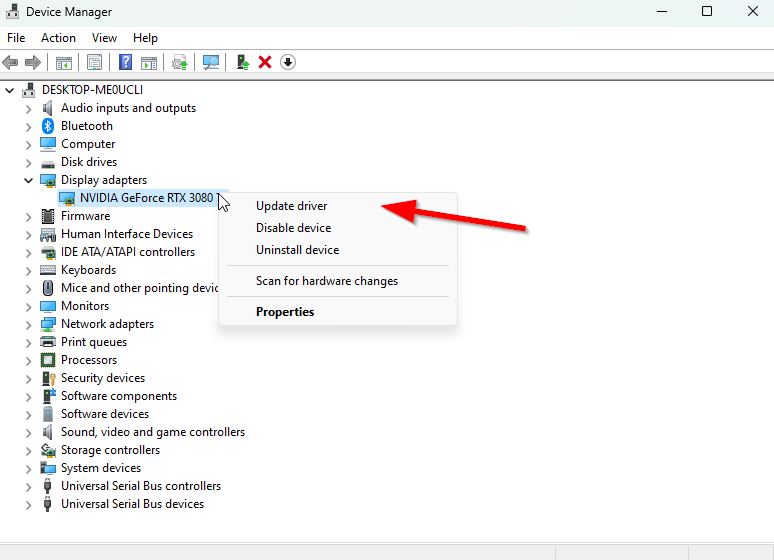
- Right-click on the Start Menu to open up the Quick Link Menu.
- Click on Device Manager from the list.
- Double-click on Display Adapters to expand it.

- Right-click on the dedicated graphics card name that’s active.
- Now, click on Update driver.
- Choose Search automatically for drivers.
- The system will automatically check for the available updates.
- An update will automatically download and install the latest version if available.
- Once done, you should restart your PC to apply the changes.
If you can’t find any pending updates, then just head over to the official website of the Nvidia website below and search manually for the latest update. If a new version is available for the graphics card, download the driver and install it on your PC. You can jump to the link below to do so:
7. Run the Game in the Compatibility Mode
Make sure to follow the steps below to easily run the Remnant 2 game in compatibility mode on the PC to cross-check if there is any issue with the system.
- Right-click on the Remnant 2 application on your PC.
- Now, select Properties > Click on the Compatibility tab.
- Ensure to click on the Run this program in compatibility mode for: checkbox to enable it.
- You can select Windows 7/8 from the drop-down menu.
- Click on Apply > Click on OK to save changes.
8. Force Run DirectX 11
Sometimes, you may have to set launch options on the game launcher for the specific game to make it compatible or force run with the required DirectX version. It’s recommended to run Remnant 2 in DX11 for better results.
- Open Steam > Click on Library.
- Right-click on Remnant 2 from the left pane.
- Click on Properties > Go to the General section.
- Go to Launch Options > Type -force -dx11 and try relaunching the game.
9. Update DirectX and Visual C++ Redistributables
The chances are high that your system doesn’t have the updated DirectX version and Microsoft Visual C++ Redistributables. An outdated version might trouble you a lot. So, you should check for updates by following the steps below.
- Visit the official Microsoft website and download the latest DirectX installer version.
- Run the installer and install DirectX completely.
- Once done, visit the official Microsoft for the latest Visual C++ Redistributable.
- Install the program and reboot the PC to apply changes.
10. Disable Antivirus Protection
Here, you can temporarily disable Windows Defender (antivirus) software by following the steps below to ensure there is no issue with the antivirus blocking the game application.
- Press the Win+I keys to open Windows Settings.
- Now, click on Update & Security > Click on Windows Security from the left pane.
- Click on the Open Windows Security button.
- Go to Virus & Threat Protection > Click on Manage Settings.
- Just Turn Off the Real-time protection option.
- If prompted, click on Yes to proceed further.
Even if you’re using third-party antivirus software, you should manually turn off the real-time scanning or protection.
11. Switch to the Dedicated Graphics Card
In case you’re using a high-end graphics card on your PC, but the game is still stuttering or throwing errors while startup, then you’re not using the dedicated GPU maybe. Follow the steps below to switch to the dedicated graphics card.
For Nvidia:
- Right-click on the desktop screen > Click on NVIDIA Control Panel.
- Click on 3D Settings > Click on Manage 3D Settings> in the left pane.
- Select the Program Settings tab > Choose Remnant 2 from the drop-down list.
- Now, select a High-performance NVIDIA processor.
- Save changes and reboot the PC to apply changes.
For AMD:
Switchable Graphics offers several standard operating modes and can be configured to run a specific application using the desired GPU.
- Right-click on the desktop screen > Select AMD Radeon Settings from the context menu.
- Now, click on System > Select Switchable Graphics.
- Save changes and reboot the PC to apply changes.
12. Disable Overlay Apps
It seems that a couple of popular applications have their overlay program that can eventually run in the background and cause gaming performance or even launching issues. You should turn them off to fix the issue by following the steps below:
Disable Discord Overlay:
- Launch the Discord app > Click on the gear icon at the bottom.
- Click on Overlay under App Settings > Turn on the Enable in-game overlay.
- Click on the Games tab > Select Remnant 2.
- Finally, Turn Off the Enable in-game overlay option.
- Make sure to reboot your PC to apply changes.
Disable Xbox Game Bar:
- Press the Win+I keys to open Windows Settings.
- Click on Gaming > Go to Game Bar.
- Turn Off the Record game clips, screenshots, and broadcasts using the Game Bar option.
If, in case, you’re unable to find the Game Bar option, then just search for it from the Windows Settings menu.
Disable Nvidia GeForce Experience Overlay:
- Launch the Nvidia GeForce Experience app > Go to Settings.
- Click on the General tab > Disable the In-Game Overlay option.
- Finally, restart the PC to apply changes and relaunch the game.
Also, do keep in mind that you should disable some other overlay apps like MSI Afterburner, Rivatuner, RGB software, or any other third-party overlay apps that run in the background.
13. Disable CPU or GPU Overclocking
It’s also worth mentioning not to enable CPU/GPU overclocking on your PC if your game is crashing or stuttering. We can understand that overclocking CPU/GPU can make a huge impact in improving gameplay but sometimes it may also cause issues with the bottleneck or compatibility. Just set the frequency to default for optimal performance.
That’s it, guys. We assume this guide was helpful to you. For further queries, you can comment below.
