Nowadays, screen recording with audio has become an integral tool for a wide variety of professionals and individuals. It might be necessary to record both the screen and audio when you do a lot of vlogging or live streaming. Although you can record the screen on mobile devices quite easily, you can’t do it same on Macs or Windows PCs. So, regardless of whether you are a professional capturing your screen for a presentation, an IT professional creating a how-to video, or an individual uploading a helpful YouTube video clip, we got your back. Here in this article, we will help you record your screen on Windows and Mac with some simple steps. So, let’s get started with the guide.

Page Contents
How to screen record with audio on a PC or Mac
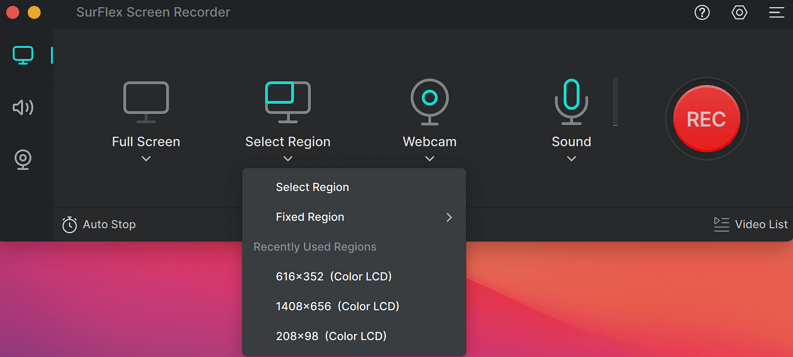
SurFlex Screen Recorder is a powerful application that allows you to record both the screen and audio on a PC and Mac. With this screen recorder app, you can record computer audio, including audio from browsers, apps, and games. It will capture the audio from any program on your computer you want. Using SurFlex Screen Recorder on Mac, you can capture screen and audio:
- Open the SurFex Screen Recorder.
- Thereafter, tap on Settings to set up your recording preferences.

3.Now, select recording mode. It can be the full screen or a selected region/window on your PC.

4.Then, select a webcam to record if you want to record yourself as well..
5.Set the audio input. Then, you can screen record with audio by selecting System Sound or System Sound and Microphone.
6.Click the Record button to get started.

7. Then, once done, hit the Stop button.

What Are The Features of SurFlex Screen Recorder?
#1. Rich Video Output Formats: Recordings can be easily saved as MP4, WMV, AVI, MOV, and FLV in various resolutions and frame rates.
#2. Save a Separate Audio File: This feature allows you to record an audio file simultaneously with the screen recording. In other words, you will receive both the complete video file and a separate file containing only the audio after completing the screen recording.
#3. Various Audio Output Formats: Windows and Mac users can record audio and save it as MP3, AAC, OGG, WMA, WAV, or FLAC files of different bitrates. This tool will assist you in recording streaming audio from YouTube to MP3 or capturing streaming audio as WAV.
#4. Customizable Shortcut Settings: With this feature, you can set up screen recording shortcuts that suit your preferences, and you will be able to record your screen easily on either your PC or Mac.
#5. Auto-Stop Recording: This feature automatically stops recording when the specified file size or recording time has been reached, giving you greater control over your recordings and conserving storage space.
While SurFlex Screen Recorder is good, you can always use the online free screen recorder that captures videos without any limits, but it has limited functionality because it’s a web-based application. You can also record free videos on your PC or Mac using the SurFlex online screen recording tool, which supports both Windows and macOS.
How to screen record with audio on an Android Device
Today, many businesses use screen recordings in their hybrid work environments. Your communications can be more clear and efficient when you share what’s on your screen through screen recordings. Well, it’s easy to record the screen of your Android device with Android 11 and later versions’ built-in screen recording tools. To record a screen on Android using built-in features, follow these steps:
- Initially, swipe down to access the Quick Settings panel of your Android device. Tap the Screen Recorder icon.
- If you don’t see the Screen Recorder icon, tap on Edit and add it.
- Depending on your needs, choose whether to record audio or where to record. Tap the Start button when you’re ready to start recording.
- In your notification panel, click the Stop icon or tap on the Screen Record icon again once you’re done recording.
- You will be able to find the video in the Gallery app on your device once it has been recorded.
Also read How to Enable Native Screen Recorder on Android 10
Steps to screen record with audio on an iPhone
If you need to capture something on your iPhone for sharing or reviewing later, screen recording is a useful feature. Fortunately, iOS comes with a simple tool for screen recording that we’ll show you how to use to ensure you get only the images and sounds you need. So, let’s check out steps to record the iPhone screen with audio.
- Initially, click on Control Center at the top right of your screen.
- After 3 seconds, tap on Screen Recording to begin recording your screen.
- Thereafter, press and hold the Screen Recording option, turn on the microphone, and then tap Start Recording to record the screen with audio.
- In order to end the recording, tap the Screen Recording icon and then choose Stop from the menu.
Conclusion
Recording a screen with audio is a versatile tool that can be used for a variety of purposes. You can record your screen activities on both PCs (Windows & Macs) and mobile devices using the steps described in this guide. So, that’s all we have for you on How to Screen Record with Audio on PCs and Mobiles. It’s our hope that this guide has helped you. Whenever you need more help, let us know in the comments below.
