Humankind is one of the newly launched historical turn-based strategical video games in 2021 that has been developed by Amplitude Studios. As the game is new in the industry, it has a couple of bugs and errors that we can’t deny. Meanwhile, several players have started reporting that Humankind Keep Crashing on their PC while launching it. If you’re also one of the victims and experiencing the same issue, then you can check this guide.
Also Read
It’s worth mentioning that the closed beta testing period has taken place for a long. Still, some of the players are getting the startup crashing issue which isn’t expected at all. Another thing we should mention is that the problem is appearing on both the Steam and Epic Games Launcher while trying to launch the game which is also worrying. Maybe there is an issue with the game files or patch version most probably.

Page Contents
- Why Does Humankind Keep Crashing?
- Humankind Keep Crashing on my PC, How to Fix?
- 1. Check System Requirements
- 2. Run the game as an Administrator
- 3. Verify Integrity of Game Files on Steam
- 4. Verify Game Files on Epic Games Launcher
- 5. Update Microsoft .NET Framework
- 6. Update Microsoft Visual C++ Redistributable
- 7. Update DirectX
- 8. Switch to Vulkan from DirectX
- 9. Update GPU Drivers
- 10. Disable Steam in-game Overlay
- 11. Delete Old Game Files from Closed Beta
- 12. Install All Pending Windows Updates
- 13. Disable Antivirus and Firewall Program
Why Does Humankind Keep Crashing?
It seems that there is an issue with the game patch version or the installed game files. But in some cases, it can also be possible that somehow the installed game files become corrupted or missing on your computer or your PC configuration isn’t meeting the system requirements or an outdated graphics driver or outdated Microsoft .NET Framework is causing such an issue.
Meanwhile, an outdated Microsoft Visual C++ Redistributable file or an outdated DirectX version or Vulkan API can also be another reason. Here we’ve mentioned all the possible workarounds to easily resolve the problem on your PC.
Humankind Keep Crashing on my PC, How to Fix?
Now, without wasting any more time, let’s jump into the guide below.
1. Check System Requirements
You’ll need to check whether your PC configuration is meeting the system requirements or not.
Minimum System Requirements:
- Requires a 64-bit processor and operating system
- OS: Windows 7, 64-bit
- Processor: Intel i5 4th generation / AMD FX-8300
- Memory: 8 GB RAM
- Graphics: NVIDIA GTX 770 / AMD R9 290
- DirectX: Version 11
- Storage: 25 GB available space
Recommended System Requirements:
- Requires a 64-bit processor and operating system
- OS: Windows 7, 64-bit
- Processor: Intel i5 6th generation (or better) / AMD Ryzen 5 1600 (or better)
- Memory: 8 GB RAM
- Graphics: NVIDIA GTX 1060 (or better) / AMD RX 5500-XT (or better)
- DirectX: Version 11
- Storage: 25 GB available space
2. Run the game as an Administrator
If you’re not running your video game using an administrator privilege, then it may cause some issues with the game launching or startup crashing or even the game not loading, etc. So, it’s better to simply run the game exe file as an administrator on your Windows computer to check if that fixes the problem or not. To do so:
- Right-click on the Humankind exe shortcut file on your PC.
- Now, select Properties > Click on the Compatibility tab.

- Make sure to click on the Run this program as an administrator checkbox to checkmark it.
- Click on Apply and select OK to save changes.
3. Verify Integrity of Game Files on Steam
Sometimes, verifying the integrity of game files can easily fix the game launching or crashing-related issues on the Windows PC. In some cases, issues with the game files or corrupted game files may cause several issues whatsoever. Luckily, these in-game file issues can be fixed by using the game launcher that you’re using. To do this:
- Launch Steam > Click on Library.
- Right-click on Humankind from the list of installed games.
- Now, click on Properties > Go to Local Files.

- Click on Verify Integrity of Game Files.
- You’ll have to wait for the process until it gets completed.
- Once done, just restart your computer.
4. Verify Game Files on Epic Games Launcher
- Open the Epic Games Launcher > Click on the ‘Library’ tab.
- Click on the three dots icon at the bottom right of the Humankind game popup.
- Then select ‘Verify’ > Follow the on-screen instructions to complete the process.
- Once done, make sure to restart your computer and then try running the Humankind game again.
5. Update Microsoft .NET Framework
- Go to C:\Program Files (x86)\Steam\steamapps\common\Steamworks Shared\_CommonRedist\DotNet\4.5.2
- Then run the NDP452-KB2901907-x86-x64-AllOS-ENU.exe file.
- Once done, you’ll need to restart your PC.
6. Update Microsoft Visual C++ Redistributable
- Head over to the following path on your PC:
C:\Program Files (x86)\Steam\steamapps\common\Steamworks Shared\_CommonRedist\vcredist
- You should see the following folders:
- 2012\vc_redist.x64.exe
- 2013\vc_redist.x64.exe
- 2019\vc_redist.x64.exe
- Just make sure to run all of these executable files that are present. (If you’ve different folders, then run the vc_redist.x64.exe file in those folders)
- Finally, restart your PC to fix the issue.
7. Update DirectX
- Go to the C:\Program Files (x86)\Steam\steamapps\common\Steamworks Shared\_CommonRedist\DirectX folder path.
- Next, run the DXSETUP.exe file to reinstall/update DirectX.
- Once done, restart your computer to apply changes.
8. Switch to Vulkan from DirectX
- Open the Steam client > Click on the ‘Library’ tab
- Right-click on the Humankind game > Select ‘Properties’ from the list
- Go to the ‘General’ tab > Select ‘Launch Options’
- Now, make sure to type the following command-line argument into the box:
-force-vulkan
- Once done, restart the computer to apply changes.
Please Note: The Vulkan API will only be applicable for the Humankind game.
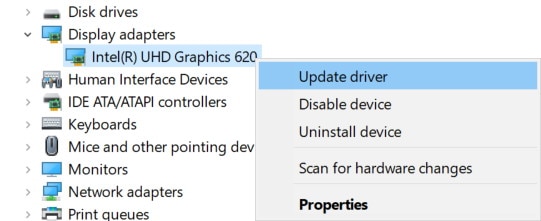
9. Update GPU Drivers
It seems that multiple affected players have reported about the outdated graphics driver. If you’re also using the outdated graphics driver for a while then make sure to check for updates by following the steps below:
- Press Windows + X keys to open the Quick Link Menu.
- Now, click on Device Manager from the list > Double-click on Display adapters.
- Right-click on the dedicated graphics card that’s active.

- Next, select Update driver > Choose to Search automatically for drivers.
- If there is an update available, the system will automatically download & install it.
- Once done, restart the computer to apply changes.
10. Disable Steam in-game Overlay
According to some of the affected players, disabling the Epic Games Launcher overlay and Steam overlay on the Windows computer has helped them to easily fix the game not launching issue. As the in-game overlay app is always running in the background whenever you launch the game client, it’s quite possible to have issues with the processes or system resources.
- Open the Steam client > Go to Library.
- Now, right-click on Humankind > Select Properties.
- Head over to the General section > Here just uncheck the Enable Steam Overlay checkbox.
- Go back to Library > Re-open Humankind to check for the not launching issue.
11. Delete Old Game Files from Closed Beta
Amplitude Studios has suggested deleting the previously installed game files or profile data under the OpenDev or Closed Beta. If you’ve used the beta build and then updated it to the public stable release, then the system may start conflicting with the old game files.
To do that, you’ll need to delete the local game folders. Just go to Users\[Your Username]\Documents\Humankind\ > Delete the full Humankind folder > Then restart the game to check if there is an issue or not.
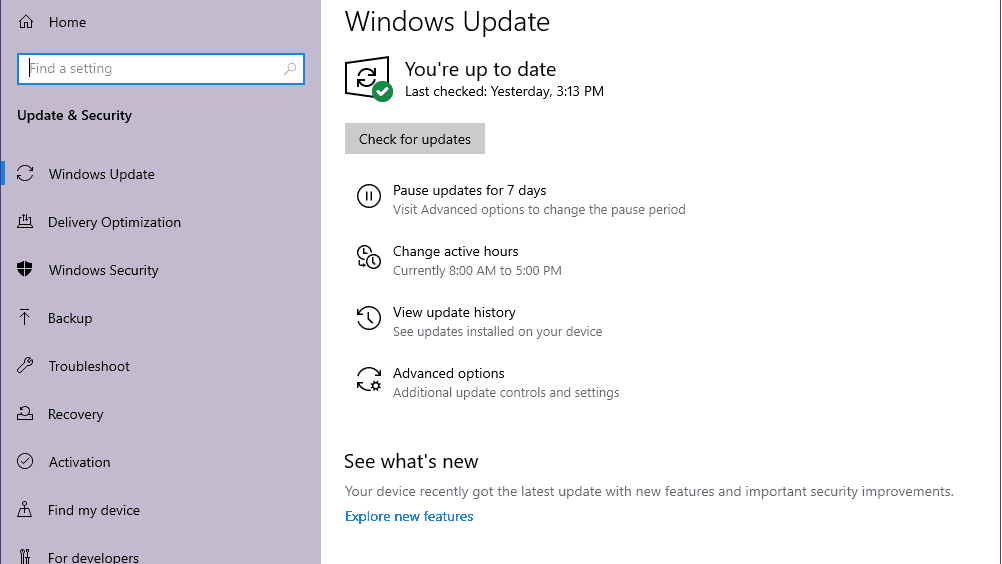
12. Install All Pending Windows Updates
It may possible that somehow any of the Windows bugs or system files conflict with the game to run it properly. Sometimes an incompatibility issue can also take place when you didn’t update the software for a while. So, make sure to install all the pending Windows updates one by one and keep it to the latest OS build whatsoever. To do that:
- Press Windows + I keys to open up the Windows Settings menu.
- Next, click on Update & Security > Select Check for updates under the Windows Update section.

- If there is a feature update available, select Download and install.
- Wait for some time until the update gets completed.
- Finally, reboot your PC to apply changes immediately.
13. Disable Antivirus and Firewall Program
- Click on the Start menu > Type Control Panel and click on it.
- Now, type firewall in the search box > Click on Windows Firewall.
- From the left pane, click on Turn Windows Firewall on or off.
- Make sure to select Turn off Windows Firewall for the Private, Domain, and Public Network Settings.
- Finally, reboot the PC to apply changes, and try checking the issue.
Now, you’ll have to disable the anti-virus protection (Windows Defender) as well by following the steps below:
- Head over to the Windows Settings > Privacy and Security.
- Now, go to Windows Security > Virus & threat protection.
- Click on Manage settings >Then turn off the Real-time Protection option.
- Once done, make sure to reboot your PC to apply changes.
If in case, you’re using any third-party antivirus program then make sure to turn it off manually.
That’s it, guys. We hope this guide was helpful to you. For further queries, you can comment below.
