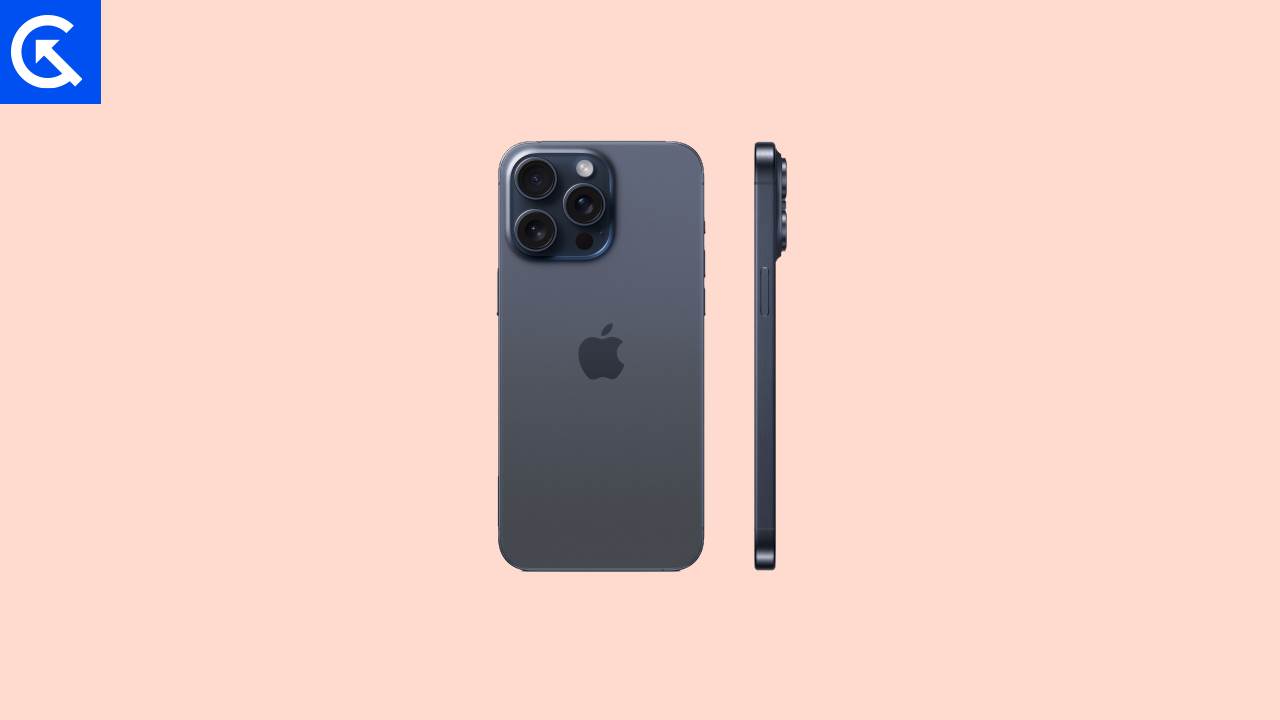
The iPhone 15 Pro and the 15 Pro Max were unveiled at the Wonderlust keynote on September 12, 2023. Both phones bring notable improvements over their predecessors. The iPhone 15 Pro and 15 Pro Max come with improved cameras, USB-C, Titanium frame, and the new iOS 17 update.
If you have one of these Pro models, you might have noticed that you have run into some issues by now. One of those issues is the iPhone 15 Pro and 15 Pro Max Wi-Fi not connecting or not working. If you are also experiencing this issue, then you are in the right place.
Here, we will guide you extensively on how to fix this issue and get back to using Wi-Fi on your iPhone 15 Pro / 15 Pro Max. We will also discuss the reasons why this issue might be happening. So, without any further ado, let’s get started!
Page Contents
- 27 Ways to Fix iPhone 15 Pro and 15 Pro Max Wi-Fi Not Connecting or Working Issue
- Fix 1: Check your Internet Connection
- Fix 2: Restart your Router
- Fix 3: Check your Router Settings
- Fix 4: Disable MAC Address Filtering
- Fix 5: Check for Router Firmware Updates
- Fix 6: Reset your Router
- Fix 7: Check Guest Wi-Fi User Authentication
- Fix 8: Contact your ISP
- Fix 9: Try Using Another Wi-Fi Network
- Fix 10: Restart your iPhone 15 Pro / Pro Max
- Fix 11: Check iPhone Date and Time
- Fix 12: Forget & Reconnect Wi-Fi
- Fix 13: Turn OFF Bluetooth
- Fix 14: Turn OFF Low Power Mode
- Fix 15: Turn OFF Wi-Fi Assist
- Fix 16: Turn OFF VPN
- Fix 17: Toggle ON and OFF Airplane Mode
- Fix 18: Turn OFF Low Data Mode
- Fix 19: Configure Parental Controls
- Fix 20: Check for App Interference
- Fix 21: Use A Different DNS Address
- Fix 22: Reset Location & Privacy Settings
- Fix 23: Reset Network Settings
- Fix 24: Reset All Settings
- Fix 25: Check for Software Updates
- Fix 26: Factory Reset your iPhone 15 Pro / Pro Max
- Fix 27: Contact Apple Support
- Frequently Asked Questions
- Final Words
27 Ways to Fix iPhone 15 Pro and 15 Pro Max Wi-Fi Not Connecting or Working Issue
Now that you know the reasons behind this issue, let’s take a detailed look into how you can fix this issue. We will resolve all the internet connection issues and proceed with the iPhone configuration issues. Let’s dive in.
Fix 1: Check your Internet Connection
First, let’s ensure your iPhone and the internet are on good speaking terms. Sometimes, it’s just a matter of a loose connection or a hiccup in the network. We’re giving it a gentle nudge to fix it.
Make sure your internet service is active and working. Sometimes, the issue might be a weak or disconnected connection. Verifying this connection helps pinpoint the problem and proceed to the next steps if needed.
Fix 2: Restart your Router
Have you ever had a long day and needed a moment to rest? Your router does, too! A quick restart is like a rejuvenating nap for your router. It clears any glitches and gives it a fresh start, often solving those pesky Wi-Fi issues.
Restarting your router can address various connectivity issues. It clears temporary glitches, re-establishes connections, and refreshes settings. Follow the steps to restart your router:
- Unplug your router from the power cord.
- Wait for a few minutes for all the power to drain out.
- Now, plug in your router and see if the Wi-Fi issue has been resolved.
Fix 3: Check your Router Settings
Think of your router settings as a control center for your Wi-Fi. Sometimes, a setting might have gone a bit off track. These settings may include firewall configurations or restricted access.
Ensuring the router settings align with your iPhone’s requirements is essential for a smooth and uninterrupted connection. Go into your router settings using the IP address and make sure all the settings are correct.
- Search for your router’s IP address. It should be written on the back.
- Enter the IP address in a browser while connected to the Wi-Fi.
- Enter the username and password (also written on the back of your router) and log in.
- Check all the settings and make sure they are configured correctly.
Fix 4: Disable MAC Address Filtering
The MAC address is like filtering as a bouncer at a club, allowing only certain devices in. In other words, MAC address filtering is a security feature on routers that can inadvertently block your iPhone from connecting.
Disabling this filtering temporarily allows your iPhone to connect, indicating whether the filtering was causing the issue. Follow the steps below to disable this filter.
- Search for your router’s IP address. It should be written on the back.
- Enter the IP address in a browser while connected to the Wi-Fi.
- Enter the username and password (also written on the back of your router) and log in.
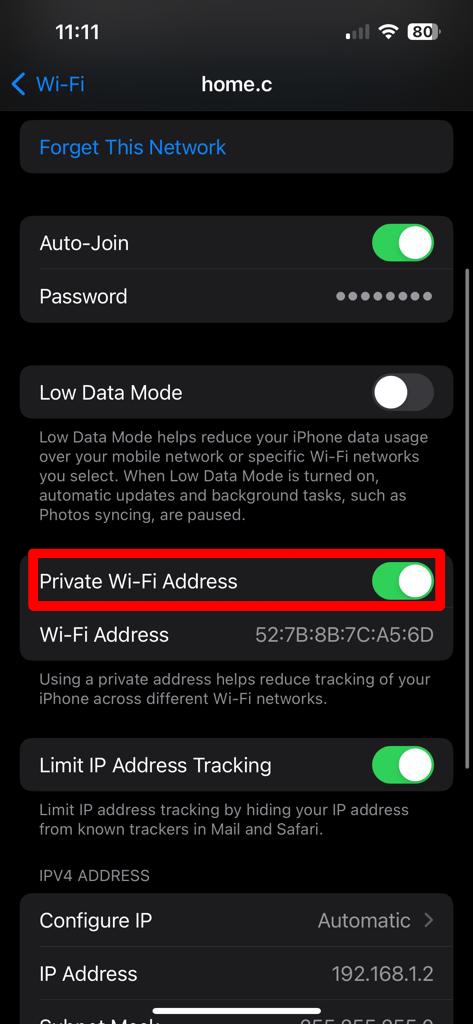
- Go to MAC Address Filtering or Blocked Devices or a similar option and ensure your iPhone’s MAC address is not listed there.
You can find your MAC address here:
- Open the Settings app on your iPhone.
- Tap on Wi-Fi.
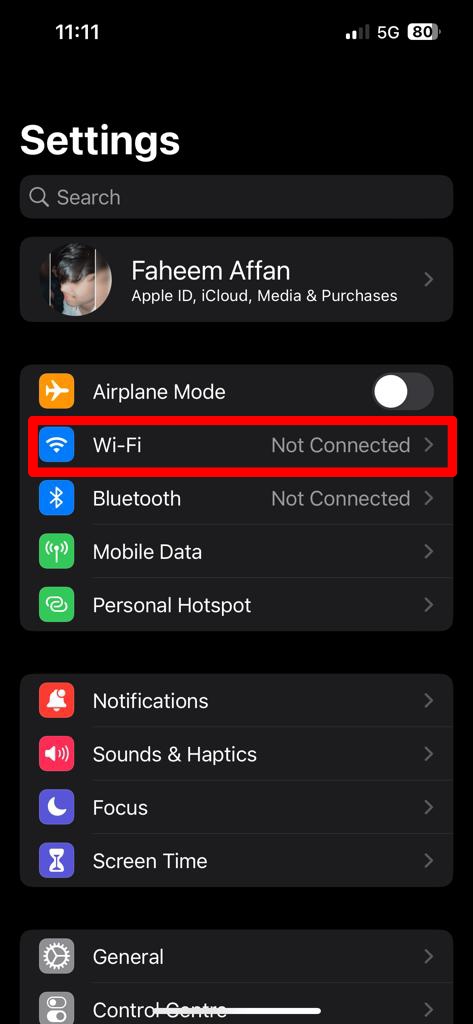
- Tap on the “i” next to your Wi-Fi network.
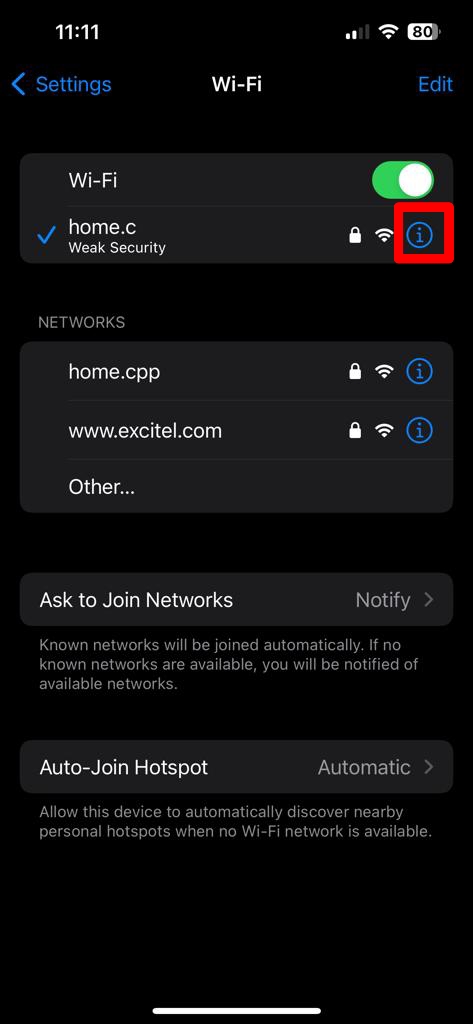
- Your MAC address is listed next to Wi-Fi Address.
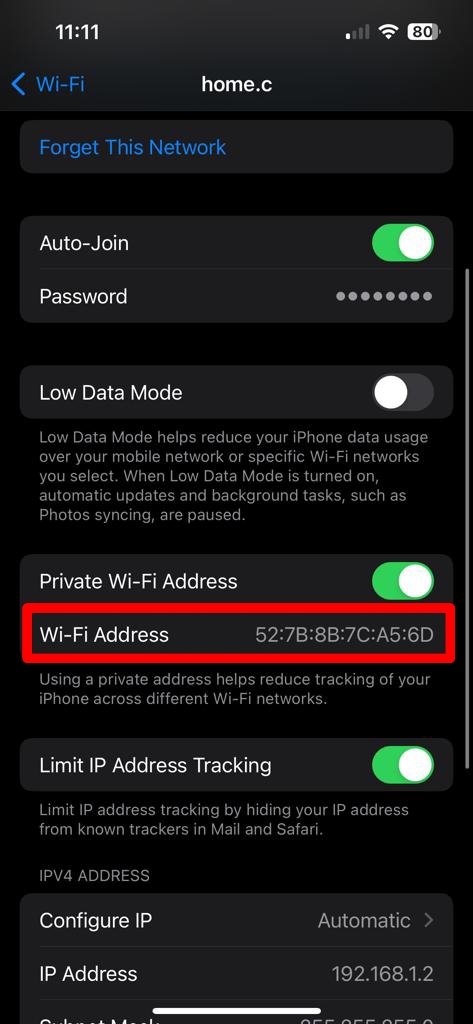
- Make sure to turn OFF the toggle next to Private Address or Private Wi-Fi Address.
Fix 5: Check for Router Firmware Updates
Just like your phone gets updates, so does your router. Sometimes, an update is all it takes to smoothen out the wrinkles in its performance. We’re making sure your router is not missing out on any important software upgrades.
Router manufacturers often release updates to improve performance and fix bugs. Ensuring that your router’s firmware is up to date can resolve compatibility issues with your iPhone and potentially enhance your Wi-Fi connection. Follow the steps below.
- Search for your router’s IP address. It should be written on the back.
- Now, enter the IP address in a browser while you are connected to the Wi-Fi.
- Enter the username and password (also written on the back of your router) and log in.
- Check for Firmware Updates and install them, if available.
- Once the update is installed, simply restart your router (as directed in Fix 2).
Fix 6: Reset your Router
When all else fails, a good old reset can do wonders. It’s like a mini-vacation for your router, wiping out any issues and giving it a clean slate. After this, your iPhone and Wi-Fi should be back on talking terms.
Resetting your router involves restoring it to its default settings. This is a more comprehensive step than a simple restart and can resolve complex network problems. It’s a measure taken when other basic troubleshooting steps don’t work. Follow the steps below.
Note: Resetting your router will delete all the configurations and reset your Wi-Fi’s SSID and password.
- Find the reset button on your router. It is usually located on the back and inside a hollow space.
- If the button is inside a hollow space, use a pin to press and hold the button for a few seconds. This will reset your router.
- Once the router has been reset, set it up and log in using the credentials on the back of your router.
Fix 7: Check Guest Wi-Fi User Authentication
Guest Wi-Fi networks sometimes have different authentication processes. Verifying that your iPhone is correctly authenticating on a guest network is crucial, as incorrect authentication can lead to connection failures. Sometimes, a little adjustment here can make a big difference in your iPhone’s ability to connect. Follow the steps below.
- If you are using a guest network, you should see a notification saying you need to enter your details.
- Tap on that notification, and fill in your details.
- After you have filled in your details, you should be able to access the internet.
Fix 8: Contact your ISP
When things get really complicated, it’s time to call in the experts – your Internet Service Provider (ISP). There could be issues at their end that are affecting your connectivity, and they might need to troubleshoot or reset your connection remotely.
Question your ISP if there is an ongoing outage and how much time it’s going to take to fix the issue. After the said time has passed, check your internet connection again and see if the issue has been resolved. If not, contact your ISP again and ask for a resolution.
Fix 9: Try Using Another Wi-Fi Network
Trying to connect to a different Wi-Fi network helps determine if the problem lies with your iPhone or the specific network. If your iPhone connects successfully to another network, then the issue may be with the original network. Follow the steps below.
- Open the Settings app on your iPhone.
- Tap on Wi-Fi.

- Tap on the “i” next to your Wi-Fi network.

- Tap on Forget This Network at the top.
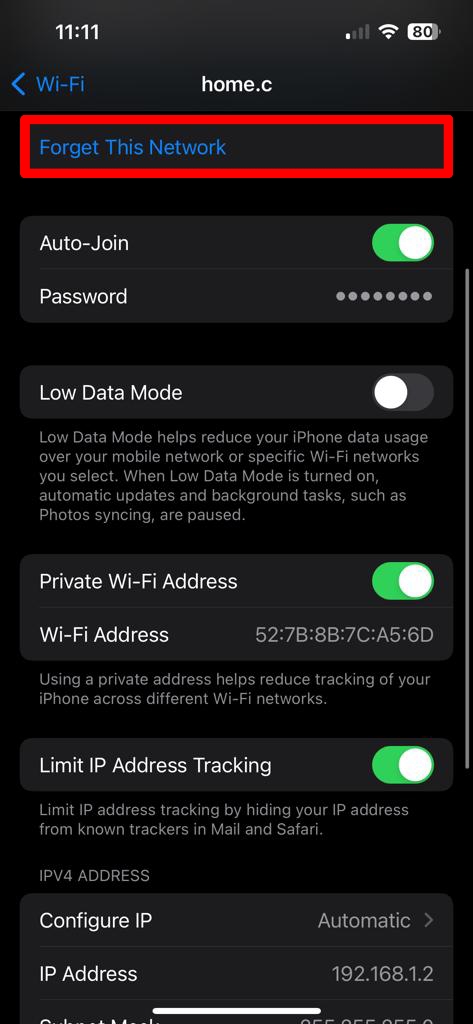
- Now, go back and tap on any other Wi-Fi network and see if the issue still persists. If the issue is resolved, then there is an issue with your Wi-Fi network itself.
Fix 10: Restart your iPhone 15 Pro / Pro Max
Restarting your iPhone is a simple yet effective step to troubleshoot connectivity issues. Just like a good night’s sleep helps you start a new day, restarting your iPhone can do wonders for its functionality. It helps in clearing any temporary glitches in the iPhone’s network configurations and often resolves minor software-related problems. Follow the steps below.
- Press and hold the Side key and the Volume Down button on your iPhone 15 Pro / Pro Max. The Power OFF menu should pop up.
- Now, drag the slider to the right to power off your iPhone.
- Wait for a few seconds. Now, press and hold the Side key for a few seconds to restart your iPhone.
- After the restart, check if your iPhone is able to use Wi-Fi.
Fix 11: Check iPhone Date and Time
Making sure the time and date on your iPhone are correct is essential for reliable Wi-Fi. Date and time inconsistencies may compromise security certificates, leading to connection problems while attempting to access Wi-Fi.
A mismatch can sometimes confuse your iPhone, like landing in the wrong city. We’re double-checking these coordinates to ensure your iPhone knows exactly where to connect. Follow the steps below.
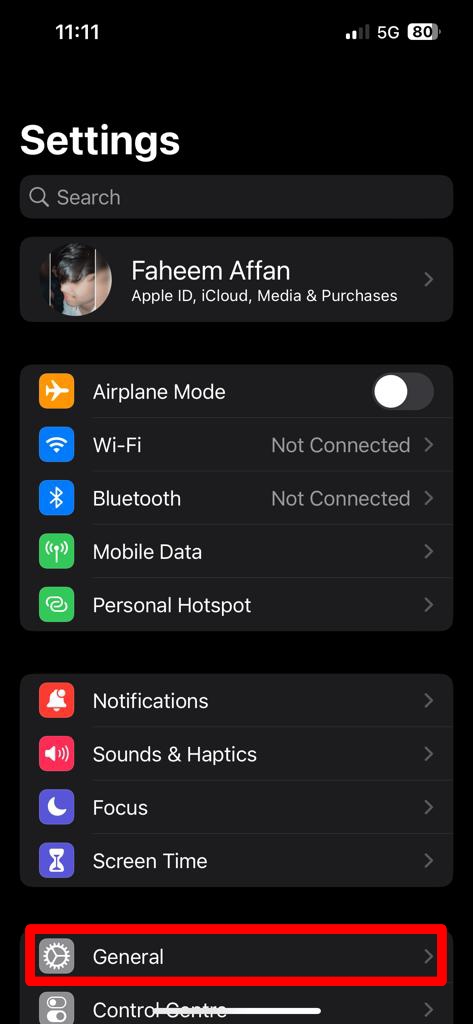
- Open the Settings app on your iPhone.
- Tap on General.
- Then, tap on Date & Time.
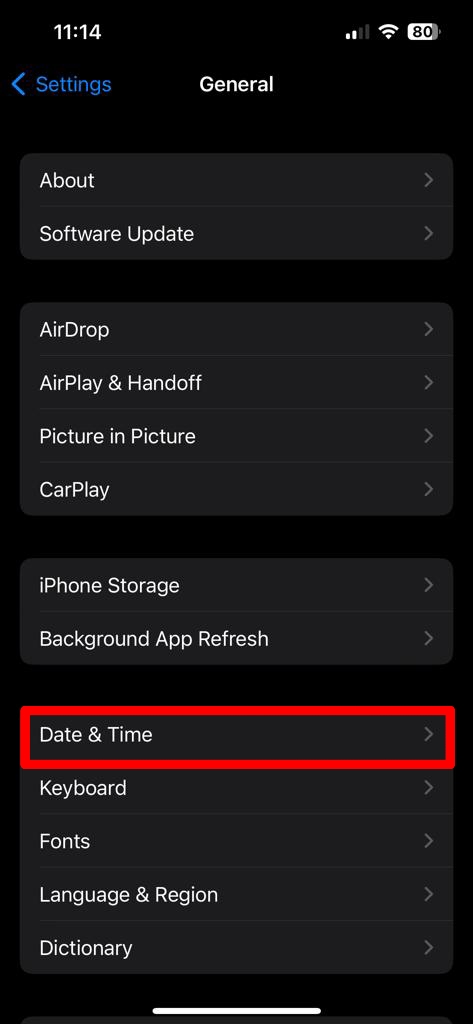
- Turn ON the toggle next to Set Automatically. This will make sure that the date and time are set correctly.
Fix 12: Forget & Reconnect Wi-Fi
Sometimes, disconnecting from a Wi-Fi network and reconnecting is all that’s needed to restore service. It erases any network-related settings and preferences from your iPhone’s memory and forces you to establish a new connection. Follow the steps below.
- Open the Settings app on your iPhone.
- Tap on Wi-Fi.

- Tap on the “i” next to your Wi-Fi network.

- Tap on Forget This Network at the top.

- Now, go back and tap on the same Wi-Fi network.
- Enter the Wi-Fi password, if any, and see if the issue has been resolved.
Fix 13: Turn OFF Bluetooth
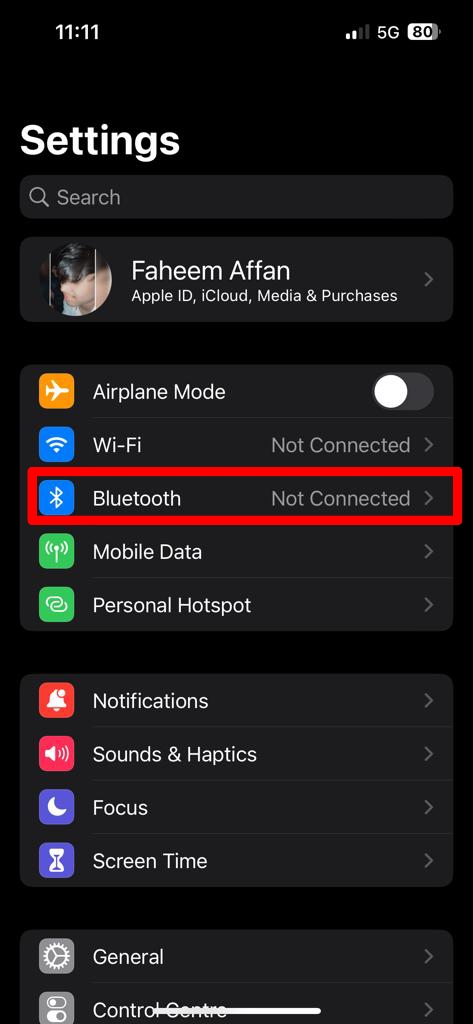
Disabling Bluetooth is another quick and easy solution. Bluetooth and Wi-Fi sometimes cross wires and cause a bit of a tangle. This is because they operate on similar frequencies. Temporarily turning off Bluetooth prevents this interference, allowing for a more reliable Wi-Fi connection. Follow the steps below to turn OFF Bluetooth.
- Open the Settings app on your iPhone.
- Tap on Bluetooth.
- Tap on the toggle next to Bluetooth to turn it OFF.
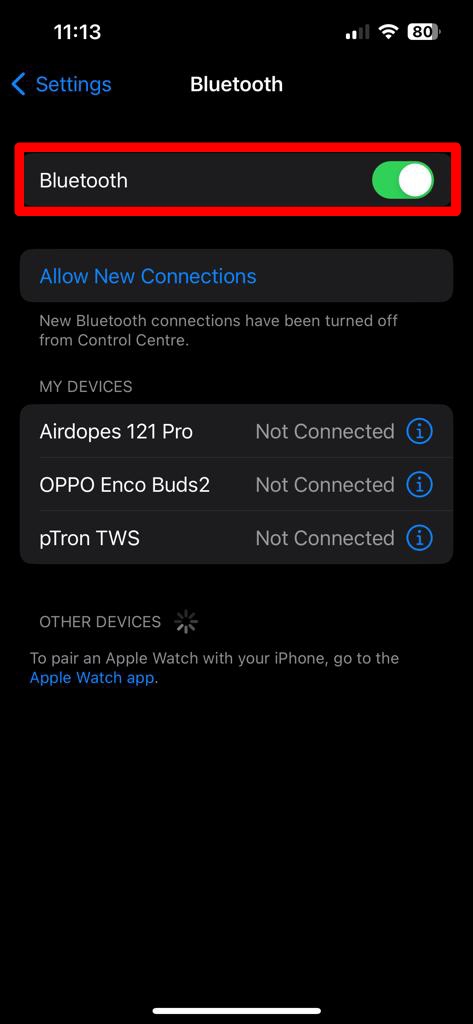
Note: You can turn off the Bluetooth from the Control Center, too, but that will only turn it off temporarily.
Fix 14: Turn OFF Low Power Mode
Low Power Mode is like your iPhone’s energy-saving superhero, but even superheroes need breaks. Sometimes, Low Power Mode can restrict certain functions, like optimal Wi-Fi connectivity. If you want your iPhone’s Wi-Fi to perform at its best, you should turn off Low Power Mode. Follow the steps below to turn OFF Low Power Mode.
- Open the Settings app on your iPhone.
- Tap on Battery.
- Tap on the toggle next to Low Power Mode to turn it OFF.
Alternatively, you can turn off the Low Power Mode from the Control Center, too.
Fix 15: Turn OFF Wi-Fi Assist
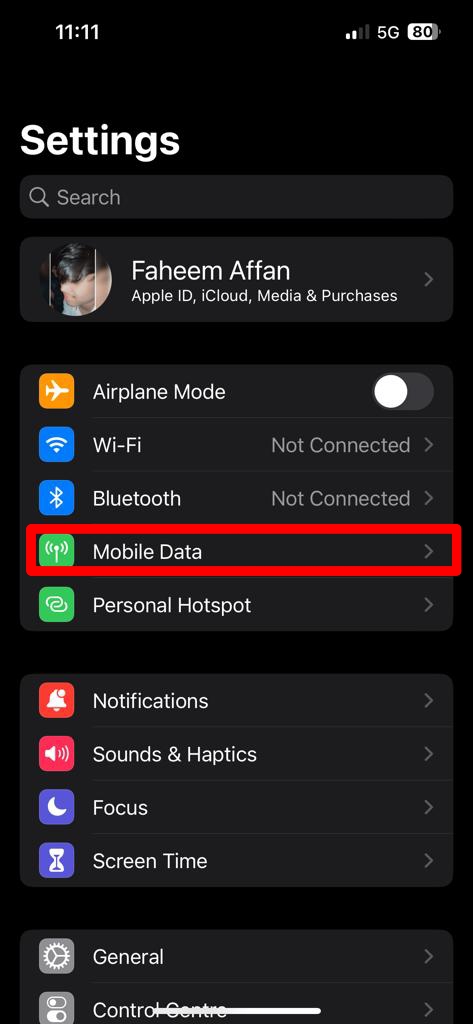
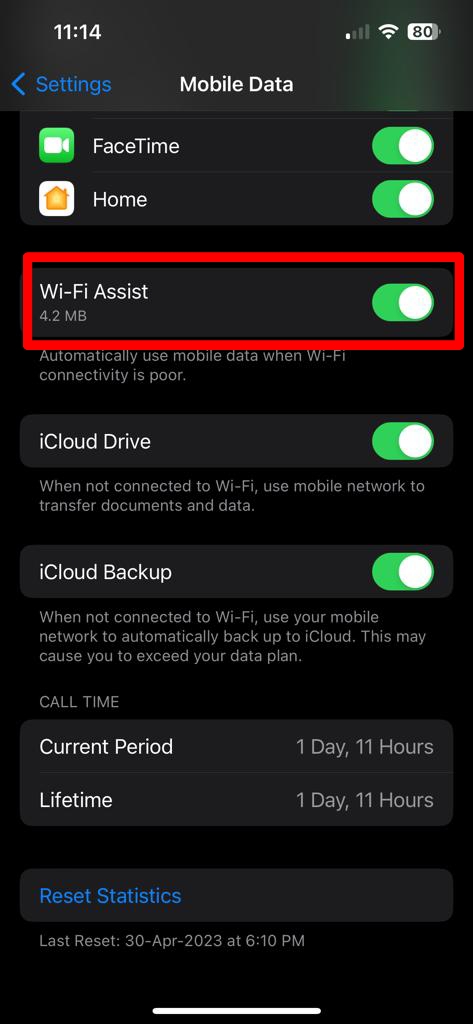
Wi-Fi Assist uses cellular data if the Wi-Fi connection is unstable. Despite its usefulness, this function has the potential to disrupt Wi-Fi connections. By disabling it, you can keep your iPhone’s Wi-Fi connection active without having to toggle anything. Follow the steps below to turn OFF Wi-Fi Assist.
- Open the Settings app on your iPhone.
- Tap on Cellular or Mobile Data.
- Scroll down to the bottom and tap on the toggle next to Wi-Fi Assist to turn it OFF.
Fix 16: Turn OFF VPN
VPNs, or virtual private networks, can sometimes cause Wi-Fi to malfunction. Temporarily turning off the VPN lets your iPhone reconnect directly to the network and determine if it’s the source of the connectivity issues. This ensures a clear path for your iPhone to connect to the Wi-Fi network. Follow the steps below.
- Open the Settings app on your iPhone.
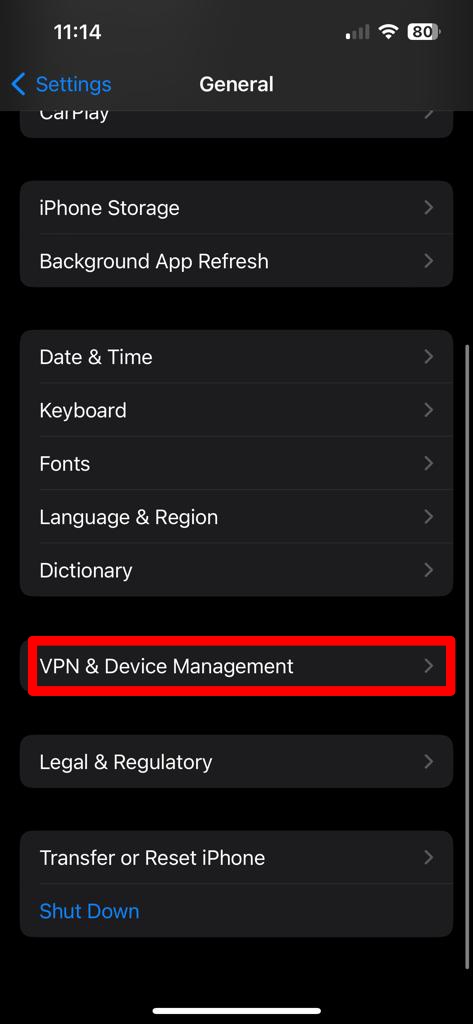
- Tap on VPN and turn the toggle OFF. If you don’t see this option, tap on General.

- Then, tap on VPN & Device Management.
- Tap on VPN.
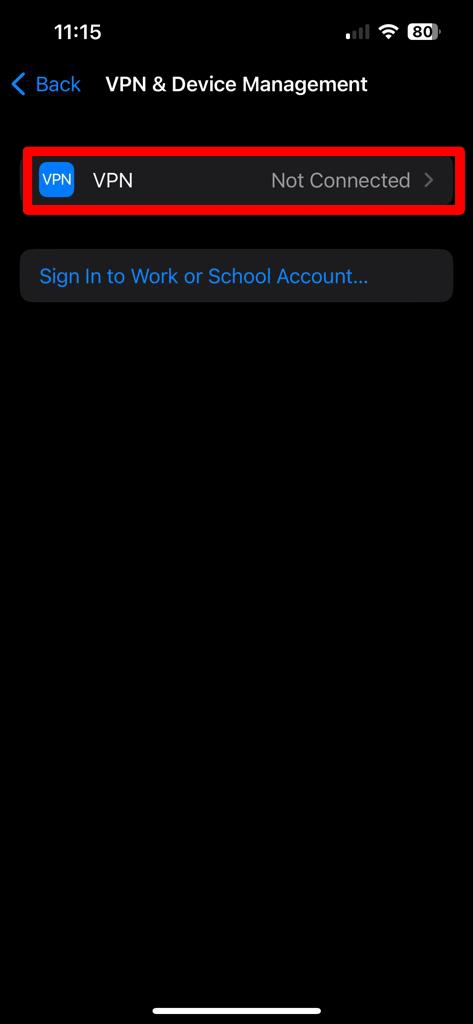
- Tap on the toggle next to Status to turn it OFF.
Alternatively, you can turn OFF the VPN from the VPN service app that you are using. Just open the app and tap on “Stop,” “Turn OFF,” or a similar option.
Fix 17: Toggle ON and OFF Airplane Mode
Think of Airplane Mode as a quick reset button for your iPhone’s connectivity. Turning your iPhone’s Airplane Mode ON and OFF will reset its network connections. It’s a quick solution for fixing Wi-Fi connectivity issues and reconnecting reliably. Just follow the steps below.
- Open the Settings app on your iPhone.
- Tap on the toggle next to Airplane Mode to turn it OFF.
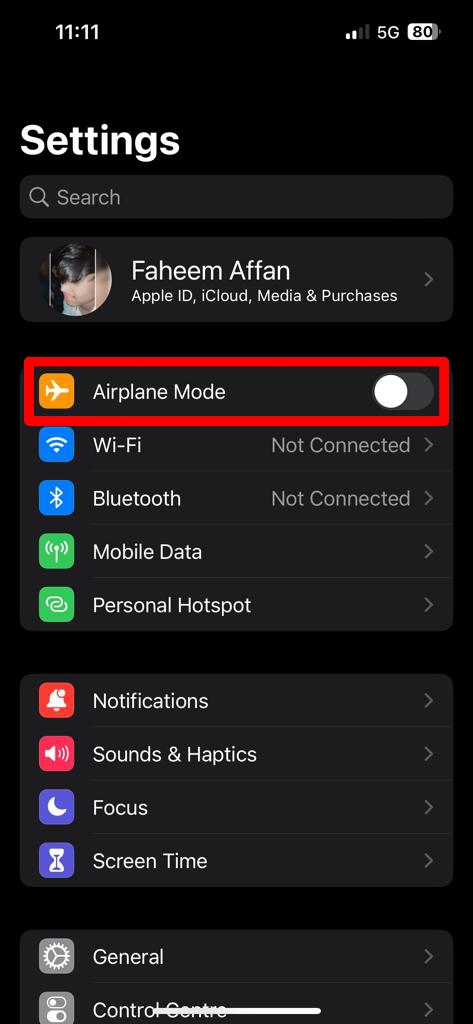
Alternatively, you can turn off the Airplane Mode from the Control Center, too.
Fix 18: Turn OFF Low Data Mode
With Low Data Mode, you can save money on your wireless and mobile data plans. While the Low Data Mode is great for saving data, it can sometimes be a bit too strict and affect Wi-Fi performance. If you disable it, your iPhone will be able to connect to any open Wi-Fi network and use it freely. Follow the steps below.
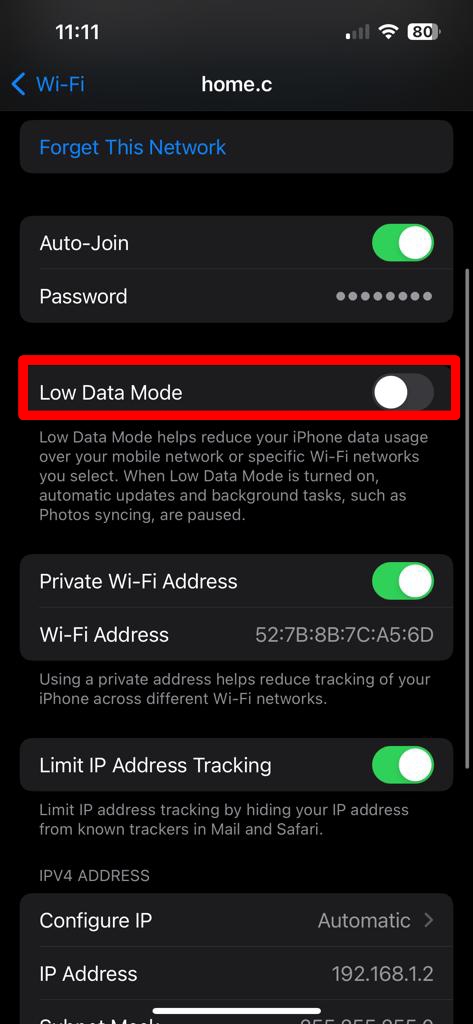
- Open the Settings app on your iPhone.
- Tap on Wi-Fi.

- Tap on the “i” next to your Wi-Fi network.

- Tap on the toggle next to Low Data Mode to turn it OFF.
Fix 19: Configure Parental Controls
Setting up parental controls on an iPhone means limiting access to specific apps, settings, or media. Inadvertently adjusting these settings can disrupt Wi-Fi connection. Making the right changes here will guarantee uninterrupted Wi-Fi connectivity. Just follow the steps below.
- Open the Settings app on your iPhone.
- Scroll down and tap on Screen Time.
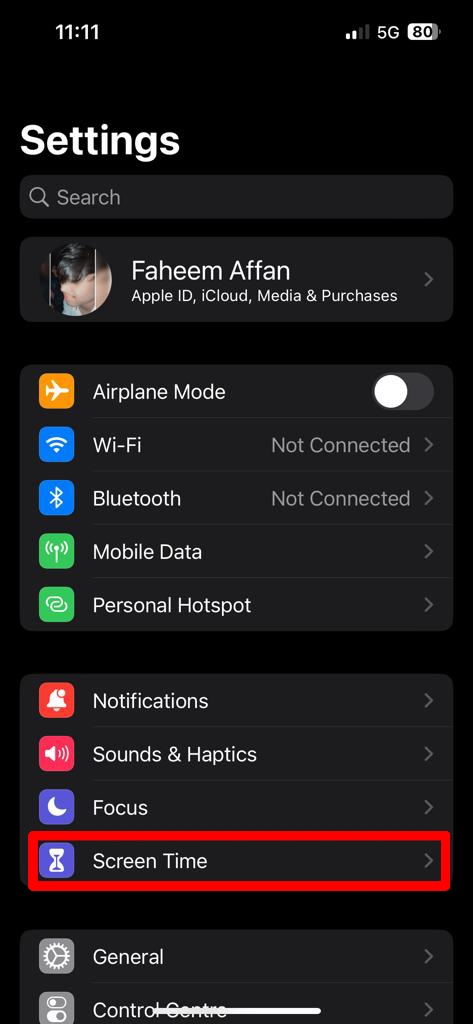
- Then, tap on Content & Privacy Restrictions.
- Tap on the toggle next to Content & Privacy Restrictions to turn it OFF.
Now, check if the Wi-Fi is working properly. If yes, then go back and check if there are settings that could be preventing the Wi-Fi from working properly. If not, then you can toggle ON the option back again.
Fix 20: Check for App Interference
Due to faults or incompatible settings, some apps may cause Wi-Fi to malfunction. If you’re having trouble connecting to Wi-Fi, try updating or reinstalling any recently added apps that may be causing interference. Follow the steps below.
Update the App:
- Open the App Store on your iPhone.
- Tap on your profile picture on the top/bottom right corner of the screen.
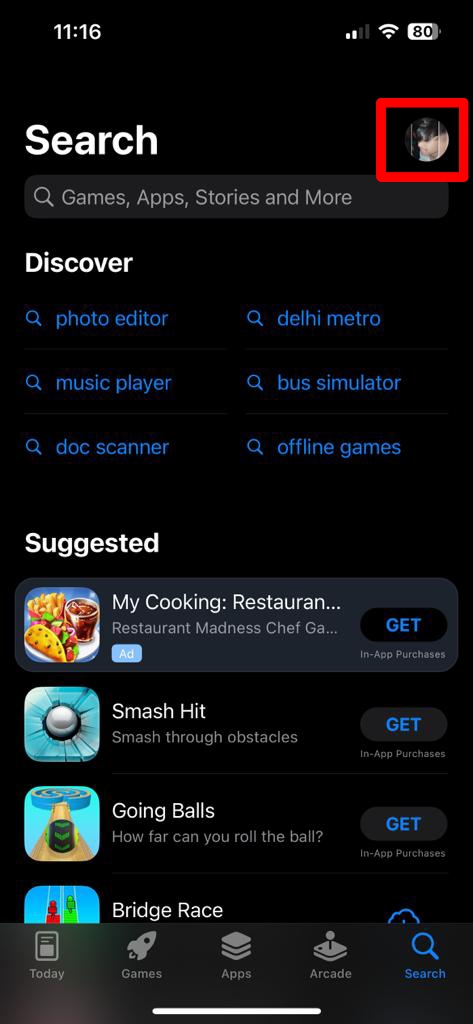
- Scroll down to see all the available updates.
- Tap on Update next to the apps that need to be updated.
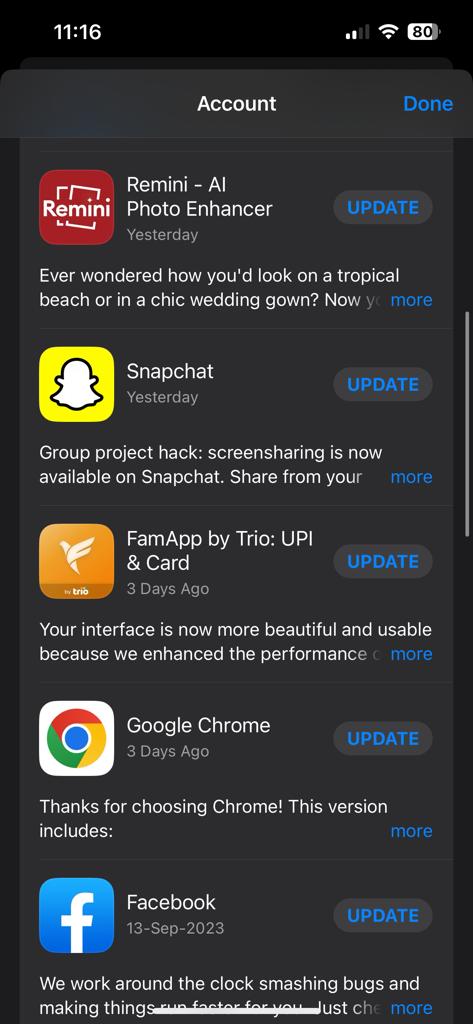
- After the updates are finished installing, restart your iPhone and see if the issue has been resolved.
Reinstall the App:
- If updating the apps doesn’t help, you might need to reinstall them.
- Tap and hold the app icon and tap on the Delete icon.
- Tap on Delete and confirm.
- Now, go to the App Store and search for the app.
- Tap on Install to reinstall the app.
Fix 21: Use A Different DNS Address
Domain Name System (DNS) is a service that transforms hostnames into IP addresses. If you’re having trouble connecting to Wi-Fi, trying a new DNS address like Google DNS or OpenDNS may help. Follow the steps below.
- Open the Settings app on your iPhone.
- Tap on Wi-Fi.

- Tap on the “i” next to your Wi-Fi network.

- Tap on Configure DNS. The default is set to Automatic.
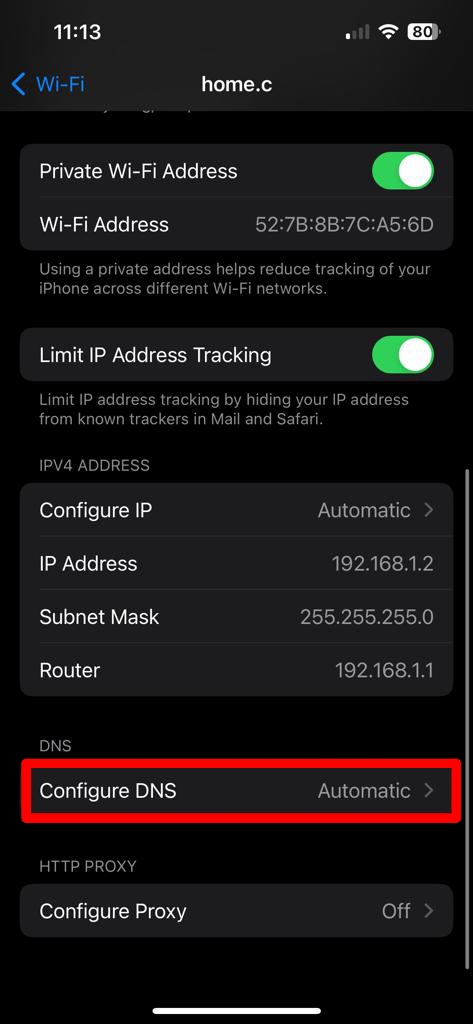
- Select Manual.
- Tap on the “–” icon to delete all the current DNS addresses.
- Then, tap on “+ Add Server” to add a new DNS server. We recommend you use either Google or Cloudflare DNS.
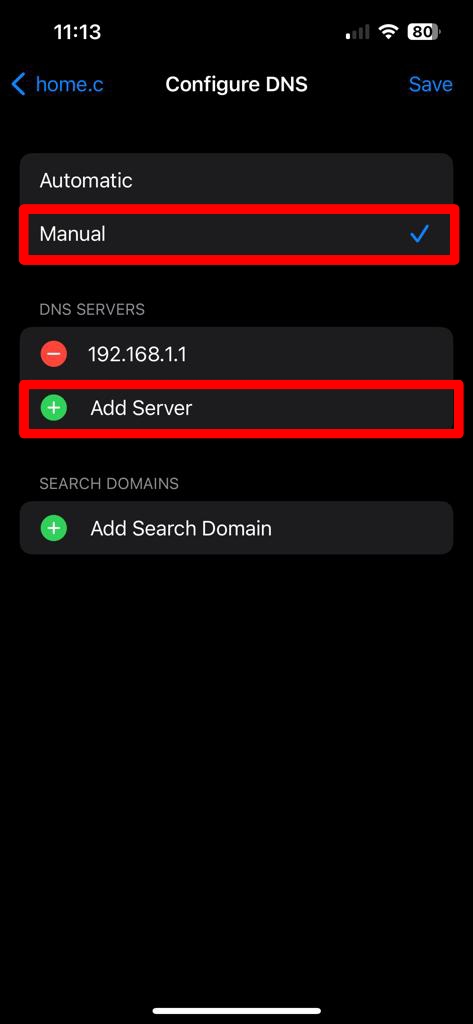
- Once you are done, simply tap on Save at the top and see if the Wi-Fi is working now.
Google DNS:
- 8.8.8.8
- 8.8.4.4
- 2001:4860:4860::8888
- 2001:4860:4860::8844
Cloudflare DNS:
- 1.1.1.1
- 1.0.0.1
- 2606:4700:4700::1111
- 2606:4700:4700::1001
Fix 22: Reset Location & Privacy Settings
You can also try resetting the location and privacy settings on your iPhone 15 Pro / 15 Pro Max. This will help rule out the possibility that corrupted or out-of-date settings are to blame for your Wi-Fi issues. Just follow the steps below.
- Open the Settings app on your iPhone.
- Tap on General.

- Then, tap on Transfer or Reset iPhone.
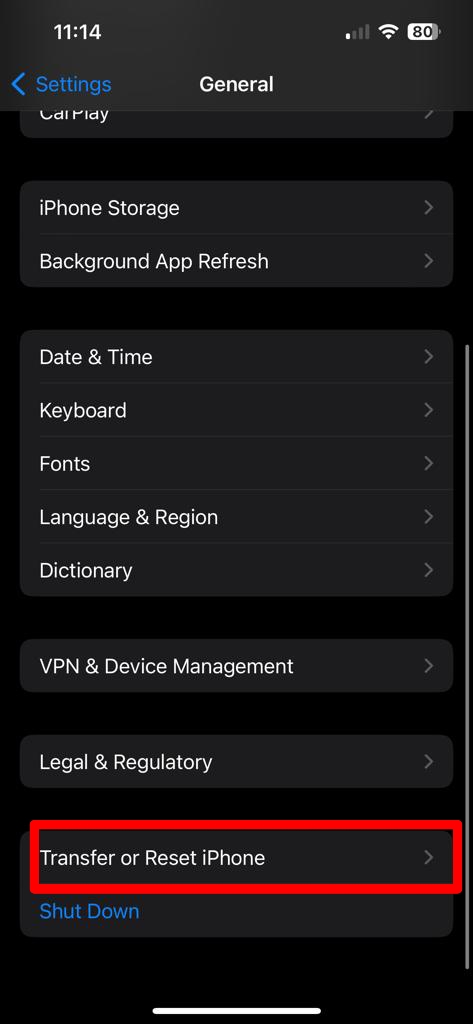
- Tap on Reset.
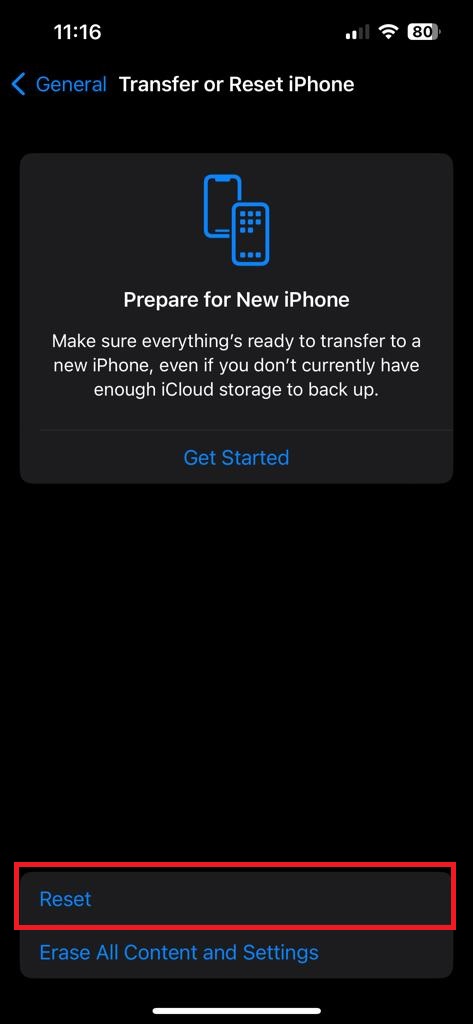
- Tap on Reset Location & Privacy.
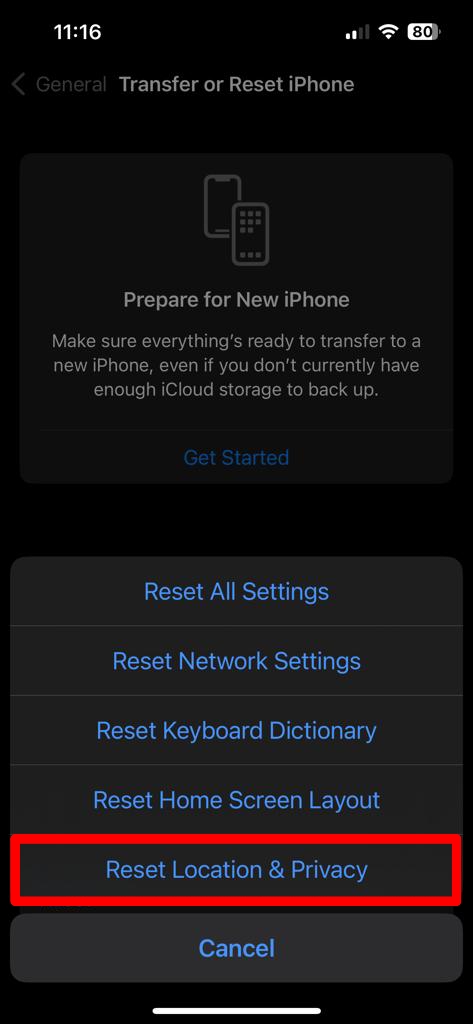
- Check to see if the Wi-Fi issue has now been resolved.
Fix 23: Reset Network Settings
Network settings are like the foundation of your iPhone’s connectivity. Resetting your iPhone’s network settings will remove all the data associated with your network. This will reset your Wi-Fi, cellular, and VPN settings to their factory defaults and can be an effective resolution for persistent Wi-Fi issues. Follow the steps below.
- Open the Settings app on your iPhone.
- Tap on General.

- Then, tap on Transfer or Reset iPhone.

- Tap on Reset.

- Tap on Reset Network Settings.
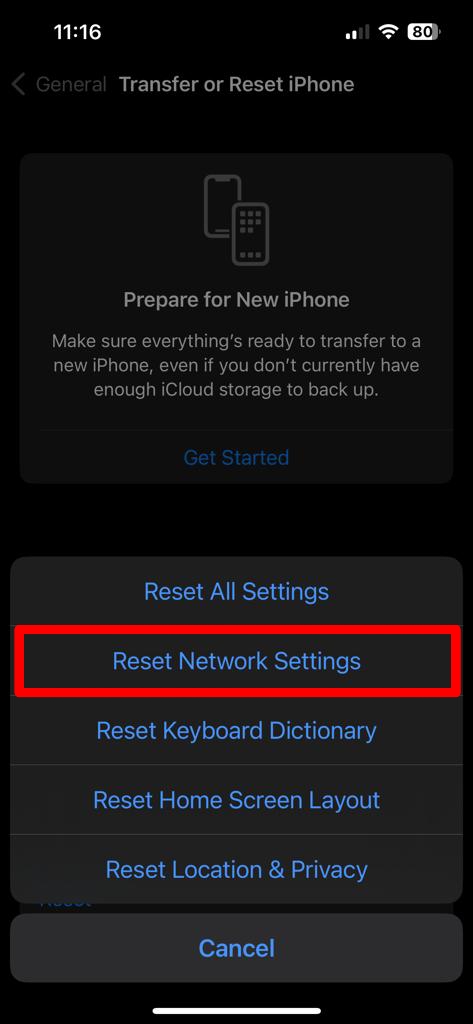
- Enter your passcode to confirm.

- Tap on Reset Network Settings again. Your iPhone may reboot now.
- Check to see if the Wi-Fi issue has now been resolved.
Fix 24: Reset All Settings
Resetting your iPhone’s settings will return the device to its original configuration without erasing any data. It’s a more comprehensive approach that can fix complicated software problems, such as those that prevent Wi-Fi from working. This will not delete any of your data, though. Follow the steps below to reset all settings.
- Open the Settings app on your iPhone.
- Tap on General.

- Then, tap on Transfer or Reset iPhone.

- Tap on Reset.

- Tap on Reset All Settings.
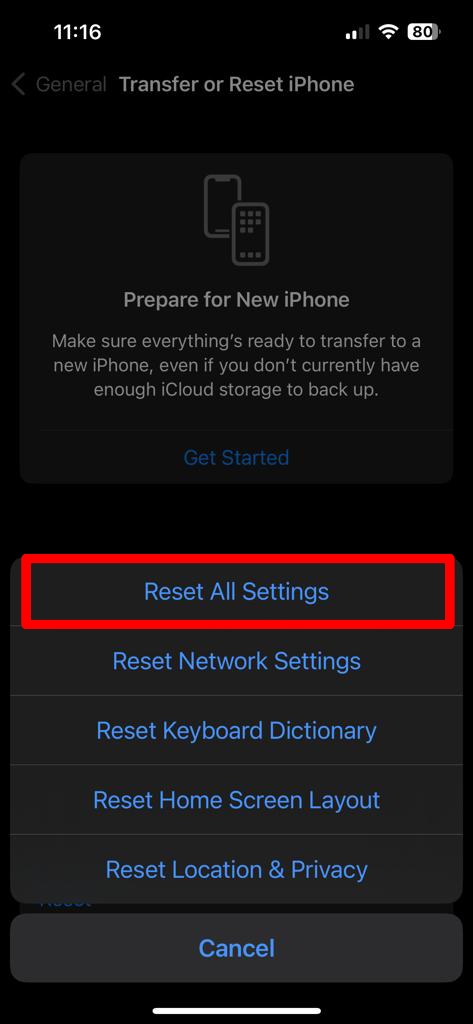
- Enter your passcode to confirm.

- Tap on Reset All Settings again. Your iPhone may reboot now.
- Check to see if the Wi-Fi issue has now been resolved.
Fix 25: Check for Software Updates
Software updates often come with improvements and fixes, including for Wi-Fi connectivity. Updating your iPhone’s software to the latest version is essential for its optimal functioning and Wi-Fi connectivity. Follow the steps below to update your iPhone’s software:
- Make sure your iPhone is either connected to the charger or has at least 60% battery capacity.
- Then, open the Settings app on your iPhone.
- Tap on General.

- Then, tap on Software Update.
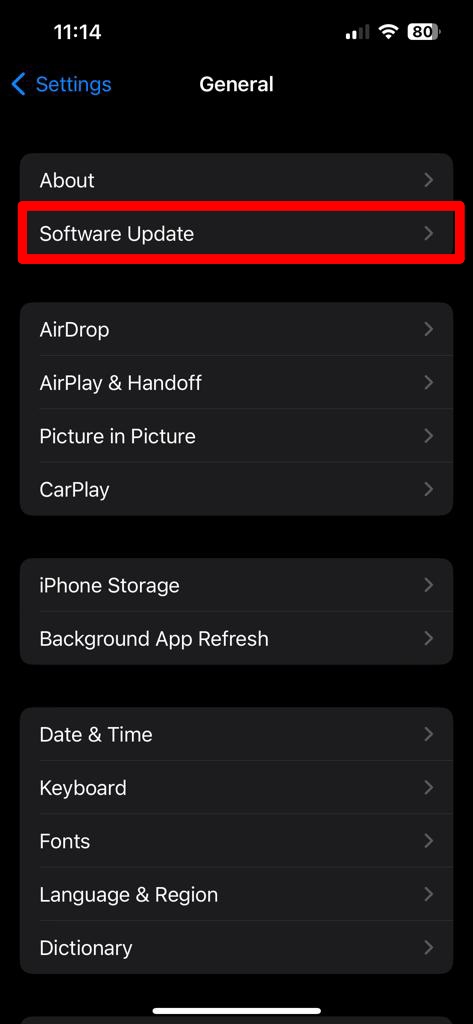
- Tap on Download and Install or Install (if your iPhone has already downloaded the update).
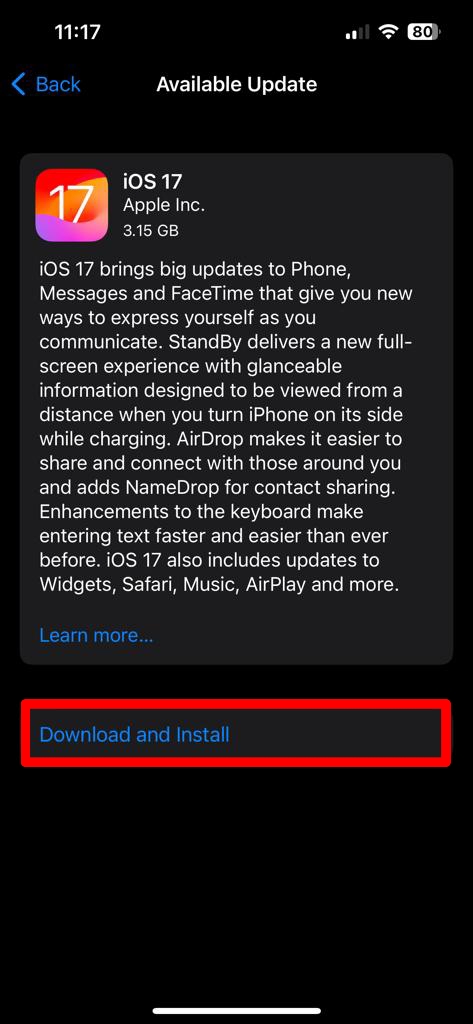
- Enter your passcode to confirm. Your iPhone will reboot now.

- Check to see if the Wi-Fi issue has now been resolved.
Fix 26: Factory Reset your iPhone 15 Pro / Pro Max
Resetting your iPhone to its factory settings is an extreme measure that will delete all of your data and settings. It’s the very last option if all else has failed. This method guarantees a fresh start, which may fix underlying software problems with Wi-Fi. But remember, this will wipe everything, so it’s a decision to take with care. Follow the steps below.
- Back up everything on your iPhone before you begin. Also, make sure you have your Apple ID and password on hand.
- Open the Settings app on your iPhone.
- Tap on General.

- Then, tap on Transfer or Reset iPhone.

- Tap on Erase All Content and Settings.
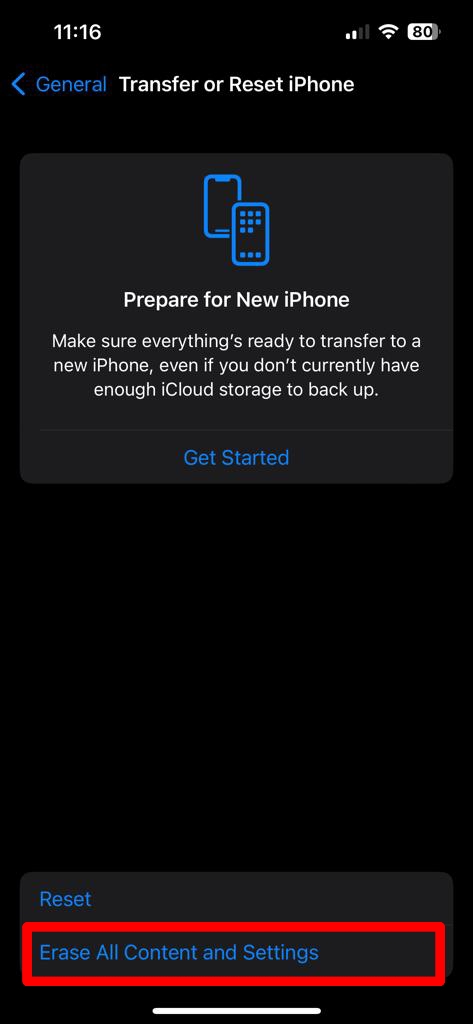
- Tap on Continue and enter your passcode to confirm.
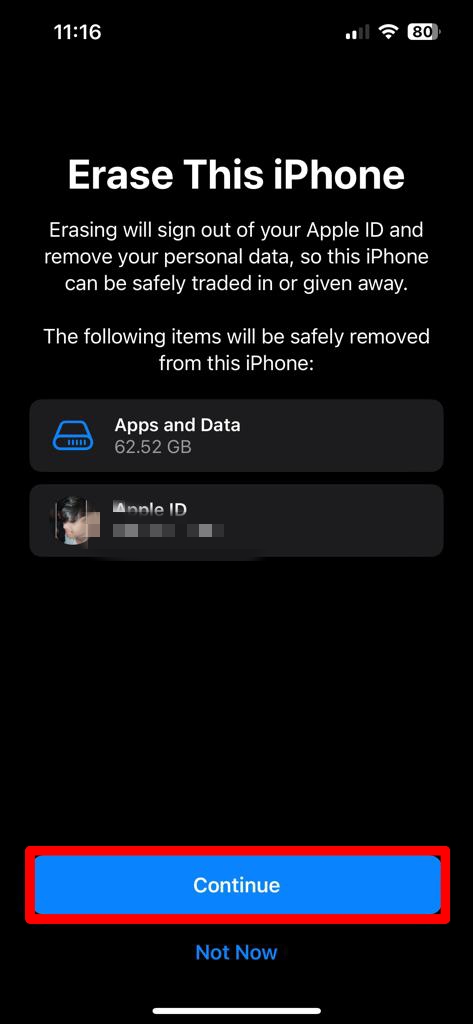
- Enter your Apple ID password and tap on Turn Off at the top right.
- Tap on Erase iPhone.
- Your iPhone will now restart. Once the iPhone boots up, you will have to set it up.
- Restore your backed-up data and see if the Wi-Fi is now working.
Fix 27: Contact Apple Support
Sometimes, despite all our efforts, the problem persists. Apple Support is your iPhone’s hotline to the pros who can guide you through the details of the issue and help fix it. Apple’s support team can give you detailed instructions, run diagnostics, and recommend sophisticated fixes. You can demand a free replacement if your iPhone unit has a serious issue.
Frequently Asked Questions
How do I check my iPhone’s Wi-Fi signal strength?
It’s quite easy to check your iPhone’s Wi-Fi signal strength. Look at the number of arches on the Wi-Fi bar; the more bars, the better the connectivity. You can also run a speed test on a website like fast.com.
Why does my iPhone keep disconnecting from Wi-Fi?
If your iPhone keeps disconnecting from Wi-Fi, it could be a software glitch or a wrong password. Restart your iPhone to eliminate any minor software glitches and update its software to the latest version available.
Is connecting to public Wi-Fi on my iPhone 15 Pro / 15 Pro Max safe?
Always be aware of public Wi-Fi networks, as they can be dangerous for your iPhone. We recommend that you use public Wi-Fi only when it’s extremely necessary.
How do I fix temporary Wi-Fi issues on my iPhone 15 Pro / 15 Pro Max?
You can try to restart your iPhone 15 Pro / 15 Pro Max first. Then, please update it to the latest software version. Try turning off Bluetooth and Low Data Mode as well. Also, you can reset the network settings to see if that helps. You can find more solutions to this issue in this guide.
Final Words
That’s how you fix the Wi-Fi not working issue on your iPhone 15 Pro / 15 Pro Max. Wi-Fi is essential for your daily needs as it is the main internet source for most of us. Although the iPhone 15 Pro and 15 Pro Max are Apple’s latest and most high-end iPhones, they are not void of issues.
We hope this extensive guide has helped you fix the Wi-Fi not working issue on your iPhone 15 Pro or 15 Pro Max. If the issue persists, contact Apple Support and ask for a replacement, if possible.
Which one of the solutions mentioned in this guide helped you fix the issue? Do you know of any other solutions that could help fix the issue? Let us know in the comments section below. Share this article with your friends who are facing a similar issue.
Also Read
How to Fix iPhone 15 Pro and 15 Pro Max White Screen Problem
Fix iPhone 15 Pro and 15 Pro Max Keyboard Not Working or Showing Up
iPhone 15 Pro and 15 Pro Max Screen Replacement Cost in India, UK, USA, Canada, and More
Fix: iPhone 15 Pro and 15 Pro Max Data Transfer Failed or Not Working
Download iPhone 15 Pro and iPhone 15 Pro Max Wallpapers in 4K
How To Record Calls on iPhone 15 Pro and 15 Pro Max
