This guide outlines the steps to manually install OTA Updates on Nokia devices. While Nokia isn’t the powerhouse that it used to be once, yet they still are a decent buy even in today’s competitive market. Keeping the brand loyalty aside, one factor that has worked in its favor is its offering of a clean and stock Android OS experience. Most of its devices have now adopted the Android One program, which apart from guaranteeing faster updates also gives you a bloatware-free experience. Talking about updates, usually, they are released in batches.
This means that not everyone would be able to enjoy the latest updates at one go. In some cases, if a user is able to get a hold of the update, then they share the OTA update URL for others. In that case, you could easily grab hold of the OTA update package and then install it onto your device. Since the process is somewhat different than the automatic installation of updates, some users might have a hard time finding the right instructions. If you are among one of them, then this guide will definitely come in handy. Today we will show you how to manually install OTA updates on your Nokia device. Follow along.

Page Contents
How to Manually Install OTA Updates on Nokia device
There are two different methods of achieving the said task. The first will make use of the ADB sideload method while the next one calls for the Apply Update from SD card. Both of these options could be accessed right from your stock recovery itself. But before we list out the steps, there are a few important points worth mentioning. Please go through them once before you proceed with the steps to manually install OTA updates on your Nokia device.
Prerequisites
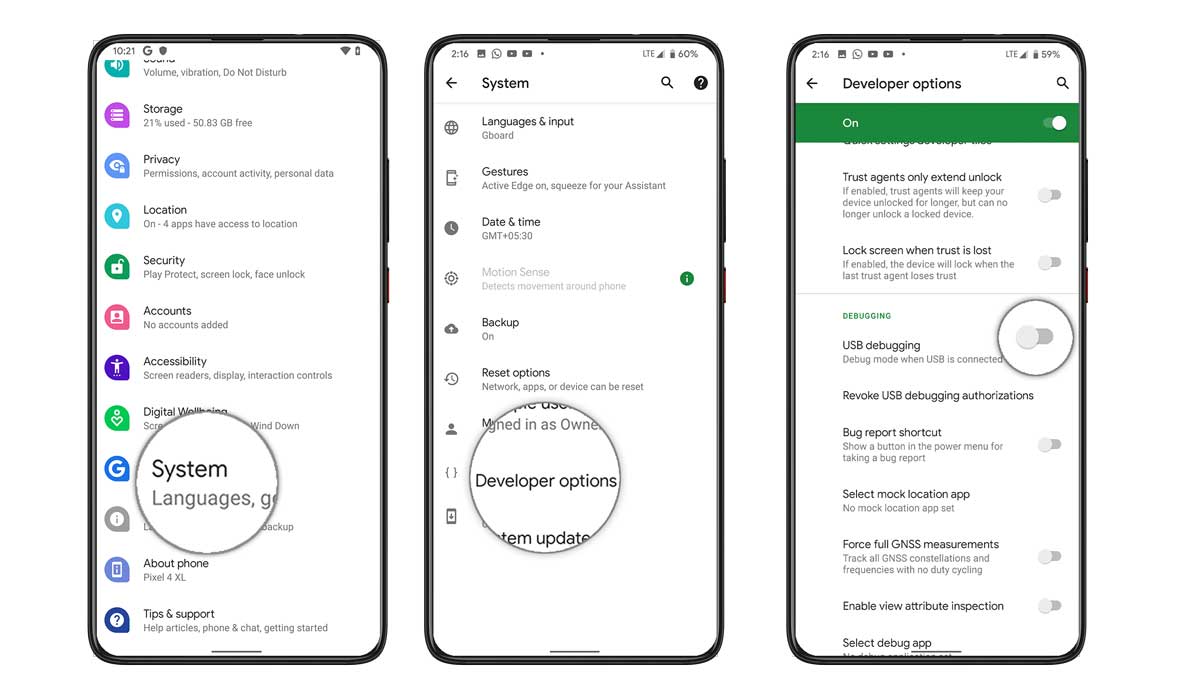
- Enable USB Debugging on your Nokia devices. This will be needed so that your device gets recognized in the ADB mode by your PC. To enable it, head over to Settings > About Phone > Tap on Build Number 7 times > Go back to Settings > System > Advanced > Developer Options > Enable the USB Debugging toggle.
- Also, create a complete device backup. Although the manual update method doesn’t lead to any loss of data, it is always recommended to be on a safer side.
- Furthermore, also install the Android SDK Platform Tools on your PC. This will provide us with the necessary ADB and Fastboot binaries.
- It goes without saying that your device should be sufficiently charged as well so that it doesn’t turn off mid-way during the process. At least 50% is recommended.
That’s all the requirements from this guide. You may now proceed with the steps to manually install OTA updates on your Nokia device.
Method 1: Manually Install OTA Updates via ADB Sideload
- Transfer the downloaded OTA update package to the platform-tools folder on your PC. Rename the package to update. The complete package name will hence be update.zip
- Now Connect your device to PC via USB cable.
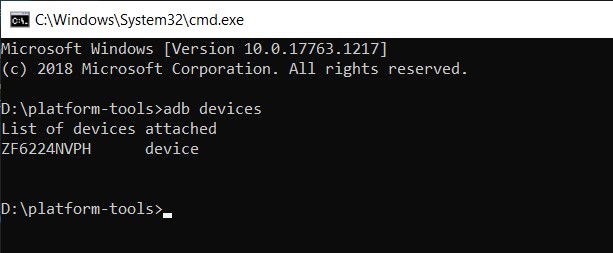
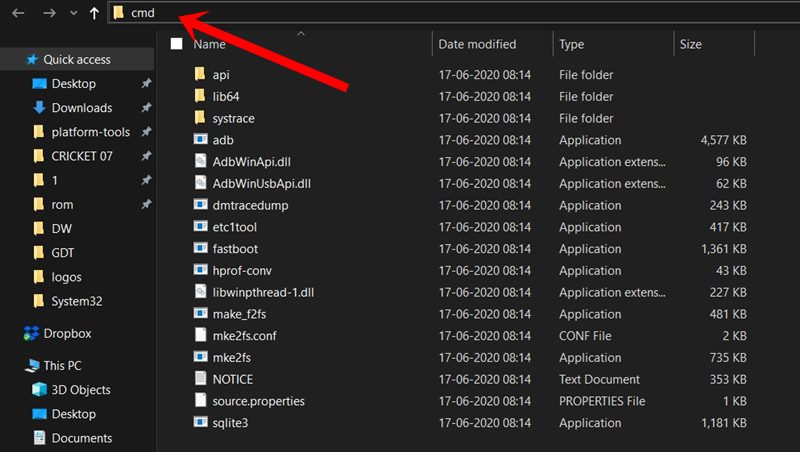
- Inside the same platform-tools folder, type in CMD in the address bar, and hit Enter. This will launch the Command prompt window.
- Execute the below command and you should get an alphanumeric string of codes. This signifies that the connection is successful
adb devices
- Next up, you will have to boot your Nokia device to the stock recovery. For that, make use of the following command:
adb reboot recovery
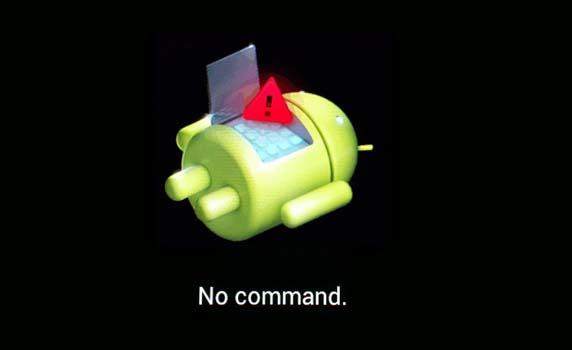
- At this point, you should see a No Command screen with the Android logo. When that happens, hold the Power key and then press the Volume Up key once. You should now be taken to the stock recovery.
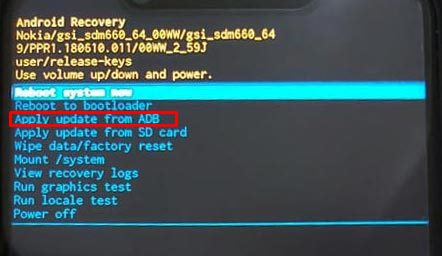
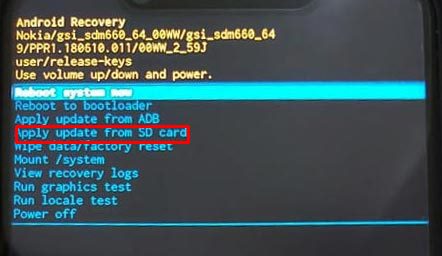
- Then use the Volume Keys to highlight the Apply update from ADB option and hit the Power key to confirm your decision.
- Finally, execute the below command to install the OTA update file:
adb sideload update.zip
- Do keep in mind that update.zip is the name of the OTA update package. If you haven’t renamed the file as instructed in the first step, then enter the appropriate file name in place of the update.zip (the extension will anyway be .zip only).
- Once the update is finished, use the Volume keys to highlight the Reboot system now option and press the Power key to confirm the decision.
That’s it. This was the first method to manually install OTA updates on your Nokia device. Let’s check out the next method of achieving the said task.
Method 2: Applying Update from SD Card
- Before beginning with the steps, make sure you have transferred the update file to your device’s SD Card.
- Now connect your device to PC via USB Cable.
- Head over to the platform-tools folder, type in CMD in the address bar, and hit Enter. This will launch the Command Prompt.
- Execute the below command to boot your device to the stock recovery:
adb reboot recovery
- At this point, you will see a No Command message. So hold the Power key and then press the Volume Up key once and you should be booted to the Stock Recovery.

- Now use the Volume keys to highlight the Apply update from SD card option and press the Power key to confirm it.
- Then select the OTA update package from the SD card and hit the Power key to begin with the installation steps.
- When that is done, use the Volume keys to highlight the Reboot system now option and hit the Power key to confirm it. Your device will now be booted to the newly updated OS.
With this, we conclude the guide on how to manually install OTA updates on your Nokia device. We have shared two different methods for the same. Select the one as per your requirement. With that said, if you have any issues, then do let us know in the comments section below. Rounding off, here are some iPhone Tips and Tricks, PC tips and tricks, and Android Tips and Trick that you should check out as well.
